If you own a caravan, you already know how much the outside matters. It is the first thing people see, and it is also the part that takes the most damage from sun, rain, dust, and road wear. That is why choosing the right caravan exterior paint is so important.
The best paint for caravans does more than improve the look. It also helps protect the surface from fading, peeling, cracking, and rust. A good finish can make an old caravan look fresh again, while the wrong paint can cause problems fast.
Why Painting Your Caravan Exterior Matters
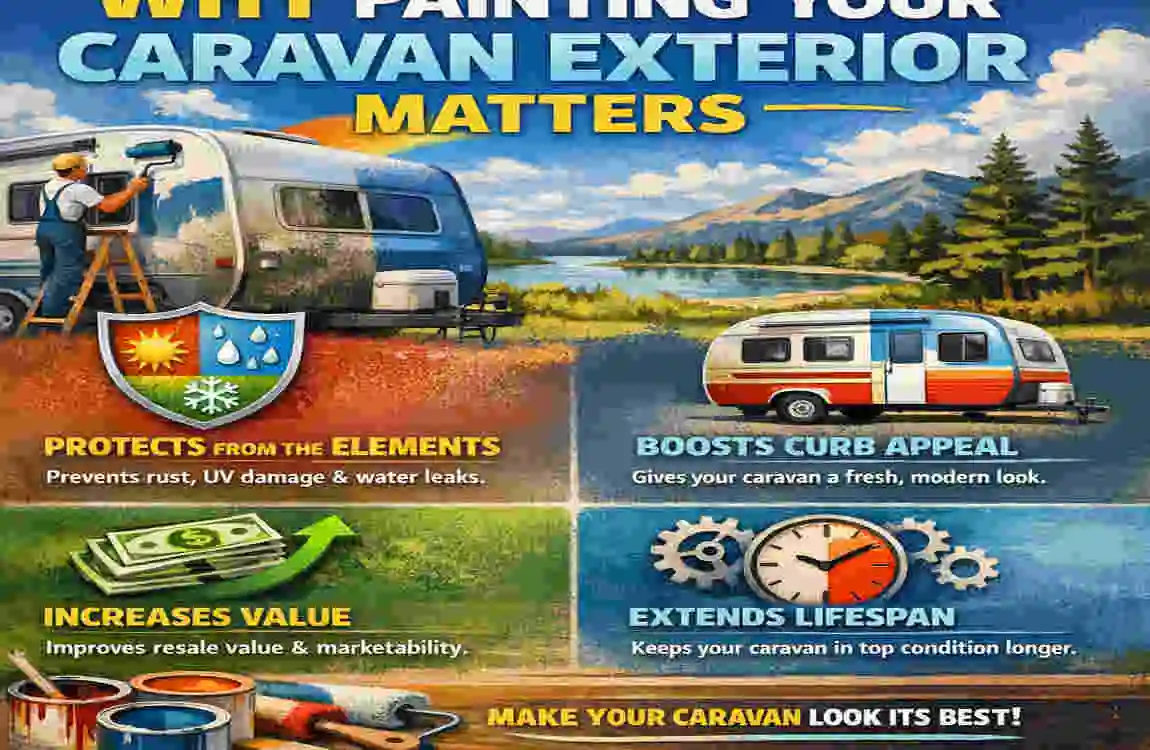
Painting a caravan is not just about style. It is also about protection.
A caravan spends a lot of time outside, so it is constantly exposed to the weather. Strong sun can fade the color. Rain can weaken the surface. Damp air can lead to rust or corrosion on metal parts. A high-quality paint layer works like a shield, helping your caravan last longer.
A fresh paint job also makes a big difference to appearance. Even if the caravan is in good condition, a worn exterior can make it look old and tired. A clean, even coat of caravan exterior paint can bring it back to life and make it feel more cared for.
There is also the resale value to think about. Buyers often judge a caravan by its appearance. If the paint is cracked or peeling, they may assume there are hidden problems too. A neat paint finish gives a better first impression and can support a higher asking price.
If the wrong paint is used, the results can be disappointing. Some paints peel when they are exposed to heat. Others fade too quickly in sunlight. Some crack when the caravan moves or flexes during travel. This is why choosing the best paint for caravans matters from the start.
Factors to Consider When Choosing Caravan Exterior Paint
Before buying paint, think about the surface, the weather, and how you plan to apply it. These details make a big difference.
Durability
A caravan needs paint that can withstand movement, vibration, and changing weather conditions. That is why durable caravan paint is so important. A strong finish lasts longer and resists chips better.
If you travel often, durability should be at the top of your list. A caravan on the road faces more wear than one that stays parked most of the time.
Weather Resistance
Your paint needs to withstand UV rays, rain, wind, and moisture. Sunlight can cause weak paint to fade quickly. Water can seep into cracks, causing damage beneath the surface.
A good exterior paint should be designed for outdoor use and retain its color and shape in harsh conditions.
Surface Compatibility
Not every caravan surface is the same. Some are aluminum, some are fiberglass, and some have mixed materials. Each one may need a slightly different paint type or primer.
For example:
- Aluminum often needs good prep and a bonding primer.
- Fiberglass works well with flexible paints that move with the surface.
- Old painted surfaces may need to be sanded before repainting.
Ease of Application
If you plan to do the job yourself, choose paint that is easy to work with. Some paints spread smoothly with a roller or brush. Others work best with spray guns.
If you are a beginner, a paint that levels well and dries slowly may be easier to handle.
Non-Toxic and Eco-Friendly Options
Many people now look for safer paint choices. Low-VOC or eco-friendly paints can be a smart pick if you want less smell and fewer harsh fumes.
These options are often better suited to enclosed spaces and more comfortable to use during DIY jobs.
Types of Paint Suitable for Caravan Exteriors
Several paint types can work well on caravans. The best choice depends on your budget, the caravan surface, and the finish you want.
Acrylic Paint
Acrylic is one of the most common choices for painting a caravan exterior.
It is popular because it is easy to use, affordable, and dries fairly quickly. It can give a neat finish and is often a good option for DIY projects.
Pros:
- Budget-friendly
- Easy to apply
- Dries quickly
- Good for simple repaint jobs
Cons:
- May not last as long as tougher coatings
- Can fade faster in strong sun
- May need more frequent touch-ups
Acrylic is a decent choice if you want a simple update without spending too much.
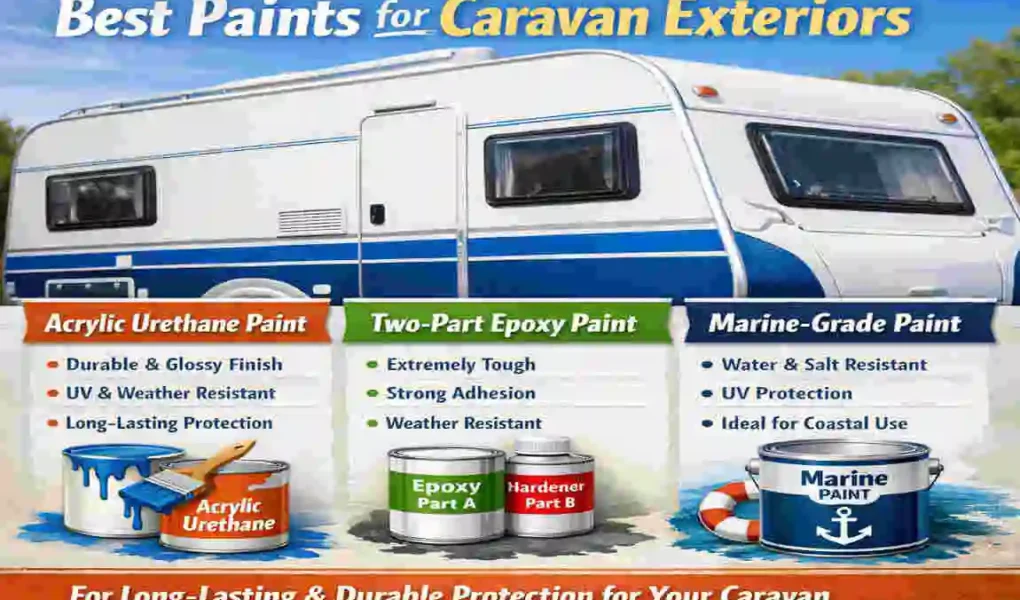
Polyurethane Paint
Polyurethane is often seen as one of the strongest choices for exterior work. It provides a hard, glossy finish and excellent resistance to weather and wear.
It is one of the best paints for caravans if you want a polished look and long-term results.
Pros:
- Very durable
- Glossy, professional finish
- Good weather resistance
- Strong color retention
Cons:
- It can be more expensive
- May require careful application
- Some types need extra safety steps during use
This is a strong pick if you want a top-quality finish and plan to keep the caravan for years.
Epoxy Paint
Epoxy is known for toughness. It bonds well and gives excellent protection against moisture and corrosion. This makes it a solid option for metal caravan parts.
Pros:
- Excellent protection
- Strong resistance to rust and corrosion
- Long-lasting
- Great for exposed surfaces
Cons:
- It can be harder to apply
- Often needs proper prep work
- Not always the best choice for a simple DIY job
Epoxy is a smart option when protection matters more than speed or ease of use.
Marine Paint
Marine paint is designed for harsh conditions, especially water exposure. That is why it can work well on caravans that travel in wet climates or are stored outdoors.
Pros:
- Excellent water resistance
- Tough and durable
- Built for weather stress
- Good for demanding conditions
Cons:
- May cost more
- It can be overkill for light use
- Some products are harder to find
If your caravan is exposed to a lot of rain or coastal air, marine paint is worth considering.
Specialized Caravan Paints
Some brands make paints specifically for caravans and motorhomes. These are often designed to stick well to common caravan materials and give a clean, lasting result.
Pros:
- Made for caravan surfaces
- Easier to choose the right product
- Often balanced for durability and appearance
Cons:
- Can be pricier than standard paint
- The product range may be limited
These are often the safest choice if you want less guesswork.
Quick Comparison Table
Paint Type: Best For, Main Benefit, Main Drawback
Acrylic DIY budget jobs, Easy and affordable, Less durable
Polyurethane Long-lasting finish Strong and glossy Higher cost
Epoxy Rust protection, Very tough coating, Harder to apply
Marine Paint Wet or coastal areas Excellent water resistance Can be expensive
Specialized Caravan Paint Overall caravan use Made for the job Fewer options
Step-by-Step Guide to Painting Your Caravan Exterior
A good paint job starts long before the brush touches the surface. Preparation is the key to a finish that lasts.
Preparation Stage
This is the most important part of the job.
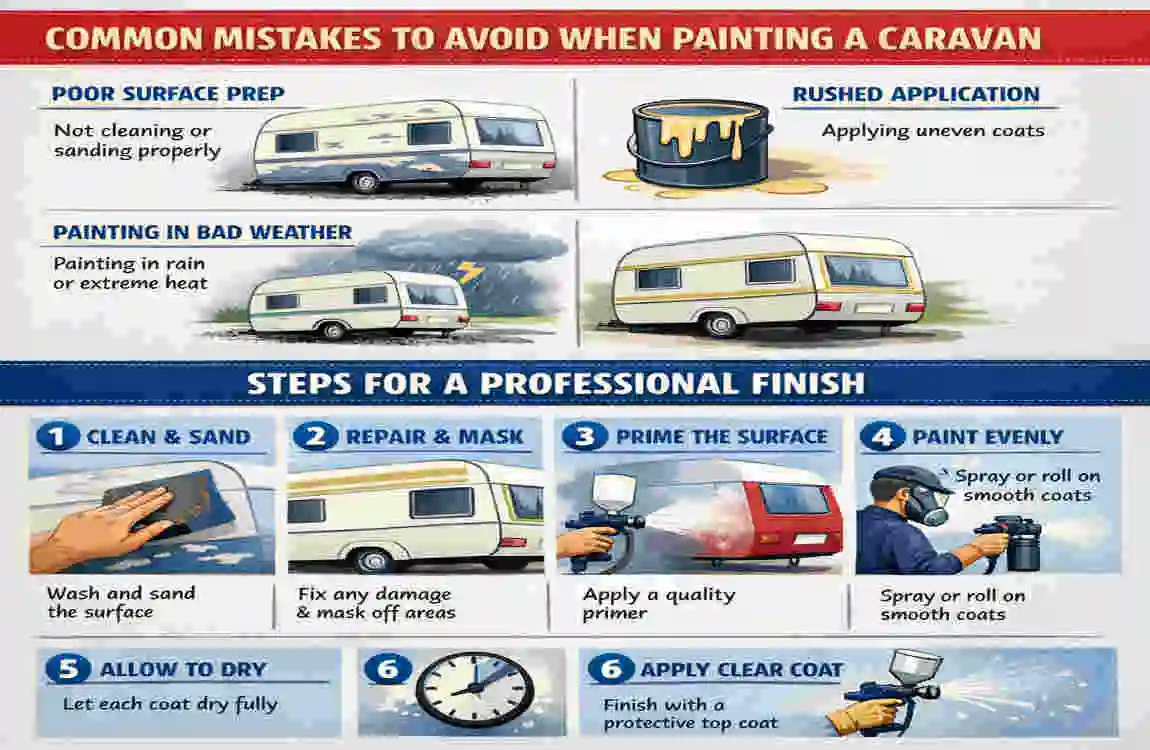
First, clean the caravan thoroughly. Remove dirt, grease, bird droppings, and old residue. A clean surface helps the paint stick properly. If you paint over grime, the finish will not last.
Next, sand the old surface. This helps remove loose paint and gives the new coat something to grip. You do not need to strip everything back unless the old paint is badly damaged.
Then, inspect for dents, cracks, or damage. Fill small cracks and repair problem areas before painting. If you skip this step, the flaws will still show through the final coat.
After that, apply primer. The primer is essential because it helps the paint bond better and provides a more even finish. It can also improve coverage and protect the surface underneath.
Choosing Tools
The right tools make the job easier.
You can use:
- Brushes for edges and small areas
- Rollers for larger flat panels
- Spray guns for a smoother, more even finish
If you are new to painting, rollers and brushes are usually easier to use. Spray guns can give a better look, but they take more practice.
Painting Process
Start with a thin first coat. Do not try to make it perfect in one go. Light coats dry better and reduce the risk of drips.
Work in sections to keep control of the paint. Move in one direction and overlap slightly for an even finish.
Be patient with drying times. Rushing this part can ruin the result. If the paint is still tacky, wait before adding the next coat.
Most caravan exteriors need at least two coats. Some may need three if the color change is large or the old surface is uneven.
Finishing Touches
Once the paint is fully dry, check the surface for missed spots or rough areas. Light touch-ups can make a big difference.
You may also want to add a sealant or clear protective coat. This can help the finish last longer and improve resistance to the weather.
Clean your tools straight away so they stay usable for the next project.
Helpful DIY Tips
Here are a few simple tips to keep in mind:
- Always test paint on a small area first.
- Paint in dry, mild weather.
- Use thin coats instead of thick ones.
- Keep the surface dust-free while drying.
These small steps can save you a lot of trouble later.
Mistakes to Avoid When Painting a Caravan Exterior
Some mistakes can shorten the life of your paint job very quickly.
One common mistake is skipping the primer. Without primer, the paint may not stick well, especially on smooth or metal surfaces.
Another mistake is using the wrong paint type. A paint that works on a wall may not work on a moving caravan exterior. Always choose a paint made for outdoor, flexible use.
Painting in poor weather is also a bad idea. Very hot, very cold, or very damp conditions can all affect the finish. The paint may dry unevenly or fail to bond properly.
People also sometimes rush the job. If you do not let each coat dry fully, the finish can become soft, patchy, or streaky.
If you make a mistake, do not panic. In many cases, light sanding and another coat can fix the problem. If the issue is bigger, you may need to remove the damaged section and start again.
Professional vs. DIY Painting: Which is Right for You?
Both options can work well. It depends on your time, skill level, and budget.
Why Hire a Professional
A professional painter brings experience and the right equipment. They can often deliver a smoother, more even finish. They also save you time and reduce the chance of mistakes.
This can be a better choice if your caravan has a large surface area, serious damage, or a finish you want to look showroom-ready.
Why Choose DIY
DIY painting can save money. It also gives you full control over the color, pace, and style of the job.
Many caravan owners enjoy the satisfaction of doing it themselves. If the caravan is in decent shape and you are willing to learn, DIY can be a rewarding choice.
How to Decide
Ask yourself:
- Do I have the tools and time?
- Is the caravan’s surface in good condition?
- Do I want a professional finish or a practical refresh?
- Is my budget limited?
If the job is simple, DIY may be enough. If you want perfect results or the surface needs major prep, a professional may be a better option.
Maintenance Tips for a Painted Caravan Exterior
Once the caravan is painted, keeping it in good shape is the next step.
Wash it regularly with mild soap and water. This removes dirt before it can damage the finish. Avoid strong cleaners or rough scrubbers because they can scratch the paint.
Waxing can also help protect the surface and keep it looking fresh. A light protective layer can improve shine and resist grime.
Check the caravan often for chips, cracks, or peeling areas. Small damage is much easier to fix early. If you wait too long, moisture can get underneath and make the problem worse.
During winter or wet seasons, store the caravan under cover if possible. If that is not possible, use a good protective cover to reduce exposure to the weather.
Good maintenance does more than improve appearance. It also helps protect value and reduce the need for major repainting later.
Recommended Products for Painting a Caravan Exterior
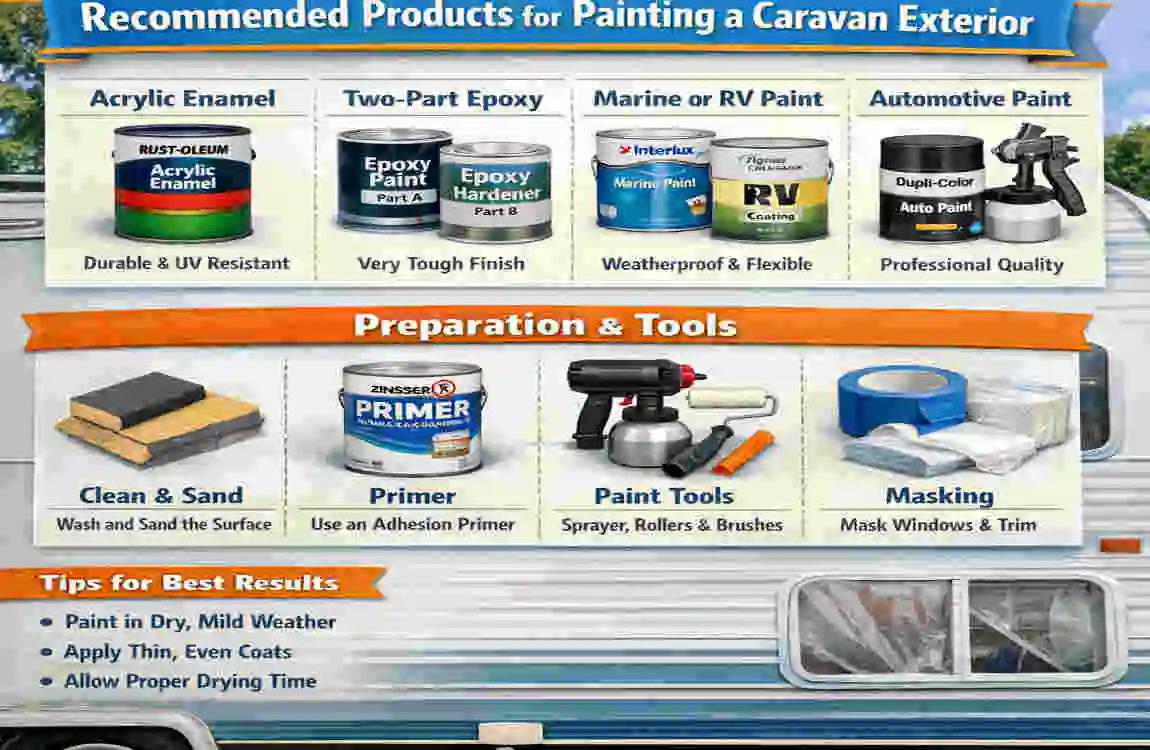
Here are a few general product types and brand examples people often consider for caravan work. These are not links; they are just useful starting points.
Budget-Friendly Option
Acrylic exterior paint from trusted brands like Dulux or Rust-Oleum
Pros: Affordable, easy to use, widely available
Cons: May need more frequent maintenance
Premium Option
Polyurethane or marine-grade coating from brands like International or Jotun
Pros: Very durable, strong finish, better weather protection
Cons: Higher cost and often more technical to apply
Eco-Friendly Option
Low-VOC exterior paint from brands with eco lines
Pros: Lower fumes, more user-friendly, better for cleaner air
Cons: May not be as tough as Premium coatings
The best product is the one that matches your caravan surface, budget, and desired finish.
Frequently Asked Questions
What is the best paint to use for caravan exteriors?
The best choice is usually polyurethane, marine paint, or a specialized caravan paint. These options tend to offer the best balance of durability, weather resistance, and appearance.
How do I know if my caravan needs a new paint job?
Look for fading, peeling, cracking, rust spots, or a dull finish. If the surface looks tired or exposed, it is probably time to repaint.
Can I paint over old caravan paint?
Yes, usually you can. You will need to clean, sand, and prime the surface first so the new paint sticks properly.
How long does a caravan paint job last?
A good paint job can last several years. The exact time depends on paint quality, surface prep, weather exposure, and maintenance.
Do I need a professional to paint my caravan?
Not always. Many caravan owners successfully paint it themselves. But if the surface is damaged or you want a flawless finish, a professional can be worth it.
| Paint Type | Best For | Main Benefits | Main Drawbacks | SEO-Friendly Recommendation |
|---|---|---|---|---|
| Acrylic Paint | Budget DIY projects | Easy to apply, affordable, quick drying | Less durable, may fade faster | Good for a low-cost caravan exterior paint option |
| Polyurethane Paint | Long-lasting finish | Very durable, glossy, weather resistant | Higher cost, needs careful application | Often one of the best paint for caravans choices |
| Epoxy Paint | Strong protection on metal surfaces | Excellent for rust and corrosion resistance | Harder to apply, more prep needed | Best for durable caravan paint and long-term protection |
| Marine Paint | Wet, coastal, or harsh weather areas | Strong water resistance, tough finish | Can be expensive | Great for painting a caravan exterior in tough climates |
| Specialized Caravan Paint | General caravan repainting | Made for caravan surfaces, balanced performance | Fewer brand options, often pricier | Best all-round answer for what paint to use on a caravan exterior |