Have you ever wanted power in the garden for lights, a lawnmower, or a heater, but felt unsure about the wiring? You are not alone. Outdoor sockets can be very useful, but they must be installed correctly because water, weather, and electricity are never a good mix.
If you are learning how to wire outdoor socket setups, the most important thing to remember is this: safety comes first. A small wiring mistake can lead to shock, damage, or fire. That is why the job needs the right tools, the right materials, and a careful step-by-step approach.
Understanding Outdoor Sockets
What Are Outdoor Sockets?
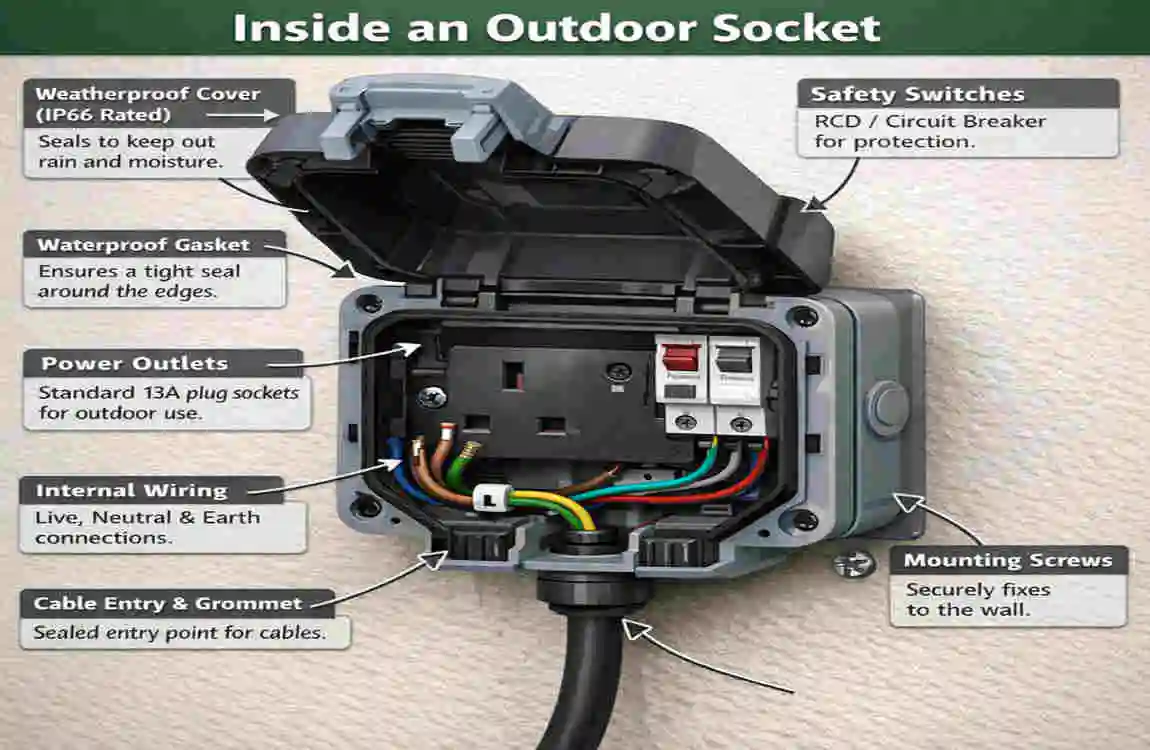
Outdoor sockets are electrical outlets made for outside use. They are built to handle rain, dust, and changing weather better than indoor sockets. Most outdoor models come in weatherproof boxes that help protect the plug and wiring from moisture.
Indoor sockets are not designed for this kind of exposure. That is why you should never use a normal indoor outlet outside and hope for the best.
Why Use Outdoor Sockets?
An outdoor socket makes life easier. You can plug in garden tools, outdoor lights, pressure washers, or holiday decorations without running long extension cords through a window or doorway.
They also help keep things safer and tidier. A proper outdoor socket is usually weatherproof, sealed, and easier to protect from damage than a temporary cable setup.
Common Uses
Outdoor sockets are often used for:
- Garden lighting
- Lawn equipment
- Outdoor heaters
- Pond pumps
- Pool equipment
- Seasonal decorations
If you use power outside often, a fixed socket is usually a better choice than carrying extension leads around every time.
Tools and Materials Required
Essential Tools
Before you begin, gather the basic tools for the job:
- Insulated screwdrivers
- Wire stripper/cutter
- Voltage tester
- Drill and drill bits
- Spirit level
These tools help you work neatly, test safely, and keep the socket securely fitted and straight.
Materials You’ll Need
You will also need the proper electrical parts:
- Outdoor-rated socket outlet
- Outdoor-rated cable
- Weatherproof box
- Cable clips or anchors
- RCD protection
Using the wrong material is one of the biggest mistakes people make. Indoor cable or a non-weatherproof box is not suitable for outdoor use.
Quick Tool and Material Check
ItemWhy It Matters
Voltage tester confirms the power is off
Outdoor socket protects against the weather
Weatherproof box keeps moisture out
Outdoor cable Handles outside conditions
RCD adds shock protection
Safety Precautions Before Wiring
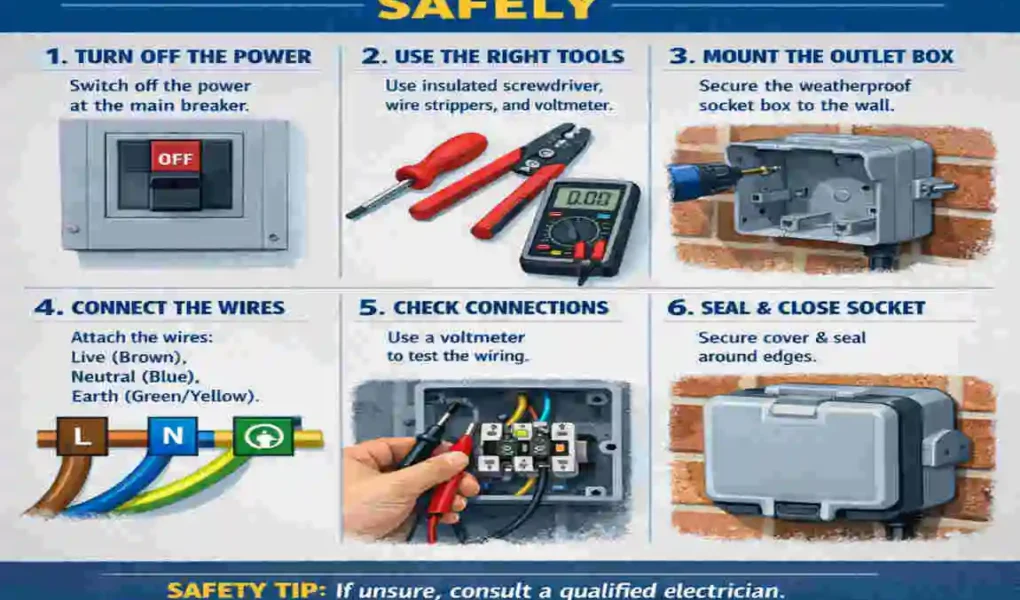
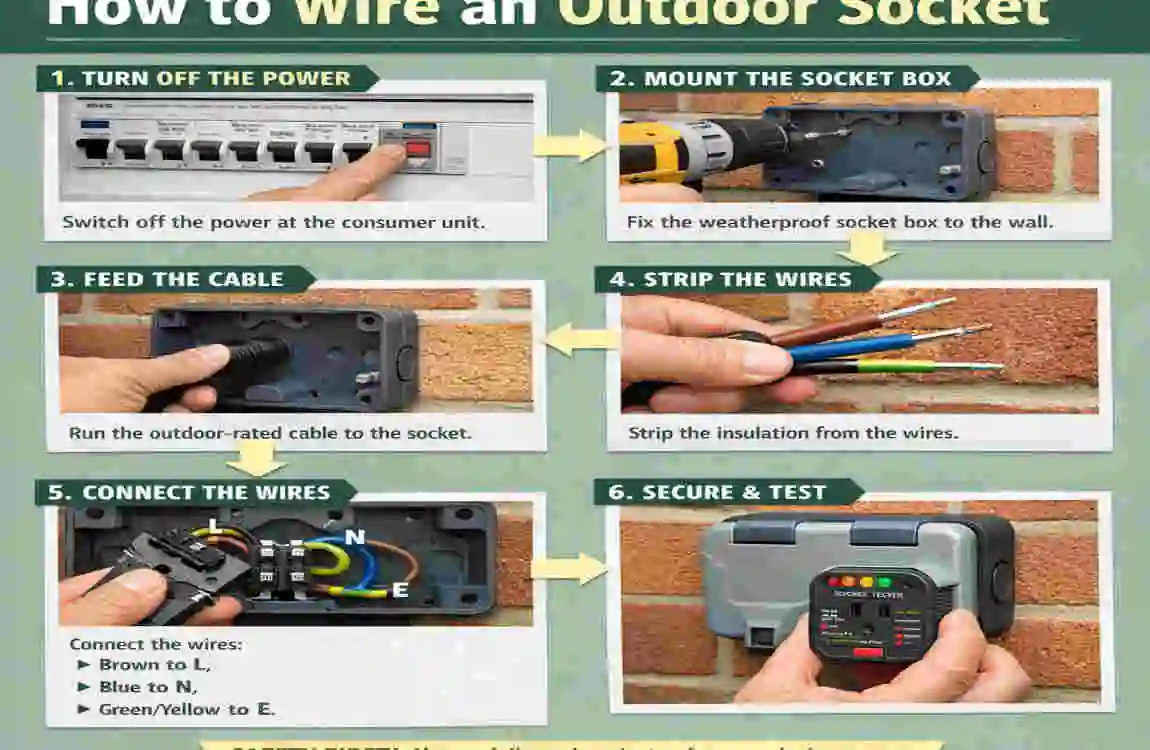
Turn Off the Power
This is the first rule. Switch off the main power supply before touching any wiring. Then test the circuit to make sure it is actually dead. Never assume the power is off just because a switch is down.
Follow Electrical Codes
Electrical work must follow local rules and standards. These may differ depending on where you live, but the idea is the same: the installation must be safe and legal.
If you are not fully confident, call a licensed electrician. That is the safest choice, especially if you are connecting to the main consumer unit or fuse box.
Wear Proper PPE
Basic protective gear can help reduce risk. Use:
- Gloves
- Safety goggles
- Proper shoes
This may seem simple, but it can make a real difference if a tool slips or debris falls while drilling.
Test for Live Wires
Always use a voltage tester before handling any wire. This quick check helps confirm the cable is not live. It is a small step, but it protects you from serious injury.
Step-by-Step Guide: How to Wire an Outdoor Socket
Choose the Right Location
Pick a spot that is easy to reach, close enough to the power source, and not directly exposed to heavy rain if possible. The socket should be useful, but it should also be protected.
Think about how you will use it. If you plan to plug in garden tools, place them somewhere practical and not too far from where you work.
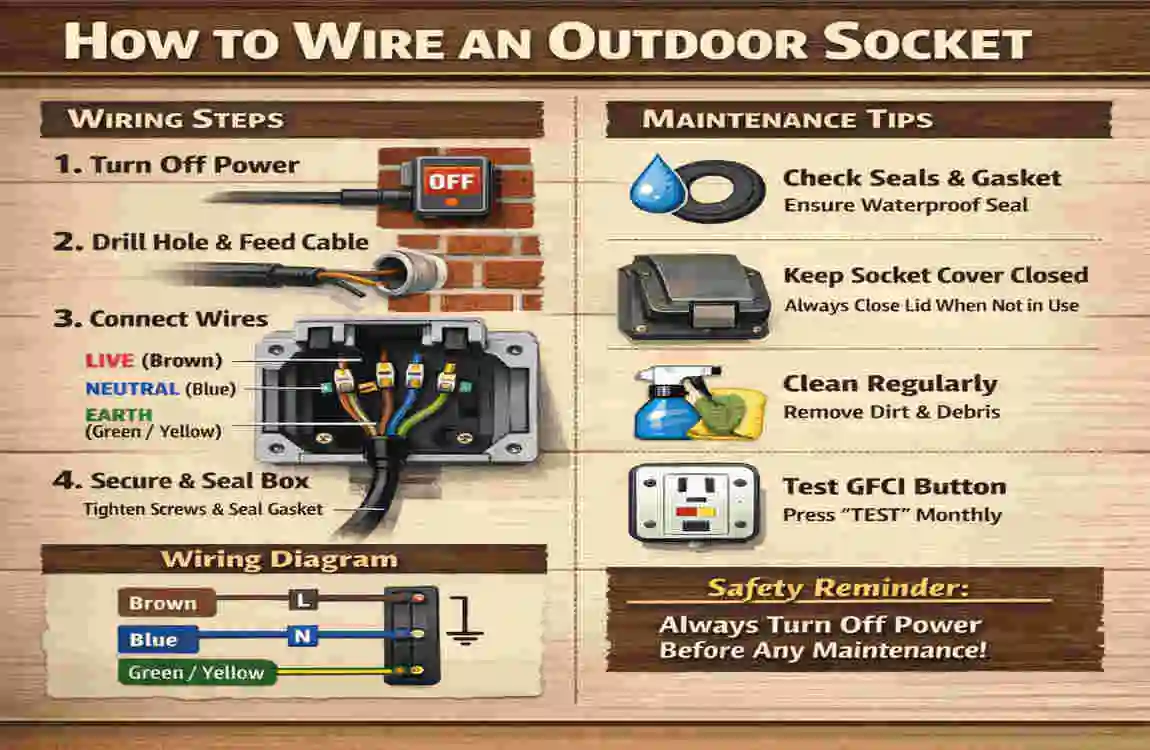
Prepare the Wall or Surface
Once the location is chosen, mark the fixing points. Drill the holes carefully and install the weatherproof box so it sits firmly and level.
A solid fixing matters because outdoor sockets can be pulled, bumped, or exposed to wind and movement.
Run the Cable
Measure the cable route before cutting anything. Use an outdoor-rated cable and secure it neatly along the wall or route it in a protected way.
Try to keep the cable tidy and avoid sharp bends. The cleaner the run, the safer and more professional the result will look.
Connect the Wires to the Socket
Inside the socket, wires are usually connected by color code:
- Live wire
- Neutral wire
- Earth wire
Make sure each wire is inserted into the correct terminal and tightened properly. The earth connection is especially important because it helps protect people in emergencies.
Connect to the Main Power Supply
This part is often the most technical. The cable must be connected correctly to the supply point, consumer unit, or fuse box, depending on the setup.
For extra safety, an RCD should be used. An RCD can help cut power quickly if it detects a fault, which is very important for outdoor circuits.
Step 6: Secure and Seal the Connections
Outdoor wiring must stay dry. Use seals, grommets, and weatherproof fittings to reduce the risk of water entering.
If water enters the socket or cable entry point, it can cause corrosion, faults, or shock hazards. This is one reason outdoor electrical work must be done carefully.
Test the Socket
After everything is connected, test the socket using a socket tester or the proper testing method for your system.
Do not rush this stage. Testing helps confirm that the wiring is correct and the socket is safe to use.
Common Mistakes to Avoid
Skipping Safety Checks
Never skip the power-off test. A live wire can be dangerous even if the job looks simple.
Using the Wrong Materials
Indoor parts do not belong outdoors. Always use weatherproof boxes, outdoor cable, and suitable fittings.
Overloading the Socket
Every socket has a limit. If you plug in too many high-power devices, you can overload the circuit. That can cause the breaker to trip or create a hazard.
Ignoring Electrical Codes
Rules exist for a reason. Ignoring them can create unsafe wiring and may cause problems later if the socket needs repair or inspection.
Maintenance Tips for Outdoor Sockets
Regular Inspections
Check the socket periodically for cracks, rust, loose covers, or signs of wear. Outdoor weather can slowly damage fittings.
Clean It Safely
Wipe the outside gently with a dry or slightly damp cloth. Do not spray water directly into the socket area.
Protect It in Bad Weather
Use the cover properly and keep the socket closed when it is not in use. Extra protection is helpful during heavy rain, snow, or storms.
Replace It When Needed
If the socket looks damaged, keeps tripping, or shows signs of corrosion, replace it. Do not wait until it becomes unsafe.
Frequently Asked Questions
How do I know if my outdoor socket is waterproof?
Look for a weatherproof or IP-rated enclosure. A proper outdoor socket should be designed to resist rain and dust.
Can I install an outdoor socket without an RCD?
You should not. An RCD adds important protection against shock, especially outside.
What is the maximum load for a standard outdoor socket?
It depends on the circuit and local rules, but you should never exceed the socket’s rated capacity. If you are unsure, ask an electrician.
Do I need a professional electrician?
Suppose you are not fully confident, yes. Outdoor wiring is safer when handled by a licensed professional.
How far can I run an outdoor cable safely?
That depends on cable type, load, and installation method. Longer runs may need a thicker cable. This is another area where an electrician can help.
| Step | What to Do | Safety Tip |
|---|---|---|
| Turn off power | Switch off the main supply before starting any work. | Never work on live wires. |
| Check the location | Choose a dry, practical spot for the socket. | Keep it away from direct rain where possible. |
| Use outdoor-rated parts | Use weatherproof sockets, boxes, and cable. | Do not use indoor electrical parts outside. |
| 4Run the cable neatly | Measure, cut, and secure the cable properly. | Avoid sharp bends and loose wiring. |
| Connect wires correctly | Match live, neutral, and earth wires to the right terminals. | Make sure all connections are tight. |
| Add RCD protection | Fit an RCD for extra shock protection. | This is especially important outdoors. |
| Seal and test | Close all covers, seal entry points, and test the socket. | Check for moisture resistance before use. |