Outdoor lighting is more than just decoration. It plays a real role in how safe, welcoming, and functional your home feels at night. When you properly install outdoor lights, you immediately improve security, enhance curb appeal, and make walkways safer for family and guests. On top of that, modern lighting systems—especially LED setups—help reduce energy usage and lower electricity bills over time.
The answer is not one-size-fits-all. Some homeowners finish a small setup in just a couple of hours, while larger properties may require a full day or even two. The time depends on several factors, including how many lights you are installing, how far the wiring needs to run, and whether your home already has an electrical setup in place for outdoor lighting.
Understanding Outdoor Lighting Wiring Basics
Before jumping into installation time or steps, it’s important to understand how outdoor lighting wiring actually works. This foundation helps you avoid mistakes and plan your project more effectively.
What Does Wiring Outdoor Lights Involve?
Wiring outdoor lights means creating a safe electrical connection between your power source and each lighting fixture. This process typically includes:
- Running electrical cables from your home’s power source
- Connecting multiple fixtures in a safe circuit
- Installing protective junction boxes
- Ensuring proper grounding for safety
- Sealing connections against rain, dust, and moisture
Each of these steps plays a role in ensuring the system is not only functional but also long-lasting and safe.
Types of Outdoor House Lights
Different lighting types can slightly change how you plan wiring. Some common options include:
- Pathway lights – Used for walkways and garden paths
- Floodlights – Bright lights for security and large areas
- Motion sensor lights – Automatically turn on when movement is detected
- Wall sconces – Mounted decorative lighting on exterior walls
- Landscape lighting – Highlight trees, plants, and outdoor features
Each type may require different placement and wiring planning, especially when multiple lights are connected.
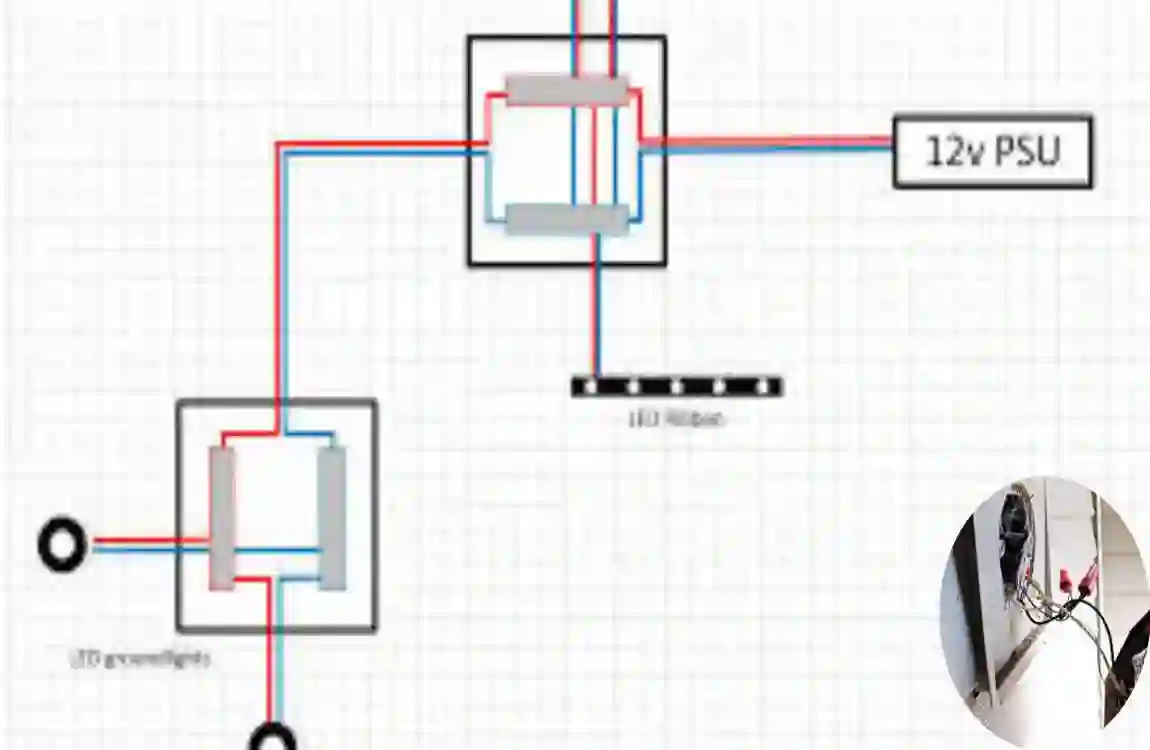
Common Wiring Configurations
When installing multiple outdoor lights, the wiring method is crucial. The most common configurations include:
- Series wiring – Lights are connected one after another (less common for homes)
- Parallel wiring – Each light gets equal power (most recommended)
- Low-voltage systems – Safer and easier for DIY installation
- Smart lighting systems – Controlled via apps or automation systems
Among these, parallel wiring is widely preferred because it ensures all lights remain equally bright and functional even if one fails.
How Long Does It Take to Wire Multiple Outdoor House Lights?
Now let’s answer the main question: how long does it actually take?
The truth is, installation time can vary widely depending on the complexity of your project.
Average Installation Time
For most homeowners, the estimated time looks like this:
- Simple setup: 2–6 hours
- Medium setup: Half a day
- Large property setup: 1–2 days
If everything is pre-planned and wiring paths are simple, you might finish even faster. However, unexpected challenges can extend the timeline.
Time Breakdown by Number of Lights
Here is a practical breakdown based on how many lights you are installing:
Number of Lights Estimated Time
2–4 lights 2–3 hours
5–8 lights 4–6 hours
10+ lights 1–2 days
This table gives a general idea, but real-world conditions can increase or reduce the time.
Factors That Affect Installation Time
Several things can influence how long your project takes:
- Existing wiring availability
- Distance between each light fixture
- Whether digging or trenching is required
- Ease of access to the electrical panel
- Weather conditions during installation
- Experience level of the installer
For example, if wiring already exists outdoors, the job becomes much faster. But if you need to dig trenches for cables, expect additional hours or even a full day of extra work.
DIY vs Professional Installation Time
One major difference comes from who is doing the work.
- DIY installation: Slower but cost-saving
- Professional electrician: Faster, more efficient, and safer
Professionals usually complete in a few hours what might take a beginner a full day. However, DIY projects are still very doable if you take your time and follow safety steps carefully.
Tools and Materials Needed to Wire Multiple Outdoor Lights
Before starting any electrical work, having the right tools is essential. Missing tools can significantly slow you down.
Essential Electrical Tools
- Wire stripper
- Voltage tester
- Power drill
- Screwdrivers
- Fish tape (for pulling wires through walls or conduits)
These tools help you handle wiring safely and efficiently.
Materials Required
- Outdoor-rated electrical cables
- Protective conduit pipes
- Weatherproof junction boxes
- Wire connectors and nuts
- Light fixtures of your choice
Always choose materials designed for outdoor use. Indoor materials can fail quickly when exposed to moisture or temperature changes.
Safety Equipment
Safety should never be ignored when dealing with electricity.
- Insulated gloves
- Safety glasses
- Circuit breaker lockout tools
These items protect you from accidental shocks and injuries.
Step-by-Step Guide on How to Wire Multiple Outdoor Lights
Now let’s walk through the actual process of installing multiple outdoor lights.
Plan the Lighting Layout
Start by deciding where each light will go. Think about:
- Entry points
- Walkways
- Driveways
- Garden areas
Measure distances carefully and plan cable routes. This step alone can save hours later.
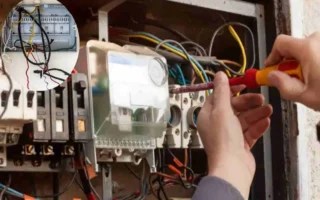
Turn Off the Power
Before touching anything electrical:
- Switch off the main breaker
- Use a voltage tester to confirm no current is flowing
Never skip this step—it ensures your safety.
Install Electrical Boxes
Next, install weatherproof boxes where connections will be made.
- Mount securely on walls or posts
- Ensure proper sealing
- Keep them accessible for maintenance
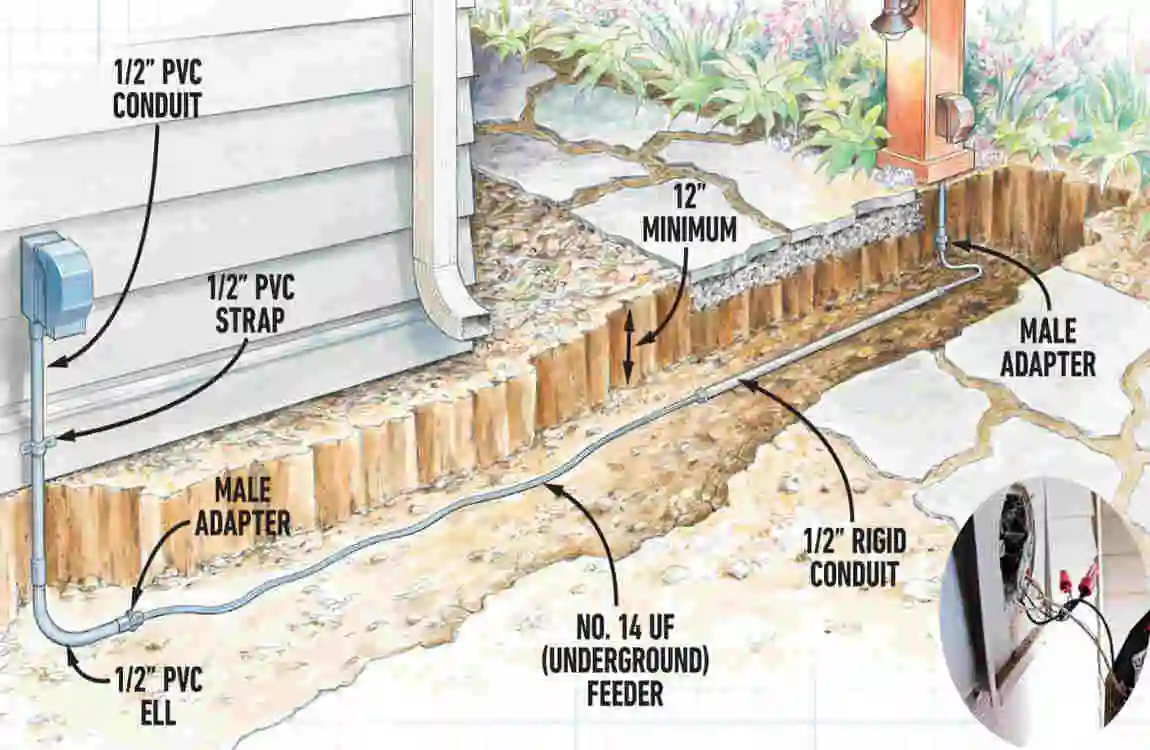
Run Outdoor Electrical Cable
Now comes the wiring process:
- Use conduit for protection
- Bury cables if needed
- Avoid sharp bends or exposed wiring
If trenching is required, this step may take the most time.
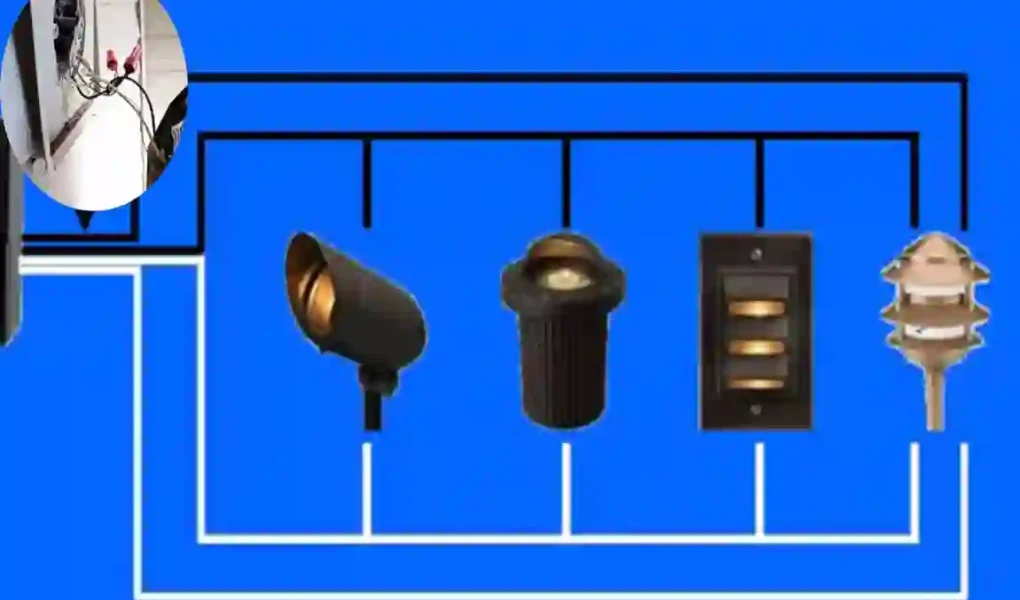
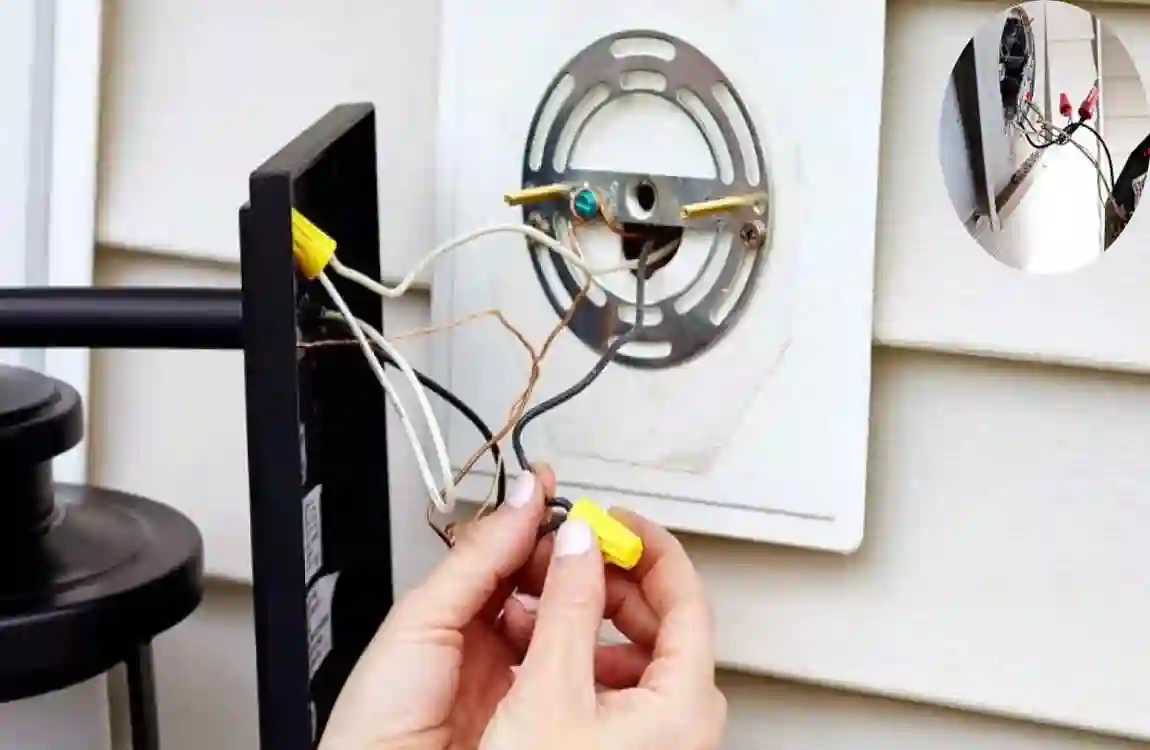
Connect Multiple Outdoor Lights
This is where wiring connections happen:
- Use parallel wiring for best results
- Connect ground wires properly
- Secure all connections with wire nuts
Take your time here—loose connections can cause future problems.
Mount the Light Fixtures
Once wiring is complete:
- Attach lights securely
- Align them properly
- Seal edges to prevent water entry
Test the Entire System
Finally:
- Turn the power back on
- Check all lights
- Look for flickering or weak connections
Fix any issues before finishing the project.
Best Wiring Methods for Multiple Outdoor Lights
Choosing the right wiring method makes a big difference in performance and safety.
Parallel Wiring Explained
Parallel wiring is the most commonly used method because:
- Each light receives full voltage
- One faulty light does not affect others
- It provides consistent brightness
This method is ideal for home installations.
Low-Voltage Lighting Systems
Low-voltage systems are becoming popular because:
- They are safer for beginners
- Easier to install
- More energy-efficient
They are perfect for garden and landscape lighting.
Smart Outdoor Lighting Systems
Modern homes often use smart systems:
- Controlled via smartphone apps
- Can be automated based on schedules
- Offer motion detection features
These systems improve convenience and energy savings.
Common Mistakes to Avoid When Wiring Outdoor Lights
Even small mistakes can lead to big issues later.
Using Indoor-Rated Materials Outdoors
Indoor materials are not designed for rain or moisture. This can cause:
- Electrical failure
- Fire risks
- Short circuits
Overloading the Circuit
Too many lights on one circuit can:
- Trip breakers
- Damage wiring
- Reduce performance
Poor Waterproofing
If connections are not sealed properly:
- Water can enter junction boxes
- Corrosion may occur
- Lights may fail early
Incorrect Wire Connections
Loose or incorrect wiring leads to:
- Flickering lights
- Power loss
- Safety hazards
Cost to Wire Multiple Outdoor House Lights
Cost is another important factor in planning your project.
DIY Installation Costs
DIY projects usually include:
- Tools (if not already owned)
- Materials and wiring
- Light fixtures
This option is more budget-friendly but requires time and effort.
Professional Electrician Costs
Hiring a professional includes:
- Labor charges
- Equipment usage
- Expertise and safety assurance
While more expensive, it ensures proper installation.
Factors That Affect Overall Cost
- Number of lights
- Wiring distance
- Trenching requirements
- Smart lighting upgrades
More complexity means higher cost.
Safety Tips for Outdoor Electrical Wiring
Safety should always come first when working with electricity.
Follow Local Electrical Codes
Ensure your installation complies with basic rules and standards. In many areas, permits may be required.
Use GFCI Protection
Ground Fault Circuit Interrupters help prevent electric shocks by shutting off power when a ground fault occurs.
Weatherproof Every Connection
Always protect outdoor wiring using:
- Sealed junction boxes
- Waterproof covers
- Outdoor-rated materials
Know When to Call a Professional
If the project feels too complex or involves main panel work, it’s better to hire an expert.
Benefits of Installing Multiple Outdoor Lights
Outdoor lighting offers several long-term benefits.
Improved Home security
Bright outdoor lighting helps discourage unwanted visitors.
Better Outdoor Visibility
Well-lit areas reduce accidents at night.
Increased Property Value
A well-lit home looks more attractive and welcoming.
Energy Efficiency with LED Lighting
Modern LED systems use less electricity and last longer.
FAQ Section
How do you wire multiple outdoor lights together?
You typically use a parallel wiring method. This allows each light to receive equal power, ensuring consistent brightness and reliable performance.
Can a single switch control multiple outdoor lights?
Yes, they can. However, the total electrical load must stay within safe limits.
What type of wire should be used for outdoor lighting?
Outdoor-rated cables, such as UF wire, are commonly used because they resist moisture and weathering.
How deep should outdoor electrical wire be buried?
Usually between 18 and 24 inches, depending on local electrical codes.
Is it hard to wire outdoor lights yourself?
It depends. Low-voltage systems are easier for beginners, while high-voltage systems require more experience.
How much does it cost to install outdoor lighting?
DIY costs are lower, while professional installation varies depending on project size and complexity.
Can LED outdoor lights be wired together?
Yes, LED lights are commonly wired together and are energy-efficient.
Do outdoor lights need a junction box?
Yes, junction boxes are required for safety and proper electrical protection.
| Number of Outdoor Lights | Estimated Time (DIY) | Estimated Time (Professional) | Key Factors Affecting Time |
|---|---|---|---|
| 2–4 lights | 2–3 hours | 1–2 hours | Simple layout, existing wiring, easy access |
| 5–8 lights | 4–6 hours | 2–4 hours | Moderate wiring distance, minor drilling/trenching |
| 9–12 lights | 6–10 hours | 3–6 hours | Longer cable runs, multiple circuits, wall mounting |
| 12+ lights | 1–2 days | 6–10+ hours | Complex layout, trenching, new circuit installation |