Have you noticed a musty smell when you open your shed? That smell is often the first sign that mold may be growing inside. Mold is a common problem in outdoor sheds because these spaces are often exposed to moisture, changing weather, and poor airflow.
If you store tools, garden supplies, furniture, or seasonal items in your shed, mold can quietly damage them over time. It can also create a space that feels dirty, damp, and unpleasant to use. In some cases, it may even affect your health, especially if you are sensitive to mold spores.
Understanding Mold and Why It Happens in Outdoor Sheds
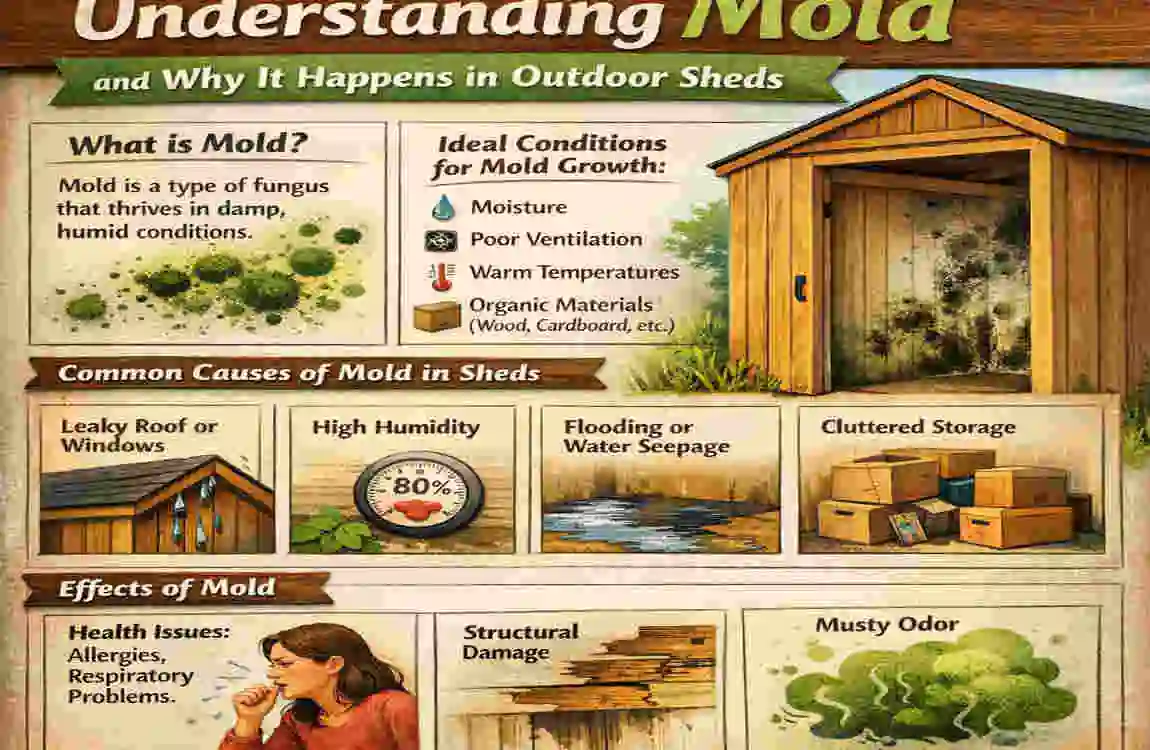
What Is Mold?
Mold is a type of fungus that grows in damp places. It spreads through tiny spores that float through the air. These spores are always around us, but they only grow into visible mold when they land on a wet or humid surface.
Mold often appears as black, green, gray, or white spots. It may look fuzzy, powdery, or slimy depending on the surface and moisture level. In outdoor spaces, mold often grows on wood, fabric, cardboard, and other organic materials.
There are many kinds of mold, but the main concern is not usually the color. The bigger issue is the moisture that allows it to grow in the first place.
Why Outdoor Sheds Are Prone to Mold Growth
Outdoor sheds are vulnerable because they often sit in areas where water collects. Rain, snow, humidity, and ground moisture can all lead to mold problems.
Here are the biggest reasons mold shows up in sheds:
- Moisture buildup from rain or humidity
- Poor ventilation, which traps damp air inside
- Wood and cardboard storage, which absorb water easily
- Cracks or leaks that let water enter
- Dark corners, where air moves slowly, and moisture stays longer
Seasonal changes can make this worse. In hot, humid weather, the air itself carries more moisture. In cold months, condensation can form when warm air inside the shed meets cool surfaces. Both situations create the kind of environment mold loves.
If your shed is in a shady area, surrounded by plants, or built directly on the ground, the risk becomes even higher. Water may not dry quickly, and the inside of the shed may stay damp for long periods.
The Dangers of Mold in Outdoor Sheds
Mold is not just a cosmetic problem. It can cause real damage.
First, it can ruin stored items. Tools may rust, wood furniture may stain, and boxes may become soft or damaged. Fabric items can pick up a strong odor and may be difficult to clean.
Second, mold can affect air quality. If you spend a lot of time in the shed, breathing mold spores may irritate your nose, eyes, throat, or lungs. This is especially important for people with allergies or asthma.
Third, mold can spread. If you ignore a small patch, it may grow into a much larger problem. It can move across walls, floors, and stored items, making cleanup more difficult and more expensive.
Signs of Mold in Your Outdoor Shed
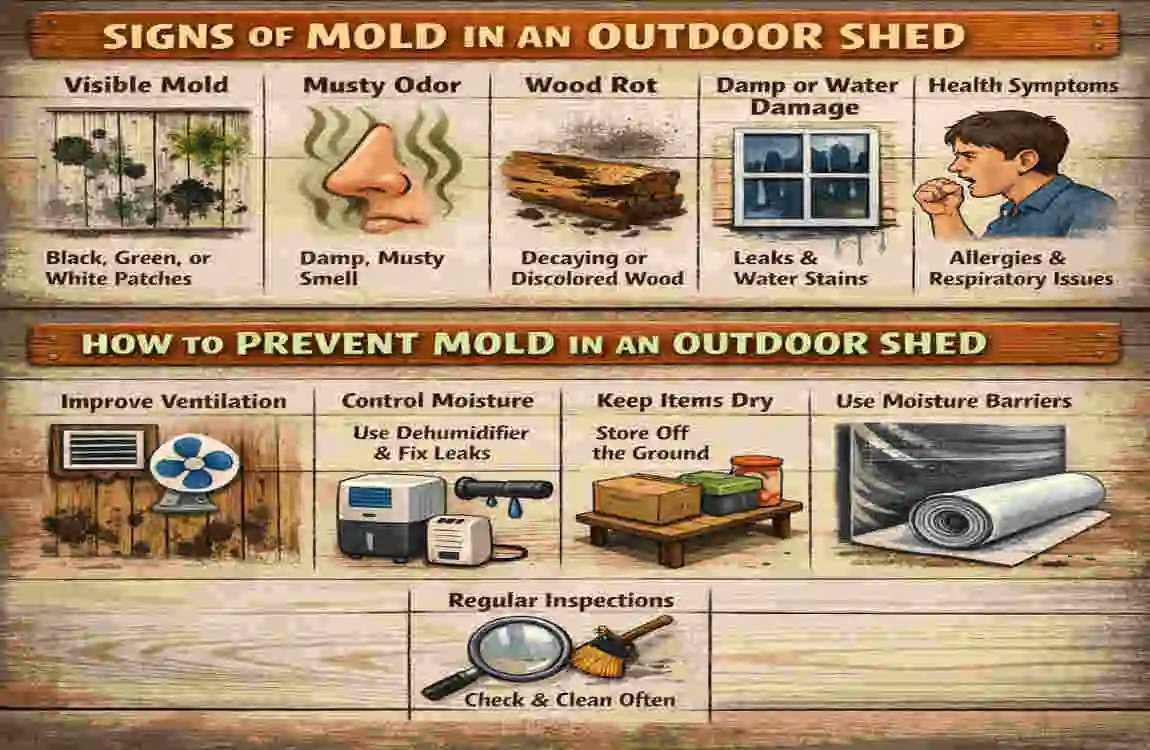
Common Indicators of Mold
The first sign is often a strong musty smell. If your shed smells wet, stale, or earthy, it is worth taking a closer look.
Other signs include:
- Visible discoloration on walls, ceilings, or floors
- Black, green, white, or gray patches
- Warped wood
- Peeling paint
- Soft or damp surfaces
- Rust on metal tools
- Damp cardboard or fabric
Sometimes mold is easy to see. Other times, it hides behind shelves, in corners, under stored boxes, or near the floor.
How to Inspect Your Shed for Mold
A careful inspection helps you catch mold early. Start by opening the shed and checking for a smell. Then look closely at the most common trouble spots.
Use this simple process:
- Open doors and windows to let in fresh air.
- Use a flashlight to inspect dark corners.
- Check around windows, door frames, and roof edges.
- Look near the floor, baseboards, and shelves.
- Move boxes and tools to see what is behind them.
- Feel surfaces for dampness.
- If needed, use a moisture meter to check wood or walls.
Pay special attention after heavy rain or long humid weather. That is when moisture problems are most likely to show up.
When to Take Immediate Action
If you only see a small spot, you may be able to clean it yourself. But if the mold covers a large area, keeps recurring, or appears to have spread into walls or insulation, you should call a professional.
You should also act quickly if:
- The mold has a strong smell throughout the shed
- Wood feels soft or damaged
- Stored items are badly affected
- You or your family feels unwell after being in the shed
The earlier you respond, the easier it is to fix the problem.
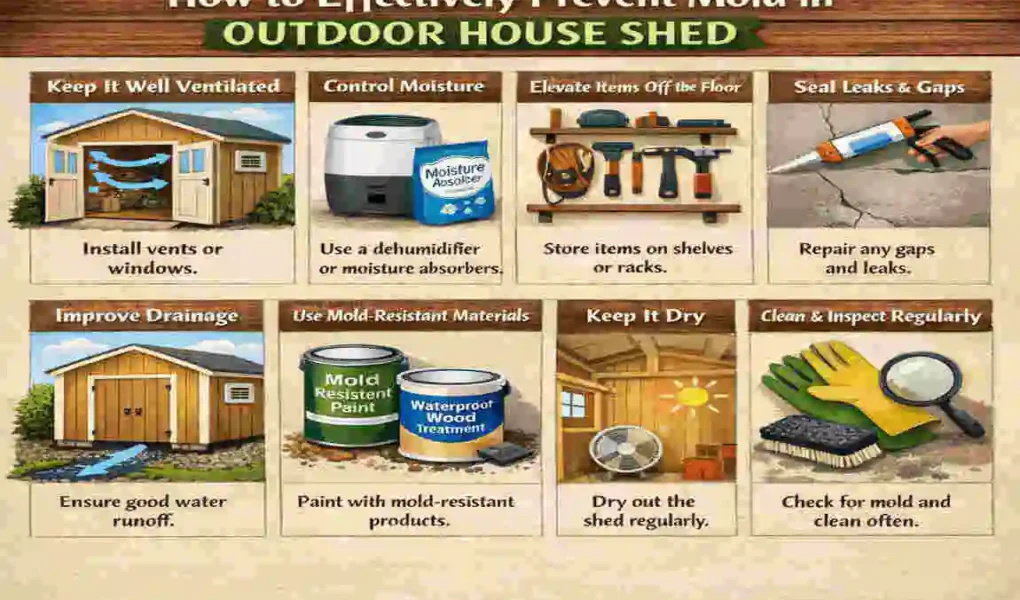
Key Strategies for Preventing Mold in Your Outdoor Shed
Proper Shed Design and Construction
The best way to fight mold is to prevent moisture from entering the shed.
Choose the Right Materials
Start with moisture-resistant materials. Treated wood, metal, and some types of plastic siding are better choices than untreated wood or cardboard-like panels.
Untreated wood absorbs water easily. Once it stays damp, mold can grow fast. If you already have a wooden shed, you can still protect it with sealants and coatings.
Elevate Your Shed
A shed placed directly on the ground is more likely to trap moisture. A raised foundation helps air move underneath and keeps the base drier.
This is especially useful in areas where rainwater pools or soil stays wet. Even a small lift can make a big difference. Concrete blocks, skids, or a proper platform can help keep the shed off wet ground.
Install a Sloped Roof
A flat roof holds water longer. A sloped roof allows rain and snow to run off more easily. That means a lower risk of leaks, pooling, or water seeping into roof seams.
If you are building a shed or replacing part of one, the roof design should be a top priority.
Controlling Moisture Levels
Moisture control is the heart of mold prevention. If you keep the shed dry, mold has a much harder time growing.
Seal Gaps and Cracks
Small openings may not look like a big issue, but they can let in water and humid air. Check around:
- Doors
- Windows
- Roof edges
- Wall joints
- Floor seams
Use caulk, weatherstripping, or outdoor sealant to seal those gaps. This helps keep rain out and also improves energy efficiency if you use the shed often.
Install Proper Ventilation
Fresh air helps remove dampness. A poorly ventilated shed traps humidity, creating a perfect environment for mold to grow.
You can improve airflow by adding:
- Roof vents
- Wall vents
- Louvered openings
- Small fans if power is available
Good ventilation does not need to be fancy. Even basic air movement can help reduce moisture buildup.
Use Vapor Barriers
A vapor barrier helps stop moisture from rising from the ground into the shed. This is especially useful if your shed sits over soil or a humid base.
You can install a vapor barrier under the floor or foundation. This extra layer provides an additional level of protection against dampness.
Monitor Humidity
If your area is humid, check the moisture level inside the shed periodically. A small dehumidifier can help in enclosed sheds with power. If you do not have electricity, moisture absorbers or desiccant packs can still help reduce the amount of damp air.
A simple hygrometer can show you when humidity starts to rise. That gives you a chance to act before mold appears.
Regular Maintenance Practices
A clean shed is a healthier shed. Mold often starts where dirt, leaves, and moisture are allowed to sit for too long.
Clean Your Shed Regularly
Sweep the floor, wipe down surfaces, and remove any clutter that holds moisture. Leaves, soil, cardboard, and cloth can all absorb water, which can encourage mold growth.
Try to clean the shed at least once a season. If the area is very damp, do it more often.
Inspect for Leaks
Check the roof, windows, and doors after storms. Even a small leak can cause significant trouble over time.
Look for:
- Water stains
- Drips
- Wet patches
- Bubbling paint
- Soft wood
Fixing small leaks early is much easier than dealing with major mold damage later.
Control Vegetation Around the Shed
Plants growing too close to the shed can retain moisture against the walls. They can also block sunlight and airflow.
Trim bushes, cut back vines, and clear away piles of wet leaves. This helps the shed dry faster after rain and keeps the area around it cleaner.
Proper Storage Practices
How you store items matters just as much as how the shed is built.
Use Sealed Containers
Waterproof, airtight bins are much better than cardboard boxes. They protect your belongings from damp air and accidental water entry.
Plastic storage containers with tight lids are a smart choice for tools, holiday décor, and fabric items.
Avoid Storing Damp Items
Never put wet tools, garden hoses, cushions, or clothing into the shed right away. Let them dry first.
If you store something while it is still damp, you bring moisture into the shed. That one habit can quickly start a mold problem.
Organize for Airflow
Leave space between boxes and walls. Keep items off the floor when possible. Shelving can help air move around your belongings and keep them dry.
Good airflow is one of the easiest and cheapest ways to reduce mold risk.
Quick Comparison of Mold Prevention Methods
Prevention Method: Why It Helps: Best For
A raised foundation keeps moisture away from the base. All sheds
Ventilation removes damp air from closed or small sheds
Sealants and caulk block water entry in older sheds with gaps
A dehumidifier lowers indoor humidity. Power-equipped sheds
Airtight containers protect stored items: tools, fabric, and seasonal items
How to Remove Mold If It Occurs
Safety Precautions Before Mold Removal
Before you clean mold, protect yourself.
Wear:
- Gloves
- A mask
- Protective goggles
Also, open the shed doors and windows if possible. Fresh air helps reduce exposure to spores while you clean.
If the mold seems large or spreads across multiple surfaces, do not rush into cleanup. Think about whether the damage is beyond a simple DIY fix.
DIY Mold Removal Methods
For small mold patches, you may be able to clean the area yourself.
A simple method is to use water and vinegar or a mold-safe cleaner. Spray or apply the solution to the affected area, then scrub it with a brush or cloth.
Here is a basic approach:
- Put on safety gear.
- Clear the area around the mold.
- Spray the surface with vinegar or cleaner.
- Let it sit for a few minutes.
- Scrub the mold away.
- Wipe the area clean.
- Dry it completely.
Drying is very important. If the surface stays damp, mold can return.
You may also want to place a fan in the shed or leave it open for several hours after cleaning.
When to Call a Professional
Some mold problems are too large or too deep to be cleaned easily. A professional is the better choice if:
- Mold covers a large area
- The shed has hidden water damage
- The mold keeps returning
- You suspect toxic mold
- The structure itself is damaged
A professional can identify the source of the moisture and help prevent the issue from recurring.
Products and Tools to Prevent Mold in Outdoor Sheds
Moisture Absorbers
Moisture absorbers are simple and useful. They pull extra moisture from the air, helping reduce dampness.
Common options include:
- Silica gel packs
- Charcoal bags
- Desiccant packs
These are helpful in small sheds, storage cabinets, and sealed containers. They work best when paired with good ventilation.
Mold-Resistant Paints and Coatings
A mold-resistant coating can protect interior shed walls and ceilings. These products create a surface that is less conducive to mold growth.
They are especially useful if your shed is wooden or has had moisture problems in the past. Make sure the surface is clean and dry before applying the coating.
Dehumidifiers and Ventilation Systems
If your shed has electricity, a compact dehumidifier can be a strong solution. Look for one that fits the size of your shed and is easy to empty or drain.
For airflow, simple vents can make a big difference. In some sheds, a small solar fan can also improve circulation without much upkeep.
Cleaning Solutions for Mold Prevention
Some cleaning sprays are made to help stop mold before it starts. You can also use simple, eco-friendly products when appropriate.
The most useful tools are often the basic ones:
- Spray bottle
- Scrub brush
- Microfiber cloths
- Flashlight
- Moisture meter
You do not need much fancy equipment. You need the right tools and a routine.
Real-Life Examples and Success Stories
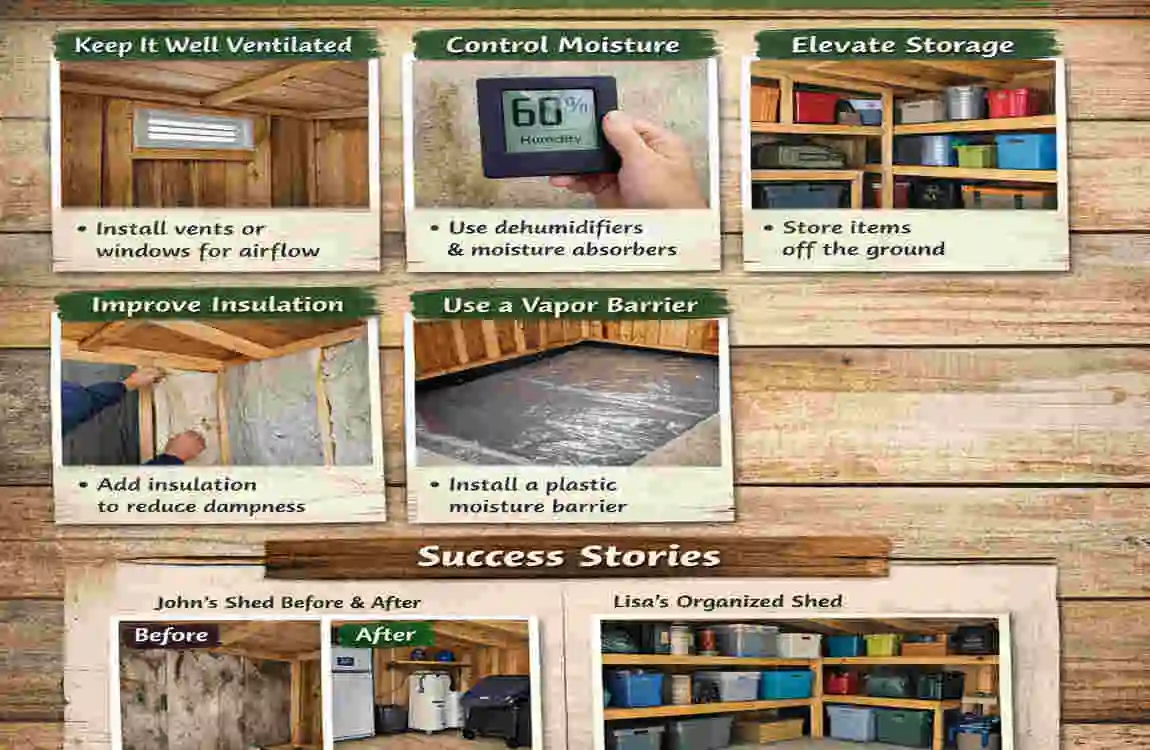
A Small Shed Saved by Better Airflow
One homeowner kept gardening tools and paint supplies in a small backyard shed. After a rainy season, the inside started to smell damp. A quick inspection showed mildew near the back wall.
Instead of letting the problem grow, the homeowner installed vents, moved boxes off the floor, and started storing items in sealed containers. They also trimmed plants that were pressing against the outside wall.
Within a few weeks, the smell was gone. More importantly, the shed stayed dry through the next rainy season.
Mold Removed and Kept Away
Another homeowner found mold on the floor and a few lower wall panels after a leak near the roof. They cleaned the visible mold, repaired the roof, and added a vapor barrier under the floor.
They also made one simple change: they stopped storing wet lawn tools inside the shed. After that, the mold did not return.
These examples show something important. When you combine cleanup, moisture control, and better storage habits, you get lasting results.
If you have dealt with mold in your own shed, your experience may help others, too.
FAQs
What causes mold in outdoor sheds?
Mold usually grows because of moisture, poor ventilation, and organic materials. Rain leaks, high humidity, wet tools, and damp ground can all create the right conditions. If air cannot move freely, mold is more likely to grow.
Can I prevent mold without using chemicals?
Yes, you can. Many people prevent mold by using ventilation, sealed storage containers, moisture absorbers, and regular cleaning. Natural options like vinegar can also help with small cleanup jobs. If you want to know how to prevent mold in outdoor shed spaces without harsh chemicals, focus on keeping them dry first.
How often should I inspect my shed for mold?
A good rule is to inspect it every season and after heavy rain or storms. If your area is humid, check more often. A quick flashlight check can help you catch mold before it spreads.
What are the best materials for a mold-resistant shed?
Treated wood, metal, and moisture-resistant siding are better choices than untreated wood. A raised base and sloped roof also help a lot. The best shed material is one that resists water and dries quickly.
What should I do if mold keeps coming back?
If mold returns, the real problem is probably still moisture. Look for leaks, poor airflow, trapped humidity, or damp items being stored inside. If you still cannot stop it, a professional may need to inspect the shed for hidden damage.
Is mold in a shed dangerous?
It can be. Mold may damage stored items, cause unpleasant odors, and affect air quality. For some people, it may also trigger allergies or breathing problems. That is why learning how to prevent mold in outdoor shed areas is worth the effort.
| Prevention Tip | Why It Helps | What You Should Do |
|---|---|---|
| Improve ventilation | Airflow reduces trapped moisture | Add vents, open windows when possible, and avoid blocking airflow |
| Keep the shed dry | Mold grows in damp areas | Fix leaks quickly and dry wet surfaces right away |
| Use sealed storage containers | Protects items from humidity | Store tools and supplies in airtight plastic bins |
| Elevate the shed or items | Stops moisture from the floor | Raise the shed foundation or keep items off the ground |
| Clean regularly | Removes dirt and organic buildup | Sweep out leaves, dust, and debris often |
| Use moisture absorbers | Lowers humidity inside the shed | Place desiccants, charcoal bags, or silica packs inside |
| Inspect for leaks | Finds water problems early | Check the roof, walls, doors, and windows often |
| Avoid storing damp items | Prevents moisture from spreading | Let tools, cushions, and garden items dry before storing |