Have you ever looked at a roof and wondered why some of them seem to stay beautiful for decades while others wear out much faster? Rosemary tiles are one of those classic roofing choices that can give a home both charm and strength.
If you want to learn how to tile a roof with rosemary tiles, this guide will help you understand the process in a simple way. It is useful for homeowners, contractors, and DIY enthusiasts who want a roof that looks great and lasts a long time. You do not need complicated language or confusing steps to get started. You need a clear plan, the right tools, and careful work.
Understanding Rosemary Tiles

What Are Rosemary Tiles?
Rosemary tiles are a type of roof tile that has been used for many years in traditional and modern homes. They are usually made from clay or concrete, which gives them strength and long life. People often choose them because they bring a classic, clean look to a roof while still offering solid protection against the weather.
These tiles are known for their simple shape, neat finish, and reliable performance. That is why they are often used in homes that want a timeless roof style.
Benefits of Using Rosemary Tiles
One of the biggest reasons people choose rosemary tiles is their long lifespan. When installed properly, they can last for many years with only basic care.
They also offer several other benefits:
- Low maintenance once fitted correctly
- Good weather resistance in many climates
- Aesthetic appeal for both old and new buildings
- Eco-friendly value when made from natural materials
- Flexibility for different roof styles
If you want a roof that combines beauty and practical value, rosemary tiles are a strong choice.
Common Applications
Rosemary tiles are often used in:
- Residential roofing
- Heritage restoration projects
- Extensions and renovation work
- Homes that need a traditional look
They work especially well when the goal is to keep the building looking classic while improving roof strength.
Preparing for the Tiling Process
Essential Tools and Materials
Before you begin, gather everything you need. Starting a roofing project without the right tools can slow you down and create mistakes.
Here is a simple list of common tools and materials:
- Rosemary tiles
- Battens
- Roofing underlay
- Nails or clips
- Hammer or nail gun
- Tile cutter or roofing cutter
- Measuring tape
- Safety gloves
- Safety boots
- Harness and ladder
- Chalk line
- Mortar, if needed for ridge work
Having all of this ready makes the job smoother and safer.
Safety Precautions
Roof work always needs careful attention. Working at heights is risky, so safety should come first.
Keep these points in mind:
- Wear non-slip boots
- Use a secure ladder
- Wear gloves and eye protection
- Use a safety harness when needed
- Do not work in strong winds or heavy rain
- Keep the work area clear of loose tools
If you feel unsure about roof safety, it is better to pause and get help than to take unnecessary risks.
Assessing the Roof
Before installing any tiles, inspect the roof structure closely. Look for weak wood, damaged boards, leaks, or sagging areas. If the base is not strong, the tiles will not sit properly.
You should also make sure the roof is:
- Clean
- Dry
- Stable
- Free from old, damaged material
A clean, solid base gives you much better results.
Planning the Layout
Good planning makes the job easier and helps you avoid waste. Measure the roof carefully to determine how many tiles you need. It is wise to order a few extra tiles in case some break during cutting or fitting.
You should also plan the tile pattern before you start. This helps keep the roof straight, even, and balanced from the bottom edge to the ridge.
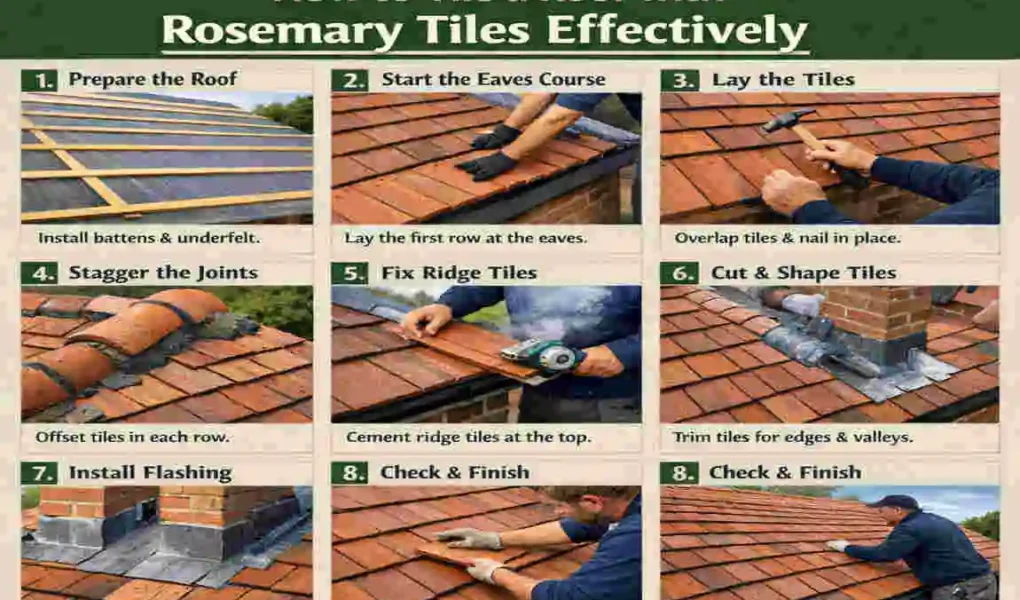
Step-by-Step Guide: How to Tile a Roof with Rosemary Tiles
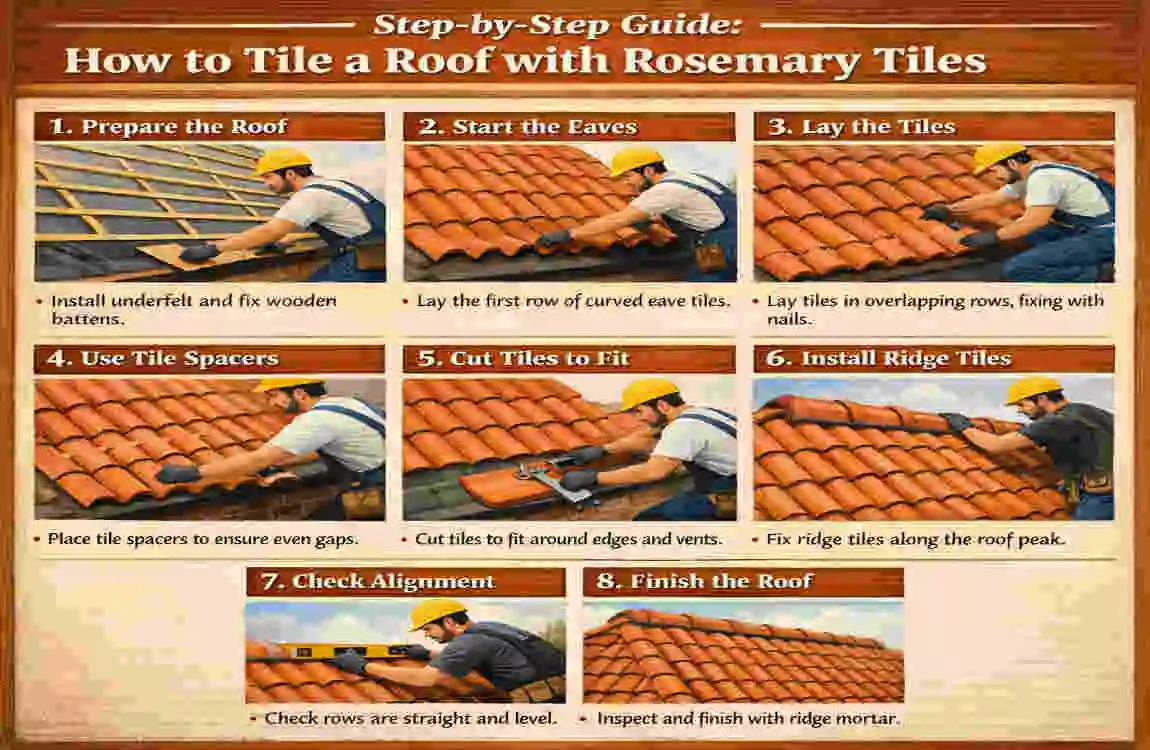
Installing the Battens
Battens are the thin strips of wood that hold the tiles in place. They create a strong support line across the roof.
To install them properly:
- Measure the correct spacing based on the tile size.
- Securely fix the battens to the roof structure.
- Make sure each batten line is straight and level.
- Check that the spacing is even from bottom to top.
When the battens are set correctly, the rest of the job becomes much easier.
Laying the Underlay
The underlay sits below the tiles and helps protect the roof from water. Think of it as a second layer of defense.
Install it carefully so it covers the roof surface without gaps. Overlap the sheets properly to help water run off the roof rather than soak in. This layer is very important because it provides waterproof protection even if a tile later gets damaged.
Starting the Tiling Process
Now the real work begins. Start at the eaves, which are the lower edge of the roof, and move upward. This approach ensures each new row overlaps the one below it correctly.
Keep these points in mind:
- Place the first row carefully
- Use a chalk line to keep rows straight
- Check spacing often
- Make sure each tile sits flat and secure
This step needs patience. A neat first row helps the whole roof look better.
Fixing the Tiles
Tiles must be fastened properly so they stay in place during wind and rain. Depending on the roof design, this may mean nailing, clipping, or both.
For best results:
- Secure the tiles according to the roof design
- Do not leave loose edges
- Make sure overlapping areas are correct
- Check that tiles are not lifting or shifting
A tight fit helps keep the roof weatherproof and long-lasting.
Cutting and Shaping Tiles
Not every tile will fit perfectly around corners, edges, or roof features. That is why cutting is part of the job.
Use the right cutter and measure carefully before making each cut. A clean cut gives a neater finish and helps the tile sit correctly. If you rush this part, you may waste tiles or create gaps.
Take your time, especially near valleys, ridges, and edges.
Finishing Touches
The final stage involves sealing the roof and carefully checking everything. Ridge tiles should be installed at the top where both sides of the roof meet. These tiles help complete the roof line and protect the peak from water.
Before finishing, inspect the whole roof:
- Look for loose tiles
- Check line alignment
- Make sure ridges are sealed
- Confirm that all cuts are clean
A final inspection can save you from future repair work.
Common Challenges and How to Overcome Them
Uneven Roof Surfaces
If the roof surface is uneven, tiles may not sit correctly. That can lead to weak spots and water problems. The best fix is to repair or level the base before you begin tiling.
Weather Conditions
The weather can affect the work more than many people expect. Rain makes surfaces slippery, and strong wind makes tile handling harder.
Try to work on a dry, calm day. If conditions change, stop and wait. A delayed project is better than a dangerous one.
Tile Breakage
Tiles can crack if they are dropped, bent, or handled too roughly. Always carry them carefully and stack them in a safe place.
If a tile breaks during installation, replace it right away. Do not leave damaged tiles in place, because they can weaken the roof.
Alignment Issues
Straight lines matter a lot in roof tiling. If the first rows are off, the mistake can carry across the whole roof.
To avoid this:
- Use a chalk line
- Check alignment often
- Step back and look at the roof regularly
- Adjust early if something starts to drift
Small corrections early on are much easier than major fixes later.
Maintenance Tips for Rosemary Tile Roofs
Regular Inspections
A rosemary tile roof does not need constant attention, but it should be checked from time to time. Inspect it at least once or twice a year, and also after strong storms.
Look for:
- Cracked tiles
- Loose tiles
- Moss buildup
- Signs of leaks
- Broken ridge sections
Catching problems early makes repairs cheaper and easier.
Cleaning the Roof
Keep the roof clear of leaves, branches, and moss. Use safe cleaning methods that do not damage the tiles. A soft brush or careful low-pressure cleaning is often better than harsh tools.
Do not scrape too hard, because that can weaken the tile surface.
Repairing Damaged Tiles
If a tile breaks, replace it quickly. The process is usually simple:
- Lift the damaged tile carefully
- Remove the broken piece
- Fit a new tile in the same position
- Secure it properly
- Check the surrounding tiles
Quick repair helps prevent leaks and further damage.
Preventing Water Damage
Water damage often starts with poor drainage or broken seals. Make sure gutters are clear, and that ridge and edge areas stay sealed.
Good drainage is one of the easiest ways to protect your roof over time.
Cost and Time Considerations

Material Costs, Labor, and Time
The cost of rosemary tile roofing can vary based on tile quality, roof size, and whether you hire a professional. Below is a simple overview:
FactorTypical RangeNotes
Rosemary tiles Medium to high Depends on material and finish
Battens and underlay are moderate, needed for proper support and protection
Tools and safety gear: Low to moderate. May already be owned
Professional labor Moderate to high Depends on roof size and complexity
DIY time Longer, Good for smaller, simpler roofs
Professional time is shorter, usually faster, and more efficient
Time Required
The time needed depends on roof size and experience.
- Small roof: 1 to 3 days
- Medium roof: 3 to 5 days
- Large roof: 1 week or more
Weather, roof shape, and tile cutting can all affect the timeline.
Expert Tips for Effective Tiling
Choose High-Quality Tiles
Not all rosemary tiles are the same. Better-quality tiles usually last longer, fit better, and create a cleaner finish. Look for tiles that are consistent in size, shape, and color.
Work with a Team
Roof tiling is easier with help. One person can measure and place, while another can pass tiles and tools. A team also helps improve safety and speed.
Stay Organized
Keep your tools close and your materials sorted. A tidy work area saves time and helps prevent mistakes.
Learn from Professionals
If this is your first roof tiling project, it can help to speak with an experienced roofer. Even a short lesson or workshop can improve your results and boost your confidence.
Frequently Asked Questions
Can I tile a roof with rosemary tiles on my own?
Yes, you can if the roof is small and you already have some roofing experience. However, larger roofs are better handled with help from another person or a professional.
What is the lifespan of a rosemary tile roof?
A well-installed rosemary tile roof can last for many years, especially if it is regularly inspected and maintained.
Are rosemary tiles suitable for all climates?
They work well in many climates, but the best choice depends on local weather, roof pitch, and proper installation.
How do I handle roof corners and edges?
Measure carefully and cut tiles to fit. Corners and edges need extra attention so there are no gaps or loose ends.
What should I do if a tile breaks after installation?
Replace it as soon as possible. A broken tile can let water in and damage the roof below.
| Step | What to Do | Why It Matters |
|---|---|---|
| Check the roof | Inspect the roof structure for damage, weak spots, and dirt. | A strong, clean base helps the tiles stay secure. |
| Gather materials | Prepare rosemary tiles, battens, underlay, nails, and safety gear. | Having everything ready saves time and keeps the job smooth. |
| Install battens | Fix battens evenly across the roof surface. | Battens support the tiles and keep rows straight. |
| Lay the underlay | Place the waterproof layer under the tiles. | This helps protect the roof from leaks and moisture. |
| Start tiling from the eaves | Begin at the bottom edge and work upward. | This creates proper overlap and better water runoff. |
| Secure each tile | Nail or clip the tiles in place as needed. | Proper fixing improves safety and weather resistance. |