Beautiful summer afternoon, and you want to relax in your conservatory with a good book and a cold drink. But the moment you step inside, you are hit with a wall of unbearable, suffocating heat. Fast forward a few months to the middle of winter, and that very same room feels like a walk-in freezer. If this sounds painfully familiar, you are not alone. Conservatories often overheat in the summer and turn freezing cold in the winter under traditional glass or polycarbonate roofs. Worse still, these older roofs are notorious for leaking and amplifying the deafening sound of heavy rain, making your expensive home extension practically unusable for half the year.
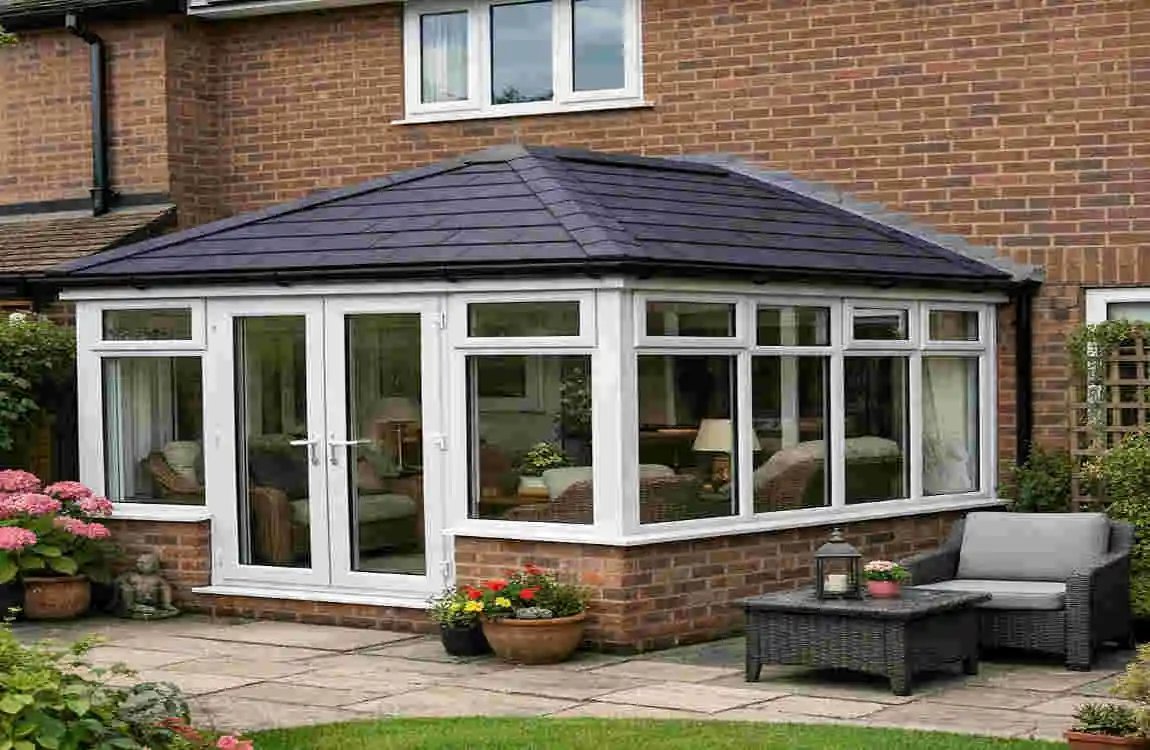
But what if there was a permanent way to fix this? The ultimate solution to reclaiming your space is swapping out that outdated clear roof for a solid, insulated one. Adding a tiled roof instantly transforms your conservatory from a seasonal greenhouse into a comfortable, stylish, year-round living space. It adds remarkable insulation, boosts your property’s aesthetic appeal, and significantly increases your home’s overall value. For homeowners dealing with extreme weather—such as the intense, scorching summers in Lahore’s hot climate—a solid roof is an absolute game-changer for temperature control.
If you are wondering whether taking on this project is worth the effort, consider the incredible energy efficiency benefits. Upgrading to a solid roof can lead to dramatic 30-50% energy savings on your heating and cooling bills. Before you grab your tools, however, it is essential to assess whether your current conservatory structure can actually support the upgrade.
Before You Start: Can Your Conservatory Handle a Tiled Roof?
The very first question you need to ask yourself is: Can my existing conservatory framework hold the weight of a brand-new solid roof? It is a vital question because skipping this step can lead to disastrous structural failures.
When you learn how to put a tiled roof on a conservatory, you quickly realize that weight is the biggest hurdle. Traditional glass and polycarbonate panels are incredibly light. Tiled roofs, on the other hand, introduce significant added weight—even if you are using modern lightweight materials. On average, a tiled roof will add an extra 20 to 40 kilograms per square meter compared to a standard glass setup. Therefore, you must rigorously inspect the entire structure. Carefully examine the existing window frames, the brick dwarf walls, and most importantly, the foundational footings to ensure they can carry this heavier load without buckling or sinking.
Next, you need to navigate the world of building regulations. Whether you are located in the UK or in PK, you will almost certainly need a professional structural survey to certify that the structure is load-bearing. In Lahore, you will specifically need to secure the appropriate permits and structural certificates via the Lahore Development Authority (LDA). Do not skip this legal step, or you could face heavy fines or be forced to tear down your hard work.
If you are preparing to assess your space, gather a few basic assessment tools. You will need a reliable spirit level to check for any existing sagging or leaning, a sturdy ladder to inspect the current roof joints, and a structural calculator app to estimate load-bearing limits based on your room’s dimensions.
Pro tip: If you are determined to tackle this as a DIY project, we highly advise hiring an independent structural engineer just for the initial assessment phase. Paying for an hour of an engineer’s time can completely avoid the nightmare scenario of a structural collapse. A strict warning: Tiled roofs are generally not suitable for older, weak Victorian conservatory frames without massive, costly reinforcements.
Common Conservatory Types for Tiling
Not all conservatories are built the same. Here is a quick breakdown of how common conservatory styles adapt to a tiled roof replacement:
Type Suitability Reinforcement Needed
Lean-to High Low
Victorian Medium High (posts/beams)
P-Shape High Medium
As you can see, the straightforward Lean-to style is incredibly suitable and rarely needs heavy reinforcement. The complex, multi-faceted Victorian style, however, often requires substantial internal support posts and thick steel beams to handle the angled weight distribution.
Essential Tools and Materials List
Before you climb up the ladder and start pulling off old roof panels, you need to make sure your arsenal of tools and materials is fully stocked. Running to the hardware store halfway through a roof removal while rain clouds gather is a stressful experience you want to avoid!
Here is your comprehensive checklist for the project:
The Hardware and Tools:
- Safe Scaffolding: A wobbly ladder won’t cut it for a full roof replacement. You need stable access to the eaves and the roof ridge.
- Cordless Power Drill: Ensure you have extra, fully charged batteries and a variety of masonry and wood drill bits.
- Tile Cutter or Angle Grinder: Essential for trimming tiles to fit the specific angles of your roof structure.
- Heavy-Duty Sealant Gun: For applying waterproof silicone to joints and flashing.
- Insulation Stapler: A high-impact staple gun for securing the breathable membrane and foil layers tightly.
The Building Materials:
- Lightweight Roofing Tiles: Traditional concrete tiles are usually too heavy. Opt for lightweight synthetic or composite tiles. In 2026, expect these to cost around £2.75 to £3 per square meter (roughly 20 tiles needed per square meter).
- OSB Boards (Oriented Strand Board): These engineered wood panels create the solid structural decking that will support your tiles.
- Breathable Waterproof Membrane: This crucial layer stops rain from getting in while allowing internal moisture to escape.
- High-Quality Rigid Insulation: We recommend using at least 100mm of a Premium brand like Kingspan insulation to guarantee maximum thermal efficiency.
- Timber Battens: Wooden strips used to create the framework that the tiles will physically attach to.
- Ridge Caps and Fascias: The finishing pieces that seal the peak of the roof and the edges.
Cost-Saving Hack: To keep your budget under control, look into buying recycled or reclaimed lightweight tiles, which are a massive, eco-friendly trend dominating the market in 2026.
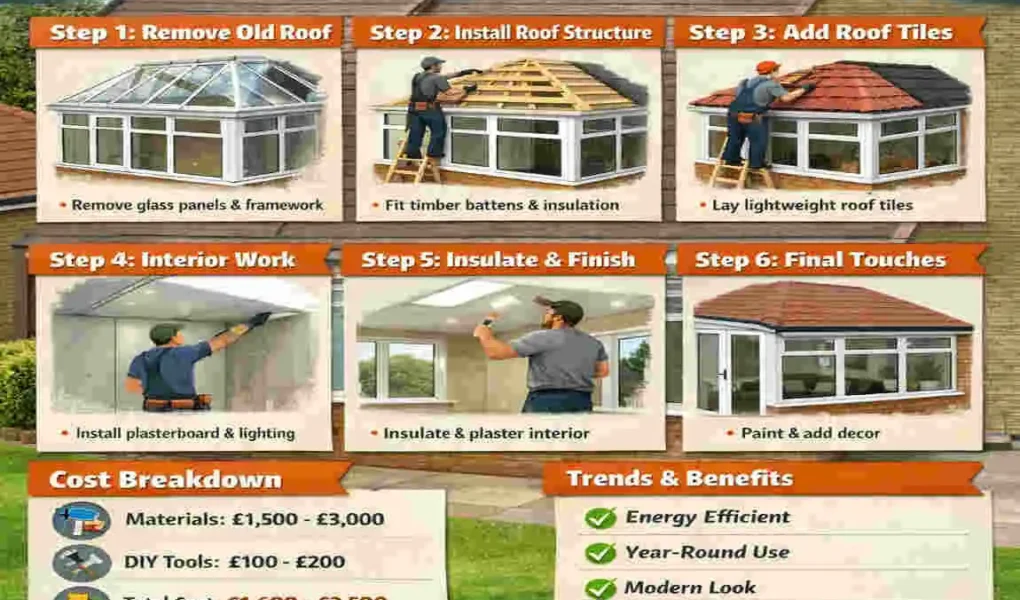
How to Put a Tiled Roof on a Conservatory: 10-Step DIY Process

Now we arrive at the core of our guide. If you want to know exactly how to put a tiled roof on a conservatory, follow these detailed, chronological steps carefully. Take your time, prioritize safety, and never rush the structural phases.
Prep & Safety
Any professional builder will tell you that a successful job is 80% preparation. Start by clearing everything out of the conservatory—furniture, plants, rugs, and electronics. Cover the floor with thick, heavy-duty dust sheets or protective plywood boards to prevent dropping tools or debris and smashing your expensive floor tiles.
Check the weather forecast obsessively; you need a guaranteed window of at least three to five dry, clear days. Working on a slippery roof in the rain is incredibly dangerous and exposes your home’s interior to water damage. Equip yourself with proper safety gear, including a roof safety harness secured to a sturdy anchor point, shatterproof safety goggles, thick protective gloves, and steel-toe boots with high-grip soles. Finally, set up your scaffolding securely around the exterior perimeter.
Remove Old Roof
Removing the old roof requires patience and a delicate touch. You cannot just take a hammer to it! Start by carefully dismantling the existing glass or polycarbonate panels from the top down. Unscrew and remove the decorative finials, the plastic ridge cappings, and the retaining strips that hold the panels in place.
If you are dealing with a glass roof, use heavy-duty industrial suction cups to grip, lift, and slide the heavy glass panes out of their frames safely. Pass them down to a helper on the ground—never try to climb down a ladder while carrying a glass pane. Once the panels are removed, carefully unscrew the old aluminum or UPVC glazing bars. Be sure to dispose of your old materials responsibly by taking them to a local recycling center.
Reinforce Frame
With the old roof completely gone, you are left with the bare conservatory frame. Because your new tiled roof is going to be significantly heavier, this is the moment to reinforce the structure. You will likely need to install a heavy-duty steel ring beam around the top perimeter of the window frames. This continuous ring of steel acts as a solid anchor that distributes the weight of the roof evenly down the walls, rather than pressing down purely on the window frames.
Use heavy-duty M6 structural studs to bolt the new eaves beam into place. Depending on your structural engineer’s report, you may also need to install vertical aluminum or steel support posts in the corners or between the window frames. Use your spirit level continuously during this step; if your ring beam is even slightly out of alignment, the entire roof will sit crookedly, leading to guaranteed leaks down the line.
Insulate Void
Insulation is the secret ingredient that transforms your conservatory from a freezing glass box into a cozy, habitable room. You will create a void (empty space) between your interior ceiling finish and the exterior roof deck. Fill this space snugly with 100mm of rigid styrene or Kingspan insulation boards. Cut the boards precisely to ensure a tight friction fit between the timber rafters.
After the rigid boards are in, apply a continuous layer of multi-layer foil insulation across the underside of the rafters. Beware: do not cut corners by purchasing cheap, single-layer multi-foil. Premium multi-layer foil reflects heat back into the room during winter and blocks the sun’s radiant heat during summer. Use expanding foam tape or metallic foil tape to seal every single gap or joint. When done correctly, this insulation system achieves a phenomenal U-value of less than 0.18, unlocking perfect year-round use.
install OSB & Membrane
Now it is time to build the solid exterior shell. Lay out your Oriented Strand Board (OSB) panels across the exterior rafters. Stagger the joints of the boards (like laying bricks) to maximize the structural strength of the deck. Screw the boards down firmly into the rafters using weather-resistant wood screws.
Once the OSB deck is entirely laid, you must cover it immediately with a damp-proof, breathable membrane. Roll the membrane out horizontally, starting from the bottom edge (the eaves) and working your way up to the top peak (the ridge). Make sure each new layer overlaps the one below it by at least 150mm so that rainwater naturally cascades down and off the roof, rather than seeping underneath the seams. Staple the membrane securely into the OSB.
Fix Battens & Underlay
With your roof completely wrapped in the protective membrane, you need to create the framework that the tiles will sit on. This involves installing timber battens. First, run vertical counter-battens up the slope of the roof, directly over the rafters. Then, fix horizontal battens horizontally across the roof.
The standard thickness for these battens is usually around 50mm, but the horizontal spacing between them must be calculated precisely based on the specific dimensions of the lightweight tiles you purchased. Secure the battens tightly through the breathable underlay and straight into the sturdy OSB deck using galvanized, rust-proof nails. This cross-battening method creates a small air gap beneath the tiles, allowing any trapped moisture to ventilate naturally.
Lay Tiles
This is the most rewarding part of the project, where your conservatory finally starts looking like a seamless extension of your home! Always start laying your lightweight tiles on the front face of the roof. Begin at the bottom left corner at the eaves, and work your way horizontally to the right. Once the first bottom row is complete, move up to the next row and repeat the process, working left to right, bottom to top.
This bottom-to-top method ensures that the tiles overlap correctly, creating a waterproof, cascading barrier against the rain. Use the recommended fixings (often specialized screws or hidden clips) to secure each lightweight tile to the timber battens. Pay close attention to the manufacturer’s guidelines regarding how much each tile needs to overlap its neighbor. Because you are using lightweight composite tiles, lifting and positioning them will be significantly less physically draining than wrestling with traditional concrete slabs.
Add Ridge & Vents
When the flat surfaces of the roof are fully tiled, you will be left with a gap at the very top peak where the different sides of the roof meet. This is the ridge. You need to seal this vulnerable area by installing and securing a specialized ridge cap. Screw the ridge caps down tightly, ensuring they overlap the top row of tiles completely.
Equally important is installing fascia vents along the lower edges (eaves) of the roof. Even with a breathable membrane, a heavily insulated roof needs dedicated airflow. Fascia vents allow fresh air to circulate through the batten void underneath the tiles, which completely prevents condensation buildup, dampness, and the eventual rotting of your roof timbers.
Seal & Waterproof
Your roof might look finished, but it is not completely weather-tight until you seal the edges. The most critical area is where the new conservatory roof physically meets the original exterior wall of your house. You must install lead flashing (or a modern lead alternative) along this junction. The flashing is chased directly into the brickwork of your house and drapes down over the new conservatory tiles.
Apply a generous, continuous bead of high-quality exterior silicone sealant along the flashing, around the fascia boards, and near any ventilation pipes or skylights you may have installed. Take your time with the sealant gun to ensure there are absolutely no tiny gaps left. A tiny pinhole now will become an annoying, dripping leak during the first heavy rainstorm.
Finish & Test
You have made it to the final step! Clear away all the offcuts, packaging, and sawdust from the roof surface. Attach brand new gutters and downpipes to the eaves beam to carry rainwater away from the foundations safely.
To test your handiwork, do not wait for a rainy day. Grab your garden hosepipe and spray a heavy, continuous stream of water over the entire roof for at least ten minutes, paying special attention to the ridge and the wall junctions. Head inside the conservatory and meticulously check every corner, joint, and edge for any signs of moisture. Finally, stand inside and notice the immediate difference in the room’s temperature and acoustics—your insulation is already hard at work!
Tiled Conservatory Roof Costs in 2026 (UK/PK Estimates)
Budgeting is easily one of the most stressful parts of home improvement. To help you plan, we have broken down the average estimated costs to put a tiled roof on a standard 3×3.5m sized conservatory in 2026. Because material and labor markets vary, we have provided side-by-side estimates for both the UK (£) and Pakistan (PKR).
ComponentLow-End (£/PKR)High-End (£/PKR)Notes
Structural Work £2,000 / 700k PKR £10,000 / 3.5m PKR Includes steel beams and support posts
Insulation £1,500 / 525k PKR £3,000 / 1m PKR Dependent on Premium Kingspan quality
Tiles (approx. 60sqm) £1,000 / 350k PKR £2,500 / 875k PKR Prices vary for trending lightweight eco-tiles
Labour (DIY = 0) £3,000 / 1m PKR £15,000 / 5m PKR Highly dependent on pro installer rates
Total Estimated £7,500 / 2.6m PKR £40,000 / 14m PKR Heavily dependent on the overall conservatory size
When analyzing these costs, several major factors will swing your final bill toward the low or high end of the spectrum. First and foremost is the overall size and shape of your conservatory; a sprawling P-shape room will naturally demand more materials than a tiny Lean-to.
Your geographical location plays a massive role in labor costs. For instance, hiring skilled installation teams in Lahore is generally significantly cheaper than hiring equivalent tradespeople in central London. Opting to do the project entirely DIY will instantly save you up to 40% on the total bill by eliminating labor costs entirely. However, if you make a critical structural mistake, fixing a collapsed DIY roof will easily cost double what you initially “saved.”
To put these figures into perspective, simply replacing your old glass with brand new solar-control glass can easily cost upwards of £6,000, and it still will not provide the incredible year-round thermal insulation that a solid tiled roof offers.
2026 Trends in Conservatory Tiled Roofs
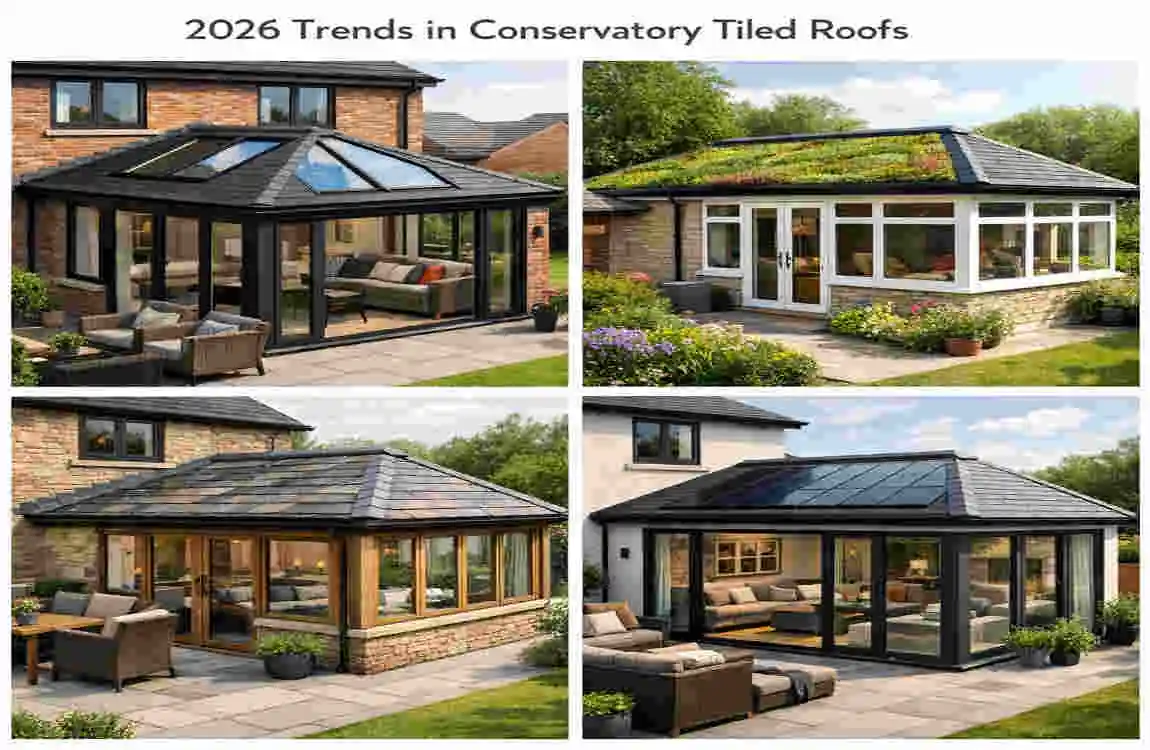
Home improvement technology moves fast, and conservatory roofing is no exception. If you are planning an upgrade in 2026, here are the top trends you should consider incorporating into your project:
- Lightweight Recycled Tiles: Gone are the days of heavy, environmentally damaging concrete blocks. The market is now dominated by ultra-lightweight composite slates and steel tiles made from fully recycled materials. They look virtually identical to natural stone but put a fraction of the stress on your home’s framework.
- Smart Insulation Systems: We are seeing a huge rise in solar-reflective insulation materials. These advanced barriers don’t just trap heat in the winter; they actively bounce the sun’s radiant heat away from the building in the summer.
- The Eco-PK Focus: In regions like Pakistan, there is a massive eco-conscious push specifically targeted at heat reduction. Rather than blasting energy-hungry air conditioning units all day, homeowners in Lahore are using highly insulated solid roofs as a passive, green strategy to survive the brutal summer heatwaves.
Quick Maintenance Tips: To protect your investment, make it a habit to perform an annual visual check for any loose tiles or minor gaps in the silicone sealant. Always consult a professional regarding building regulations, and aim to clean your gutters and the roof surface at least once a year to prevent moss buildup.
Exploring the Alternatives
If a full tiled roof feels slightly out of your budget or structural capacity, there are alternative options. You could opt for highly insulated aluminum panels, which usually start around the £3,000 mark. These slide directly into your existing glass frame without needing heavy steel reinforcements. You could also downgrade to modern multi-chamber polycarbonate, though it offers the lowest insulation value and remains noisy during the rain. Ultimately, when you compare the lifespan, comfort, and aesthetics, tiles remain the undisputed Premium choice.
FAQs: How to Put a Tiled Roof on a Conservatory
Is putting on a tiled roof a DIY project I can actually do? Technically yes, but realistically, no for most average homeowners. Removing glass, installing steel ring beams, and ensuring complete waterproofing requires an advanced level of technical carpentry and structural knowledge. If you are not highly experienced, we strongly recommend hiring a professional.
What is the expected timeframe for the installation? For a professional crew, a standard conservatory roof replacement takes between 3 to 7 working days, depending on the weather conditions and whether complex structural reinforcements are needed.
Are the costs significantly different in Lahore compared to the UK? Yes! Due to drastically lower local labor rates and the availability of regional materials, homeowners in Lahore typically pay about 20% to 30% less for a full tiled roof installation compared to UK residents.
Do I absolutely need building permits for this? Almost always, yes. Because you are fundamentally changing the structure from a temporary, translucent roof to a solid, heavy roof, you must secure a structural certificate to prove the building is safe and complies with local zoning regulations.