Bathrooms can be surprisingly noisy places. Hard tile, bare mirrors, thin walls, and running water all work together to create echoes, hums, and vibrations. If your bathroom sits next to a bedroom, a hallway, or a home office, those sounds can travel farther than you expect.
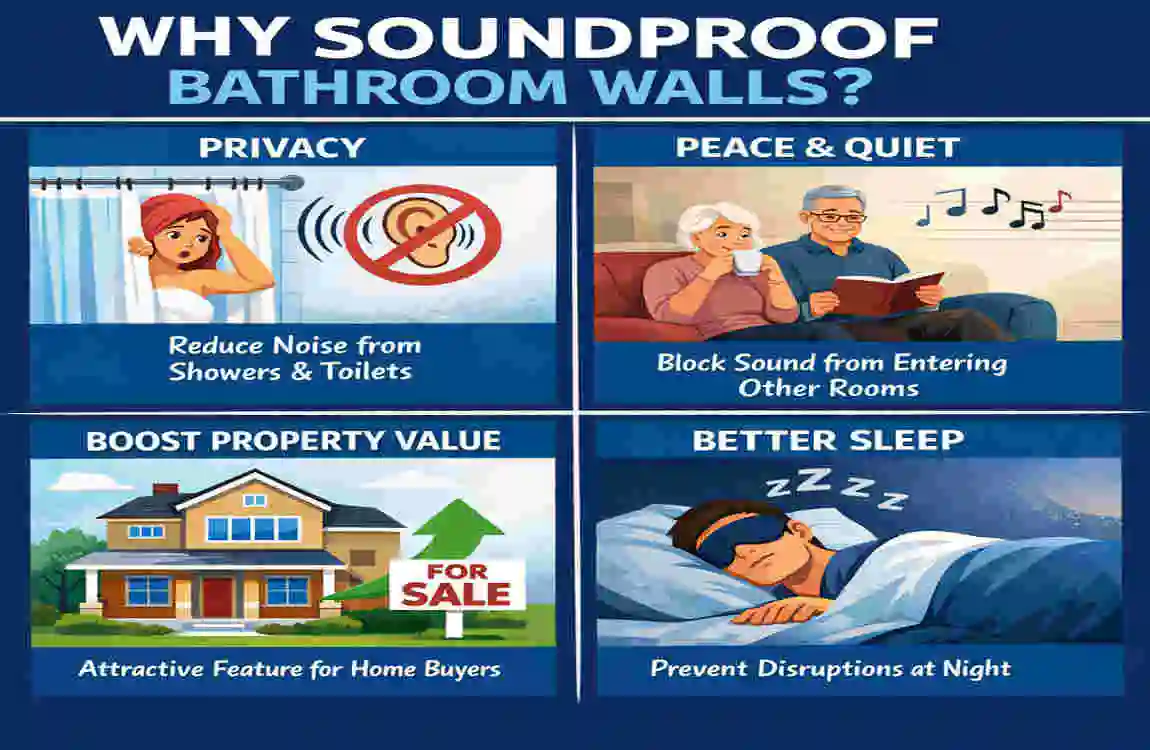
That is why learning how to soundproof bathroom walls matters. A quieter bathroom gives you more privacy, less echo, and a calmer feel every time you use the space. It can also help if you live with family, share a wall with neighbors, or want to keep your early morning routine peaceful.
The good news is that you do not need to spend a fortune to make a real difference. In 2026, renovation prices remain tight for many homeowners, especially as labor and materials rise together. That makes smart, affordable soundproofing even more valuable. The best approach is often to start with the wall itself, then add moisture-safe materials that reduce noise without creating new problems.
Why Soundproof Bathroom Walls Matter
Noise Challenges in Bathrooms
Bathrooms are loud for a reason. Most of the surfaces are hard, smooth, and easy for sound to bounce off. Tile floors, ceramic tubs, glass shower doors, and mirrors all reflect sound rather than absorb it. That means even small noises can feel bigger than they really are.
Think about the sounds you hear in a typical bathroom. A toilet flush, a shower running, a fan buzzing, or someone brushing their teeth can all travel through the room and beyond it. If the wall is thin, those sounds may move into the next room with very little resistance.
Moisture makes the job harder. Some soundproofing materials work well in dry spaces but struggle in humid rooms. Bathrooms need materials that can handle steam, splashes, and long-term dampness without breaking down.
Here are the most common noise problems in bathrooms:
- Impact noise from footsteps, door closing, or pipes vibrating inside the wall.
- Airborne noise like voices, hairdryers, fans, and running water.
- Echo is caused by hard surfaces that bounce sound around the room.
- Moisture damage can weaken the wrong materials over time.
When you understand these issues, it becomes easier to choose the right fix. The wall is often the main path for sound to move from one room to another, so improving it can make a big difference.
Benefits of Soundproofing a Bathroom
Soundproofing bathroom walls is not just about reducing noise. It also improves the overall feel of the room. A quieter bathroom feels more private, more comfortable, and more relaxing. That matters whether you are getting ready for work, winding down at night, or sharing the home with others.
One big benefit is privacy. Bathroom sounds are personal, and most people prefer to keep them that way. When wall sound transfer is lower, you feel more at ease using the space.
Another benefit is better sleep. If a bathroom shares a wall with a bedroom, even a small flush or fan noise can interrupt rest. Soundproofing can help soften those sounds and keep the bedroom quieter.
It can also support property value. Buyers often like homes that feel solid, well-cared-for, and thoughtfully improved. A quieter bathroom can be part of that impression, especially in homes where bathrooms are close to living spaces.
For homeowners, there is also the appeal of DIY control. Many bathroom soundproofing upgrades are manageable without a full remodel. You can start small, improve the wall, and build from there.
A Quick Visual Idea
Image suggestion: A bright bathroom with hard tile surfaces, showing visible echoes and reflective surfaces before soundproofing.
Types of Bathroom Noise
Airborne Noise vs. Impact Noise
When people ask how to soundproof bathroom walls, the first step is understanding the type of sound they are dealing with. Not all bathroom noise behaves the same way.
Airborne noise travels through the air. This includes talking, coughing, fan noise, hairdryers, and running water. These sounds pass through weak walls, gaps, and thin materials with surprising ease.
Impact noise comes from physical vibration. This includes footsteps, a toilet seat dropping, pipes banging, or a wall that shakes when something hits it. Impact noise often travels through studs, joists, and plumbing lines, reaching beyond the visible wall surface.
Bathroom walls matter because they are often the main barrier between the noisy room and the quiet room next door. If the wall is light, hollow, or full of gaps, sound will move through it more easily.
Common Examples of Bathroom Noise
A few examples help make the difference clearer:
- A loud toilet flush can send both water noise and pipe vibration through the wall.
- A shower creates constant airborne sound from water spray and drain noise.
- A hairdryer can be one of the loudest everyday bathroom tools.
- A fan may hum for minutes at a time, especially in a small room.
- Footsteps on a bathroom floor can create vibration that reaches the room below or beside it.
The key lesson is simple: if you want better results, focus on both the sound itself and the way it moves through the wall structure.
Noise Types and Wall Impact
Noise TypeExamplesWall Impact
Airborne Voices, fans, hairdryers, shower sound, High transmission through thin or poorly sealed walls
Impact Footsteps, pipe banging, toilet vibration Vibrates through studs and framing.
This table shows why wall treatment matters so much. If you only reduce the echo within the room, you may still hear the sound from the next room. A robust soundproofing plan should address both surface sound and the wall structure behind it.
Best Materials for Soundproofing Bathroom Walls
What to Look For
Not every soundproofing material is a good match for bathrooms. Humidity changes everything. You need products that can resist moisture, hold up over time, and still reduce sound well.
The best materials usually do one of three things:
- Add mass to the wall so sound has more trouble passing through.
- Absorb vibration to reduce sound transmission through the structure.
- Seal air gaps so noise cannot sneak through openings.
A bathroom-friendly solution often combines more than one of these effects. For example, insulation can absorb sound inside the wall, while drywall and sealant add mass and close gaps.
Common Soundproofing Materials
Material Description Cost per sq ft Moisture Resistance
Mass-Loaded Vinyl (MLV) A flexible, heavy barrier that blocks noise $2–$5 High
Acoustic Foam or Panels helps absorb echo and soften sound $2–$5 Moderate
Rockwool Insulation Dense mineral wool batts that absorb sound $1–$2 Excellent
Double 5/8″ Drywall adds mass to slow sound transfer, $40–$60 per sheet. Good with sealant
Green Glue Compound Damps vibration between wall layers. About $30 per tube. High
Mass-Loaded Vinyl
Mass-loaded vinyl, or MLV, is a popular choice because it adds weight without taking up too much space. That makes it useful when you want stronger sound blocking but do not want a thick wall build-up.
It works especially well in bathrooms, where you need a barrier that resists moisture better than many soft materials. It is often used with drywall or behind panels for a stronger result.
Rockwool Insulation
Rockwool is one of the best options for wall cavities. It is dense, handles moisture well, and absorbs sound much better than light fiberglass in many cases. If you are opening the wall, this is often one of the first materials to consider.
It is especially useful for reducing mid-range bathroom sounds, such as voices, fan noise, and running water.
Double Drywall and Green Glue
Adding a second layer of drywall increases mass, which makes it harder for sound to pass through. When you place Green Glue between layers, it helps absorb vibration and lowers sound transfer even more.
This combination is one of the most effective upgrades for a bathroom wall, especially if you want a noticeable difference without building an entirely new wall.
Acoustic Panels
Acoustic panels are better at reducing echo inside the bathroom than blocking sound from leaving the room. They are still useful, especially for renters or light upgrades, but they are usually not enough on their own.
Because bathrooms are damp, you should choose moisture-resistant versions if you go this route.
Quick Tip for Bathrooms
Always choose materials with moisture resistance in mind. A soundproof wall that fails in a humid room is not a good investment. The best results come from products that can survive steam, splashes, and daily use.
How to Soundproof Bathroom Walls Step by Step
Preparation: Start with the Wall You Have
Before you add anything, inspect the wall carefully. Find out where sound is leaking. Common weak spots include gaps around outlets, plumbing holes, trim edges, and the space where the wall meets the ceiling or floor.
Measure the wall area to determine how much material to buy. In many homes, a bathroom wall section can be around 25 square meters, but your space may be smaller or larger.
You will usually need a few basic tools:
- Stud finder
- Utility knife
- Tape measure
- Acoustic caulk
- Screwdriver or drill
- Masking tape
- Safety gear
The first and easiest fix is sealing gaps. Even small openings can let sound pass through. Acoustic caulk is especially helpful because it stays flexible and fills spaces better than standard filler in many cases.
If you skip this step, you may spend money on materials but still hear too much noise. That is why preparation matters.
DIY Insulation + Drywall
This is one of the most effective ways to soundproof bathroom walls if you are ready to open the wall or work during a renovation.
Remove Fixtures if Needed
If the wall area is behind a vanity, towel rail, or other fixed item, you may need to remove it first. If plumbing or electrical parts are involved, take extra care. You do not want to damage pipes or wiring.
Install Resilient Channels or Isolators
Resilient channels help reduce vibration transfer from the drywall to the studs. In simple terms, they create a small gap that makes it harder for sound to pass through the wall.
This is a smart step because sound not only moves through the surface. It also moves through the frame behind it.
Add Rockwool Insulation
Fill the wall cavity with Rockwool or another dense, sound-absorbing insulation. This helps trap noise inside the wall and reduce the amount that escapes.
Make sure the insulation fits snugly but is not crushed. A proper fit gives better sound control.
Hang Double 5/8″ Drywall with Green Glue
Once the cavity is insulated, add one layer of drywall, then apply Green Glue, then add the second layer. The double layer adds mass, and the compound helps break up vibration.
This combination is one of the strongest soundproofing setups for a bathroom wall. It is especially useful if the bathroom sits beside a bedroom or a quiet office.
Seal the Edges and Finish the Surface
After the drywall is installed, seal every edge with acoustic caulk. This helps stop sound from leaking through tiny openings.
Then, repaint or finish the wall with your chosen surface. If the wall is in a wet area, make sure the final finish is suitable for bathrooms.
Why This Method Works
This approach works because it handles the problem in layers. The insulation absorbs sound, the drywall adds weight, and the Green Glue reduces vibration. Together, they create a much better barrier than a standard wall alone.
Cost Range
For materials only, this approach typically falls between $1 and $4 per square foot, depending on the products you choose.
A Simple Visual Idea
Image suggestion: A cutaway view of a bathroom wall, with insulation, resilient channels, and double drywall layers clearly shown.
Method 2: Mass-Loaded Vinyl or Acoustic Panels on Existing Walls
If you do not want to open the wall, this method is a good alternative. It is especially useful for renters or anyone who wants a less invasive upgrade.
How It Works
Mass-loaded vinyl can be attached to the existing wall surface or used as part of a layered build. Because it is heavy and flexible, it helps block airborne sound.
Acoustic panels can then be added over the top to reduce echo and improve the feel of the room. They also help make the bathroom sound less harsh.
Basic Installation Approach
You can cut MLV to fit the wall section, then fasten it securely to the studs or wall surface. After that, cover it with a finish layer or acoustic panel system that suits the bathroom.
If the bathroom is very humid, make sure the top layer is moisture-resistant. Not every decorative panel is suitable for wet spaces.
Best Uses
This method works best when:
- You cannot open the wall.
- You need a faster upgrade.
- You want a renter-friendly option.
- You want to reduce sound without major construction.
What to Expect
This is usually not as powerful as full insulation plus drywall, but it can still make a noticeable difference. It is a practical middle-ground option for many homes.
Method 3: Build a New Stud Wall
If you want the strongest result and have enough space, building a false wall can be an excellent solution.
What a False Wall Does
A new stud wall creates a separate barrier between the noisy bathroom and the room next to it. You can fill this new wall with insulation, then cover it with drywall and seal it properly.
Because it is not directly tied to the original wall, it can reduce sound transfer very effectively.
When to Choose This Method
This is best when:
- You are already doing a full renovation.
- You want the highest level of sound reduction.
- You can afford more labor and materials.
- You have enough room to lose a little floor space.
Cost Expectation
For a bathroom wall of about 25 square meters, this type of build can reach around £4,200 or more, depending on finish level, labor, and materials.
Why It’s Effective
The advantage is simple: the wall system becomes thicker, heavier, and more isolated. That means both airborne and impact noise have a harder time moving through it.
Bathroom-Specific Tips That Help Right Away
Even if you are planning a bigger project, a few small changes can make the room quieter and faster.
- Wrap exposed pipes to reduce vibration noise.
- Upgrade the extractor fan to a quieter model.
- Add thicker towels or a fabric shower curtain to absorb some sound.
- Use sealant around gaps near fixtures and trim.
- Check for loose fittings that rattle when water runs.
These small fixes will not replace full soundproofing, but they often improve the overall result more than people expect.
A Quick Visual Idea
Image suggestion: A bathroom wall with resilient channels and a partial wall section removed to show insulation placement.
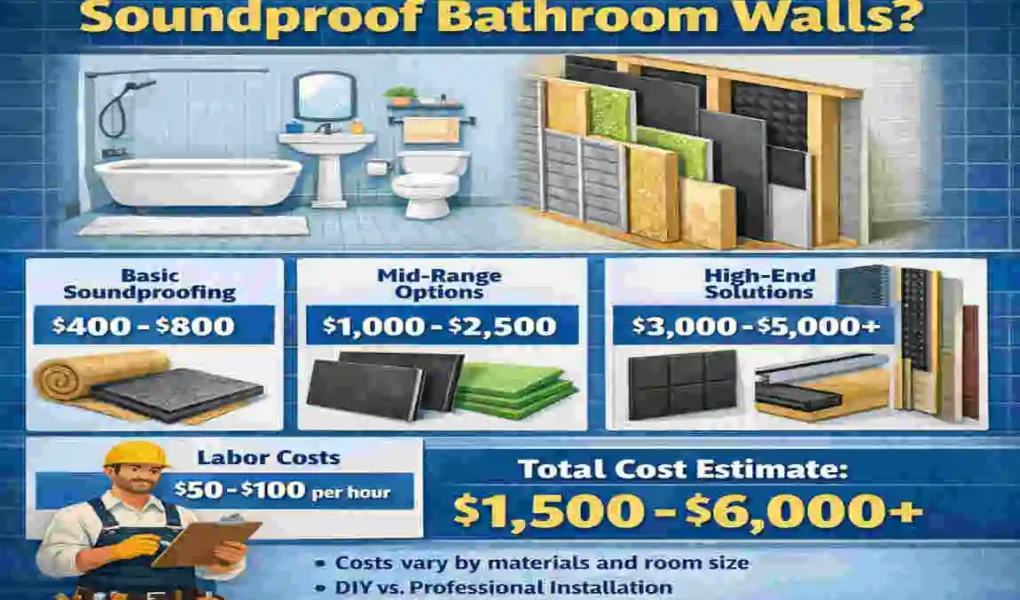
Cost Breakdown: What Bathroom Wall Soundproofing Really Costs
Why Costs Vary So Much
The cost of soundproofing bathroom walls depends on several things. The size of the wall matters, but so do the material type, the amount of labor required, and whether you are opening the wall or working on the surface only.
In 2026, prices can also be affected by labor rates, product availability, and regional differences. A small bathroom in one city may cost far less than a larger project in another.
If you want the best value, think about what you actually need. Sometimes a moderate upgrade gives enough quiet without paying for the most expensive system.
Average Cost Table
Method Materials for 25 sqm Labor Total
Insulate Existing Wall £700 / $900 £1,100 / $1,400 £1,800 / $2,300
Add Plasterboard or Batons £900 / $1,200 £1,700 / $2,000 £2,600 / $3,200
Full New Wall £2,400 / $3,000 £1,800 / $2,200 £4,200 / $5,200
DIY Panels or MLV $500–$1,500 per wall None $500–$1,500
What Drives the Price Up
Several factors can raise the total cost:
- Room size: More wall area means more materials.
- Wall condition: Damaged walls may need to be repaired before other work.
- Labor involvement: Skilled work costs more.
- Plumbing or electrical work: Any work around pipes or wiring increases complexity.
- Material quality: Better moisture resistance often costs more.
How to Save Money Without Cutting Corners
You do not always need the most expensive option. There are smart ways to save:
- Buy materials in bulk if you are doing more than one wall.
- Do the prep work yourself to reduce labor time.
- Use a hybrid approach by combining caulk, insulation, and one extra layer rather than a full rebuild.
- Focus on the noisiest wall first, rather than treating every surface.
If you are on a budget, start with sealing gaps and adding insulation where possible. These steps often yield the best return on investment.
A Simple Rule for Budget Planning
If your goal is to reduce everyday bathroom noise, many homeowners can achieve good results without spending more than $2,000 on a moderate project. Bigger renovations will cost more, but you do not always need a full rebuild to notice a real improvement.
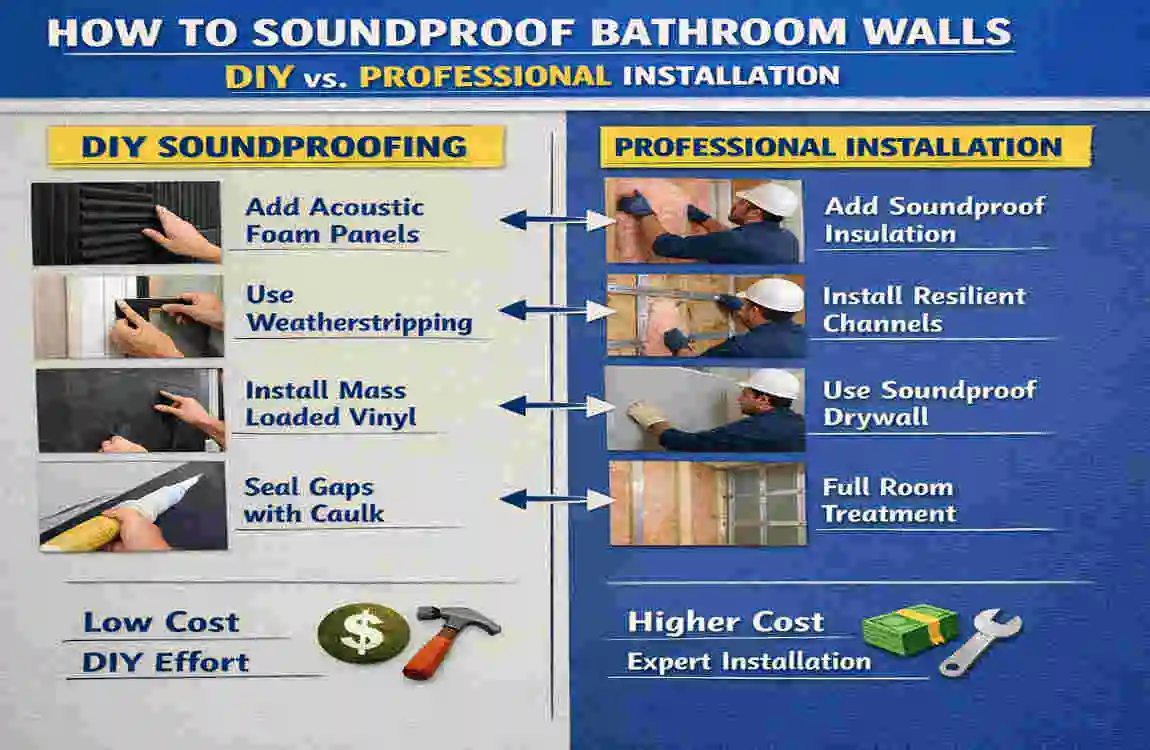
DIY vs. Professional Installation
When DIY Makes Sense
DIY is a great choice if you are working with panels, MLV, sealant, or a simple insulation upgrade. It keeps costs lower and gives you more control over the project’s pace.
It also works well if you like hands-on home improvement and are comfortable using basic tools.
Limits of DIY
DIY becomes harder when the wall needs to be opened, plumbing gets in the way, or electrical work must be moved. Bathrooms are more complicated than dry rooms because moisture and safety matter so much.
A small mistake can create bigger problems later, especially if water gets behind the wrong material.
When to Hire a Pro
A professional is the safer choice when:
- The wall includes plumbing or electrical systems.
- You want a false wall or a major rebuild.
- You need a guarantee or warranty.
- You want the job done quickly and cleanly.
Cost Difference
Professional installation often costs more, but you are paying for speed, skill, and fewer mistakes. In many cases, that is worth it for a bathroom because the room has special moisture and layout challenges.
Maintenance and Long-Term Upgrades
Keep the Wall Sealed
Soundproofing works best when it stays sealed. Over time, caulk can wear down or shrink, especially in damp rooms. Check the edges once a year and re-seal any gaps you find.
Watch for Moisture Problems
Bathrooms get wet, so look out for peeling paint, soft spots, mold, or loose trim. Fixing moisture issues early protects both the wall and the soundproofing layer.
Add Soft Materials Where It Helps
Even with a soundproofed wall, the room can still feel echoey if every surface is hard. Towels, bath mats, curtains, and even a fabric-covered storage piece can soften the sound.
Consider Smarter Ventilation
A quiet, efficient fan is a great long-term upgrade. It removes steam without adding unnecessary noise. That improves comfort and helps protect your materials, too.
FAQs About How to Soundproof Bathroom Walls
How much does it cost to soundproof bathroom walls?
The cost can range from about $500 to $5,000, depending on whether you choose panels, MLV, insulation, drywall, or a full wall rebuild. A simple DIY setup is much cheaper than a professional remodel.
Can I soundproof bathroom walls myself?
Yes, you can. Many homeowners handle MLV, sealant, insulation, and panel-based upgrades themselves. If the project involves plumbing or a full wall rebuild, though, a professional may be the better choice.
What is the best material for bathrooms with high humidity?
Rockwool and MLV are both strong options because they handle moisture better than many other soundproofing products. They are often used in bathrooms for that reason.
Does acoustic foam work in a bathroom?
It can help reduce echo, but it is usually not enough on its own to block sound through a wall. It works better as part of a bigger plan.
What is the cheapest way to soundproof a bathroom wall?
The cheapest approach is usually to seal gaps, add MLV, and use a few moisture-resistant acoustic panels. This will not be as strong as a full rebuild, but it can still improve privacy.
How much do soundproof bathroom walls cost in the UK?
In the UK, a modest soundproofing project may start at around £1,800. At the same time, a more comprehensive wall system can cost £4,200 or more, depending on labor and materials.
Will soundproofing stop all bathroom noise?
No, and that is important to understand. Soundproofing reduces noise significantly, but it rarely eliminates all sound. The goal is to make the bathroom much quieter and more private, not silent.