A roof valley may not look like the most exciting part of your home, but it plays a huge role in keeping water away from your house. It is the channel where two roof slopes meet, and it carries a lot of rainwater, snowmelt, and debris. Because so much water moves through this area, it is also one of the most common places for leaks to start.
If you have ever noticed a stain on your ceiling, a damp smell in the attic, or water dripping during a storm, the roof valley may be the problem. And if you are wondering how to find a leak in a roof valley, you are not alone. Many homeowners struggle with this because the leak often appears far from the actual source. Water can travel along wood, insulation, and even metal before it finally drips inside.
That is what makes roof valley leaks so frustrating. You may see damage in one spot, but the actual entry point is somewhere else. If you do not catch it early, the problem can grow fast. A small leak can turn into stained ceilings, mold growth, damaged insulation, wood rot, and expensive repairs.
What Is a Roof Valley?
A roof valley is the line where two sloping roof sections meet. When rain falls on your roof, water naturally flows down the slope. In a valley, the water flow becomes stronger because two roof planes send water into the same channel. That is why valleys carry a larger volume of water than many other parts of the roof.
Because they handle so much water, roof valleys must be built carefully. If the materials are not installed correctly or wear out over time, water can seep beneath and enter your home.
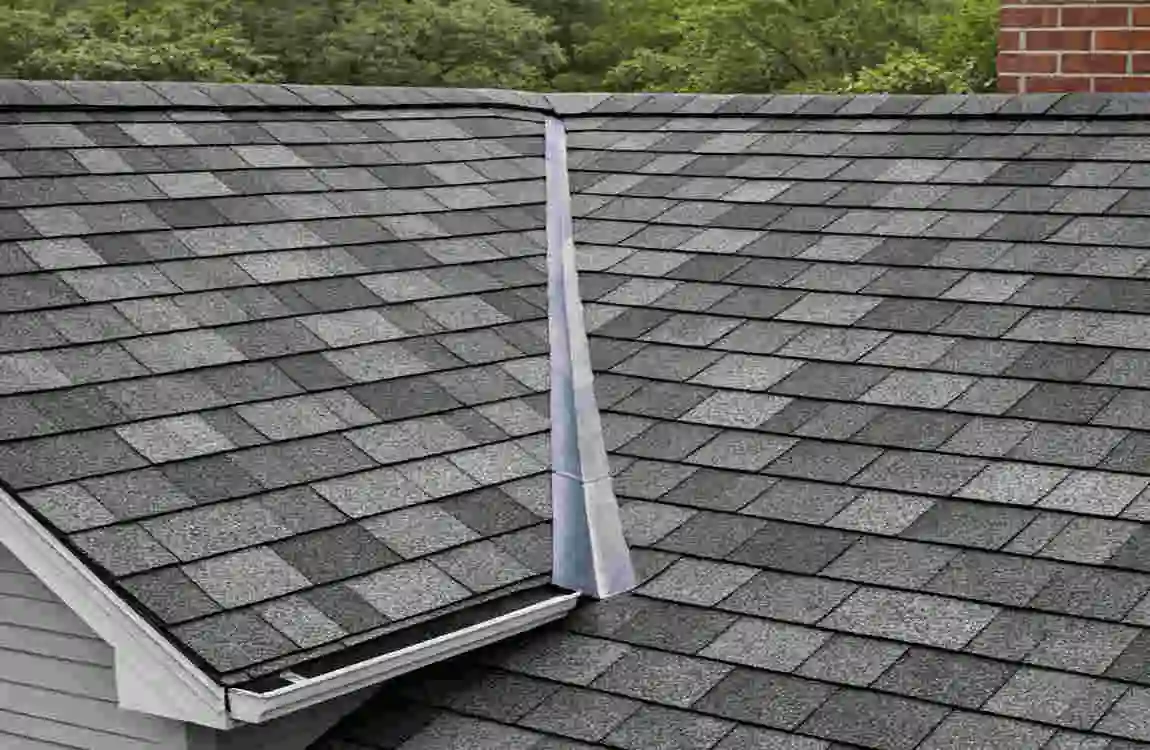
Open Roof Valleys
An open valley leaves part of the metal lining visible. Water flows over the metal surface and moves down the roof more freely. Many roofers like open valleys because they are often easier to inspect and can handle heavy water flow well.
Open valleys can work very well when they are installed properly. However, if the metal gets damaged, debris piles up, or shingles lift near the edges, leaks can develop.
Closed Roof Valleys
A closed valley has shingles covering part or all of the valley floor. This gives the roof a cleaner look, and some homeowners prefer it for appearance. But a closed valley can be more difficult to inspect because the shingles hide the underlying material.
If a closed valley is installed poorly, or if the shingles crack or shift, water can sneak under the surface. That is why roofers often pay close attention to installation quality in these areas.
Why Roof Valleys Matter So Much
Roof valleys are not just another roof detail. They are critical drainage points. That means they have to handle a lot of water quickly and safely. If they fail, water does not just drip harmlessly away. It can enter the roof deck, insulation, attic framing, and interior ceilings.
That is why learning how to inspect a valley matters. A roof valley leak may look small at first, but the damage behind it can be much bigger than it seems.
Common Causes of Roof Valley Leaks
Roof valley leaks usually do not happen for just one reason. Often, several small problems work together until water finally gets inside.
Damaged or Missing Shingles
Shingles protect the roof from rain, wind, and sun. In the valley, they experience extra stress because water moves fast there. If shingles are cracked, curled, loose, or missing, water can slip underneath them.
Even a small gap can become a problem during heavy rain. Once water gets under the roofing layer, it can travel along the roof deck before you notice anything inside your home.
Poor Installation
A roof valley that was not installed correctly may leak sooner than expected. Maybe the shingles were overlapped the wrong way. Maybe the flashing was not sealed well. Maybe the valley lining was cut too short.
Poor installation can be hard to spot from the ground, but it often shows up as repeated leaks in the same area. If you have had repairs before and the problem keeps coming back, bad installation may be the real cause.
Cracked or Damaged Flashing
Flashing is the thin metal material that helps direct water away from weak spots. In a roof valley, flashing is especially important because it protects the joint where water flow is strongest.
If flashing rusts, cracks, shifts, or pulls away from the roof surface, it may stop working the way it should. Water can then move under the roofing materials and into the house.
Debris Buildup
Leaves, pine needles, branches, and dirt can gather in a valley and block water flow. When water cannot move freely, it can pool or back up under the shingles.
Debris also holds moisture against the roof surface. Over time, that extra moisture can wear down roofing materials and increase the likelihood of leaks. If trees hang over your roof, this problem can get worse fast.
Ice Dams
In colder regions, ice dams can create serious roof valley leaks. Snow melts on the warmer parts of the roof and then refreezes near the colder edges or valleys. That creates a block of ice that prevents water from flowing away.
When water gets trapped behind the ice, it can push under shingles and find a path into the home. Ice dams are especially risky because they can cause hidden damage that grows over time.
Aging Roofing Materials
No roof lasts forever. As shingles, underlayment, sealants, and metal components age, they weaken. Sun, wind, rain, and temperature changes slowly break them down.
An older roof valley may still look fine from a distance, but the materials may no longer seal properly. If your roof is aging and you’re seeing recurring moisture issues, age may be part of the problem.
Early Signs of a Roof Valley Leak
A roof valley leak often gives warning signs before the damage becomes major. The key is to notice those signs early and act quickly.
Water Stains on Ceilings or Walls
One of the most common signs is a brown, yellow, or gray stain on the ceiling. You may also see marks on upper walls, especially near corners. These stains often indicate that water has already entered the house.
The stain may not appear directly below the leak. Water can move through framing and insulation before it reaches your living space.
Dripping During Rain
If you hear dripping during a storm, do not ignore it. That sound often means water is entering somewhere in the roof system. Even if the drip seems small, it can indicate a larger, hidden issue.
Mold or Mildew Smell
A musty smell in the attic, upstairs hallway, or upper rooms can signal trapped moisture. Mold and mildew love dark, damp areas, so that a roof valley leak can create the perfect environment for them.
Peeling Paint or Bubbling Drywall
When moisture gets into the walls or ceiling, paint may start peeling or bubbling. Drywall may feel soft, warped, or spongy. These signs often mean the leak has been present long enough to affect the building materials.
Damp Insulation in the Attic
If you check the attic and find wet or compressed insulation, there is a strong chance that water is entering from above. Insulation should be dry and fluffy. Once it gets wet, it loses much of its ability to protect your home.
Musty Odors in Upper Floors
A stale or damp smell upstairs can be another clue. Even if you cannot see water yet, odor changes often tell you moisture is present somewhere hidden.
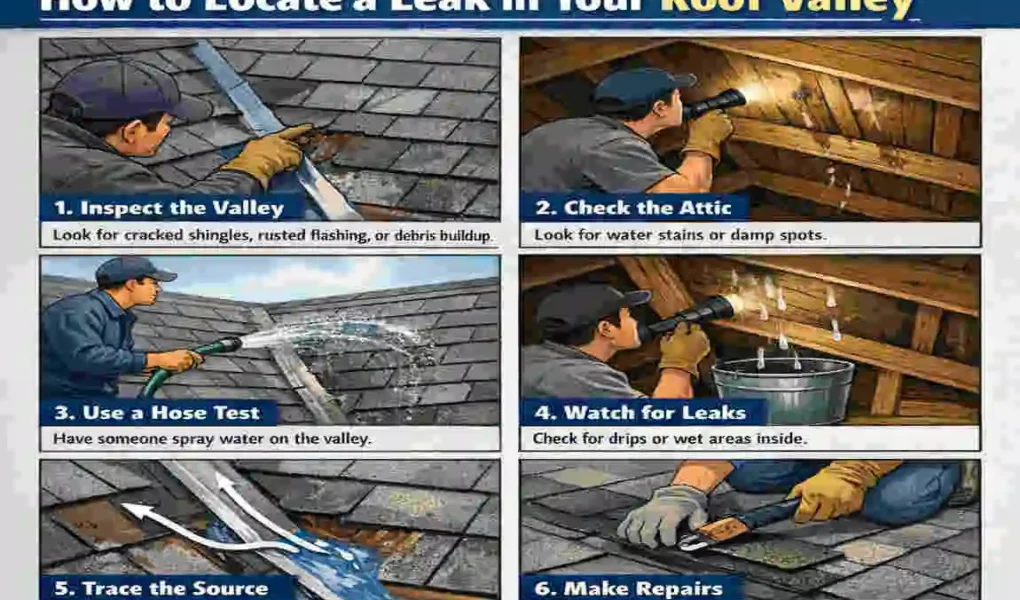
How to Find a Leak in a Roof Valley
Now let’s get to the part most homeowners want to know: how to find a leak in a roof valley in a practical, step-by-step way.
The trick is to look in the right order. Start inside, then move outside. Do not assume the leak is right below the stain you see. Water often travels before it becomes visible.
Inspect the Attic
Your attic is often the best place to start. If possible, inspect it during or just after rain. That timing makes it easier to spot active moisture.
Use a strong flashlight and look for:
- Wet or darkened insulation
- Water stains on rafters or roof decking
- Drips or fresh moisture
- Mold or black spotting
- Wood that looks swollen or soft
Move slowly and check the full length of the roof valley area if you can identify it from inside. Sometimes the leak is only visible when you get close to the source.
If you do not see an obvious leak, do not stop too soon. Water may enter in one spot and show up in another. Follow the clues carefully.
Trace Water Entry Points
Once you find a wet area, look above it and around it. Water tends to travel along wood, framing, nails, and insulation before it drops. That means the real entry point may be several feet away from the visible stain.
Try to follow the path upward. Look for:
- Dark streaks on wood
- Wet lines along rafters
- Stains that begin higher up
- Moisture near roof intersections
This step helps you avoid fixing the wrong spot. A stain on the ceiling may be the result of a roof valley leak, but the actual entry point could be higher and farther to the side.
Inspect the Roof Valley From Outside
If it is safe to do so, inspect the roof from the outside. You should only climb onto the roof if the weather is dry, the surface is stable, and you feel comfortable doing it. If not, use binoculars from the ground or ask a professional for help.
Look closely at the valley for:
- Missing or damaged shingles
- Lifted shingle edges
- Gaps in the valley line
- Cracks in the roofing material
- Debris that blocks water flow
- Areas that look uneven or loose
The valley should look smooth and aligned. If shingles are broken or not sitting flat, water can slip under them. If one side of the valley looks different from the other, there may be a problem with installation or wear.
Check the Valley Flashing
Flashing is a common weak point, so inspect it carefully. If the valley has exposed metal, look for rust, holes, cracks, or signs of shifting. If the valley is covered, look for areas where shingles have lifted near the center line.
Signs of flashing trouble may include:
- Rust or corrosion
- Separation at seams
- Bent or warped metal
- Nails that have backed out
- Sealant that has dried out or split
A tiny gap in flashing can let in a surprising amount of water during a heavy storm. That is why this area deserves close attention.
Perform a Controlled Hose Test
If you still cannot find the source, a hose test can help. This method works best with two people. One person stays in the attic or on the upper floor to watch for water. The other person uses a hose outside.
Do not spray the whole roof at once. Start at the lowest part of the suspected valley area and move slowly upward in sections. Hold water on one spot for several minutes before moving to the next.
This helps you narrow down the entry point. If water begins to appear inside, you will know the leak is tied to that section of the roof.
A good hose test depends on patience. If you rush it, you may miss the source or flood an area that was not originally leaking.
Document the Damage
Take photos of everything you find. This includes:
- Stains
- Wet insulation
- Damaged shingles
- Rusted flashing
- Mold spots
- Exterior roof issues
Photos help in two ways. First, they let you compare damage over time. Second, they give a roofer a clearer picture if you decide to call one.
Write down when you noticed the leak, when it rains, and whether the problem gets worse during heavy storms or wind. These notes can help you spot a pattern.
Match the Inside Clues to the Outside Damage
At this stage, you should compare what you saw inside the attic with what you found outside the roof. The goal is to connect the indoor moisture to the outdoor damage.
For example:
- Wet insulation under one valley area may point to lifted shingles above it
- A ceiling stain near a wall may trace back to cracked flashing
- A musty odor in the attic may match a slow hidden leak near debris buildup
This matching process is at the heart of finding a leak in a roof valley. You are not just searching for water. You are tracing a path from inside signs to outside causes.
Confirm Before Repairing
Before you patch anything, make sure you understand the source. A quick sealant fix on the wrong spot may hide the symptom but not solve the real issue.
If you are unsure, or if the leak appears to be widespread, stop and call a roofer. It is better to confirm the problem than to guess and make it worse.
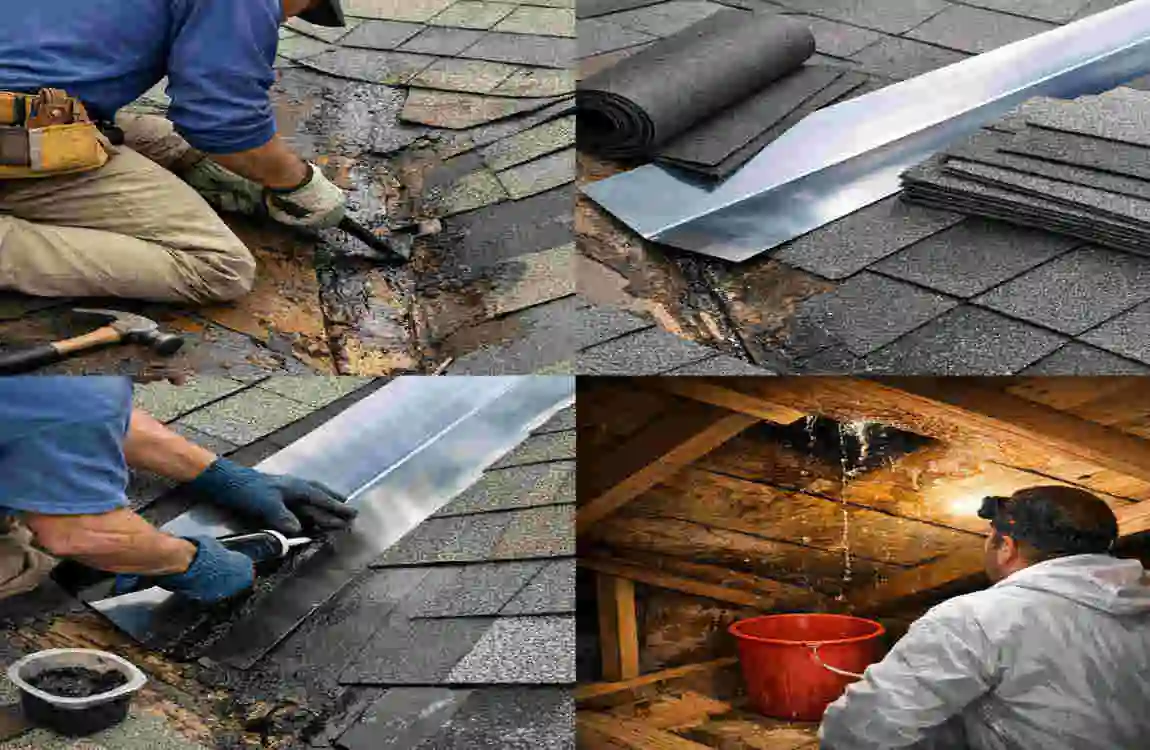
DIY Fixes for Minor Roof Valley Leaks
Not every roof valley leak needs a major repair right away. Some small issues can be handled by a careful homeowner, especially if the damage is minor and easily accessible.
Replacing Loose Shingles
If one or two shingles are loose or missing near the valley edge, replacing them may stop the leak. Make sure the new shingles match the area as closely as possible and are secured properly.
If the roof is older or brittle, be gentle. Forcing shingles can cause more damage than you started with.
Applying Roofing Sealant
Roofing sealant can help close very small gaps around flashing or shingle edges. It works best as a temporary or minor repair, not a full solution for serious leaks.
Use sealant only on clean, dry surfaces. If the area is wet or dirty, the seal will not hold well.
Clearing debris Safely
If leaves or branches are blocking the valley, clearing them out may restore normal water flow. Use a roof-safe method and avoid damaging the shingles.
A roof rake, soft brush, or careful hand removal may work, depending on the roof’s slope and your safety level.
Temporary Waterproof Patches
If the weather is bad and you need a short-term fix, a waterproof patch can help slow the leak until a proper repair is made. This is not a permanent answer, but it can protect the attic and ceiling from more damage for a short time.
Safety Precautions
Never ignore safety. Roof work can be dangerous.
Keep these points in mind:
- Use a stable ladder
- Wear shoes with good grip
- Avoid wet, icy, or windy conditions
- Do not work alone if you can avoid it
- Use a harness if the roof is steep
- Stay off the roof if you feel unsure
A minor repair is not worth a fall. If the area is hard to reach or the roof is steep, call a professional instead.
When to Call a Professional Roofer
Some leaks are simple. Others are not. Knowing when to step back is just as important as knowing how to inspect.
Large or Hidden Leaks
If the leak is spreading across a large area, or if you cannot find the source after careful inspection, a professional should take over. Hidden leaks can involve more than one damaged section.
Signs of Structural Damage
If you notice soft wood, sagging roof sections, or major staining, the problem may be deeper than a simple leak. Structural damage can become expensive quickly and should be evaluated by an expert.
Persistent Water Intrusion
If the same spot keeps leaking after several repairs, something has been missed. This may point to a valley design problem, flashing failure, or installation error.
Complex Flashing Issues
Flashing repairs often require skill and experience. If the metal is badly damaged or tied into multiple roof sections, a roofer can handle it more reliably than a quick DIY fix.
Why Expert Inspection Matters
A professional roofer knows how to spot the subtle signs that homeowners often miss. They can check the roof system as a whole, not just the visible damage. That broader view can save time and money in the long run.
How to Prevent Roof Valley Leaks
The best leak is the one that never starts. With regular care, you can reduce the chance of future trouble.
Schedule Regular Roof Inspections
Check your roof at least twice a year, and also after heavy storms. Look closely at valleys, shingles, flashing, and areas where debris collects.
Early inspection helps you catch small issues before they turn into major leaks.
Keep Gutters and Valleys Clean
Leaves and dirt do not belong in roof valleys. When water cannot move freely, it may back up and force its way under the roofing materials.
Clean the roof and gutters regularly, especially in the fall or after strong winds.
Use Proper Installation Methods
If you are replacing a roof or repairing a valley, make sure the work is done correctly. Good installation matters more than quick patching. The right underlayment, flashing, and shingle layout can make a big difference.
Install High-Quality Flashing
Flashings should be strong, well-fitted, and sealed properly. Cheap materials or rushed work can fail early. Good flashing is one of the best protections against future leaks.
Trim Overhanging Trees
Branches over the roof drop leaves, scrape shingles, and trap moisture. Trimming trees back can help keep the valley cleaner and reduce wear on the roof surface.
Simple Prevention Checklist
- Inspect the roof in spring and fall
- Clean valleys after storms or heavy leaf drop
- Watch for curling or cracked shingles
- Make sure flashing stays tight and rust-free
- Keep attic ventilation working properly
A little attention now can prevent a lot of damage later.
Cost of Roof Valley Leak Repairs
Repair costs can vary a lot depending on how serious the problem is. A tiny fix may be affordable, while a deep leak with hidden damage can become costly.
Minor Repairs
Small repairs, like replacing a few shingles or sealing a minor gap, are usually less expensive. These jobs may stay manageable if you catch the problem early.
Major Repairs
If the leak has damaged the roof deck, insulation, or structural wood, the cost will rise. You may also need flashing replacement, valley rework, or interior repair to the ceiling and walls.
Factors That Affect Cost
Several things can change the total price:
- Size of the damaged area
- Type of roofing material
- Roof pitch and accessibility
- Amount of hidden water damage
- Whether attic or interior repairs are needed
Why Early Detection Saves Money
The sooner you learn how to find a leak in a roof valley, the more likely you are to stop the damage before it spreads. That can save you from mold cleanup, drywall replacement, wood repair, and larger roof work.
In short, catching the problem early is almost always cheaper than waiting.
FAQ: How to Find a Leak in a Roof Valley
What is the most common cause of roof valley leaks?
The most common causes are poor installation and damaged shingles. Debris and flashing problems can also lead to leaks.
Can I find a roof valley leak from inside my house?
Yes. The attic is often the best place to start. Look for wet insulation, stains, or dripping water during or after rain.
How do I know if water is coming from a roof valley?
Look for moisture lines, ceiling stains, or damp spots that seem to lead upward toward the roof structure. The valley area is a strong suspect if water collects there.
Is it safe to inspect a roof valley myself?
It can be safe if the weather is dry, the roof is not too steep, and you use proper safety gear. If you feel unsure, it is better to stay off the roof and call a professional.
How often should roof valleys be inspected?
Inspect them at least twice a year and after major storms. Regular checks help catch small problems before they become serious.
Do roof valley leaks always require replacement?
No, not always. Some leaks only need a small repair, such as replacing shingles or sealing the flashing. Bigger or repeated leaks may need more extensive work.
| Step | What to Do | What to Look For | Tools You May Need |
|---|---|---|---|
| Interior Check | Inspect attic or ceiling below roof valley | Water stains, damp insulation, mold spots | Flashlight |
| Visual Roof Inspection | Check roof valley from outside | Cracked shingles, gaps, debris buildup | Ladder, binoculars |
| Water Hose Test | Spray water slowly on roof valley area | Drips or wet spots inside attic | Garden hose, helper |
| Check Flashing | Inspect metal flashing in valley | Rust, lifting edges, separation | Screwdriver, ladder |
| Look After Rain | Observe roof after rainfall | Active dripping or damp patches | None |
| Clear Debris | Remove leaves and dirt from valley | Blocked water flow causing overflow | Gloves, roof brush |
| 7. Trace Water Path | Follow moisture trail in attic | Entry point vs. drip location mismatch | Marker or chalk |