Have you ever walked through a model home and felt like something was just… off? Maybe the kitchen was too far from the dining area, or the bedrooms felt cramped, while the hallway was unnecessarily huge. We have all been there. You dream of a home that is perfectly tailored to your specific family dynamic, but you hate the idea of settling for cookie-cutter blueprints that don’t quite fit your life.
Designing your own house floor plans is more than just a search term; it is a growing movement. It allows you to DIY a custom layout without breaking the bank or hiring expensive firms right out of the gate. In fact, with the home renovation and construction market projected to hit massive highs in the coming years, more homeowners are taking the pencil—and the mouse—into their own hands.
Benefits of DIY House Floor Plans Over Hiring Pros
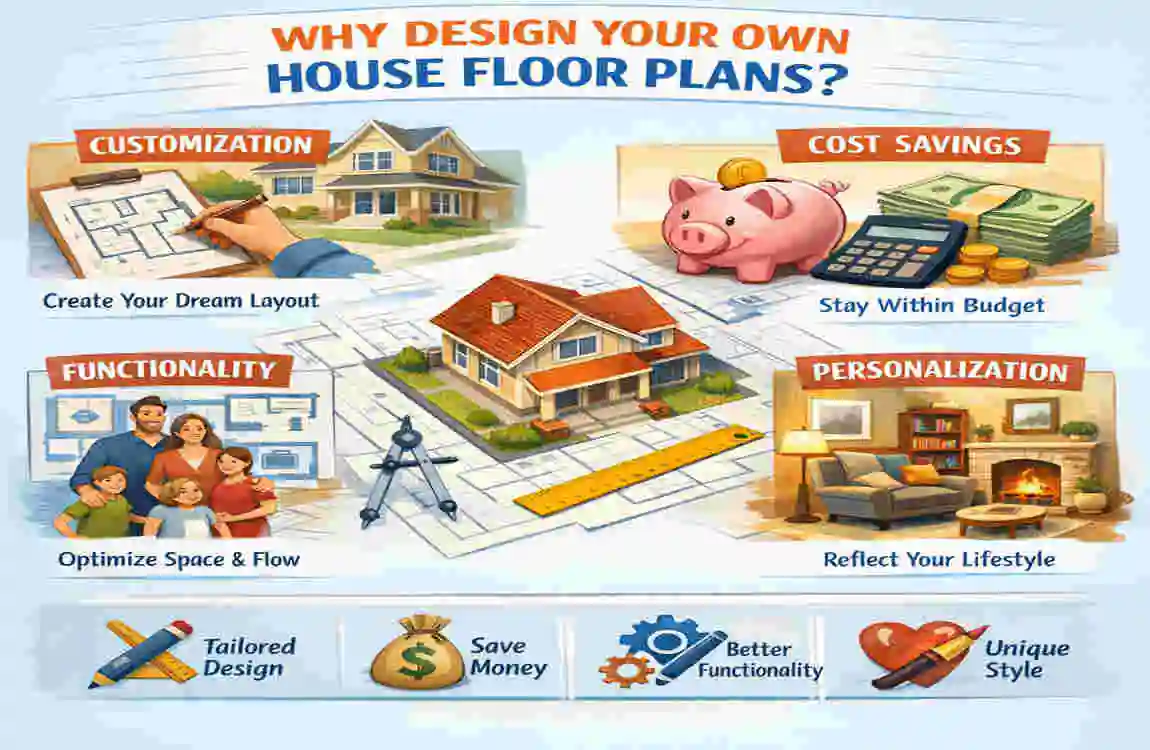
Why would you want to take on the task of designing your own house floor plans? Isn’t that what architects are for? While architects are invaluable for the final technical details, doing the conceptual work yourself has massive advantages. According to recent reports, over 65% of millennials prefer custom homes over existing inventory. They want spaces that reflect who they are, not who a developer thinks they should be.
The Financial and Creative Upside
Let’s talk money. Architect fees can range anywhere from 5% to 20% of the total construction cost. If you walk into a firm with a blank sheet of paper, you are paying them for every hour they spend brainstorming. However, if you walk in with a solid, well-thought-out floor plan you designed yourself, you are saving thousands—potentially $5,000 to $20,000—right off the bat.
Beyond the money, there is the factor of creative control. When you design your own house floor plans, you dictate the priority. Do you want a massive kitchen for family gatherings, but don’t care about a formal living room? You can make that trade-off. You can adapt to modern trends, like dedicated home offices or multi-generational living suites, which became essential after 2020.
Furthermore, the process is often faster. You don’t have to wait weeks for an architect to return a draft that you might hate. You can iterate on your design every evening after work until it is perfect.
DIY vs. Hiring a Pro: A Quick Comparison
To help you visualize the differences, here is a breakdown of what to expect when you take the DIY route versus hiring a professional from day one.
Feature DIY Design Hiring a Professional
Cost Free to Low Cost (Software fees) High ($5k – $20k+ fees)
Creative Control 100% Yours Shared with the Architect
Time Investment High (Requires learning) Low (You outsource the work)
Technical Accuracy Variable (Depends on your research) High (Code-compliant)
Flexibility, instant changes anytime. Changes cost money and time.
Common Myths Busted
“It’s too hard for a beginner.” This is the biggest myth of all. People assume you need a degree in engineering to figure out where a wall goes. The truth is, if you can organize a closet, you can organize a floor plan. Modern software handles the math; you just need to handle the vision.
“My design won’t be buildable.” While you might draw a wall that isn’t structurally sound, that is why you hire a draftsman or engineer at the end of the process to “stamp” and correct your plans. Your goal isn’t to create construction documents; it is to create a functional layout.
Free and Paid Software to Design Your Own House Floor Plans
Gone are the days when you needed a drafting table, T-squares, and expensive vellum paper. Today, if you want to design your own house floor plans, you have access to incredible technology right in your browser.
Here are the top 5 tools that balance power with ease of use:
Floor planner (Free Tier & Paid)
This is widely considered the gold standard for beginners. Floorplanner operates entirely in your web browser. It features a drag-and-drop interface that makes moving walls as easy as moving icons on your desktop.
- Best feature: You can switch between 2D and 3D instantly to see how your room feels.
- Output: You can export professional-looking PDFs to show your contractor.
Sweet Home 3D (Open-Source)
If you prefer software that lives on your computer rather than the cloud, this is it. It is open-source (completely free) and very robust.
- Best feature: It has a massive library of furniture. You can drag a “couch” into your living room and see exactly how much space is left for walking.
SketchUp Free
For those who want to get a little more technical, SketchUp is a powerful 3D modeling tool. It has a steeper learning curve than Floorplanner, but it offers limitless freedom.
- Best feature: You aren’t stuck with pre-made shapes. You can model custom built-ins, unique rooflines, and intricate details.
Room Sketcher
This is fantastic if you are working on a tablet or mobile device. It is designed for quick, on-the-go sketching.
- Best feature: Their “Live 3D” feature lets you take a virtual walk through your home, as if you were playing a video game.
AutoCAD LT (Paid)
This is the heavyweight champion. It is expensive and difficult to learn, but it is the industry standard.
- Best feature: Extreme precision. If you are serious about producing final blueprints yourself, this is the tool.
Choosing the Right Tool
Software Cost Ease of Use Best For
Floor planner Free/Freemium 4.8/5 Beginners & Web users
Sweet Home 3D Free 4.5/5 Offline experimentation
SketchUp Free/Paid 3.5/5 3D Visualization
AutoCAD LT $$$ 2/5 Professional Drafting
Quick Tutorial: To get started, simply take a screenshot of your lot or an existing sketch. Upload it to Floor planner as a background image. Set the scale (tell the software that “this line is 10 feet”), and then simply trace over it with the wall tool. You can have a digital replica of your ideas in under 30 minutes.
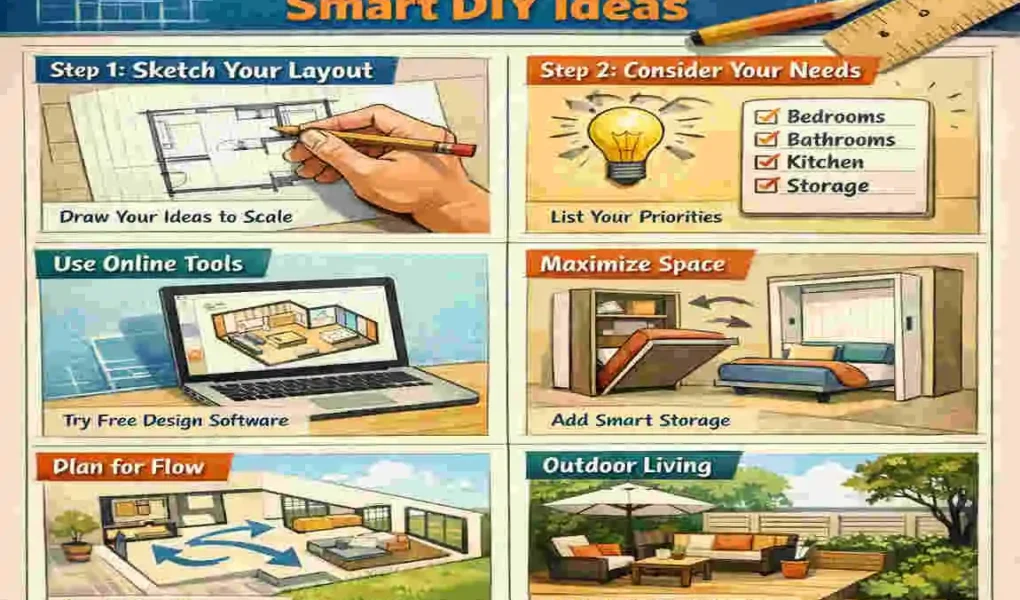
Beginner’s 7-Step Process to Create Custom DIY House Floor Plans
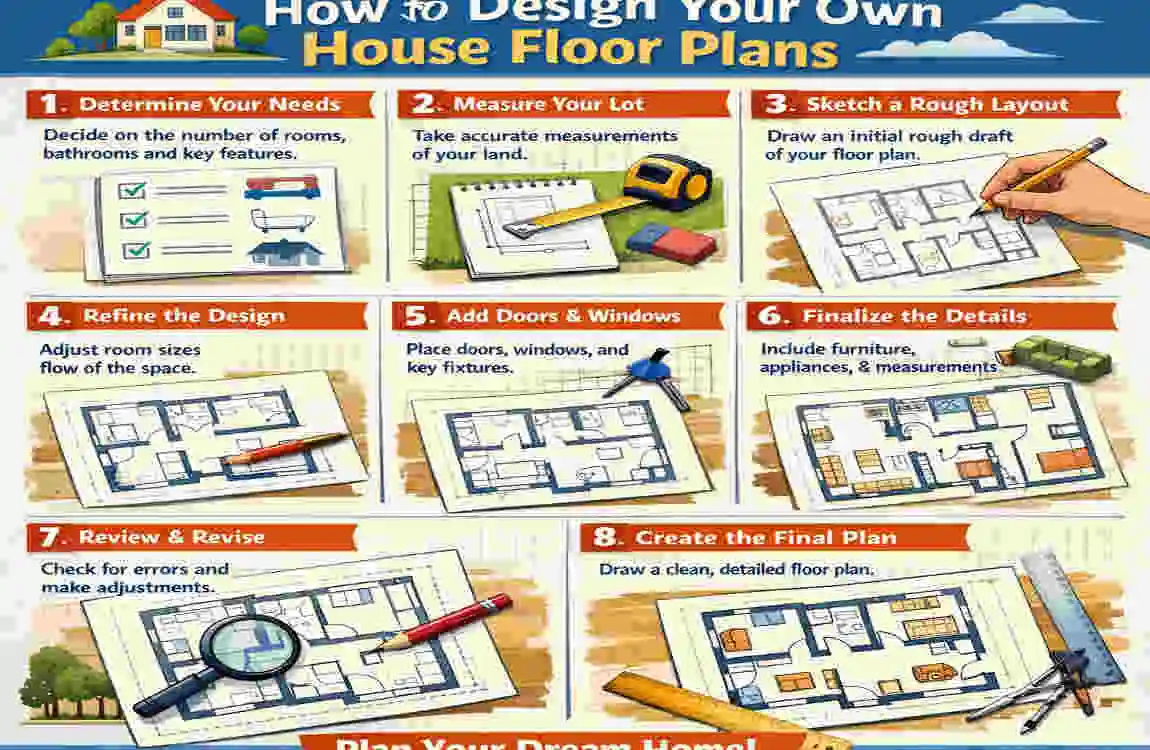
Now that you have your motivation and your tools, it is time to get to work. This 7-step process is designed to take you from a vague idea to a concrete plan. This is the core workflow to design your own house floor plans effectively.
Assess Your Needs and Lifestyle
Before you draw a single line, you need to audit your life. Don’t just list rooms; list activities.
- Do you cook while talking to guests? (You need an open kitchen.
- Do you work from home in a noisy house? (You need a sound-insulated office far from the living room.
- Budget Check: In regions like Pakistan or India, construction costs can average a specific amount per square foot (e.g., Rs. 3000-5000 or $100 USD/sq ft). Knowing your budget limit determines your square footage limit.
- Worksheet Idea: Write down “Must Haves” vs. “Nice to Haves.” If you have a small lot, a laundry room might be a “Nice to Have,” but a second bathroom is a “Must Have.”
Research and Gather Inspiration
You don’t have to reinvent the wheel. Spend time on Pinterest, Houzz, and architectural digests. Look for keywords like “modern 4BHK floor plans” or “cottage style layout.”
- Create a Mood Board: Save images of layouts you like. Look specifically for flow. How do people move from the entrance to the kitchen?
- Analyze Limitations: If you see a plan you love, check the dimensions. Does it require a 50-foot-wide lot when you only have 30 feet? Filter your inspiration by your reality.
Sketch Rough Layouts (The Bubble Diagram)
This is a pro tip that will change how you design. Do not start by drawing walls. Start by drawing bubbles.
- Draw a circle for “Living Room,” a circle for “Kitchen,” and a circle for “Bedroom.”
- Draw lines connecting them as you move. You want a line between the Kitchen and Dining room (strong connection). You do not want a line between the Bathroom and the Kitchen (bad view).
- This method, often called “zoning,” helps you figure out relationships between rooms without worrying about wall thickness yet. It is the smartest way to design your own house floor plans at the conceptual stage.
Choose an Architectural Style
Your floor plan dictates your exterior, and vice versa.
- Modern/Minimalist: Uses simple, rectangular shapes. Easier and cheaper to build.
- Colonial/Traditional: Often boxy with a central hallway. Great for separating rooms.
- Climate Considerations: If you are building in a hot climate like Lahore or Phoenix, you might want an open plan with high ceilings or a central courtyard to promote airflow. In colder climates, compact, compartmentalized designs retain heat better.
Digitize Your Design
Take your bubble diagram and rough sketches to your chosen software (like Floorplanner).
- Start with Exterior Walls: Draw the house’s box first.
- Add Interior Walls: Place your rooms.
- Dimensions Matter: Be realistic. A master bedroom should be at least 12×14 feet to feel comfortable. A standard hallway needs to be 3 to 4 feet wide.
- Wall Thickness: Remember, walls take up space! Exterior walls are usually 6-9 inches thick; interior walls are 4-5 inches. Software handles this, but don’t forget it when calculating square footage.
Add Details and Furniture
A room is just a box until you put furniture in it. This step is crucial for scale.
- The “Bed Test”: Place a King-sized bed in your bedroom plan. Do you still have room to walk around it? If not, move the wall.
- The “Door Swing”: Ensure doors don’t swing into furniture or block other doors.
- Systems: Think briefly about where your plumbing is. Grouping bathrooms and kitchens (back-to-back or stacked) saves significant plumbing costs.
Review, Iterate, and Simulate
Walk away from your design for a day. Come back with fresh eyes.
- The Mental Walkthrough: Close your eyes and imagine walking in the front door with groceries. Is the kitchen a hike away? Imagine having guests. Is the bathroom awkward to find?
- Get Feedback: Show your plan to friends. They will spot things you missed, like “Why is the laundry room upstairs if the bedrooms are downstairs?”
10 Creative Ideas to Elevate Your House Floor Plan Design
To truly make your home stand out, you need to incorporate smart design trends. Here are 10 ideas to consider when you design your own house floor plans for 2026 and beyond.
Smart DIY Layout Trends
- Multi-Functional Rooms: The “Guest Room” is dead. Long live the “Office-Gym-Guest” room. Use Murphy beds (wall beds) and built-in desks to make one room serve three purposes.
- Indoor-Outdoor Flow: Especially in favorable climates, consider large sliding glass doors that open the living room completely to a patio. This makes a small house feel twice as big.
- Smart Home Zoning: Design a central “hub” closet for your router and smart home automation systems. Hardwire Ethernet points to where your TVs and desks will be.
- The “Drop Zone”: Don’t just have a front door; have a mudroom or a “drop zone” with a bench and hooks immediately upon entry. This keeps the rest of the house clean.
- Sustainable Orientation: Orient your house so that the main windows face South (in the Northern Hemisphere) to capture winter sun but shade them for summer. This is free heating and cooling!
- Pet-Friendly Zones: Design a niche under the stairs for a dog crate, or a dedicated cabinet in the laundry room for cat litter.
- Aging-in-Place Features: Even if you are young, wider hallways (42 inches+) and a master bedroom on the ground floor add value and future-proof the home.
- Pocket Doors: In small bathrooms or pantries, a swinging door takes up 9 square feet of space. A pocket door (which slides into the wall) takes up zero space.
- The “Costco” Pantry: Walk-in pantries are trending. Design a dedicated space for bulk goods so your main kitchen cabinets stay minimalist and uncluttered.
- Zoned Acoustics: Place closets between bedrooms as a sound buffer. This creates a natural noise barrier for privacy.
Floor Plans by Home Size
Small Homes (Under 1500 sq ft):
- Focus: Vertical storage and open sightlines. Eliminate hallways; they are wasted space. Have rooms open directly off the living area.
Medium Homes (1500 – 3000 sq ft):
- Focus: Family balance. You have room for a dedicated laundry room and perhaps a separate den or playroom. The key here is separating the “noisy” zone from the “quiet” zone.
Large Homes (3000+ sq ft):
- Focus: Entertaining and flow. Ensure you have a clear path for guests that doesn’t lead them through private family areas. Double-height ceilings work well here.
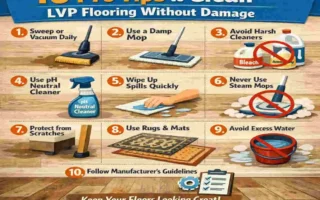
Pitfalls When You Design Your Own House Floor Plans
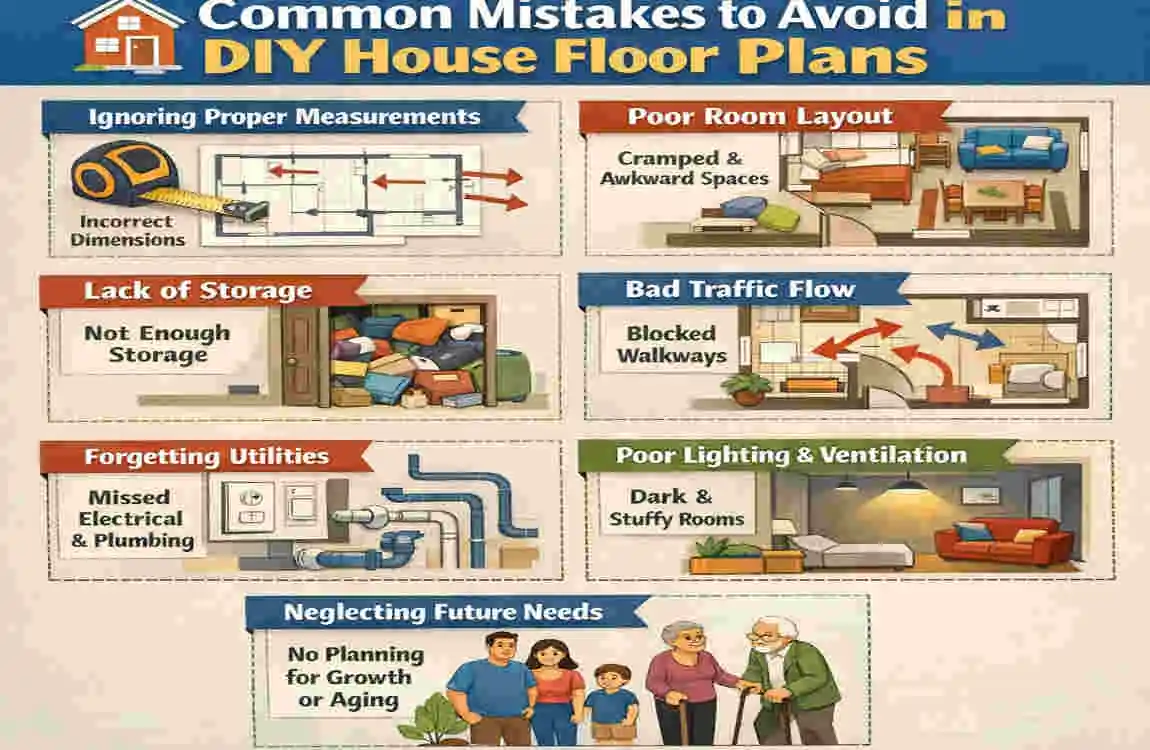
It is easy to get carried away. To ensure your DIY dream doesn’t become a nightmare, avoid these common mistakes.
Ignoring Building Codes
Every region has codes. In the US, it is the IBC; in Pakistan, you have the Punjab Building Code, etc.
- The Risk: If you design a staircase that is too steep or a window that is too small for fire escape (egress), your plans will be rejected by the city, or worse, be unsafe.
- The Fix: Read up on basic local requirements for stair widths, ceiling heights, and bedroom window sizes.
Poor Traffic Flow
We mentioned this earlier, but it bears repeating.
- The Mistake: Placing a bathroom directly off the kitchen or living room so everyone sees you enter/exit.
- The Fix: Create a small vestibule or hallway to provide visual privacy.
Underestimating Plumbing Costs
- The Mistake: Placing a bathroom in the far left corner, the kitchen in the far right, and the laundry upstairs in the middle. This requires plumbing to run everywhere.
- The Fix: “Wet walls.” Try to put bathrooms back-to-back or stack them. It simplifies the pipe runs and saves money.
Skipping Natural Light
- The Mistake: Creating a deep house where the center rooms have no windows.
- The Fix: Use skylights, solar tubes, or clerestory windows (windows high up near the ceiling) to bring light into the center of the home.
Over-Customizing
- The Mistake: Designing a house so weirdly specific to you (e.g., a hexagon-shaped bedroom) that no one else would ever buy it.
- The Fix: Keep the “bones” of the house fairly standard. Use paint and decor for the crazy stuff. This protects your resale value.
From DIY Sketch to Real Build: Legal and Practical Next Steps
You have spent weeks on your laptop. You have a plan you love. You have successfully designed your own house floor plans. Now what?
Consult the Professionals
You cannot take a Floorplanner printout to a construction crew and say, “Build this.”
- Draftsman/Architect: Hire a pro for a “review and refine” service. They will take your layout and turn it into official CAD blueprints.
- Structural Engineer: This is non-negotiable. An engineer must calculate the load-bearing walls, beam sizes, and foundation depth. In many places, you legally need an engineer’s stamp to get a building permit.
Cost Estimation
With your detailed plan, you can now get accurate quotes.
- Take your plan to the builders. Because you know exactly how many square feet of tile and how many linear feet of wall you have, their quotes will be accurate.
- Example: For a 2000 sq ft custom home in a city like Lahore, costs might hover around $150k-$200k, depending on finishes. In the US, that might be $400k+. Your detailed plan helps you lock this number down early.
Here is a concise, SEO-friendly FAQ section suitable for adding to the bottom of your blog post or using as a quick social media caption.
FAQ: Design Your Own House Floor Plans
Can I legally design my own house floor plans? Yes, you can design the layout and concept yourself! However, in most jurisdictions (including the UK and US), you will eventually need a licensed architect or structural engineer to review, stamp, and finalize the drawings to ensure they meet local building codes and safety regulations before you can get a building permit.
What is the best free software for beginners? Floorplanner is widely considered the best browser-based tool for beginners because of its drag-and-drop interface. Sweet Home 3D is a great downloadable option that is free and open-source. Both allow you to visualize in 2D and 3D without needing technical CAD skills.
How much money can I save by doing it myself? By handling the conceptual design phase yourself, you can save significant billable hours when you eventually hire a pro. Architect fees often range from 5% to 15% of construction costs; having a prepared floor plan can reduce the time they spend on “schematic design,” potentially saving you thousands.
Where should I start when designing a floor plan? Don’t start with walls; start with a “bubble diagram.” Draw circles representing rooms and draw lines connecting them based on how you want to walk between them (e.g., Kitchen connects to Dining). This helps you figure out the flow before you get stuck on specific dimensions.
What is the most common mistake DIY designers make? The most common mistake is ignoring traffic flow. Beginners often place doors and hallways in spots that create bottlenecks or force people to walk through private areas (like a bedroom) to get to public areas (like a backyard).
Do I need a powerful computer to run floor plan software? Not for most beginner tools! Web-based tools like Floorplanner or Planner 5D run on standard laptops and even tablets. You only need a high-performance computer if you move into professional-grade software like Revit or AutoCAD.