Welcome! If you’re curious about how to install slate roof tiles, you’ve landed in the right place. Slate roofs are renowned for their unmatched durability and classic beauty, lasting well over a century in many cases. Whether you’re a DIY enthusiast or a professional roofer looking to up your game, understanding the slate roof installation process is essential for achieving a roof that not only protects but also elevates your home’s style.
Benefits of Slate Roof Tiles

Slate roofing has been a top choice for centuries, and for good reason. Let’s explore the key advantages that make slate a Premium roofing material.
Durability That Lasts Generations
Slate roof tiles can last 75 to 200 years, far surpassing the lifespan of common roofing materials like asphalt shingles. This longevity means fewer replacements, less waste, and better value over time.
Fire and Weather Resistance
Slate is naturally fire-resistant and withstands harsh weather conditions, including heavy rain, snow, and hail. This makes it a dependable shield for your home, especially in areas prone to wildfires or storms.
Timeless Aesthetic Appeal
Few roofing materials can match the elegant, natural look of slate. Its unique texture and color variations add charm and character, complementing both traditional and modern homes.
Comparing Slate to Asphalt Shingles
To give you a clearer picture, here’s a quick comparison table between slate roof tiles and asphalt shingles:
Feature Slate Roof Tiles Asphalt Shingles
Lifespan 75-200 years 20-30 years
Maintenance Low High
Aesthetic Timeless elegance Standard
Cost per sq ft $10-20 installed $3-5 installed
As you can see, while slate requires a higher initial investment, its durability and beauty offer long-term rewards.
Essential Tools and Materials for Slate Roof Installation
Before starting, gather the right tools and materials. Having these at hand will smooth your installation journey and ensure professional results.
Must-Have Tools
- Slate hammer: Specially designed for drilling holes and cutting slate tiles cleanly.
- Copper nails: Use two nails per tile to secure them firmly without damaging the tile.
- Cutting tools: Slate scissors or a diamond blade saw handle, make precise cuts easily.
- Safety gear: Harnesses, gloves, and sturdy footwear to keep you safe on the roof.
Materials You’ll Need
- Underlayment membrane: A waterproof barrier laid beneath the tiles.
- Wooden battens and starter shims: These provide a structure for nailing the slats and proper drainage.
- Ridge caps and flashing: Essential for sealing roof edges and preventing leaks.
Budget Tip
For an average 1,000 sq ft roof, expect to spend between $500 and $ 1,000 on tools alone. It’s a worthy investment for quality and safety. Check out trusted roofing supply stores online for deals and recommendations.
Roof Preparation Steps
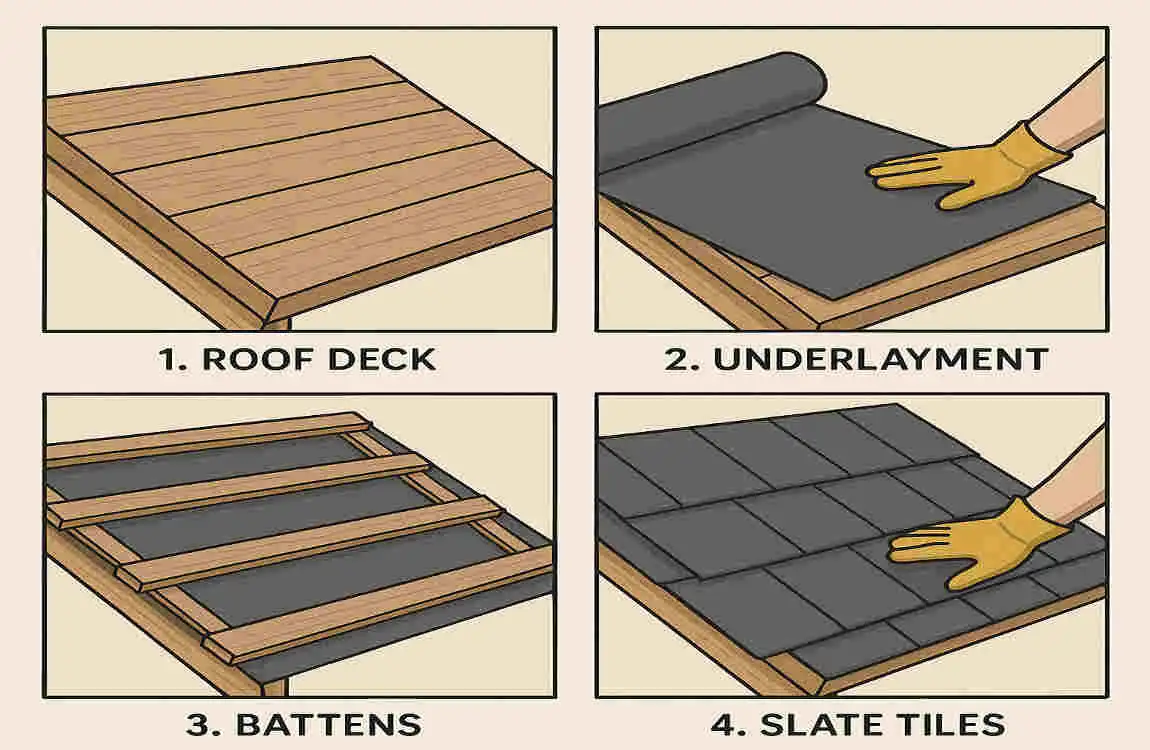
Proper preparation sets the foundation for a flawless slate roof installation. Here’s how to get your roof ready.
Inspect and Repair Existing Roof
Start by checking your current roof for damage or weak spots. Replace any rotted wood or damaged sheathing. A solid base is crucial for supporting the heavy slate tiles.
Install Underlayment and Sheathing
Lay down a 30 lb felt underlayment, overlapping each strip by at least 3 inches. This layer protects against moisture and acts as a secondary barrier.
Add Starter Shims and Battens
Attach wooden starter shims (about ½ inch thick) along the eaves. These raise the first course of tiles slightly, helping with water runoff.
Then mark and install the battens horizontally, using a batten gauge to ensure consistent spacing—typically around 25mm exposure.
Trial Layout
Before nailing, perform a dry run by laying out tiles to check alignment and spacing. This helps avoid uneven courses and wasted materials later on.
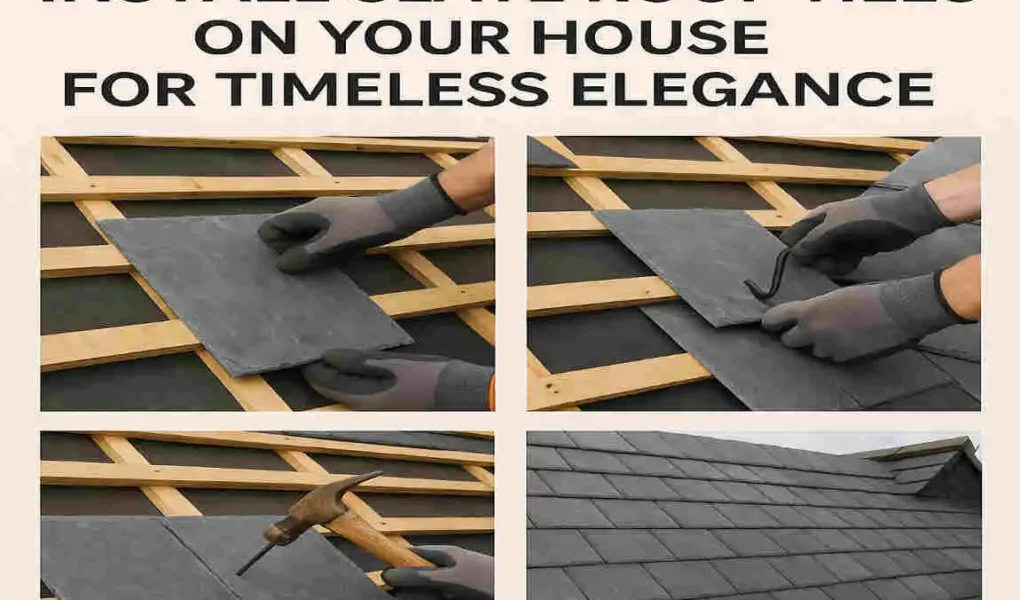
Step-by-Step Slate Roof Tiles Installation Process
Now, let’s get to the heart of the matter: how to install slate roof tiles step by step. Follow this guide carefully for professional results.
Starter Course Installation
Begin by nailing the shim strip at the eaves. Lay the first row of tiles so they overhang the gutters slightly, about halfway on the batten. Maintain a clearance of 6-12mm between tiles to allow for expansion.
Drilling Holes
Using your slate hammer, drill holes 20-25mm from the tile edge. Avoid drilling too close to the edge to prevent cracks.
Nailing Tiles
Secure each tile with two copper nails, positioning the nail heads to cover the holes without pressing into the slate. This prevents damage and ensures a tight fit.
Second and Subsequent Rows
For the second row, offset the joints by approximately 7cm and stagger seams to enhance water shedding and roof strength.
Maintain a 3-layer overlap at edges and valleys to keep water out effectively.
Working with Valleys and Ridges
Valleys and ridges require custom-cut tiles and special flashing to properly channel water. Use precise cuts and overlapping to avoid leaks here.
Cutting Tiles
Use slate scissors or a diamond blade saw to trim tiles for fitting around chimneys, vents, and roof edges. Take your time for clean, safe cuts.
Finishing Touches
Install ridge caps to seal the roof peaks. Clean debris off the roof surface to prevent staining and ensure a neat finish.
Important Warnings
- Steep roof pitches: If your roof is very steep, consider hiring professionals. Working safely at heights is challenging.
- Avoid over-nailing: Too many nails can crack tiles and shorten their lifespan.
Maintenance and Troubleshooting for Slate Roofs
To keep your slate roof looking and performing its best, regular care is key.
Annual Inspections
Check your roof yearly for loose or missing tiles and nails. Early spotting of problems prevents costly repairs.
Cleaning Tips
Use a soft brush or low-pressure water to clean moss and debris. Avoid pressure washers, which can damage the slate surface.
Common Issues
Leaks often stem from poor overlapping or damaged flashing. Fix minor leaks by re-nailing or replacing affected tiles promptly.