Did you know that an uninsulated flat roof can allow a staggering 25% of your home’s precious heat to escape directly into the cold outdoor air? Imagine turning on your heating system during the freezing winter months, only to have a quarter of that warmth vanish through your ceiling. This invisible heat drain is one of the leading causes of spiking utility bills and uncomfortable, drafty rooms.
If you are a homeowner looking to put a stop to this financial drain without tearing up your exterior roofing membrane, you are in the right place. Internal insulation—specifically the “cold loft method”—is an incredibly accessible and practical DIY fix. By insulating between the roof joists directly from the inside, you can completely bypass the need for expensive exterior scaffolding, weather-dependent construction days, and pricey professional contractors.
The best part? If your ceiling is currently exposed or you are planning a renovation, this quick installation process can often be tackled in just a few hours.
By mastering how to insulate a flat roof from the inside, you are setting yourself up to establish a powerful thermal barrier. This barrier has the potential to slash your heating and cooling costs by up to 50%.
Why You Need to Know How to Insulate Flat Roofs Internally
Flat roofs have historically been notorious for their poor thermal performance. Unlike pitched roofs, which boast large, easily accessible attic spaces perfect for rolling out thick blankets of fiberglass, flat roofs present a unique architectural challenge. Because of this, many older buildings were constructed with little to no default insulation.
This oversight in older construction methods translates into a massive energy drain today. In fact, a lack of proper insulation in a flat roof can lead to an estimated £230 in annual heating waste for the average homeowner. As energy prices continue to rise, that is money literally going through the roof.
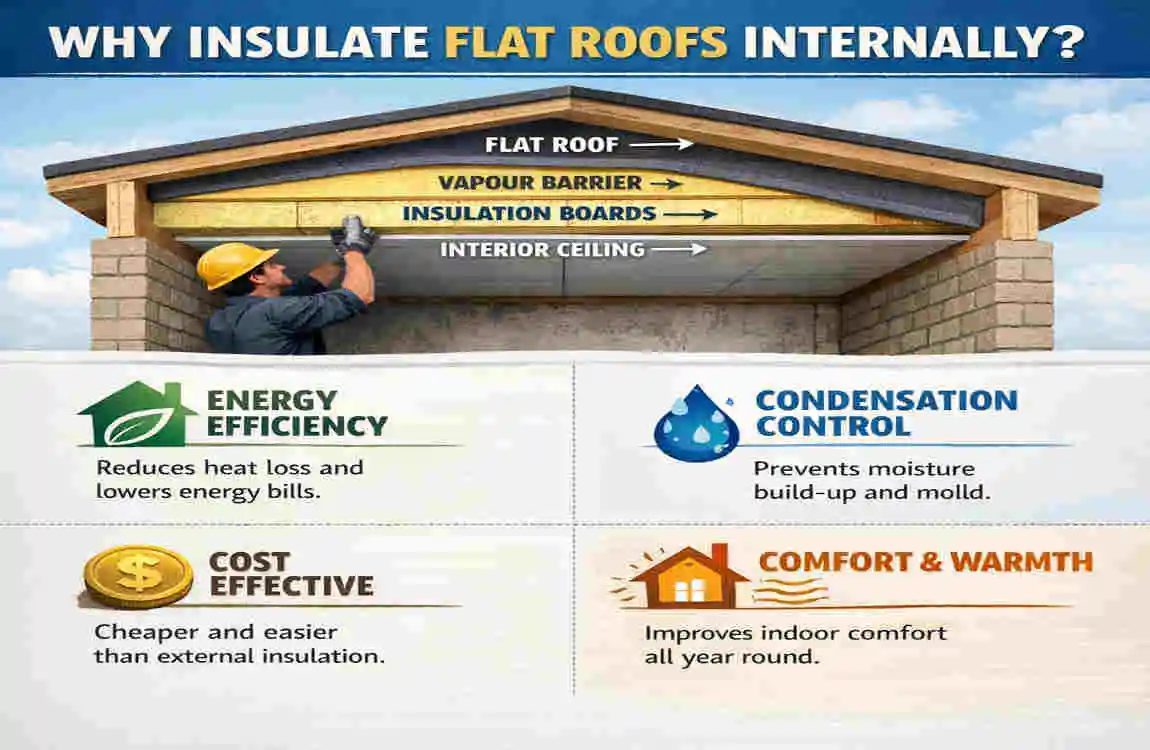
Internal insulation is the smartest way to combat this heat loss without disrupting your home’s exterior. When you insulate from the inside, you do not have to worry about replacing expensive waterproof membranes, scheduling around rainy weather, or altering the outward appearance of your home.
The benefits extend far beyond just keeping your home warm in the winter. Let’s look at the primary advantages:
- Exceptional Thermal Benefits: By adding a layer of insulation, you stabilize your indoor temperatures. This means your rooms stay cozy and warm during the winter and refreshingly cool during the scorching summer months.
- Acoustic Perks: Flat roofs can be incredibly noisy during heavy rain or hail. Dense insulation acts as a fantastic sound barrier, significantly muffling exterior noise and giving you a quieter, more peaceful living space.
- Moisture and Condensation Control: Uninsulated ceilings are prone to cold spots, which attract warm, moist indoor air. This leads to condensation, which can eventually cause mold growth and wood rot. Proper insulation, paired with a vapor barrier, stops this moisture cycle in its tracks.
Finally, the DIY appeal of internal insulation cannot be overstated. Hiring professionals to insulate a roof externally can easily cost thousands. By taking the DIY route and insulating internally, you avoid the cost of scaffolding and specialized labor. You can expect to pay around £30 to £35 per square meter for materials, making this an incredibly cost-effective weekend project.
The Triple Threat of Flat Roof Insulation Benefits
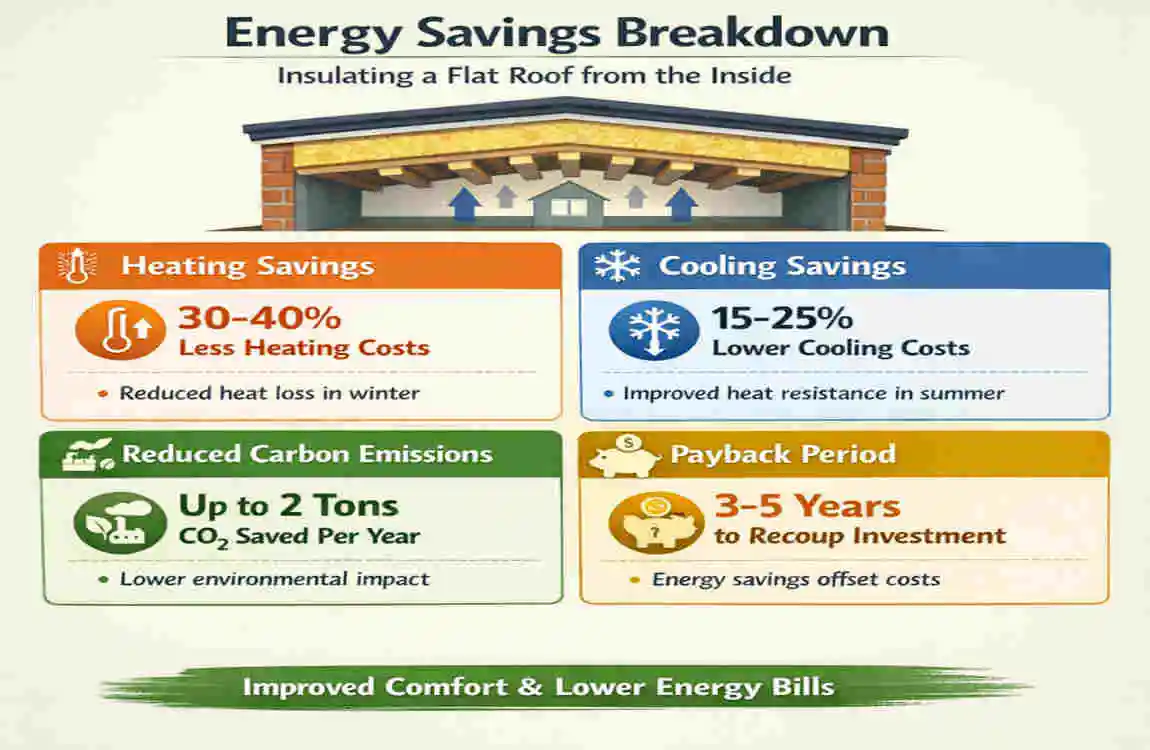
- Energy Efficiency: A properly installed thermal layer blocks up to 25% of your home’s total heat escape. This eases the burden on your HVAC system and prolongs its lifespan.
- Cost Recovery: Because the initial material costs are so low (especially when you do the labor yourself), the payback period is incredibly fast. Most homeowners recover their investment in just 2 to 3 years via immediate bill cuts.
- Eco-Impact: Using less energy doesn’t just help your wallet; it helps the planet. Insulating your flat roof can cut your household’s carbon footprint by approximately 0.6 tonnes of CO2 per year.
Best Materials for Internal Insulation
When you are learning how to insulate a flat roof from the inside, selecting the right material is half the battle. Not all insulation is created equal, and flat roofs require materials that offer high thermal resistance (R-value) without taking up too much precious vertical space.
You generally have five main options: rigid boards, mineral wool, fiberglass rolls, spray foam, and blown cellulose. Let’s break them down so you can make an informed choice for your home.
For a flat roof DIY project, we highly recommend rigid PIR (Polyisocyanurate) or polyurethane foam boards. These boards provide incredibly high R-values per inch of thickness, meaning you get maximum heat retention without having to lower your ceiling drastically. Furthermore, rigid boards are easy to cut to size and friction-fit snugly between your wooden roof joists.
Here is a detailed comparison of the most popular flat roof insulation materials:
Material R-Value (per inch)Estimated Cost (£/m²) Pros Cons
PIR Boards 6.5 25-35 Very thin, high thermal resistance, highly moisture-resistant. A rigid structure means edges need careful sealing with foam.
Mineral Wool 4.0 15-25 Completely fireproof, breathable, excellent sound dampening. Much heavier than foam, it can be itchy to handle during install.
Spray Foam 6.0-7.0 30-40 Creates an impeccable airtight seal, fills every tiny gap easily. Usually requires professional application and expensive equipment.
Fiberglass Rolls 3.5 10-20 Very cheap, lightweight, highly flexible for uneven joist spaces. Settles and compresses over time, losing thermal efficiency.
Tools and Preparation: Getting Ready for Success
Preparation is the secret ingredient to any successful DIY project. When insulating a flat roof, careful prep work prevents disastrous future issues like thermal bridging—where heat bypasses the insulation by traveling through the wooden joists themselves—and hidden moisture build-up.
Before you start ripping down drywall or purchasing materials, you need to gather the right tools and assess the workspace.
Your Essential Tool Checklist
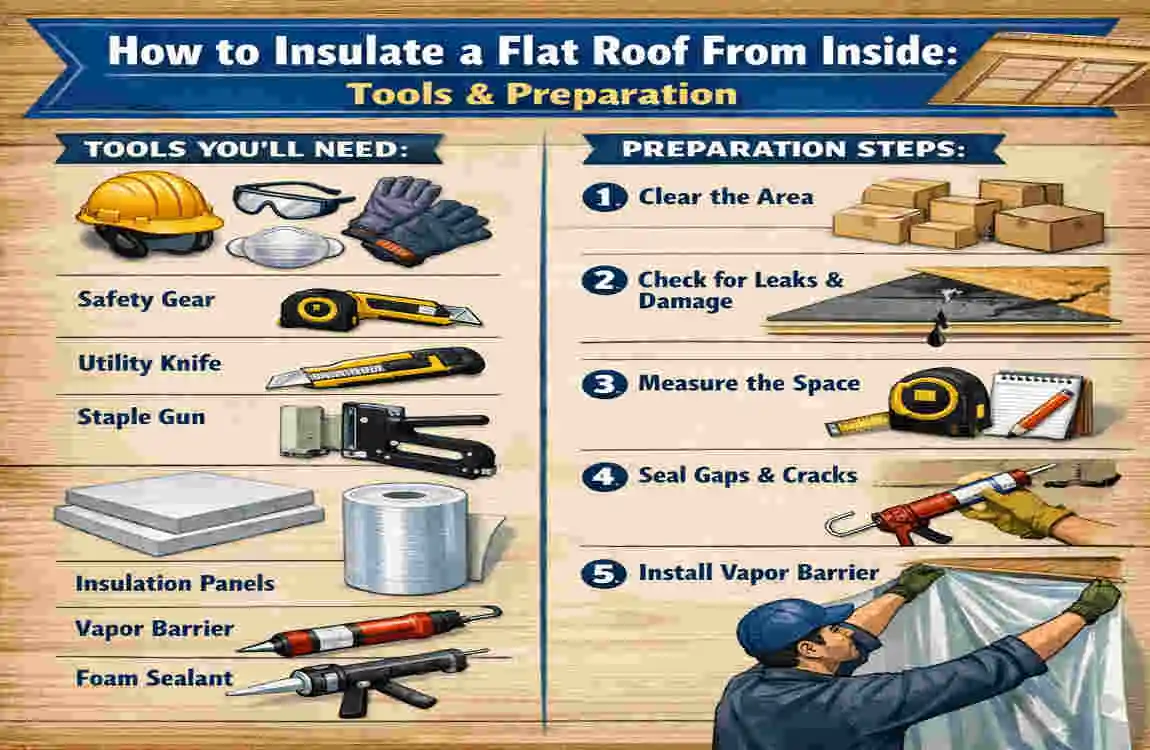
You do not need a shed full of professional power tools for this job. You can complete the entire project with these accessible essentials:
- Measuring and Cutting: A heavy-duty measuring tape, a T-square for straight lines, and a sharp utility knife or a fine-toothed hand saw (crucial for cleanly cutting rigid PIR boards).
- Sealing and Fixing: A reliable caulk gun, expanding polyurethane foam sealant, foil tape for your vapor barrier, and appropriate wood screws or adhesives/fasteners.
- Access and Safety Gear: A sturdy, secure step ladder. Never skip safety gear: You must have thick work gloves, protective safety goggles, and a high-quality dust mask or respirator (especially if working with older fiberglass or dusty environments).
Crucial Preparation Steps
- Inspect the Joists: Once your ceiling is open, take a flashlight and meticulously inspect the wooden roof joists. Look for any signs of water damage, dark stains, rot, or structural weakness. If your roof is currently leaking, stop immediately. You must fix the exterior leak before adding internal insulation, or you will trap the water inside your ceiling.
- Clear the debris: Clear out any old, decaying insulation, cobwebs, or attic debris. You need a clean, clear cavity to work within.
- Ensure Proper Ventilation: This is a vital step for the “cold loft” method. You must ensure there is a continuous 25mm (1-inch) ventilation gap above the insulation, directly under the roof deck, running from the eaves. This gap allows fresh air to flow over the insulation, carrying away any stray moisture and preventing wood rot.
- Calculate Your Area: Measure the total length and width of your room to calculate the square meters. When buying your rigid boards and vapor barrier, always add a 10% buffer to account for offcuts and mistakes.
Step-by-Step DIY Guide: How to Insulate a Flat Roof from the Inside
Now we arrive at the core of our guide. Learning how to insulate a flat roof from the inside is not inherently complicated, but it does require patience and attention to detail. This section is optimized to give you a clear, easy-to-follow roadmap.
For an average 50m² flat roof, expect to dedicate a full 1 to 2 days to complete this project from start to finish. Let’s dive into the steps.
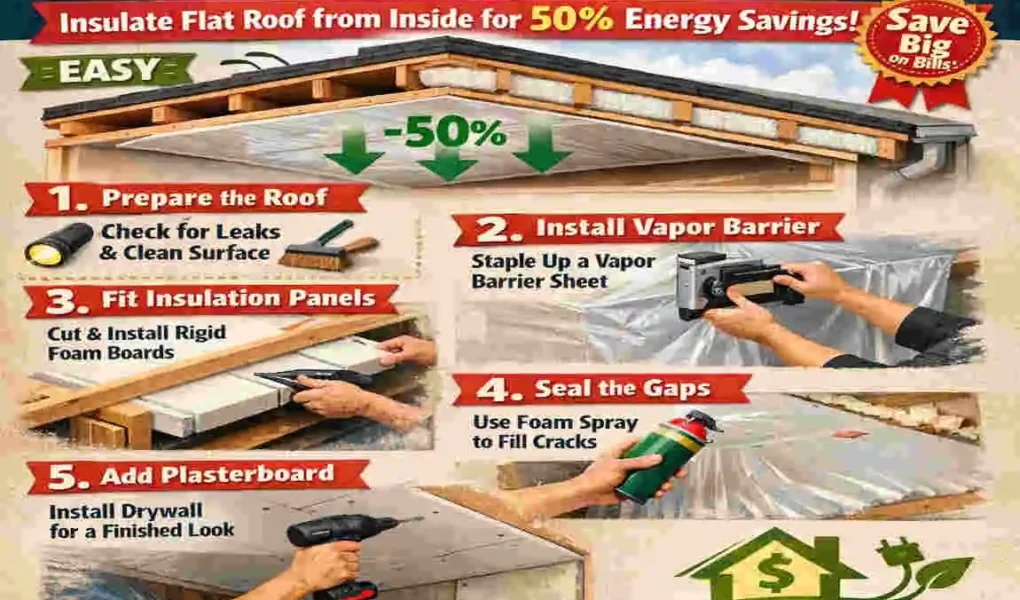
Prioritize Safety and Set Up Your Workspace
Before you even touch a piece of insulation, you need to prep your environment. Start by clearing all the furniture out of the room. Lay down thick drop cloths or plastic sheeting over the floor to catch the inevitable dust, sawdust, and debris.
Next, gear up. Put on your safety glasses to protect your eyes from falling dust, strap on your respirator mask, and wear long sleeves and gloves. Insulation can be an irritant to the skin and lungs, so full coverage is essential. Finally, set up your step ladder on a flat, even surface. Ensure your tools are organized on a nearby table so you aren’t constantly climbing up and down.
Measure Carefully and plan Your Materials
Grab your measuring tape and accurately measure the distance between your roof joists. Do not just measure one gap and assume the rest are identical; in older homes, joist spacing can vary wildly from one end of the room to the other.
Write down the measurements for every single cavity. This map will be your guide when cutting the rigid PIR boards. Remember to buy 10% extra materials when you go to the hardware store. Having an extra board on hand will save you a frustrating mid-project trip to the shop if you accidentally cut a piece too small.
install a High-Quality Vapor Barrier
A vapor barrier is a continuous sheet of impermeable plastic (usually 500-gauge polythene) that stops the warm, moisture-heavy air from your living space from rising up and hitting the cold roof deck. Without it, condensation will form, leading to mold and structural rot.
To install it, wait until your insulation is in place (as detailed in Step 4), and then unroll the polythene sheet across the underside of the joists. Use a heavy-duty staple gun to secure the plastic to the bottom of every wooden joist.
Fit the Insulation Between the Roof Joists
This is the most critical phase of understanding how to insulate a flat roof from the inside. Take your measurements from Step 2 and transfer them to your rigid PIR boards.
Using your fine-toothed hand saw or a sharp utility knife, cut the boards to size. Here is the secret to a perfect installation: Cut the boards exactly 1mm or 2mm wider than the actual gap between the joists. This allows you to push the board up into the cavity for a tight “friction fit.” The board should wedge itself between the wood and hold its own weight without falling down.
Push the board up, but stop before it touches the roof deck. You absolutely must leave a 25mm (1-inch) gap between the top of the insulation board and the wooden underside of the roof. This ventilation gap is non-negotiable for a cold flat roof design; it allows air to circulate from the eaves and prevents moisture from getting trapped.
If you have deep joists (e.g., 200mm), use two layers of 75mm board rather than one thick board. If you do this, stagger the joints between the first and second layer to prevent any straight-line heat leaks.
Add the Top Layer and Plasterboard
While insulating between the joists is great, the wooden joists themselves can act as “thermal bridges,” conducting cold air straight from the roof down into your room. To stop this, you need to add a continuous layer of insulation across the bottom of the joists.
The easiest way to do this is by using insulated plasterboard (also known as composite board or thermal board). This is a standard sheet of drywall with a layer of PIR insulation pre-bonded to the back of it.
Lift these boards into place across your ceiling, covering the joists and the vapor barrier you stapled up in Step 3. Use specialized drywall screws to secure the boards directly into the wooden joists. Make sure you stagger the joints of the plasterboard (like a brickwork pattern) to increase the structural integrity of your new ceiling.
Seal Every Single Gap and Test for Leaks
Insulation is only as effective as its weakest gap. Even a millimeter-wide crack can allow a localized draft that ruins your energy efficiency.
Take a can of expanding polyurethane foam sealant and carefully go around the perimeter of the room where the new ceiling meets the walls. Fill in the gap completely. Use the same foam to fill any accidental gaps you left between the rigid boards and the joists earlier in the process.
Once the foam has cured and hardened, take a utility knife and slice off the excess so it is perfectly flush with your ceiling. To test for air leaks on a windy day, carefully hold a lit stick of incense near the edges of the room; if the smoke blows horizontally, you have a gap that needs more sealant.
Finish the Ceiling for a Flawless Look
With your insulation perfectly fitted and sealed, all that is left is the aesthetic finish. Use fiberglass joint tape to cover the seams between your insulated plasterboards. Apply a high-quality jointing compound (mud) over the tape, feathering the edges out smoothly.
Allow the compound to dry fully, sand it down until it is seamlessly smooth, and wipe away the dust. Finally, apply a coat of drywall primer, followed by two coats of your favorite ceiling paint.
A Final Warning: Never aggressively compress insulation (like fiberglass rolls) to make it fit. Compressing it squeezes out the trapped air pockets that actually do the insulating, drastically reducing its effectiveness. Always monitor your newly insulated roof for the first few months to ensure no hidden moisture issues are developing.
Energy Savings Breakdown: The ROI of Insulating Your Flat Roof from Inside
Undertaking a DIY project of this scale requires effort, but the return on investment (ROI) is staggering. When you learn how to insulate a flat roof from the inside, you are essentially plugging a massive leak in your household budget.
By eliminating that 25% heat loss through the roof, homeowners can routinely see up to a 50% overall reduction in their monthly energy bills. Let’s put that into perspective with a real-world example.
Imagine you have a 100m² flat roof over your main living area. Uninsulated, your HVAC system has to work overtime. At current energy rates, proper internal insulation could easily save you £500 or more every single year. Because your DIY material costs were likely around £1,000 for that space, your insulation literally pays for itself in just two years. After that, the £500 annual savings are pure money back in your pocket.
The exact savings will depend on two major factors: the total R-value depth you achieved and how airtight your sealing work was.
Compare the pre- and post-insulation experience: In the winter, your heat retention skyrockets, allowing you to turn the thermostat down several degrees while feeling just as warm. In the summer, the insulation blocks the sun’s radiant heat from baking your ceiling, keeping your cooling costs low.
Beyond monthly bills, this project offers long-term financial benefits. Upgrading your insulation actively boosts your property’s overall value and improves its official Energy Performance Certificate (EPC) rating, making your home highly attractive to future buyers.
Insulation Scenario: Estimated Annual Savings, Average Payback Time
Basic Upgrade (100mm depth) 30% reduction (approx. £300) 3 years
Optimal Upgrade (250mm depth) 50% reduction (approx. £500) 2 years
Pro Tips and Common Mistakes When Insulating a Flat Roof Internally
Even with a comprehensive guide, first-time DIYers can stumble. To ensure you get the absolute best results from your flat roof insulation project, keep these pro tips in mind:
- Embrace Multi-Layer Insulation: Don’t just rely on the space between the joists. As mentioned in our step-by-step guide, combining between-joist rigid boards with a continuous under-joist insulated plasterboard is the ultimate way to defeat thermal bridging.
- Conduct Annual Checks: Make it a habit to check your roof once a year. Look for any new cracks in the ceiling plaster or signs of dampness that might indicate an exterior leak compromising your new insulation.
Common Mistakes to Avoid at All Costs:
- Skipping the Vapor Barrier: This is the most catastrophic mistake you can make. If you skip the polythene sheet, warm indoor moisture will travel through the plasterboard, hit the freezing cold roof deck, condense into liquid water, and rot your wooden joists from the inside out.
- Poor Gap Sealing: Leaving tiny gaps around the edges of your rigid boards allows cold air to bypass the insulation entirely. Always use expanding foam to seal the perimeter.
- Blocking the Ventilation Gap: Shoving insulation all the way up against the roof deck chokes the airflow. You must maintain that 25mm gap to let the roof “breathe.”
A Climate-Specific Note: If you live in an area with extreme summer heat and high humidity (such as tackling building projects in regions like Lahore or similar climates), you might want to consider using a highly breathable material like mineral wool paired with smart vapor retarders. These specialized barriers allow trapped moisture to escape during the sweltering summer months while still blocking moisture during cooler nights.
FAQs on How to Insulate a Flat Roof from the Inside
How much does it cost to insulate a flat roof from the inside? If you choose the DIY route, you can expect to pay around £30 to £35 per square meter for high-quality materials like rigid PIR boards, vapor barriers, and insulated plasterboard. This is significantly cheaper than hiring professionals, which can run into the thousands.
Is planning permission needed for this project? Generally, no. Because internal insulation does not alter the exterior appearance or height of your property, it usually falls under permitted development. However, you should always check your local building regulations, as you may need to meet specific U-value targets for energy efficiency.
What is the best insulation depth for a flat roof? To achieve the maximum 50% energy savings, you should aim for a total insulation depth of at least 250mm. This is usually achieved by placing 150mm between the joists and adding a 100mm insulated plasterboard layer beneath them.
Can I still store items in the attic space after insulating? If you have a very tall flat roof cavity with a small access hatch (a cold loft), yes, you can store items. However, you must lay a raised boarded platform over the joists. Never compress the insulation with heavy boxes, as this destroys its thermal efficiency.