Are the garage walls in your house insulated right now? It’s a question that most homeowners never think to ask until they step into their garage on a freezing winter morning or a sweltering summer afternoon. You might assume that, because the rest of your home is cosy, your garage is built to the same standard. Unfortunately, that is often not the case.
For decades, builders treated garages as simple storage units for cars and lawnmowers, not as extensions of the living space. Because of this, garage walls are often uninsulated by default, leaving a massive gap in your home’s thermal envelope. This oversight doesn’t just make your car cold; it affects your energy bills, your home’s structural health, and your overall comfort.
If you have noticed that the room above the garage is always colder than the rest of the house, or if your energy bills seem suspiciously high despite your best efforts, your garage walls might be the culprit.
Why Garage Insulation Matters
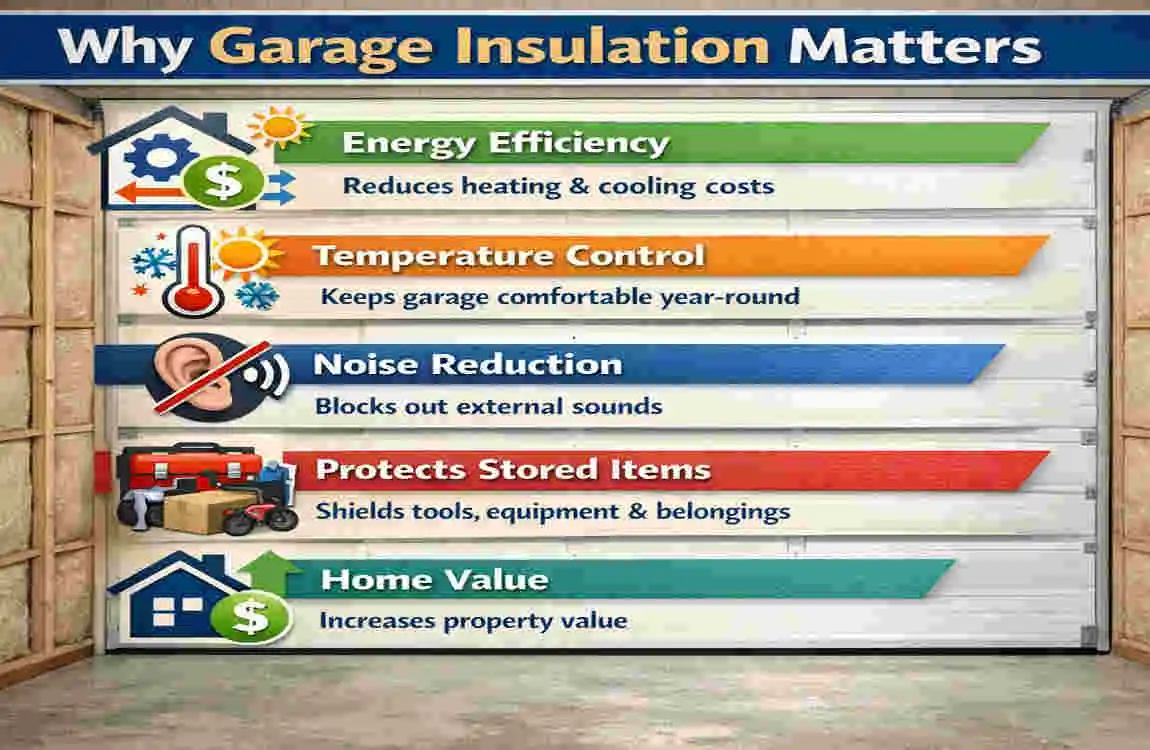
You might be thinking, “It’s just a garage. Why should I care if the walls have insulation?” It is a valid question. However, when you look at the data, an uninsulated garage acts like a massive energy leak attached to the side of your house.
The Energy Drain
The biggest issue is heat transfer. If you have an attached garage, it likely shares one or two walls with your actual living space—perhaps your kitchen or living room. It might even have a bedroom located directly above it. When the temperature in your garage drops to near freezing, it sucks the heat right out of those adjacent rooms.
Studies show that heat loss through uninsulated garage walls and ceilings can increase your winter HVAC costs by 15-20%. Your furnace has to work overtime not just to heat your house, but to battle the cold radiating from that massive, unconditioned space next door.
Summer Heat and Fumes
It isn’t just a winter problem. In the summer, an uninsulated garage can turn into an oven, with temperatures soaring well above 100 degrees. This heat radiates into your home, forcing your air conditioner to run harder.
Beyond temperature, there is the issue of indoor air quality. An insulated and air-sealed garage helps create a barrier. Without it, noise from power tools, street traffic, and—more dangerously—fumes from car exhaust, paints, or chemicals stored in the garage can easily infiltrate your living space.
Boosting Home Value
Finally, we have to talk about resale value. In today’s real estate market, buyers are savvy about energy efficiency. A fully insulated and finished garage is a major selling point. It creates potential for a home gym, a workshop, or a play area. Experts estimate that finishing and insulating a garage can boost your home value by 5-10%, offering a solid return on investment.
To visualize the difference, take a look at the comparison below:
Table: Insulated vs. Uninsulated Garage Impacts
Aspect Uninsulated Garage Insulated Garage
Energy Bills 10-15% higher annually due to heat transfer. Saves up to 15% on utilities by stabilizing temps.
Comfort Drafty, freezing in winter, oven-like in summer. Stable temperatures year-round; comfortable for hobbies.
Noise Level Echoey and loud; street noise enters the home. Quiet and dampened; blocks up to 50% of outside noise.
Home Value Lower appeal; seen strictly as car storage. Higher ROI; viewed as usable flex space.
Durability Prone to moisture, mold, and pest intrusion. Better moisture control and structural protection.
For example, if you have a standard 400 sq ft garage, insulating it could save you $200-$300 per year in energy costs, depending on your climate. Over ten years, that is money that stays in your pocket rather than going to the utility company.
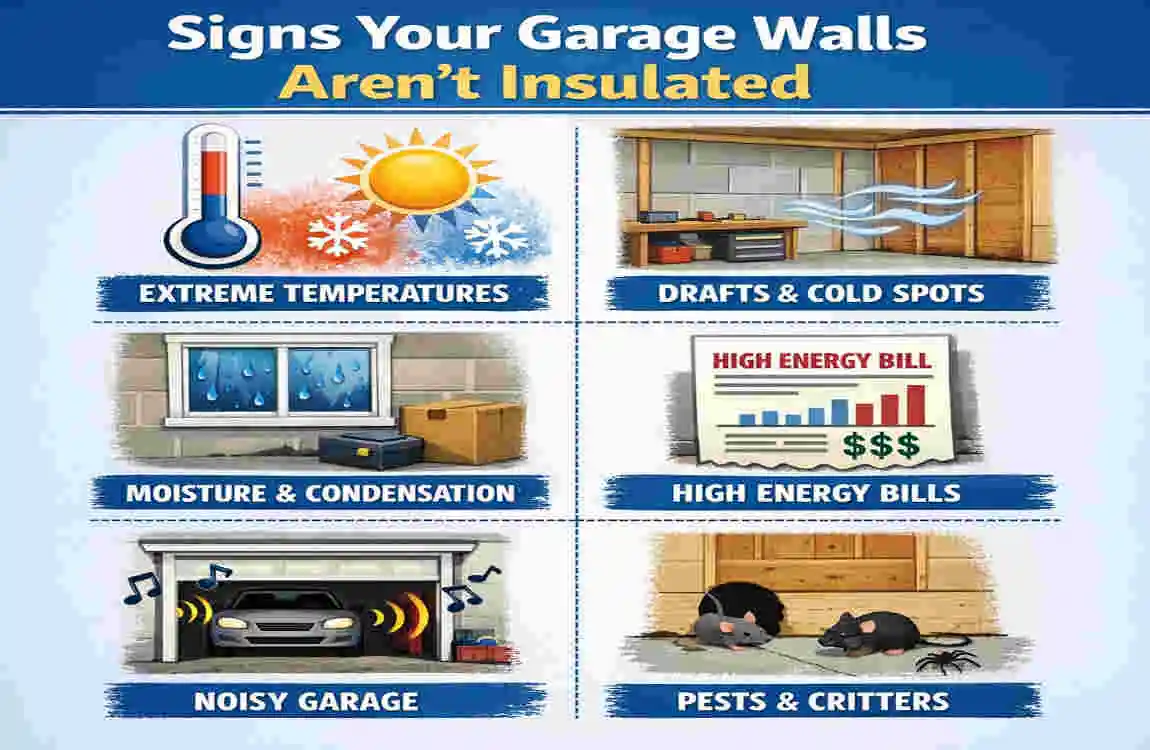
Signs Your Garage Walls Aren’t Insulated
So, how do you answer the question, “Are garage walls insulated in my home?” You don’t necessarily need to tear down the drywall to find out. There are several tell-tale signs that your garage is lacking this essential layer of protection.
The Touch Test
The simplest method is the touch test. On a very cold or very hot day, walk into your garage and place your hand flat against the drywall on a wall that is shared with the outside.
- If the wall feels cold in winter or hot in summer, there is likely no insulation behind it.
- Insulated walls tend to feel closer to room temperature because the insulation stops the outside temperature from transferring through the studs and drywall.
unexplained Utility Spikes
Have you noticed that your heating bill spikes dramatically in January, or your electric bill skyrockets in July, even though you are keeping the thermostat at a reasonable level? If your HVAC system is well-maintained and your windows are sealed, that energy loss is likely happening through the garage.
Condensation and Frost
Moisture is a huge indicator. In the winter, warm air from your car engine or your home leaks into the cold garage. When that warm air hits a cold, uninsulated wall, it condenses. You might see water droplets, dark mold spots, or even frost forming on the drywall or nail heads. This is a clear sign that the wall surface is too cold.
The Echo Chamber
Walk into your garage and clap your hands loudly.
- Does it sound hollow and echoey?
- Or is the sound dull and “dead”? Insulation acts as a sound dampener. If your garage sounds like an empty cavern, the wall cavities are likely empty as well. If the sound is absorbed quickly, you likely have some form of batting or foam inside the walls.
Visual Clues
Look closely at your walls. Are there visible gaps or cracks in the drywall? Can you see light peeking through around the garage door frame? These are signs of poor sealing, which almost always accompanies a lack of insulation.
Quick Checklist to Spot Uninsulated Walls:
- Tap on the walls: Knock on the drywall between the studs. A hollow, drum-like sound usually means no insulation. A solid “thud” suggests something is back there.
- Check adjacent rooms: Is the bedroom above the garage significantly colder than the hallway?
- Look for pink fibers: Check unfinished areas, like around the garage door tracks or up near the ceiling, for peeking fiberglass.
- Use an infrared thermometer: These affordable tools can instantly show you temperature differences. If the space between studs appears blue (cold) on the screen while the studs appear yellow/orange (thermal bridging), the cavity is empty.
- Inspect during weather extremes: The best time to check is when conditions are severe. That is when the lack of insulation becomes most obvious.
Benefits of Insulating Garage Walls
Deciding to insulate your garage is one of the smartest home improvement projects you can undertake. It goes beyond just saving a few dollars on heating; it transforms the utility of your home. Let’s break down the major benefits in detail.
Superior Energy Efficiency
This is the big one. By installing insulation with an R-value of R-13 to R-21 in your walls, you are essentially putting a thermal blanket around your home. This stops the “stack effect,” where hot air rises and sucks cold air in through the garage. It eases the burden on your furnace and AC unit, extending their lifespan and lowering your monthly operational costs.
Year-Round Usability
An uninsulated garage is a “dead zone” for half the year. It’s too cold to work in during winter and too hot in summer. Once you insulate, that space becomes usable 365 days a year.
- Home Gym: No more shivering while you lift weights.
- Workshop: Your paints and glues won’t freeze, and you can work comfortably.
- Pet Area: It becomes a safe, temperature-controlled space for pets.
- Storage: Protects sensitive items such as electronics, photos, or canned goods from temperature fluctuations.
Significant Noise Reduction
If you live on a busy street or are the one making the noise with power tools or a drum set, insulation is a game-changer. Fiberglass and cellulose are excellent at absorbing sound waves. Insulating the walls—especially the shared wall with the house—can reduce noise transfer by up to 50%. This means you can run the table saw without waking up the baby inside.
Moisture and Mold Control
Garages are notorious for moisture problems. The temperature difference between the inside and outside creates condensation, which feeds mold. Insulation, combined with a proper vapor barrier, keeps the wall surface temperature above the dew point, preventing that condensation from forming. This protects your drywall, your studs, and your health.
Health and Safety
Attached garages are a source of carbon monoxide (from cars) and volatile organic compounds (from stored chemicals). While air sealing is the primary defense here, dense-packed insulation also helps slow the migration of these dangerous fumes into your living area. It adds a layer of safety for your family.
impressive Return on Investment (ROI)
Unlike some renovations that barely pay for themselves, insulation pays you back every month via lower bills.
- Payback Period: Most homeowners see the project pay for itself in energy savings within 2 to 5 years.
- Resale: In competitive markets, energy-efficient homes sell faster. Buyers love seeing “fully insulated garage” on a listing.
Quantified Gains You Can Expect:
- 15% Lower Bills: According to EPA estimates for homes in varied climates.
- Quieter Living: A noticeable drop in street noise and garage echoes.
- Extended Appliance Life: Your refrigerator or freezer stored in the garage won’t have to work as hard, saving electricity and preventing burnout.
How to Check If Garage Walls Are Insulated
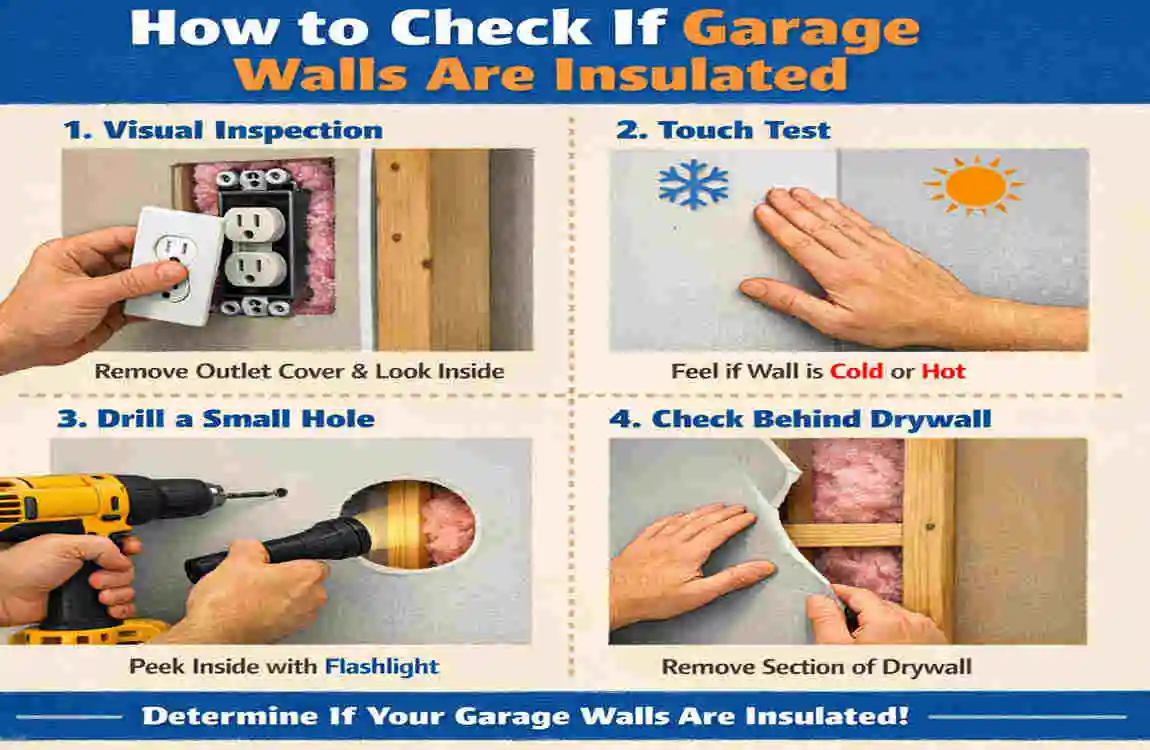
If the sensory tests we mentioned earlier left you unsure, it is time for a more technical home audit. You need to know for sure before you start buying materials. Here is a step-by-step method to answer “are garage walls insulated” definitively.
The Outlet Inspection (The Easiest Method)
This is the least invasive way to see inside your walls.
- Turn off the power to the garage outlets at your breaker box (Safety first!).
- Unscrew the faceplate of an electrical outlet or light switch located on an exterior wall.
- Shine a flashlight into the crack between the electrical box and the drywall.
- What to look for: If you see pink or yellow fluff, you have fiberglass batts. If you see white foam, you have spray foam. If you see empty darkness, you have no insulation.
The Drill Test
If you don’t have outlets on the exterior walls, you might need to drill a small hole for a probe.
- Choose a spot in an unobtrusive area (like behind a shelf or near the floor).
- Drill a small hole (about 1/4 inch) through the drywall.
- Insert a long screwdriver or a stiff wire bent into a hook shape.
- Poke around. If it feels like it is moving through cotton candy, you have insulation. If it hits the back of the exterior sheathing with no resistance, the wall is empty.
- Patch the hole with a dab of spackle.
Thermal Imaging
You don’t need to buy a $5,000 camera for this. many hardware stores (like Home Depot or Lowe’s) rent out thermal imaging cameras for a half-day.
- Turn on the camera and point it at the walls.
- Look for the “stud finder” effect. The wooden studs act as thermal bridges.
- If the space between the studs is a vastly different color than the studs themselves, it usually indicates a lack of insulation. Dark blue usually means cold (uninsulated) spots.
Professional Energy Audit
If you want a comprehensive report, hire a pro. An energy audit typically costs between $300 and $500.
- They will use blower door tests to check for air leaks.
- They use high-end infrared cameras.
- They provide a detailed report on exactly where you are losing money and how much it will cost to fix it.
Insulation Types for Garage Walls
Not all insulation is created equal. The right choice depends on your budget, whether your walls are already finished (drywall is up) or open (studs are exposed), and your climate. Let’s compare the top contenders to help you decide.
Table: Garage Wall Insulation Options
TypeR-Value (per inch)Cost (per sq ft)ProsConsBest For
Fiberglass Batts R-13 to R-21 (Total) $0.50 – $1.00 Cheapest option; easy DIY project; widely available. Can be itchy; requires a separate vapor barrier; gaps allow airflow. Budget DIYers with open walls.
Spray Foam R-6 to R-7 (per inch) $1.50 – $3.00 Excellent air seal; blocks moisture; high R-value per inch. Expensive, requires professional installation, and messy. Attached garages needing max efficiency.
Rigid Foam Board R-5 (per inch) $0.80 – $1.50 Moisture-resistant; great for thin walls; high durability. Must be cut to fit; joints must be taped/sealed—damp climates or masonry walls.
Blown-in Cellulose R-3.5 (per inch) $1.00 – $2.00 Eco-friendly (recycled paper); fills odd shapes well. Can settle over time; holds moisture if not sealed properly—retrofits (walls with drywall already up).
Fiberglass Batts
This is the standard “pink stuff.” It comes in rolls pre-cut to fit standard stud spacing (16 or 24 inches on center). It is the most common choice for a reason: it is affordable and easy to handle. However, if you don’t cut it perfectly around outlets and pipes, you lose significant efficiency.
Spray Foam (Open or Closed Cell)
This is the gold standard. Spray foam expands to fill every crack and crevice, providing both insulation and air sealing in one step.
- Closed-cell foam becomes rigid, adding structural strength while completely blocking moisture.
- It is significantly more expensive but offers the best protection against fumes entering the home.
Rigid Foam Boards
These are stiff panels of Styrofoam (polystyrene or polyisocyanurate). They provide a continuous layer of insulation and are fantastic for blocking thermal bridging. They are often used on the outside of the garage under siding, but can be cut to fit between studs.
Blown-in Cellulose
If your garage is already finished with drywall, you don’t want to tear it all down. Blown-in cellulose is the solution. A contractor drills small holes at the top of the wall and pumps in treated paper insulation. It fills the cavity like popcorn, packing it tight. It is a fantastic, non-invasive retrofit option.
Recommendation: For most 2×4 walls, aim for a minimum of R-13. If you have 2×6 walls, go for R-19 or R-21.
DIY vs. Professional Insulation Guide
Should you tackle this messy job yourself or pay someone to do it? It depends on the job’s complexity and your comfort level with home improvement.
The DIY Route (Best for Fiberglass Batts)
If your garage walls are open (no drywall) and you are on a budget, this is a very manageable weekend project.
Basic DIY Steps:
- Prep the Space: Clear the walls. Use caulk or spray foam (in a can) to seal small gaps around wires, pipes, and the bottom plate of the wall. Air sealing is critical!
- Safety Gear: Wear long sleeves, gloves, goggles, and a high-quality N95 mask. Fiberglass irritates the skin and lungs.
- Measure and Cut: Measure your stud bays. Cut the batts about an inch longer than needed for a snug fit.
- Install: Press the insulation into the cavity. Do not compress it! Compression ruins the R-value. Split the batt to fit around wires, not behind or in front of them.
- Vapour Barrier: If you are using faced batts (paper on one side), staple the paper flange to the stud face. If using unfaced batts, staple a sheet of 6-mil plastic over the entire wall.
- Cost Estimate: For a standard 400 sq ft garage, DIY materials will cost between $500 and $1,000.
When to Hire a Pro
There are specific scenarios where calling an expert is the smarter move:
- Finished Walls: If drywall is already up, “drill-and-fill” cellulose requires expensive equipment that pros handle best.
- Spray Foam: The chemicals used in spray foam are temperature-sensitive and require precise mixing. DIY kits exist, but they are expensive and easy to botch.
- Large Scale: If you have high ceilings or a massive detached garage, the labor savings might not be worth the physical toll.
- Cost Estimate: Professional installation ranges from $1,500 to $4,000, depending on the insulation type and garage size.
Warning: Always be aware of electrical and plumbing hazards. Never insulate over recessed light fixtures unless they are rated “IC” (Insulation Contact), as this is a fire hazard.
Costs and ROI of Garage Wall Insulation

Let’s talk numbers. Is this investment worth it?
Cost Breakdown:
- Materials Only: $0.50 to $3.00 per square foot.
- Labor: Adds $1.00 to $2.00 per square foot.
- Total Project Cost: Expect to spend between $1,000 and $5,000 for a full professional job, or significantly less for a DIY project.
The Payoff (ROI): While the upfront cost might seem high, the savings are cumulative.
- Annual Savings: Average savings on heating and cooling bills range from $100 to $300 per year.
- Payback Time: In colder climates (like the Midwest or Northeast), the project can pay for itself in as little as 3 years. In milder climates, it might take 5-7 years.
- Value Add: Remember the home value increase? Even if you sell before you recoup the energy costs, the home’s increased appraisal value often covers the cost of the insulation immediately.
Common Mistakes to Avoid
Even well-intentioned homeowners can make mistakes that reduce the effectiveness of their insulation. Here is what to avoid:
- Skipping Air Sealing: This is the #1 error. Insulation is like a wool sweater; it keeps you warm, but not if the wind blows right through it. You must seal gaps with caulk or foam before adding insulation batts.
- Compressing the Insulation: trying to jam R-19 batts into a shallow wall cavity forces the air pockets out of the fiberglass. This drastically reduces its ability to hold heat. Always buy the right size for your studs.
- Ignoring the Garage Door: You can insulate the walls perfectly, but if you have a thin, metal garage door, it acts like a giant hole in your thermal envelope. Consider buying an insulated door kit to match your new walls.
- Poor Ventilation: While you want to seal air leaks, you don’t want to trap moisture. Ensure your garage still has adequate ventilation to prevent mould growth, especially if you park wet cars inside.
- Forgetting the Ceiling: Heat rises. If you insulate the walls but leave the garage ceiling empty, you are losing massive amounts of heat through the roof.
Frequently Asked Questions (FAQ)
1. Are garage walls insulated in new construction homes? Surprisingly, often not. Building codes vary by region. While the wall shared with the house must be insulated for fire and fumes, the exterior walls of the garage are frequently left uninsulated by builders to save costs, unless the homeowner specifically requests it or it is a “living space” ready home.
2. Do I need to insulate garage walls if it is detached? It is less critical for your home’s energy bills since it doesn’t share a wall, but it is still highly recommended if you plan to use the garage for anything other than parking. If you want to store tools, paint, or use it as a shop, insulation is necessary to control moisture and temperature.
3. What is the absolute best insulation for garage walls? If budget is no object, Closed-Cell Spray Foam is the best. It provides the highest R-value per inch, adds structural rigidity to the walls, and creates a perfect vapor and air barrier, preventing fumes and moisture from entering your home.
4. How much does it cost to insulate garage walls professionally? You can expect to pay between $1.00 and $5.00 per square foot for professional installation. For a standard two-car garage, this typically ranges from $1,500 to $3,500, depending on the insulation type (batt vs foam) and local labour rates.
5. Can I insulate garage walls myself? Yes! Installing fibreglass batts or rigid foam boards is a very common DIY project that requires only basic tools (a utility knife, a stapler, and safety gear). However, blown-in cellulose or spray foam is best left to professionals due to the equipment required.
6. Does garage insulation increase home value? Yes. In a market where energy efficiency is prized, a fully finished and insulated garage is a strong selling point. It signals to buyers that the home has been well-maintained and offers additional “livable” square footage for hobbies or storage.