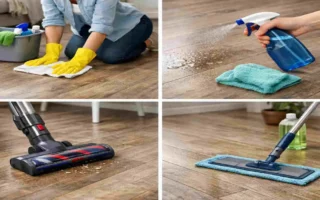
It’s a Tuesday night, you are cooking a delicious dinner, and suddenly—CRASH! A heavy cast-iron pot slips from your grip and hits the kitchen floor. You wince, look down, and see the aftermath. It isn’t just a loud noise; it is an ugly, jagged crack running right through your beautiful ceramic flooring.
We have all been there. Whether it is a dropped object, years of heavy foot traffic, or even just the house settling, damaged floor tiles are a common headache for homeowners. It ruins the aesthetic of your room and, if left alone, can lead to more serious structural issues down the road.
Many people assume that tile repair requires years of trade experience or thousands of dollars in equipment. The truth? You can fix most issues yourself with a free afternoon and a little bit of patience. By taking the DIY route, you could save 70-80% compared to hiring a professional, who usually charges $200-$500 for a small room repair.
Why Fix Damaged Floor Tiles Yourself?
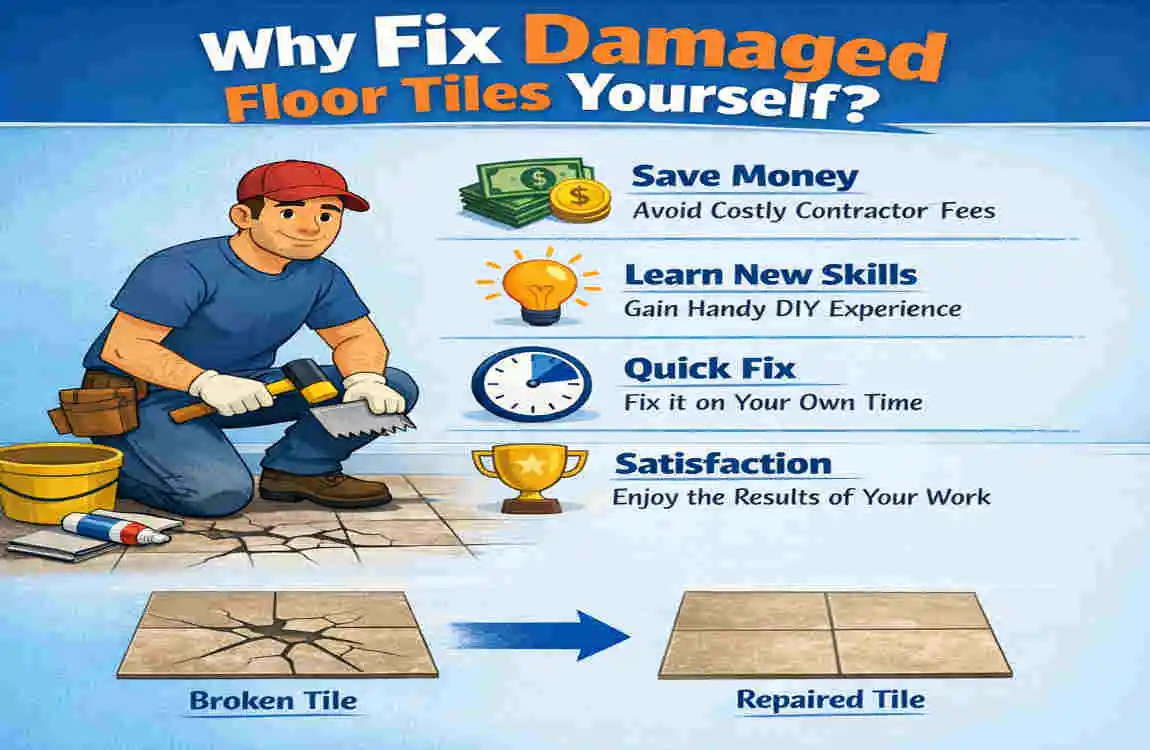
Before we pick up a hammer, let’s talk about why you should tackle this project personally. It can feel intimidating to mess with your home’s flooring, but the benefits far outweigh the fear.
Benefits of DIY Tile Repair
First and foremost, let’s talk about your wallet. Cost savings is the biggest motivator. Professional tilers often charge minimum call-out fees, meaning even replacing a single tile could cost you hundreds of dollars in labor. When you learn how to fix damaged floor tiles yourself, your only costs are the materials—which often total under $50.
Secondly, consider the time factor. Scheduling a contractor can take weeks. They have to fit you into their route, and you have to take time off work to let them in. Quick fixes are the reality of DIY tile work. Most repairs, specifically replacing a single broken tile, can be completed in just 1-2 hours of actual labor (plus drying time).
Finally, never underestimate the power of a pristine home. Fixing these small imperfections boosts home value. If you are planning to sell, buyers will notice cracked tiles immediately—it signals “deferred maintenance.” A flawless floor appeals to buyers and suggests the home has been loved and cared for.
When to DIY vs. Call a Pro
While we are big fans of the “do it yourself” spirit, knowing your limits is crucial. Not every tile disaster is a quick patch job. Use the table below to decide whether to grab your kneepads or your phone.
Issue DIY-Friendly ?Pro Needed If…
Cracked tile Yes The cracks span across multiple tiles in a straight line (could be a foundation issue).
Loose tile Yes You discover water leaking or pooling underneath the tile.
Chipped edge Yes The subfloor is rotting or the entire floor feels bouncy/unstable.
Grout crumbling Yes The tile is made of natural stone, which requires specialised cutting/polishing.
If you have assessed the situation and it appears to be a standard break, you are ready to proceed. Let’s move on to the next step: figuring out exactly what kind of damage you are dealing with so you can succeed in how to fix damaged floor tiles.
Types of Damaged Floor Tiles and How to Identify Them
Not all damage is created equal. The way you approach a hairline crack is different from how you handle a tile that is wobbling back and forth. Identifying the specific type of damage is the first critical step in your repair journey.
Common Tile Damage Types
- Cracked Tiles: This is the most common issue. These can range from tiny hairline fractures that catch dirt to full, jagged breaks caused by heavy impact. Sometimes, cracks appear due to the subfloor moving underneath (settling), which puts tension on the rigid tile until it snaps.
- Chipped Tiles: This usually happens at the corners or edges. Perhaps a chair leg dragged across it roughly, or something metal fell and pinged a piece of the ceramic off. The tile is structurally sound, but it looks terrible.
- Loose or Lifting Tiles: This is a tricky one. The tile might look fine, but when you step on it, it shifts, clicks, or feels “soft.” This happens due to grout failure or the adhesive (mortar) beneath losing its grip, often due to moisture changes.
- Stained Tiles: While less structural, a deep stain on porous tile can look like damage. Hard water or chemical spills can permanently discolor tiles. Sometimes, the fix is cleaning, but often, replacement is the only option.
Visual Inspection Guide
Before you run to the hardware store, perform a thorough inspection. Here is a simple numbered guide to checking your floors:
- Sweep and Clean the Area: You cannot see hairline cracks through dust bunnies. Give the floor a good sweep and a wipe-down.
- The “Tap Test”: This is a pro secret. Take a broom handle or a heavy coin and gently tap the tiles. A solid tile will make a sharp “ping” sound. A tile that has lost its bond with the floor will make a dull, hollow sound. If you hear that hollow thud, you have a loose tile, even if it isn’t cracked yet.
- Check Grout Lines: Inspect the grout around the damaged tile. Is the grout cracked too? If the grout is crumbling, water might have seeped underneath, which changes how you need to fix it.
Tools and Materials Needed to Fix Damaged Floor Tiles
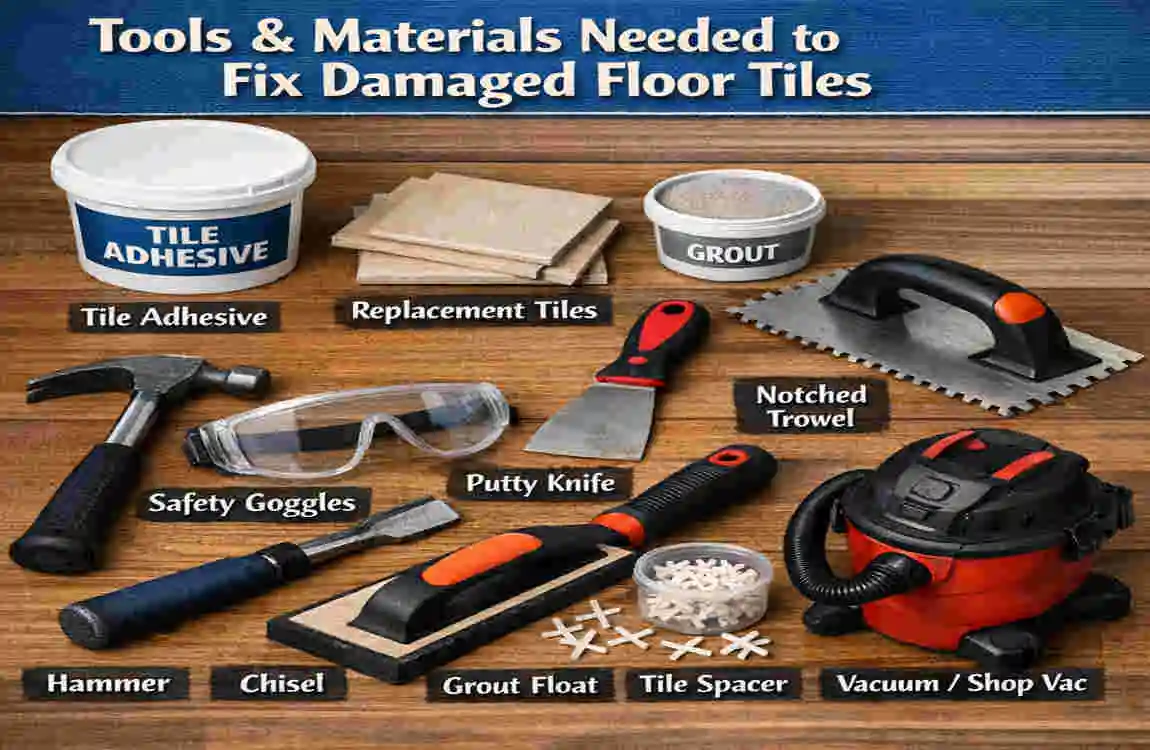
You wouldn’t try to bake a cake without flour, and you can’t fix a floor without the right gear. The good news is that learning how to fix damaged floor tiles requires tools you might already have, or can buy cheaply.
Essential Tools List
- Tile Chisel and Hammer: You need these to break up the old, damaged tile without hurting the surrounding healthy ones. A cold chisel is best.
- Grout Saw or Oscillating Tool: Remove the grout around the bad tile first. A manual grout saw costs about $10, while an electric oscillating tool is faster but pricier.
- Putty Knife or Scraper: Essential for scraping up the old, dried glue from the floor.
- Level: Ensure your new tile sits flush with its neighbours.
- Rubber Mallet: For gently tapping the new tile into place without cracking it.
- Notched Trowel: To apply the new adhesive (mortar) evenly.
- Safety Gear: Always wear safety goggles (flying ceramic shards are sharp!) and heavy work gloves.
Materials Checklist
Here is a breakdown of what you need to buy to ensure the repair lasts.
Category Items Where to Buy
Removal Thin-set mortar remover (optional, but helpful) Local Hardware Stores
Replacement Matching tiles, appropriate grout color Home Depot / Lowe’s / Floor & Decor
Adhesive Thin-set mortar (powder or pre-mixed) Home Depot / Lowe’s
Finishing Grout sealer, caulk (if near a wall/tub) Online (Amazon) or Hardware Stores
Budget Breakdown: If you already have a hammer and chisel, your total spend for adhesive, grout, and a new tile should be roughly $30-60.
Step-by-Step Guide: How to Fix Cracked or Chipped Floor Tiles
This is the main event. We are going to walk through the process of replacing a single damaged tile. Take your time, breathe, and focus on one step at a time.
Preparation
Before you start swinging that hammer, turn off the water if you are working in a bathroom or near pipes, just in case. Lay down drop cloths to protect the surrounding floor from dust and flying debris. Dust from removing tile gets everywhere, so you might want to tape plastic sheeting over the doorways.
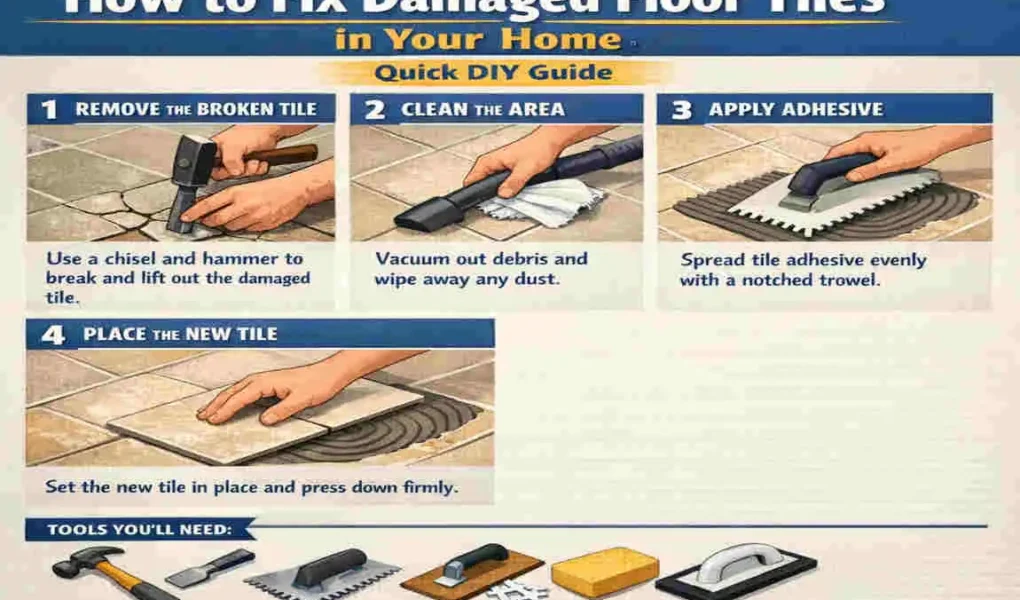
Remove the Damaged Tile
This requires finesse. You want to destroy the bad tile without chipping the good ones next to it.
- Isolate the Tile: Use a grout saw (or an oscillating tool) to scrape out the grout completely around the perimeter of the damaged tile. This “disconnects” it from the rest of the floor. If you skip this, vibrations from hammering can travel and crack the neighbor tiles.
- Break the Centre: Use a hammer and a centre punch (or just the corner of your chisel) to punch a hole right through the centre of the cracked tile. This relieves tension.
- Chisel Outwards: Place your chisel in the centre hole and tap gently, working toward the edges. Pry up the pieces carefully.
- Clean Residue: Once the ceramic is gone, vacuum up every crumb of dust.
Prepare the Subfloor
You will now see the old adhesive (mortar) stuck to the subfloor. You cannot put new tile on top of this bumpy mess.
Use your putty knife or a rigid scraper to chip away the old mortar. You need to get down to the bare concrete or backer board. The surface must be perfectly level and clean. If there is stubborn glue, a chemical adhesive remover can soften it up. Vacuum again—dust is the enemy of a good bond!
Install the New Tile
Now for the satisfying part: making it look whole again.
- Dry Fit: Place your new tile in the empty spot without glue. Does it fit? Is it too high? If it sits too high, you need to scrape away more old mortar.
- Apply Mortar: Mix a small amount of thin-set mortar. Using the notched trowel, apply mortar to the back of the tile (called “back-buttering”) or directly to the floor. “Back-buttering” is usually easier for single repairs.
- Set the Tile: Press the tile into the space.
- Level It: Use your rubber mallet to gently tap the corners and center. Use your spirit level to make sure it is perfectly flush with the surrounding tiles. If it sinks too low, pull it up and add more mortar.
Grout and Seal
Wait for the mortar to cure (usually 24 hours). If you rush this, the tile will shift.
- Mix Grout: Mix a small batch of grout that matches your floor.
- Apply Grout: Push the grout into the gaps using a rubber grout float or your finger (wearing a glove). Pack it in tight.
- Clean Up: Wait about 15–30 minutes until the grout sets slightly, then use a damp sponge to wipe away excess from the tile surface. Don’t scrub the gap, just the tile face.
- Seal: After 24 hours, apply a grout sealer to prevent stains.
How to Fix Loose or Lifting Floor Tiles
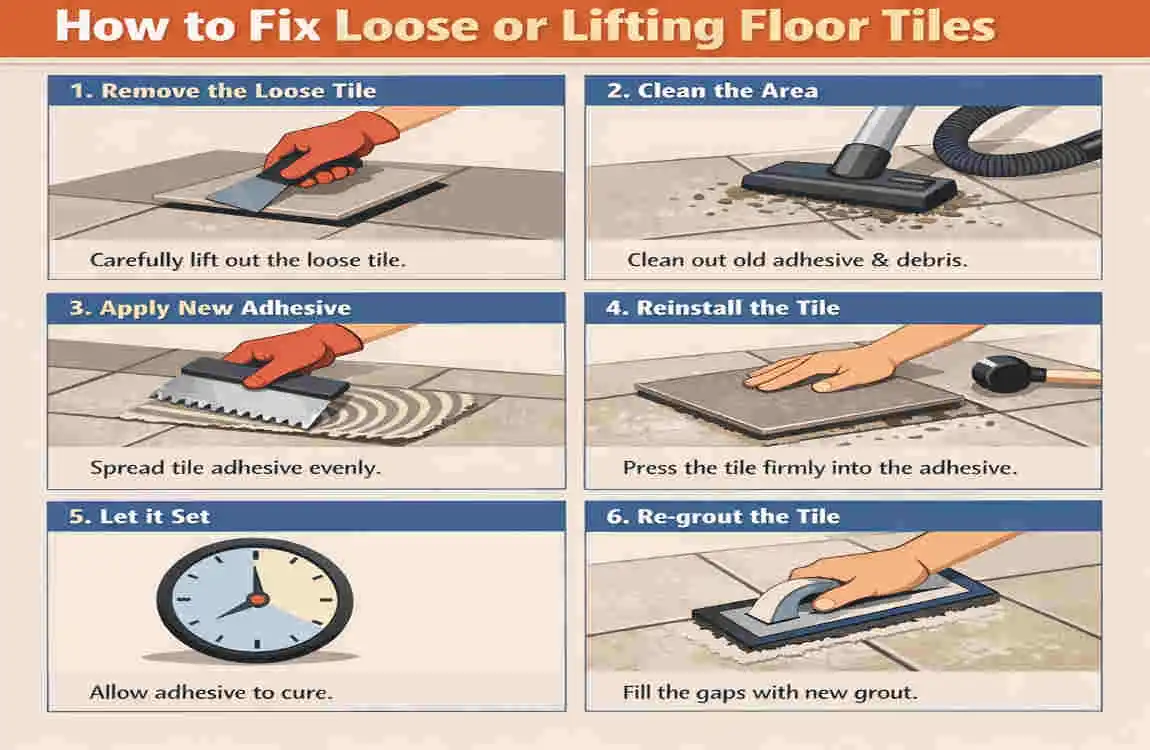
Sometimes the tile isn’t broken; it has just popped loose. This feels annoying and sounds “clicky” when you walk. The approach here is slightly different because you might be able to save the original tile.
Diagnosis First
Perform the tap test we mentioned earlier. If the tile is whole but sounds hollow, the adhesive bond has failed.
Repair Steps
- Lift the Tile: Carefully remove the grout around the tile as described above. Gently pry the tile up. Since it is already loose, it should pop up easily. Be extremely gentle so you don’t crack it.
- Clean the Cavity: This is crucial. You must scrape the back of the tile and the floor until they are smooth.
- Reapply Adhesive: Apply fresh thin-set mortar to the floor.
- Press and Weight: Press the tile back in place. Because you aren’t fighting a tight fit, it should slide right in. Place a heavy object (such as a stack of books or a bucket of water) on the tile overnight to ensure it bonds flat while drying.
Pro Tip for Moisture Issues: If you found the subfloor was damp when you lifted the tile, do not just glue it back. You need to find the leak. For high-moisture areas, use a waterproof mastic or modified thin-set specifically designed for wet environments.
LSI Keyword Integration: This is the most quick way to fix loose ceramic floor tiles without spending money on new materials.
Special Cases: How to Fix Damaged Floor Tiles in High-Traffic or Wet Areas
The kitchen and bathroom are the hardest working rooms in your house. Repairs here need to be tougher than a repair in a guest bedroom.
Kitchen and Bathroom Fixes
Water is the enemy of tile repairs. If you are fixing a tile in a shower or right next to the kitchen sink:
- Use Epoxy Grout: Standard grout is porous. Epoxy grout is waterproof and much more durable. It is harder to work with (it dries fast!), but it is worth it for wet zones.
- Waterproofing Steps: Ensure the substrate (the layer under the tile) is waterproofed. If you removed the red or orange waterproofing membrane, paint a new layer of “RedGard” or a similar liquid waterproofing before laying the tile.
Porcelain vs. Ceramic Differences
Knowing your material changes the difficulty level.
Tile Type Fix Difficulty Best Adhesive Cutting Notes
Ceramic Easy Standard Thin-set Easy to cut and snap; softer clay body.
Porcelain Medium Modified Mortar Very hard; requires a diamond blade or wet saw to cut.
Outdoor Tiles: If you are fixing patio tiles, you must use weatherproof sealers and mortar designed for freeze-thaw cycles. Indoor mortar will crack the first time the temperature drops below freezing.
Common Mistakes to Avoid When Learning How to Fix Damaged Floor Tiles
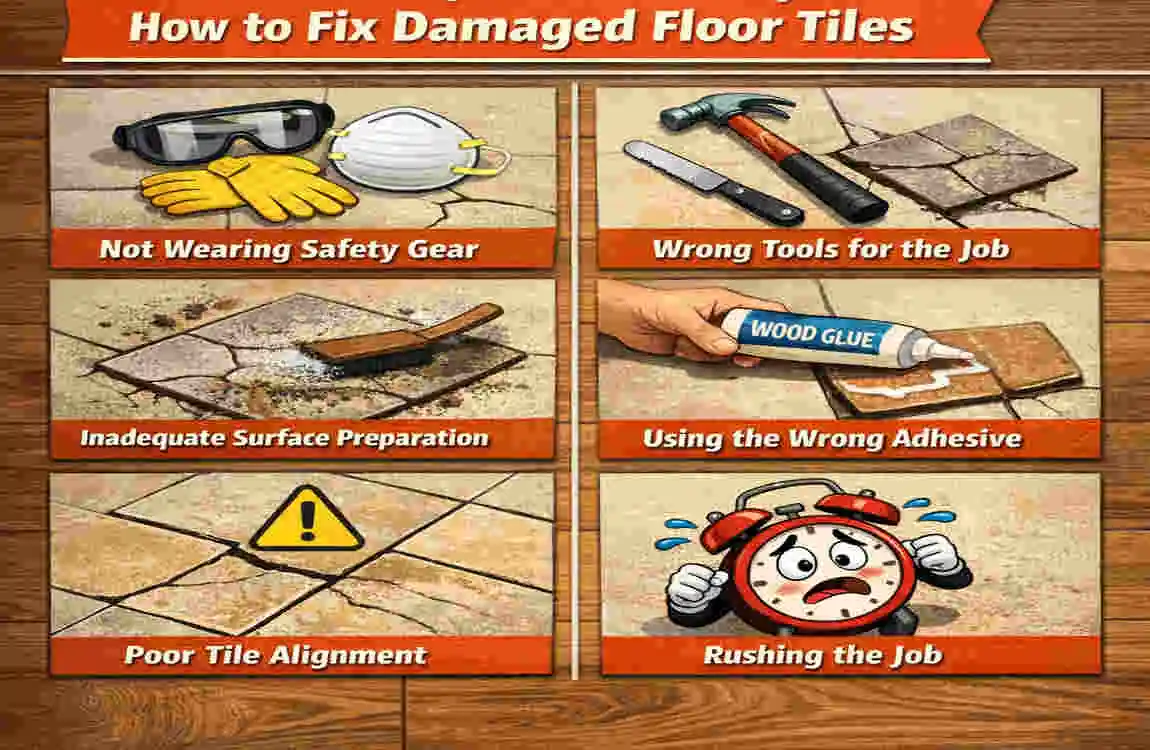
Even with the best intentions, DIY repairs can go wrong. Here are the top pitfalls to avoid so your floor looks professional.
Top 5 Pitfalls
- Rushing Grout Cleanup: If you wipe the grout too soon, you will pull it out of the cracks. If you wait too long, it hardens on the tile face and becomes a nightmare to scrape off (creating “grout haze”). Adhere strictly to the 15-30 minute window.
- Wrong Adhesive: Do not use “Liquid Nails” or construction glue for floor tiles. It creates “high spots” and the tile will eventually crack again. Always use thin-set mortar.
- Ignoring Subfloor Prep: If you leave chunks of old glue, the new tile will sit higher than its neighbors. It becomes a “toe-stubber.”
- No Color-Matching: “White” is not a single colour. There is bright white, snow white, antique white, etc. Take a shard of your old tile to the store to compare against the grout charts.
- Skipping Sealing: If you don’t seal the new grout, it will absorb dirt and turn black within a month, making your repair look obvious and dirty.
Prevention Tips: Keep Your Floor Tiles Damage-Free Long-Term
Now that you have mastered how to fix damaged floor tiles, let’s make sure you never have to do it again.
Daily Habits
- Use Mats in High-Traffic Spots: Place rugs or runners in the kitchen triangle (sink, stove, fridge) and entryways. This cushions the blow if you drop a pot and reduces wear from shoes.
- Clean Spills Immediately: Acidic spills (like tomato sauce, wine, or vinegar) can eat away at grout sealers, eventually weakening the tile’s hold.
Maintenance Schedule
- Regrout Every 5-10 Years: Grout doesn’t last forever. If you see it cracking, scrape it out and replace it before the tiles start to loosen.
- Seal Annually: Make it a habit to apply a spray-on grout sealer once a year. It takes 20 minutes and saves you hours of scrubbing later.
FAQs: How to Fix Damaged Floor Tiles
Here are quick answers to the most common questions homeowners ask about tile repair.
Q: Can I fix a single cracked tile without replacing the whole floor?A: Yes! Using the “center punch and chisel” method allows you to remove just one tile without affecting the rest of the room.
Q: How long does DIY tile repair take?A: Actual work time is about 1 to 4 hours, spread over two days (to allow the mortar to dry before grouting).
Q: What’s the best grout for beginners?A: Look for premixed sanded grout (for gaps wider than 1/8 inch) or unsanded (for tiny gaps). Premixed tubs save you the hassle of getting the water ratio right.
Q: How much does it cost to fix damaged floor tiles myself?A: Generally between $20 and $50, depending on if you need to buy tools. The tile itself is usually just a few dollars.
Q: How do I match old tiles if they are discontinued?A: Check with tile salvage yards, look online at eBay for vintage stock, or consider creating a “feature” pattern with a contrasting tile if a perfect match is impossible.