When it comes to architectural drawing or even casual sketching, one of the most common challenges is drawing a realistic window for a house. Whether you’re an aspiring architect, a design student, or simply someone who loves to draw, mastering this skill can add depth and professionalism to your work. But where do you start?
Why Learning to Draw House Windows Matters
Have you ever tried sketching a house only to realise something feels “off”? Chances are, the windows were the culprit. Windows aren’t just openings in a wall—they’re a defining feature of any architectural design. They influence the scale, light, and realism of your drawing.
For architects, designers, and hobbyists alike, knowing how to draw a window for a house is more than just a technical skill—it’s a creative tool. Whether you’re sketching a simple home or planning a grand architectural project, windows help convey personality, style, and function.
This guide simplifies the process with beginner-friendly steps, practical exercises, and tips to avoid common drawing mistakes. Let’s start by understanding the basics.
Understanding the Basic Types of House Windows
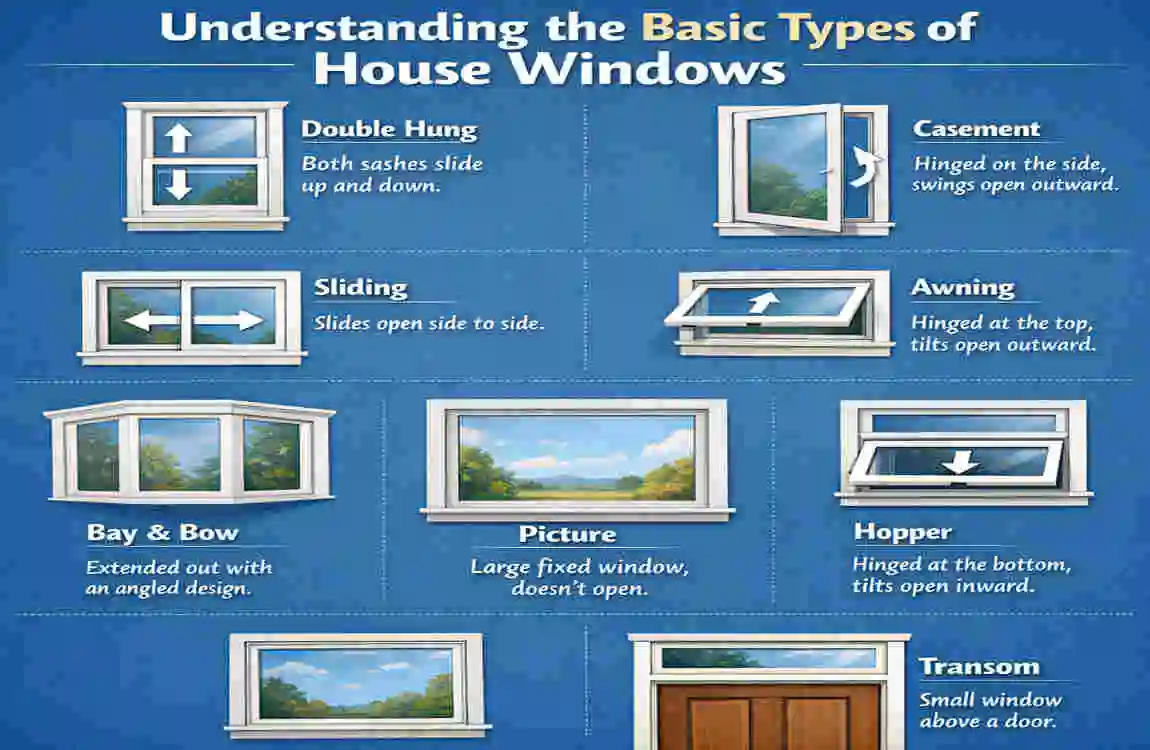
Before jumping into the drawing process, it’s important to familiarise yourself with the different types of windows. Each style brings its own challenges and opportunities for creativity. Here are the most common types of windows you’ll encounter:
Single-Pane Flat Window
This is the simplest and most beginner-friendly style. It’s a single rectangular pane of glass, often used in minimalist designs. Start with this if you’re completely new to window drawing.
Double-Hung (Sash) Window
A classic style in residential architecture, this window features two vertically sliding panes. Its symmetry makes it a great practice subject for learning proportions.
Casement Window
Casement windows are hinged on one side and open outward, like a door. They’re excellent for practising angled perspectives and depth.
Bay and Bow Windows
These windows project outward from the wall, creating a semi-circular or angular shape. They’re more advanced but add stunning depth and complexity to your sketches.
Fixed (Picture) Window
This window doesn’t open; it’s designed to frame a view. It’s perfect for learning how to draw reflections and light effects on glass.
Tools and Materials You’ll Need
You don’t need fancy tools to get started. Here’s a list of essential supplies for drawing windows:
- Pencil (HB and 2B): Use an HB pencil for rough sketches and a 2B pencil for darker, refined lines.
- Eraser: A must-have for corrections and cleaning up guidelines.
- Ruler or T-Square: For straight, precise lines.
- Tracing Paper or Lightbox: Helpful for refining your initial sketches.
- Sketchbook (Grid Paper Optional): Grid paper can help maintain proportions.
- Digital Tools (Optional): Programs like Procreate or Adobe Illustrator are great for digital sketches.
Even with just a pencil and paper, you can create stunning window drawings. Let’s move on to the actual steps.
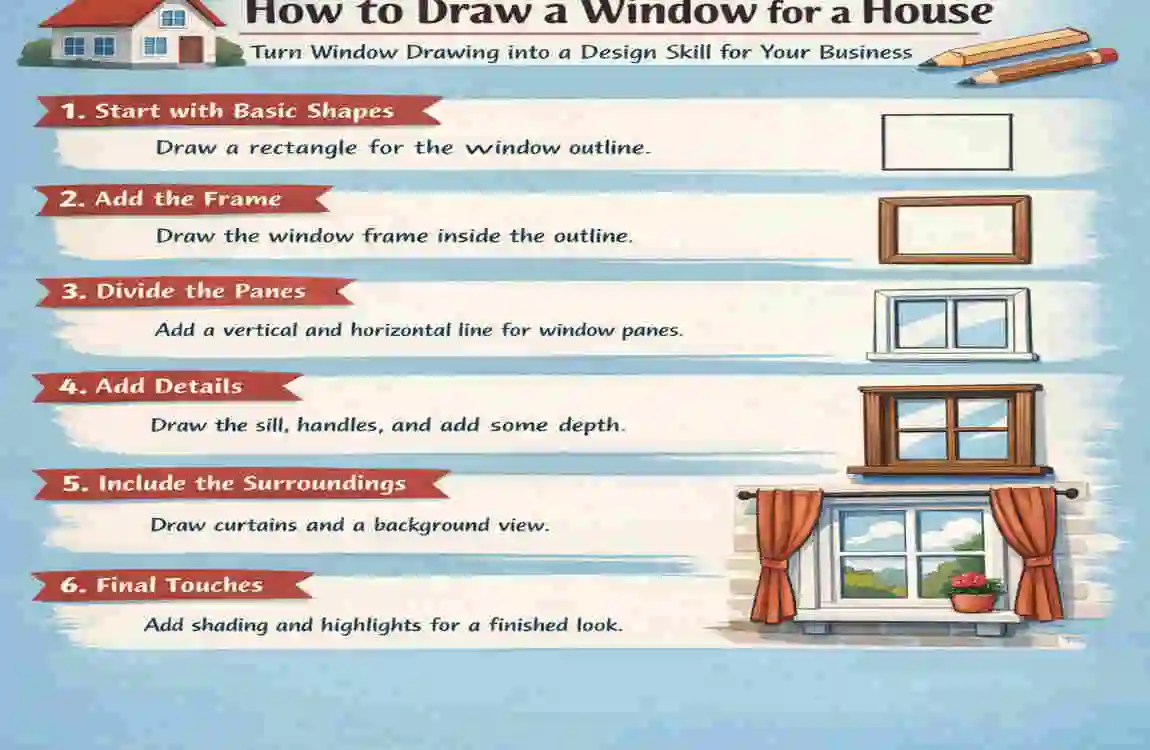
Start with the Wall and Window Opening
Every window starts with a wall. This step forms the foundation of your drawing.
- Draw a Rectangle for the Wall: Begin by sketching a simple rectangle to represent a section of the house wall. Keep the lines light so you can erase them later.
- Mark the Window Opening: Inside the wall, draw another rectangle to indicate the window’s height and width. Use a ruler to ensure straight lines.
- Focus on Proportion: Make sure the window’s size is proportional to the wall. For example, a window that’s too small or too large will throw off the balance of your drawing.
- Spacing Matters: Pay attention to the distance between the window and other elements, like the roof or adjacent windows.
Draw the Basic Window Frame
Once you’ve outlined the window opening, it’s time to add the frame. This step is crucial for defining the window’s structure.
Creating a Simple 2×2 Grid Window
- Start by drawing four outer lines to form the window’s frame.
- Inside the frame, divide the space into 4 equal squares (a 2×2 grid).
- Use a ruler to ensure the grid is symmetrical. Uneven panes can make the window look unbalanced.
Adding a Centre Mullion for Sash-Style Windows
- For a sash window, draw a vertical line through the centre of the frame to divide it into two vertical panes.
- Add a horizontal mullion to divide each vertical pane into two smaller sections.
- Lightly sketch the glazing bars (thin strips that hold the glass panes in place).
Key Point: The frame and mullions should be slightly thicker than the glazing bars to add realism.
Add Depth and Perspective to the Window

A flat window can look unrealistic. Adding depth and perspective makes it more three-dimensional.
- Draw Depth Lines: From each corner of the inner frame, draw short parallel lines into the wall. Connect these lines to form the window’s recess.
- Consider Perspective: If your window is at an angle, use a vanishing point to guide the depth lines. This is especially important in one-point or two-point perspective drawings.
- Darken Inner Edges: Shade the inner edges of the recess to create contrast and make the window pop.
Detailing Sills, Trim, and Frame
Details like sills and trim give your window character and style.
Drawing a Simple Window Sill
- Add a short horizontal ledge at the bottom of the window to represent the sill.
- Draw a vertical line beneath the ledge to show its thickness.
Adding Minimal Trim for a Clean Look
- Around the outer frame, sketch simple lines to represent trim or moulding.
- Keep the trim proportional to the window’s size—too thick or too thin can look awkward.
Shading and Light to Make It Look Real
Shading can dramatically enhance your drawing by adding depth and realism.
- Decide on the Light Source: Choose the light source (e.g., the top-left corner).
- Shade the Inner Edges: Lightly shade the recessed areas of the window to show depth.
- Add Glass Reflections: Use faint diagonal lines or highlights to suggest reflections on the glass.
How to Draw a Window for a House at an Angle
Drawing angled windows involves perspective techniques.
One-Point Perspective House Window
- Start with a vanishing point on the horizon line.
- Draw the window opening so its sides converge toward the vanishing point.
Two-Point Perspective for Corner Windows
- Use two vanishing points to draw a corner wall.
- Draw windows on both walls, ensuring they align with their respective vanishing points.
Drawing Different Window Styles for Houses
Casement Window
Sketch the frame and add a slightly open pane to show its functionality.
Bay Window
Draw three connected window sections projecting outward. Add depth by sketching the angled side panes.
Arched Windows
Start with a rectangle and add a semi-circle or gentle arch on top.
Common Mistakes When Drawing House Windows
- Wrong proportions: Avoid windows that are too wide or too narrow.
- Flat appearance: Always add depth lines for realism.
- Uneven grids: Use a ruler to maintain symmetry.
Practice Exercises
- Draw five versions of the same window with different pane layouts (e.g., 2×2, 3×2, arched).
- Sketch a simple house façade and add multiple windows.
FAQs About Drawing Windows
Q: How do you draw a window for a house in one-point perspective?
Start with a vanishing point and draw the window opening so its sides converge toward it.
Q: How do you draw a window for a house with curtains?
Add a curtain rod above the frame and sketch curved lines to represent fabric folds.
| Step | What to Do | Why It Matters |
|---|---|---|
| Set the wall and opening | Lightly sketch the house wall, then mark the window opening as a smaller rectangle inside it. | Ensures correct proportion and placement on the façade. |
| Add the outer frame | Draw a clean rectangle around the opening; this becomes the window frame. | Gives the window clear boundaries and architectural feel. |
| Divide into panes | Use straight lines to create a grid (e.g., 2×2, 3×2) inside the frame. | Reflects real‑world window styles and improves realism. |
| Show depth and perspective | Add short parallel lines from the inner frame into the wall to create the reveal (depth). | Makes the window look set into the wall instead of floating. |
| Detail sills and trim | Draw a horizontal ledge (sill) and thin lines for trim around the frame. | Adds realism and style without over‑complicating the drawing. |
| Apply simple shading | Shade the inside edges of the reveal and lightly darken glazing bars; keep glass mostly light. | Creates light, depth, and realism with minimal effort. |
| Practice angles | Redraw the same window on a wall using one‑point or two‑point perspective. | Helps you master “how do you draw a window for a house” in 3D. |