There is nothing quite like the warmth and elegance that wood brings to a space. However, mixing wood and water can feel like a recipe for disaster. If you do not properly protect your surfaces, you quickly invite water damage, unsightly swelling, stubborn mold, and severe warping.
But do not let that scare you away from achieving your dream bathroom design—the secret lies entirely in creating a waterproof barrier. Sealing bathroom wood floors is absolutely essential to keeping them looking brand new for years to come.
| Aspect | Recommended Option | Notes / Why It Matters |
|---|---|---|
| Best wood type | Engineered hardwood or solid hardwood (only in low‑moisture bathrooms) | More stable than solid wood in humid areas; still needs strong sealing. |
| Subfloor prep | Level, dry, clean plywood or concrete; fix leaks first | Prevents warping and hidden mold; critical before sealing. |
| Waterproof underlayment | PVC or rubberized underlayment beneath wood (if not in a wet zone) | Adds moisture barrier between slab and floorboards. |
| Floor sealer type (oil‑based) | Oil‑based polyurethane (e.g., Parquet Glazer VP500 style systems) | Deep penetration, excellent water resistance, long‑lasting but slower dry, higher VOC. |
| Floor sealer type (water‑based) | Water‑based polyurethane or acrylic sealers | Faster drying, low odor, retains natural color; good for eco‑friendly projects. |
| Advanced protection | Nano‑coatings or vitrified finishes for timber floors | Repels water, resists scratches, and prolongs life in humid bathrooms. |
| Number of coats | 2–4 coats, depending on sealer and traffic | More coats = better protection; sand lightly between coats per manufacturer. |
| Application method | Lambswool applicator or brush along the grain | Ensures even coverage and avoids bubbles or streaks. |
| Edge sealing | Extra sealant or silicone at joints, skirting, and fixtures | Prevents water from seeping under tiles or boards. |
| Perimeter sealing | Continuous bead of mould‑resistant silicone where floor meets wall and around toilet, tub, basin | Stops water from migrating behind walls or under the floor. |
| Maintenance | Re‑coat every 3–7 years; prompt mop‑ups of spills, control humidity | Preserves the waterproof layer and prevents cupping or staining. |
| Not recommended for | Solid wood in wet‑zone showers or high‑splash areas without full waterproofing system | Use stone, tile, or fully waterproof wood‑look products in direct‑wet zones. |
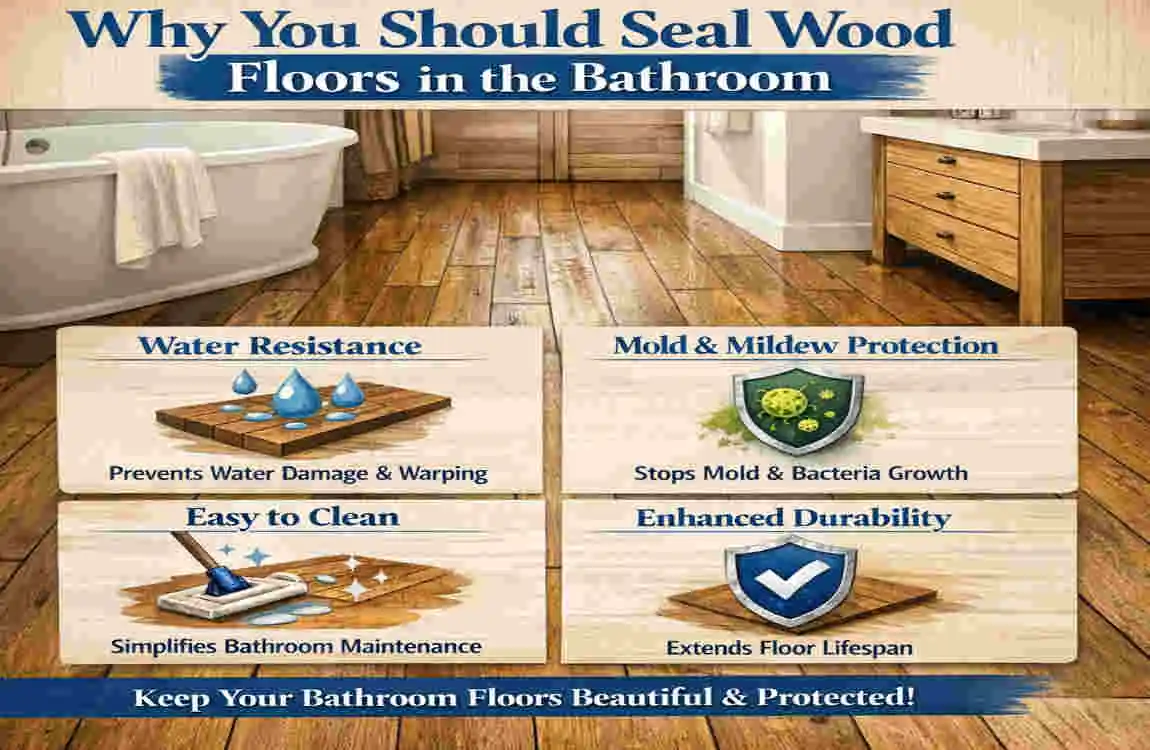
Why You Should Seal Wood Floors in the Bathroom
Bathrooms are practically war zones for natural materials. Every time you turn on the hot water, thick steam fills the room. Splashes from the sink and drips from wet towels constantly hit the floor. Worse yet, hidden leaks under the toilet or around the sink plumbing can quietly pool up over time.
If you leave wood unsealed in this harsh environment, it acts like a giant sponge. It will absorb every drop of moisture, leading to structural damage that can cost thousands of dollars to replace.
By applying a high-quality sealant, you completely change how the wood reacts to its environment. Here are the main benefits you will enjoy:
- Water resistance and reduced moisture absorption: A good seal creates a tough invisible shield. Water will bead up on the surface instead of soaking into the wood grain.
- Easier cleaning and maintenance: Dirt, grime, and spilled cosmetics wipe right off a smooth, sealed surface. You will spend much less time scrubbing.
- Longer lifespan of the floor: Protecting the wood prevents it from rotting or splintering. This ensures your investment lasts for decades instead of just a few short years.
- Better appearance and shine: Sealants enrich the natural color of the wood. They give your bathroom a fresh, polished, and high-end look.
Assessing Your Bathroom Wood Floor First
Before you rush out to buy supplies, you need to know exactly what you are working with. Take a good look at your current bathroom floor. Understanding its current condition is the very first step toward a successful project.
Start by inspecting the existing finish type. Is it a hard, glossy layer like polyurethane? Does it have a soft, matte feel like wax or oil? Knowing what is currently on your floor tells you how much sanding and stripping you need to do later.
Next, look closely for any existing damage. You want to spot issues like cupping (where the edges of the boards raise up), warping, deep cracks, or wide gaps between the planks. These physical defects must be fixed before you trap them under a fresh coat of sealant.
You also need to hunt for signs of hidden moisture. Look for dark discoloration around the tub, feel for soft or spongy spots near the toilet, and trust your nose. If you smell a musty odor, you might have trapped water under the floorboards.
Finally, you must check the overall environment of the bathroom. Make sure you have:
- Reliable ventilation and exhaust fans to pull steam out of the room quickly.
- Proper underfloor vapor barriers to block moisture from creeping up from the ground below.
- Good condition of walls and grout around your showers and baseboards to stop water from leaking down the sides of the walls.
Choosing the Right Wood Floor for Bathrooms
If you are planning a new installation or a full replacement, picking the right material is half the battle. Not all wood handles moisture the same way. The battle between solid hardwood and engineered wood really matters here.
Engineered wood is highly recommended as a better choice for bathrooms. Unlike solid hardwood, which is just one thick piece of wood, engineered wood is made of multiple layers. These layers are glued together in a crisscross pattern. This brilliant design makes engineered wood incredibly stable. It will not expand, contract, or warp nearly as much as solid wood when the humidity in the room changes.
If you absolutely must have solid wood, you need to choose incredibly dense species. Hardwoods like white oak, hard maple, and teak handle moisture much better than softwoods like pine. Teak, for example, is naturally full of oils that repel water, making it a famous choice for boats and high-end showers.
However, if you want zero stress, you should explore waterproof wood-look options. Luxury Vinyl Plank (LVP) and fully waterproof engineered hardwood give you the gorgeous aesthetic of natural wood without any of the moisture anxiety. These modern materials have completely changed the game for bathroom renovations.
Best Sealants for Bathroom Wood Floors
Here is a crucial rule to remember: not all sealants belong in a bathroom. A product that works beautifully in a dry living room might completely fail next to a steamy shower. You need something tough, flexible, and highly water-resistant. Let us break down your most common options.
Polyurethane Sealant (Oil‑Based and Water‑Based)
Polyurethane is the heavy lifter of the floor finishing world. It forms a hard, durable, plastic-like film sitting right on top of the wood. This film blocks water from ever touching the natural grain.
When shopping for polyurethane, you will face two main choices: oil-based and water-based.
- Oil-based polyurethane: This is extremely durable and offers the highest level of water resistance. However, it dries very slowly, smells quite strong, and leaves a slight amber or yellowish tint on the wood.
- Water-based polyurethane: This goes on completely clear, dries very fast, and barely smells. The trade-off is that it is slightly less abrasion-resistant, so you might need to apply an extra coat for full bathroom protection.
For bathrooms, we highly suggest using high-gloss or satin finishes. These smoother finishes have fewer microscopic ridges, giving them slightly better water-repellent properties than matte finishes.
Comparison Table: Polyurethane Options
Feature Oil-Based Polyurethane Water-Based Polyurethane
Drying Time 12 to 24 hours per coat 2 to 4 hours per coat
Odor Level Very High (Requires heavy ventilation) Low (Safe for indoor use with basic airflow)
Color Finish Dries with an amber/warm tint Dries crystal clear
Water Resistance Excellent for heavy splashes Great, but requires more coats
Oil‑Based Finishes (Tung Oil, Waterlox‑Type Sealers)
If you hate the look of a shiny, plastic-like film, penetrating oils are your best friend. Instead of sitting on top of the floor, these oils soak deeply into the wood fibers. They harden inside the wood, creating a highly water-resistant barrier that leaves a gorgeous, natural look.
Products like pure tung oil or specialized resin-oil blends (like Waterlox) are fantastic for bathrooms. Just be aware that they require patience. You need to apply multiple coats to build up enough moisture resistance. Furthermore, you will likely need to reapply these oils more frequently than you would a polyurethane finish.
Wax and Parquet Sealers
Let us keep this brief: wax is generally a terrible idea for a full bathroom floor.
While wax gives wood a classic, soft sheen, it offers very little protection against standing water. A hot puddle from the shower will easily turn a wax finish cloudy and white. Wax is strictly better for low-traffic areas like bedrooms, or used solely as a top-up protective layer over a much stronger sealer.
Water‑Repellent Impregnators (Silane/Siloxane, etc.)
These are highly scientific treatments that soak into the wood and chemically change how it reacts to water. Impregnators reduce water absorption dramatically without changing the visual look of the wood at all.
However, they do not protect against scratches or heavy foot traffic. Therefore, you should almost always combine an impregnator with a tough top-coat sealer to get full bathroom protection.
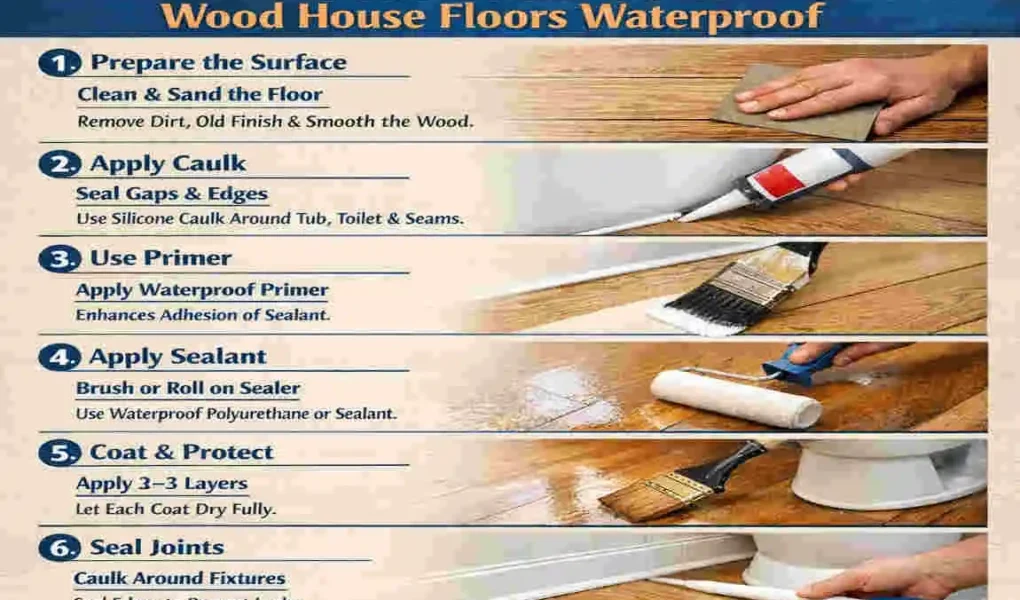
Preparing the Bathroom Floor for Sealing
If you want to know the big secret to a flawless finish, here it is: proper preparation is 70% of success when asking “how to seal wood floors in bathroom.” If you rush the prep work, your sealant will peel, bubble, and eventually fail.
Cleaning the Floor Thoroughly
You cannot seal over dirt, hair, or old soap scum. You must start with a perfectly blank canvas.
- First, completely clear the room. Remove all small furniture, bath rugs, trash cans, and accessories.
- Next, thoroughly sweep or vacuum the floor to pick up loose dust and stray hairs.
- Then, mop the floor using a mild, pH-neutral cleaner specifically made for wood. Never use harsh chemicals like bleach or ammonia, as they can damage the wood fibers.
- Finally, let the floor dry completely. Give it at least 24 hours to ensure zero moisture is left behind.
Repairing Damage and Gaps
Water loves to sneak into tiny crevices. You need to close off its hiding spots before you seal.
- Inspect the floor for any deep scratches, cracks, or gaps between the boards. Fill these spaces using a high-quality, stainable wood filler.
- If you spot any raised edges or slightly warped areas, carefully sand them down until they are flush with the rest of the floor.
- Run your hand over the repaired areas to ensure the floor is completely smooth before applying any liquid sealer.
Sanding and Removing Old Finish
If your existing finish is peeling, flaking, dull, or simply incompatible with your new sealant, you must sand the floor down to the bare wood.
- Rent a floor sander for large bathrooms, or grab a handheld orbital sander for smaller spaces. Start with medium-grit sandpaper (around 60 or 80 grit) to strip the old finish.
- Always sand in the exact direction of the wood grain. Going across the grain will leave ugly, permanent scratch marks.
- Finish with a fine-grit sandpaper (around 120 grit) to smooth everything out.
- Once done, remove every single speck of dust using a shop vacuum, followed by wiping the entire floor down with a sticky tack cloth.
Checking Moisture Levels and Environment
You cannot trap moisture inside the wood. If you do, the wood will rot from the inside out.
- If you have a moisture meter, check the floor’s moisture content. It should be below 10%.
- Wait for the perfect environmental conditions. You want low indoor humidity, excellent ventilation, and a room temperature comfortably sitting between 18–25°C (65–77°F).
- Keep your bathroom windows open or set up exhaust fans during the application and drying phases. This speeds up drying and keeps you safe from fumes.
Step‑By‑Step: How to Seal Wood Floors in Bathroom
Now comes the exciting part. You have prepped the surface, and you are ready to apply the finish. If you want to master how to seal wood floors in bathroom environments, follow this clear, numbered workflow.
Choose the Right Sealant and Finish
Before opening any cans, take a moment to match your product choice to your specific lifestyle. Consider your daily bathroom traffic, your design taste, and your maintenance preferences.
Do you have kids splashing water everywhere? You definitely want a high-quality, heavy-duty polyurethane. Do you have a guest bathroom that sees occasional use and you want a rich, matte look? A penetrating oil system is a brilliant starting point. Pick the right tool for your specific job.
Mask Off and Protect Surroundings
Sealants are extremely sticky and can easily ruin surfaces they are not supposed to touch. Take ten minutes to protect your bathroom.
- Grab a roll of high-quality painter’s tape. Carefully tape off all baseboards, the bottom of the shower curb, and your door frames.
- Cover the base of your toilet, the bottom of your vanity, and the lower sections of your walls with plastic sheeting.
- If you have floor-level outlet covers or floor vent grates, safely remove them and set them aside.
Apply the First Coat of Sealant
It is time to start sealing. Open your can of sealant, but whatever you do, do not shake it. Shaking creates hundreds of tiny air bubbles that will transfer directly onto your floor. Instead, stir the sealant slowly and gently with a wooden stick.
Dip a high-quality synthetic bristle brush, a microfiber roller, or a lamb’s wool applicator pad into the sealant. Start in the corner of the bathroom furthest away from the door. You always want to paint yourself out of the room, never into a corner.
Work in small, manageable sections. Always follow the direction of the wood grain. Apply thin, perfectly even coats. Resist the urge to slap a thick layer of liquid down; thin coats dry harder, smoother, and completely avoid messy drips or trapped bubbles.
Let the Coat Dry and Lightly Sand
Patience is your greatest tool right now. Look at the back of your sealant can and note the manufacturer’s recommended drying times. Water-based polyurethanes might be ready in a few hours, while oil-based finishes will require an overnight wait.
Once the first coat is completely dry to the touch, you need to do a “light scuff sand.” Take a piece of very fine-grit sandpaper (220-grit works beautifully) and gently run it over the entire floor.
Why do this? Light sanding knocks down any tiny dust particles that settled into the wet finish. It also creates microscopic scratches in the first coat, which dramatically improves the adhesion of the second coat. Just remember to vacuum and use a tack cloth to wipe away the new dust before moving on.
Apply Additional Coats
One coat is never enough for a damp bathroom. We strongly recommend applying at least 2 to 3 full coats for standard bathroom spaces. If you are sealing wood near a very high-moisture area like a walk-in shower entrance, consider a fourth coat.
Repeat the process of applying a thin layer, letting it dry, lightly sanding, and cleaning up the dust. Emphasize letting each coat cure fully before applying the next. If you rush this process, the layers will remain soft and gummy forever.
Final Buff and Clean Up
Once your final coat is completely dry, do not sand it! Instead, give the floor a final buff with a soft, clean microfiber cloth. This removes any lingering fuzz and brings out the beautiful, protective shine.
Carefully peel away your painter’s tape by pulling it at a sharp 45-degree angle. Clean your brushes and tools according to the product instructions. Finally, allow the floor to cure fully. Even if the floor feels dry to the touch, it takes several days for the chemicals to harden completely. Keep heavy traffic, bath mats, and water off the floor for at least 3 to 7 days.
Waterproofing Touches Around Fixtures and Joints
Here is a pro tip that many beginners miss: sealing the flat surface of the floor is not enough. In a bathroom, the edges and joints are exactly where water sneaks in and causes massive destruction.
Sealing Around the Toilet, Sink, and Shower
Water loves to run down the side of a toilet or slip under the edge of a bathtub. To stop this, you need to seal the transitions.
Once your floor is fully cured, apply a bead of high-quality, 100% silicone flexible sealant around the base of the toilet, along the shower base, and tightly around the vanity cabinet. Silicone is completely waterproof and stays rubbery. This means it can stretch and shrink as the wood naturally moves, keeping the wood-to-tile and wood-to-fixture transitions safely and properly caulked.
Managing Expansion Gaps and Baseboards
Wood is a natural material; it expands when it gets warm and humid, and shrinks when it gets cold and dry. This means you must leave a tiny gap (usually about 1/4 inch) between the wood floor and the walls. These are called expansion gaps.
Expansion gaps are completely normal and necessary, but they should be cleverly hidden under your baseboards or a piece of quarter-round molding.
Never fill these expansion gaps with rigid wood filler or hard grout. If you pack that gap with a rigid material, the wood will have nowhere to go when it expands. It will eventually buckle, crack, or push your walls outward.
Maintaining Sealed Wood Floors in Bathrooms

Learning “how to seal wood floors in bathroom” environments is only the first half of the journey. The second half is ongoing care. Proper maintenance guarantees your floor will look stunning for years to come.
Daily and Weekly Cleaning Tips
You must treat your sealed bathroom floor with a little bit of respect.
- Use a soft mop or microfiber cloth: Sweep up dust and hair a few times a week. When mopping, lightly dampen the mop. Never use a soaking wet, dripping string mop.
- Avoid soaking the floor with water: Even with a great seal, standing water is your enemy. Always use a highly absorbent bath mat right outside the shower or tub to catch drips.
- Clean up spills immediately: If you drop a wet towel, spill some mouthwash, or splash water out of the sink, wipe it up right away. Do not let puddles sit and challenge your sealant.
Long‑Term Maintenance (Re‑Sealing Periodically)
No sealant lasts forever. Friction from walking, harsh bathroom cleaners, and constant humidity will eventually wear the top layer down.
You will know it is time to re-seal your floor when the surface looks consistently dull, or more importantly, when splashed water starts to soak into the wood instead of tightly beading up on the surface.
As a general rule of thumb, you should plan on lightly sanding and applying a fresh coat of sealer every 3 to 5 years. This timeframe heavily depends on how much foot traffic the room gets and the exact product you originally used.
Common Mistakes to Avoid When Sealing Bathroom Floors
If you want to save yourself from a costly headache, take a close look at these typical errors. Avoiding these common mistakes will ensure your floor looks flawless.
Not Letting the Floor Dry Enough Before Sealing
This is the number one mistake DIYers make. If you mop the floor or fix a plumbing leak and then immediately apply a sealant, you trap water directly inside the wood. Applying sealant to a damp floor causes the finish to turn cloudy, peel right off, and eventually leads to severe wood rot. Always wait until the floor is bone dry.
Skipping Sanding or Surface Prep
We all want to save time, but skipping the prep work is a fatal flaw. If you do not sand away the old, flaking finish, your new sealant has nothing to grip onto. Skipping prep leads to incredibly poor adhesion, an uneven, bumpy finish, and peeling layers just weeks after you finish the job.
Applying Too Thick Coats
More sealant is better, right? Absolutely wrong. If you slather on thick layers of polyurethane, the top of the layer will dry quickly while the bottom stays wet. This causes nasty air bubbles, ugly runs, and gummy spots that take weeks to cure. Always stick to thin, even coats.
Using the Wrong Finish for Bathrooms
Do not try to cut corners by using cheap products. Using a wax-only finish or a low-duty interior craft sealer on a bathroom floor will result in immediate water damage. Always buy products specifically rated for heavy moisture and high traffic.
Ignoring Ventilation and Safety
Floor sealers, particularly oil-based polyurethanes, release strong chemical fumes known as VOCs. Breathing these in a tiny, enclosed bathroom is highly dangerous.
- Always wear protective chemical-resistant gloves and a respirator mask.
- Ensure good cross-ventilation by opening windows and running fans pointed outside.
- Keep your children and curious pets strictly away from the bathroom during the application and drying times.
When to Call a Professional Floor Sealing Contractor
While sealing a floor is a highly rewarding DIY project, it is not always the right path for everyone. Sometimes, you need to hand the reigns over to an expert.
Consider calling a professional contractor in a few specific situations. If you pull up old linoleum and discover extensive, bad water damage or rotting subfloors, you need an expert to fix the structural issues safely.
Likewise, if you have massive, sprawling master bathrooms with complex floor layouts, angles, and custom cabinetry, a professional can ensure the finish is perfectly smooth across the entire vast space. Multi-room projects or commercial restroom spaces also demand heavy-duty, commercial-grade equipment that the average homeowner does not own.
If you feel overwhelmed by the process, do not hesitate to contact local experts. Many flooring businesses specialize in professional sealing and comprehensive waterproofing services, guaranteeing a perfect result.
Top Products and Brands to Consider
Walking down the paint and stain aisle at your local hardware store can be dizzying. While we encourage you to research what fits your specific needs, here is a quick buyer’s guide to point you in the right direction.
High‑Durability Polyurethane Finishes
When you need maximum strength to combat heavy family use, polyurethane is king.
- Bona Mega or Bona Traffic HD: These are highly respected in the professional community. They are water-based, dry incredibly fast, and are renowned for standing up to intense wear and tear.
- Minwax Fast-Drying Polyurethane: A staple for home DIYers. Their oil-based formulas give an incredibly rich, warm tone to wood and provide an exceptionally hard, water-resistant shell.
Penetrating Oil and Water‑Resistant Sealers
If you prefer a natural, matte look that sinks deeply into the grain, look toward oil-based resins.
- Waterlox Original Resin-Modified Tung Oil: This is often considered the gold standard for areas exposed to water. Because it is a blend of tung oil and protective resins, it penetrates the wood while leaving a highly elastic, waterproof barrier that will not crack.
- Pure Tung Oil: For the absolute purist, 100% pure tung oil (mixed with a citrus solvent for better penetration) creates a lovely, eco-friendly, water-resistant barrier, though it requires patience and many coats.
FAQ Section – “How to Seal Wood Floors in Bathroom“
Do you still have a few lingering questions? Here are the most common things people ask when figuring out how to seal wood floors in bathroom spaces.
Can I use regular wood floor sealant in the bathroom?
Generally, no. Regular, standard-grade finishes designed for living rooms or bedrooms may not be moisture-resistant enough. They are built to handle dry foot traffic, not daily steam, pooling water, and high humidity. If you use a regular sealant, the protective barrier can easily break down and fail over time, letting water destroy the wood beneath.
How long does sealed wood flooring last in a bathroom?
If properly sealed and well cared for, a bathroom wood floor finish can easily last a realistic range of 3 to 8 years before needing a top-up coat. The exact lifespan highly depends on the quality of the product you used, how much foot traffic the bathroom sees, and how religious you are about wiping up spilled water.
Do I need to remove the toilet to seal the bathroom floor?
Technically, it is not always 100% necessary, but it is highly, highly recommended. Water leaks often start directly under the base of the toilet. If you do not seal the wood underneath it, you are leaving a vulnerable weak spot. Lifting the toilet off its wax ring allows you to get a full, continuous, waterproof edge seal across the entire floor.
Can I install wood floors in a bathroom that has no vapor barrier?
We do not advise doing this. Installing wood floors over a substrate with no vapor barrier is incredibly risky. Moisture can easily rise up from the ground or the room below, seeping right into the bottom of the wood planks where your top-coat sealant cannot reach. A proper vapor barrier or a specialized moisture-resistant subfloor is strongly recommended to protect your investment from below.