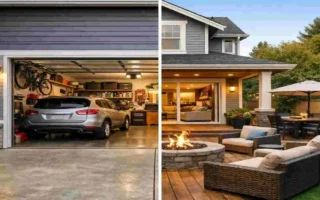
You step into your garage on a Saturday morning. Instead of being greeted by a dusty, stained grey slab that looks like it’s seen better days, you are standing on a gleaming, pristine surface that looks like a professional showroom. It feels clean, it looks expensive, and most importantly, it’s protecting your biggest investment—your home.
But right now, that is a dream. If you are like most homeowners, your garage floor is likely a magnet for trouble. Unsealed concrete is a hard sponge. It drinks up oil drips, absorbs moisture, and creates that annoying fine dust that somehow tracks its way into your living room, no matter how hard you wipe your feet. Even worse, those small hairline cracks you’re ignoring? They are letting moisture seep into your home’s foundation.
Here is the hard truth: Homeowners can spend upwards of $500 every single year on minor repairs and deep cleaning simply because their concrete floors aren’t sealed. Neglect can lead to spalling (flaking), deep cracks, and even mold, which can affect your home’s air quality.
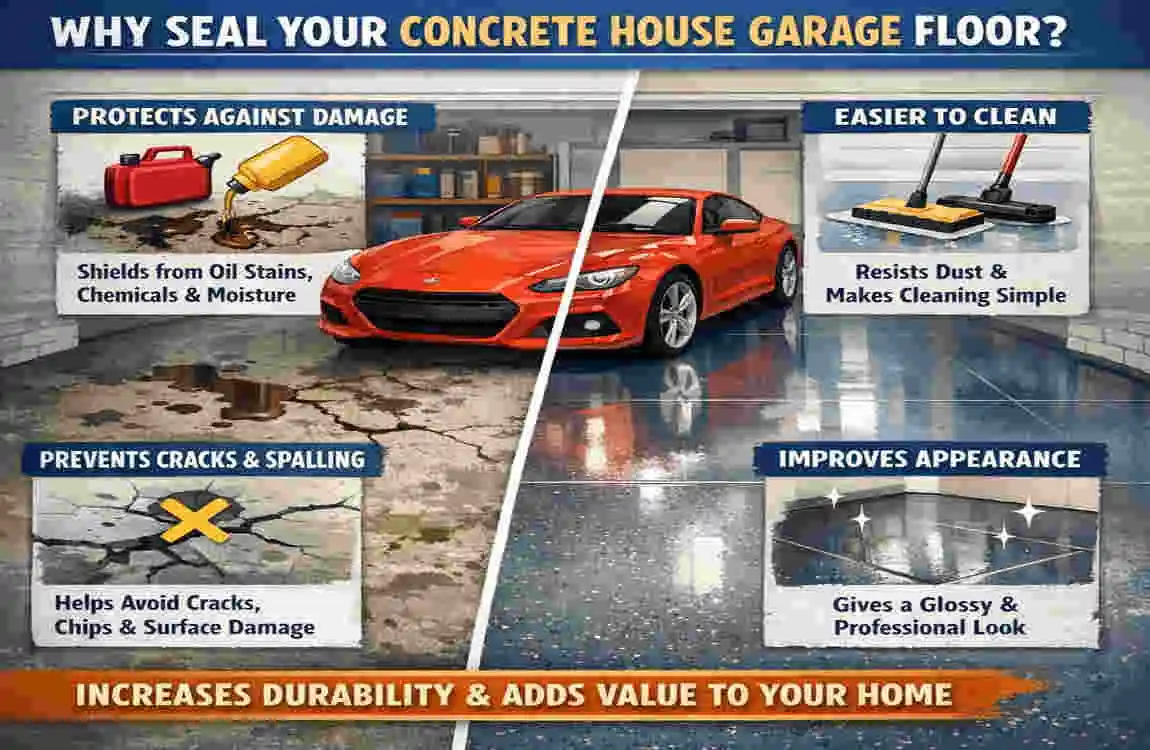
Why Seal Your Concrete House Garage Floor?
You might be asking, “Is it really worth the effort?” The short answer is: Absolutely.
Sealing your garage floor isn’t just cosmetic; it is a critical maintenance step for the longevity of your entire home. When you leave concrete “naked,” it is vulnerable to the elements, chemicals, and physical wear. Here is a deep dive into why this project is essential.
Protection Against Stains and Chemicals
We use our garages for everything—parking cars, storing lawnmowers, DIY projects, and painting. This means your floor is constantly under attack from motor oil, brake fluid, antifreeze, and even drippings from your BBQ grill.
On unsealed concrete, a single drop of oil penetrates deep into the pores immediately. Once it’s in there, it leaves a permanent, ugly stain that is nearly impossible to remove. Sealing creates a non-porous barrier. When you spill oil on a sealed floor, it beads up on the surface, making it easy to wipe away with a rag.
Preventing Moisture Damage and Mold
This is a major factor in home protection. Concrete is porous, meaning ground moisture can wick up through the slab (a process called hydrostatic pressure), or surface water from wet tires can seep down into the slab. This moisture can travel into your home’s framing or drywall if the garage is attached, leading to mold growth and rot.
By learning how to seal a concrete house garage floor, you are essentially waterproofing the base of your home. A quality sealer stops water intrusion in its tracks.
Stopping the “Concrete Dusting” Cycle
Have you ever swept your garage, only to find a layer of fine white dust settled on your car’s windshield the next day? That is called “dusting.” It occurs when the surface of unsealed concrete slowly disintegrates due to foot and vehicle traffic.
Sealing the floor locks that surface down. It eliminates concrete dust, keeping your car cleaner, your storage boxes dust-free, and you from tracking gritty particles into your house.
Extending the Lifespan
The statistics are clear: Sealed concrete floors last 2 to 3 times longer than unsealed ones. Studies show that nearly 70% of unsealed garages show significant surface damage (pitting and cracking) within just 5 years. By sealing, you are reinforcing the surface matrix, preventing it from crumbling under the weight of your vehicle or cracking during freeze-thaw cycles.
![Image Placeholder: A split image showing a stained, dirty garage floor on the left and a clean, sealed floor on the right with water beading on top.]
Tools and Materials Needed
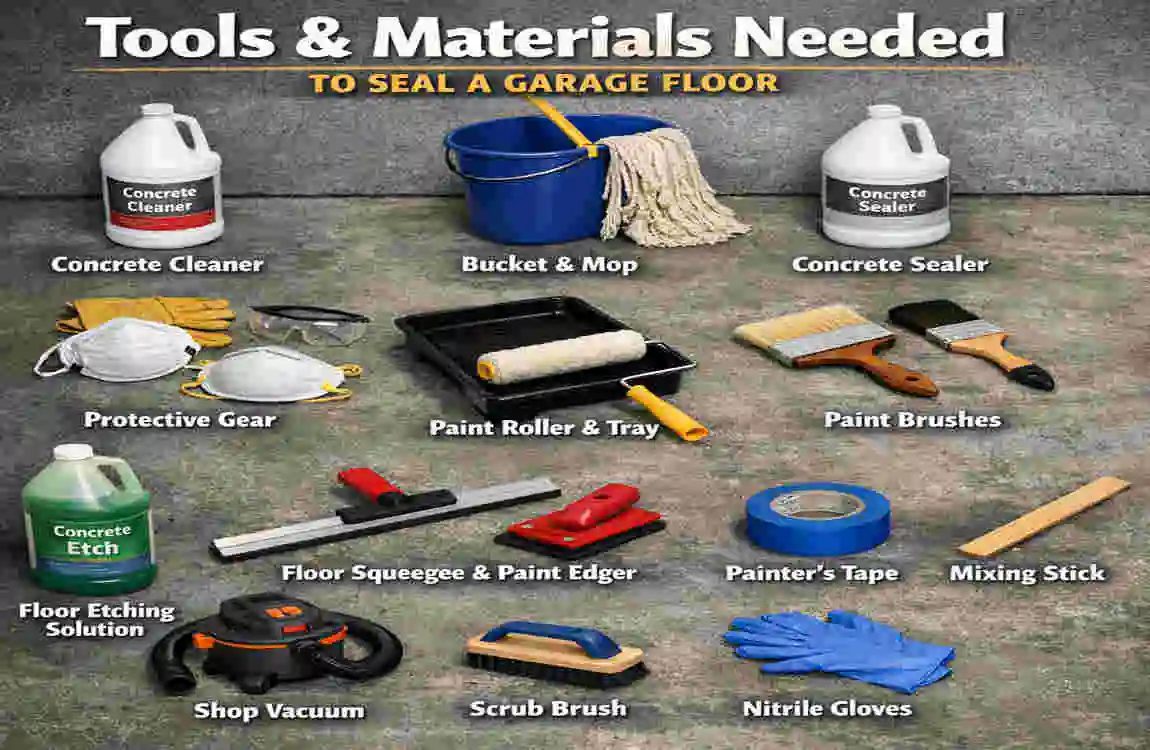
Before we dive into the “how-to,” let’s get your shopping list sorted. The beauty of this project is that you don’t need heavy machinery. Most of these tools can be found at your local hardware store or online.
The Essentials:
- Concrete Cleaner/Degreaser: You cannot seal a dirty floor. You need a heavy-duty degreaser to lift old oil stains.
- Etching Solution: This is crucial. It uses mild acid to slightly roughen the concrete surface, opening the pores so the sealer can grab hold. Think of it like sanding wood before painting.
- Crack Filler: A flexible concrete filler or polyurethane caulk to repair existing damage.
- The Sealer: Your choice of Acrylic (easy, budget-friendly), Epoxy (super durable), or Penetrating (invisible protection). For most DIYers, a water-based Acrylic or Epoxy kit is best.
- Application Tools: You will need a paint roller (3/8 inch nap is standard), a threaded extension pole, a wide paint tray, and a stiff-bristle nylon brush for cutting in the edges.
- PPE (Personal Protective Equipment): Safety first! Wear rubber gloves, safety goggles, and sturdy boots.
Cost Breakdown: Generally, you can expect to spend between $100 and $300 to seal a standard 2-car garage, depending on the quality of sealer you choose. This is a fraction of the cost of professional installation, which can run upwards of $1500.
Pro Tip: If you are a beginner, opt for a water-based sealer. They have lower fumes (low VOCs), dry faster, and cleanup is as simple as using soap and water.
Quick Reference Table: Materials & Costs
Item Purpose Approx. Cost
Etching Solution Opens concrete pores for better adhesion $20
Concrete Sealer (5-gal) The main protective barrier $50 – $100
Roller, Frame & Tray For even application of the sealer $15 – $25
Crack Filler Repairs gaps to prevent water intrusion $10 – $15
Stiff Broom For scrubbing during cleaning $10
Step-by-Step: How to Seal a Concrete House Garage Floor
Now, let’s get to work. This process is broken down into manageable chunks. Don’t rush the prep work—90% of a successful sealing job is in the preparation. If you skip cleaning, the sealer will peel, and you’ll have to do it all over again.
Prepare and Clean the Surface
This is the most labor-intensive part, but it makes or breaks the project. You need the floor to be clinically clean.
- Clear the Area: Remove everything from the garage. Sweep out all loose debris, leaves, and dust.
- Degrease Oil Spots: If you have oil stains, pour your undiluted degreaser directly on them. Scrub vigorously with a stiff brush. If the stain is stubborn, you might need a poultice or a specific oil-eating enzyme cleaner.
- Power Wash: If you have a pressure washer, use it. It blasts deep-seated dirt out of the concrete pores. If not, a garden hose with a high-pressure nozzle and a lot of scrubbing will work.
- The Acid Etch: This step is vital if your concrete feels smooth. Mix your etching solution with water (follow the instructions on the bottle) and pour it onto the wet floor. Scrub it in with a broom. You will hear it fizz—that’s the acid reacting with the concrete.
- Rinse and Dry: Thoroughly rinse the floor. You don’t want any acid residue left. Now, let it dry. Wait at least 24 to 48 hours. The concrete must be bone dry before you seal it.
The “Moisture Test”: Tape a 2×2 foot square of plastic sheeting to the floor. Leave it for 24 hours. If you see condensation under the plastic or the concrete looks dark when you peel it off, the floor is still too wet to seal.
Repair Cracks and Imperfections
Sealer is a protectant, not a filler. If you paint over a crack, the crack will eventually mirror through the sealer.
- Clean the Cracks: Use a screwdriver or a wire brush to scrape out any loose debris from inside the cracks. Vacuum them out to remove dust.
- Apply Filler: for hairline cracks, use a bottle of liquid concrete crack filler. For larger cracks (wider than a credit card), use a polyurethane caulk or a patch compound.
- Smooth it Out: Use a putty knife to smooth the filler flush with the floor surface.
- Sand: Once the filler is dry (check the package for dry times), lightly sand it to create a seamless transition with the rest of the floor.
Why this matters: Repairing cracks restores the surface’s structural integrity and prevents water from seeping beneath your new seal, which could cause it to bubble later.
Choose the Right Sealer Type
Not all sealers are created equal. Your choice depends on your goals and your climate (especially if you live in hot regions like Lahore or humid areas).
- Acrylic Sealers: These are the most common for DIYers. They are affordable, easy to apply, and UV stable (they won’t turn yellow in the sun). They come in high-gloss (wet-look) or matte finishes.
- Epoxy: This is a coating, not just a sealer. It sits atop the concrete and is extremely hard. It’s great for high-traffic garages, but it’s harder to apply.
- Penetrating Sealers (Silane/Siloxane): These soak into the concrete. They don’t change the floor’s appearance (no gloss), but they make it waterproof. Great if you want a natural look.
Decision Factor: If you want that shiny, showroom look, go with a Solvent-Based Acrylic or Epoxy. If you want protection without the shine, go with a Penetrating Sealer.
Apply the First Coat
You’ve cleaned, you’ve repaired, and you’ve bought your sealer. It’s go time.
- Plan Your Exit: Start in the back corner of the garage, furthest from the door. You do not want to paint yourself into a corner!
- Cut In: Pour some sealer into a small bucket. Use a 3-inch paintbrush to apply sealer along the edges of the wall where the roller can’t reach. Do this for the entire perimeter.
- Roll it On: Pour the sealer into your paint tray. Dip your roller (use a medium nap, around 3/8″) and apply it to the floor in a “W” pattern. Then, fill in the “W” by rolling vertically and horizontally. This ensures even coverage.
- Thin is In: Don’t puddle the sealer. A thin, even coat is better than a thick, gloppy one. If it’s too thick, it won’t cure properly and might stay tacky.
- Coverage: Typically, one gallon covers about 250-400 square feet, but check your can.
Add Second Coat and Grip
Most concrete surfaces require two coats for maximum protection. The first coat acts as a primer, penetrating the pores. The second coat builds the protective layer.
- Wait: Allow the first coat to dry. This usually takes 2 to 4 hours, depending on the humidity. It should be dry to the touch and not tacky.
- Change Direction: If you rolled the first coat North-South, roll the second coat East-West. This “cross-rolling” technique eliminates roller marks and ensures you don’t miss any spots.
- Add Grip (Important!): Sealed concrete can be incredibly slippery when wet. To prevent slips and falls, mix a non-slip additive (often called “shark grip” or anti-skid sand) into the sealer for your second coat. Just sprinkle it into the tray or bucket and stir often.
Cure and Maintain
Patience is the final step in learning how to seal a concrete house garage floor.
- Ventilate: Keep the garage door open or cracked to let fumes escape and air circulate.
- Foot Traffic: You can usually walk on the floor after 24 hours.
- Vehicle Traffic: This is the hard part. Do not drive your car onto the floor for at least 48 to 72 hours. If you drive on it too soon, your hot tires can peel the sealer right off (a phenomenon known as “hot tire pickup”).
- Maintenance: To keep it looking new, sweep it regularly and mop it with a mild soap-and-water solution occasionally. Avoid harsh ammonia-based cleaners, which can dull the shine over time.
- Re-sealing: Depending on traffic, you might need to apply a fresh maintenance coat every 2-3 years.
Common Mistakes to Avoid
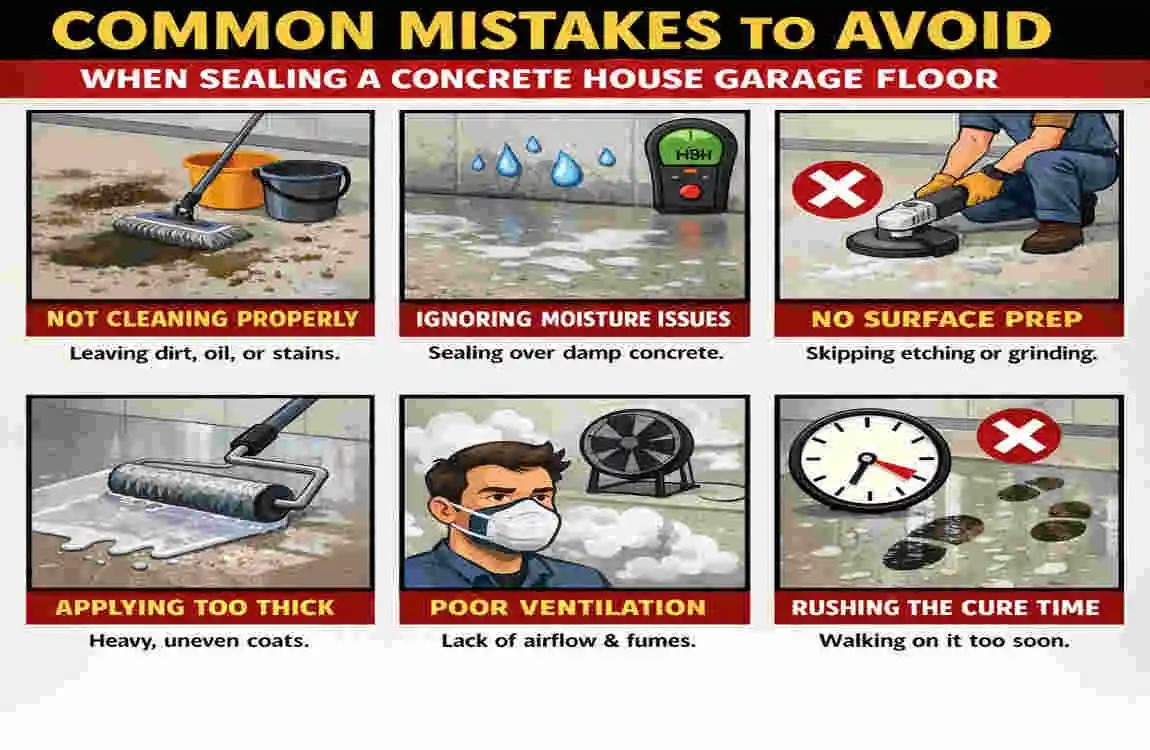
Even the handiest homeowners can slip up. Here are the pitfalls that ruin a sealing job and how to avoid them.
Skipping the Etching Step If your concrete is hard-troweled (very smooth), the sealer has nothing to grab onto. It’s like trying to put a sticker on a dusty window—it just peels off. Always etch smooth concrete. The surface should feel like 120-grit sandpaper before you seal.
Sealing Damp Concrete Moisture is the enemy. If you wash the floor and seal it 4 hours later, you are trapping water inside. This water will try to evaporate, pushing the sealer up and causing ugly white bubbles or peeling. Give it 24-48 hours to dry.
Applying Too Much More is not always better. Thick layers of acrylic sealer often dry on the surface but remain soft underneath. This leads to tracking and easy scratching. Two thin coats are infinitely superior to one thick coat.
Wrong Sealer for the Climate If you apply a solvent-based sealer in high heat or direct sunlight, it can “flash dry,” causing bubbles. If you are in a hot climate, try to seal early in the morning or later in the evening when the slab is cooler.
FAQs
Here are the most common questions people ask when taking on this project.
How long does a concrete garage floor sealer last? Generally, a high-quality acrylic sealer will last 2 to 5 years before needing a touch-up. Epoxy coatings can last 10 to 15 years if maintained well. Penetrating sealers can last up to 10 years, but don’t offer the same surface protection against oil.
Can I seal over the old sealer when sealing a concrete house garage floor? It depends. If the old sealer is the same type (e.g., acrylic over acrylic), you can usually clean and re-coat. However, you cannot put a water-based sealer over a solvent-based one, or epoxy over a sealer, without stripping the old layer first. When in doubt, perform a “Xylene test” or strip the old sealer.
What’s the best sealer for high-traffic garages? If your garage is a workshop or sees heavy vehicle traffic, Epoxy or Polyaspartic coatings are the gold standard. They are harder and more abrasion-resistant than standard acrylic sealers.
How do I remove the old sealer? If your old sealer is flaking or you want to switch types, use a chemical stripper specifically designed for concrete sealers. Apply it, let it soften the sealer, and scrape it up. Follow with a pressure wash.
Is sealing DIY worth it vs. hiring a pro? For a standard seal (acrylic or simple epoxy), DIY is absolutely worth it. You save labor costs, which are usually 70% of the total bill. However, for complex metallic epoxies or if the floor requires major structural repair, a pro might be the safer bet.