The lights are shining, the vanity looks spectacular, and the shower is pristine. But as you walk barefoot across your brand-new tiles, you feel it. One tile sits just a fraction of an inch higher than the next. A sharp edge catches your toe. Later, after a hot shower, you notice a small puddle of water pooling in the corner instead of draining properly.
These frustrating scenarios are the direct result of a poorly prepped subfloor. When you skip the critical step of creating a perfectly flat surface, your entire renovation is put at risk. Wobbly tiles, cracked grout, and dangerous water pooling are the nightmares every DIYer wants to avoid. That is exactly why understanding the proper techniques for floor leveling is non-negotiable.
This ultimate DIY guide walks you through how to level a bathroom floor before tiling, step by step, ensuring a flawless result even if you are a complete beginner. We will break down every phase of the project, from the initial assessment of your space to the final curing of the compound. You will learn the secrets the professionals use to achieve a mirror-flat surface, setting the stage for a stunning tile installation.
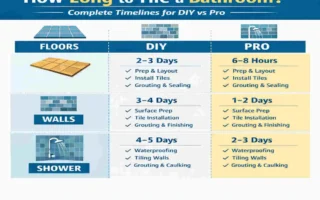
Beyond the satisfaction of a job well done, taking on this project yourself can save you a significant amount of money. Hiring a professional contractor for bathroom subfloor prep can easily cost anywhere from $500 to $2,000, depending on the size of your space and the severity of the unevenness. By rolling up your sleeves and tackling this yourself, you keep that money in your pocket to spend on higher-end tiles or luxury bathroom fixtures.
Why You Must Level Your Bathroom Floor
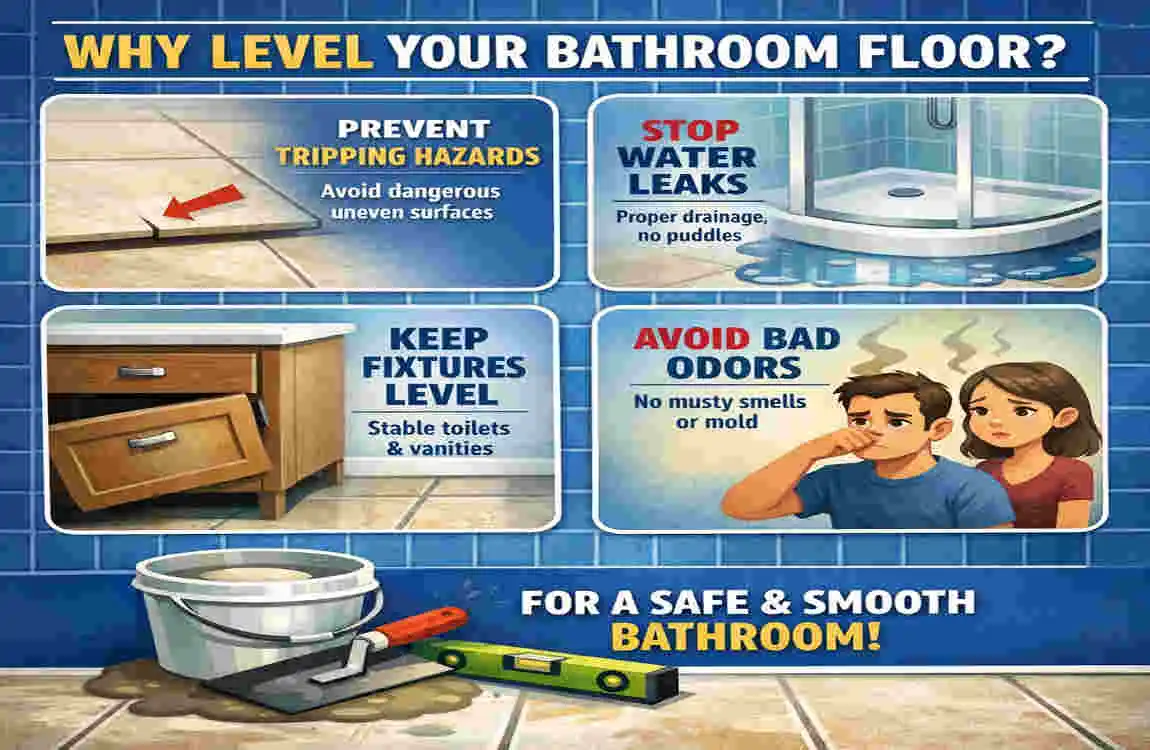
Before you rush out to buy your beautiful ceramic or porcelain tiles, you need to understand exactly what happens if you try to tile over a bumpy, sloping surface. Uneven floors cause a domino effect of expensive and annoying problems, especially in moisture-prone areas like bathrooms.
Preventing Tile Lippage and Cracking
The most immediate issue you will face on an uneven floor is called “tile lippage.” This happens when one edge of a tile is higher or lower than the adjacent tile. Not only does this look incredibly unprofessional, but it also creates a tripping hazard. If you are using large-format tiles, which are very popular in modern bathroom designs, even a slight dip in the floor will cause massive lippage.
Furthermore, tiles require a solid, uniform base of thinset mortar to support them. If there is a void or a dip underneath a tile because the floor was not leveled, that tile becomes a hollow trap. The moment someone steps heavily on that unsupported section, the tile will snap. Cracked grout lines will also appear as the tiles shift slightly under foot traffic, ruining the waterproof seal of your floor.
Avoiding Hidden Water Damage
Bathrooms are notoriously wet environments. From steamy showers to splashing children in the bathtub, water is constantly hitting your floor. If your floor slopes incorrectly or if there are dips where water can collect, you are inviting disaster.
Slopes greater than 1/8 inch per 6 feet can actually void the manufacturer’s warranties on your flooring materials. More importantly, standing water eventually finds its way through microscopic cracks in grout. Once moisture penetrates an uneven concrete floor or a wood subfloor, mold begins to grow. Over time, this hidden water damage can rot the structural joists of your home, turning a simple tile job into a massive structural repair.
Enhancing Durability and Aesthetics
Taking the time to level your floor creates a perfectly flat canvas for your thinset adhesion. When your subfloor is perfectly flat, spreading mortar becomes a breeze. Your tiles will lie flat naturally, your grout lines will be perfectly straight, and the final aesthetic will look like it belongs in a luxury hotel.
Improving safety, boosting aesthetic appeal, and maximizing tile durability are all massive benefits. Learning how to level the bathroom floor before tiling is absolutely essential for DIY success. It is the invisible foundation that guarantees your visible hard work will last a lifetime.
Essential Tools and Materials for the Job
To do this job right, you need the right gear. Attempting to level a floor with subpar tools will only lead to frustration and a sloppy finish. Before you begin the physical work, take a trip to your local hardware store and gather these essentials.
The Must-Have Tool List
Here is exactly what you will need to get the job done efficiently:
- Laser Level or a 6-Foot Straightedge: This is your diagnostic tool. It will tell you exactly where your floor rises and falls.
- Angle Grinder with a Diamond Cup Wheel: You need this aggressive grinding tool to shave down the high spots on your floor.
- Heavy-Duty Shop Vac: Grinding creates massive amounts of dust. A good vacuum is non-negotiable for cleanup and dust control.
- Self-Leveling Compound: This magic powder mixes with water to create a liquid that seeks its own level, filling in all the low spots.
- Floor Primer: This liquid ensures the self-leveling compound actually sticks to your subfloor.
- Large Mixing Bucket: You will need a heavy-duty, 5-gallon bucket to mix the compound.
- Mixing Drill and Paddle: Do not try to mix this by hand. A heavy-duty drill with a mixing paddle attachment is required to get a lump-free consistency.
- Spiked Roller and Gauge Rake: These specialty tools help you push the liquid compound around and pop any trapped air bubbles.
- Trowel: A basic flat trowel helps smooth out edges and corners where the roller cannot reach.
Your Project Budget
To help you plan, here is a general breakdown of what these materials will cost for a standard bathroom project.
ItemPurposeApprox. Cost
Self-Leveling Compound Fills low spots and dips $40 per bag
Angle Grinder + Diamond Wheel Grinds down high spots $100
Laser Level Checks flatness and mapping $30
Liquid Floor Primer Bonds compound to the subfloor $20
Spiked Roller Pops air bubbles in compound $25
Safety Gear
Do not skip your personal protective equipment. You are dealing with fine silica dust from grinding and chemical powders from the leveling compound. You absolutely must wear thick work gloves, goggles, and a high-quality dust mask or respirator.
If you are starting from scratch, your total starter kit for gathering supplies for how to level a bathroom floor before tiling should come in under $200. This is a tiny investment compared to the cost of replacing broken tiles down the road.
Preparing the Bathroom Space for Success
Preparation is the unglamorous, tedious part of the job, but it is arguably the most important. If you pour self-leveling compound onto a dirty, unprepared floor, it will fail. Period. It will crack, it will peel up, and you will have to chip it all out and start over.
Clearing Out the Room Completely
You cannot level a floor around obstacles. You must strip the bathroom down to the bare subfloor.
First, turn off the water supply to your toilet and vanity. Flush the toilet to drain the tank, disconnect the supply lines, and carefully unbolt the toilet from the floor flange. Move it completely out of the room. Next, remove your vanity cabinet. If it is glued to the wall, pry it gently to avoid drywall damage.
You must also remove all baseboards and trim touching the floor. Use a utility knife to slice the caulk line at the top of the baseboard, then gently pry it away from the wall with a pry bar. Label the back of your trim pieces with a marker so you know exactly where they go when it is time to reinstall them.
Finally, protect your adjacent rooms. Hang heavy-duty plastic sheeting over the bathroom doorway and tape it down tightly with painter’s tape. Grinding high spots creates a dust storm, and you do not want that fine powder migrating into your bedroom or hallway.
Deep Cleaning and Patching the Subfloor
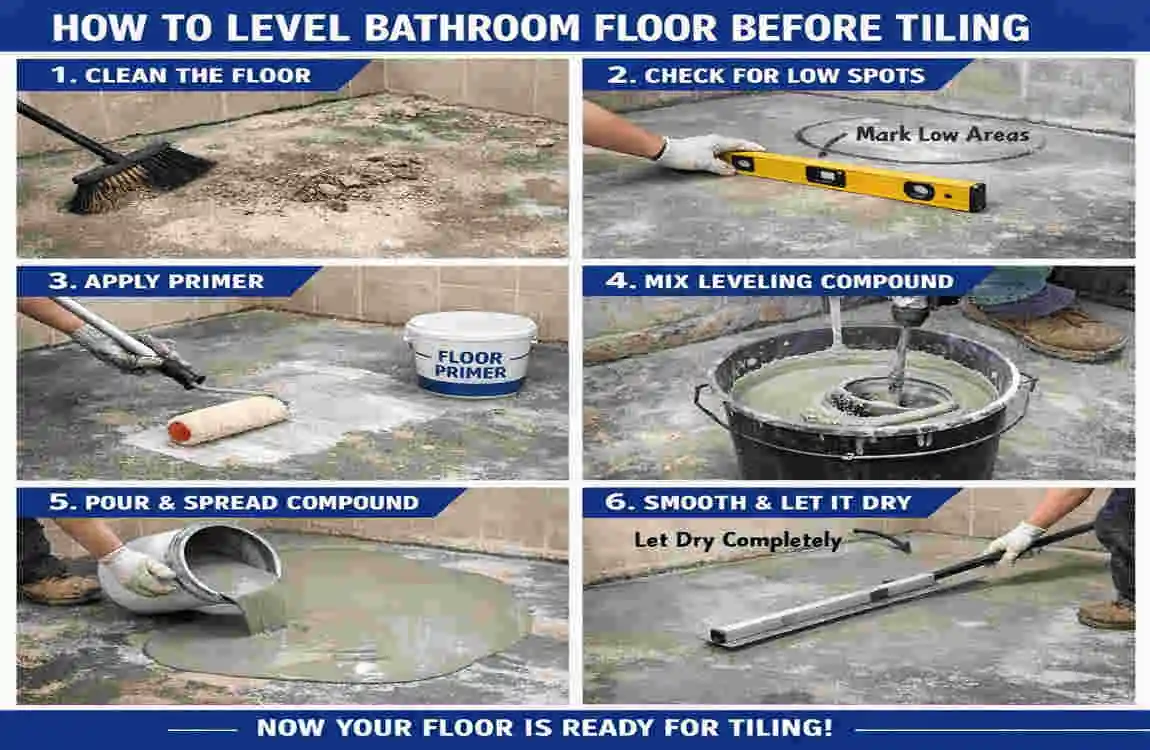
Once the room is empty, it is time to clean. Grab your shop vac and thoroughly vacuum every square inch of the room. Pay special attention to the corners and the edges where the floor meets the wall.
After vacuuming, you need to degrease the floor. Over the years, bathrooms accumulate soap scum, hairspray, and body oils. Wash the floor with a strong degreaser like TSP (Trisodium Phosphate) mixed with water. Scrub it with a stiff brush, mop it up, and rinse it with clean water. Let it dry completely.
Now, inspect the floor for cracks, holes, or gaps. Self-leveling compound has the consistency of pancake batter. If there is a hole in your floor—even a small one near a plumbing pipe—the liquid will drain right through it and ruin the ceiling in the room below. Fill all cracks and holes with a fast-setting patching mortar or a high-quality silicone caulk.
Protecting Your Plumbing and Doorways
You do not want self-leveling compound flowing into your toilet drain or out the bathroom door.
Stuff a rag tightly into the toilet waste pipe to block fumes and prevent debris from falling in. Then, wrap the pipe in duct tape. If you have floor vents for heating or cooling, block them off securely with foam weatherstripping and cardboard.
To keep the liquid compound contained inside the bathroom, build a temporary door dam. You can use a piece of scrap wood wrapped in plastic, wedged tightly across the doorway, and sealed at the bottom with caulk.
This deep preparation is a crucial step in how to level a bathroom floor before tiling, and you should dedicate at least 2 to 4 hours just to getting the room ready. Do not rush this phase.
Assessing Floor Unevenness Like a Pro
With a clean, empty room, you can finally see what you are working with. But human eyes are terrible at judging flatness. You need to objectively measure the dips and valleys of your floor so you can create a targeted plan of attack.
Using a Laser Level or Straightedge
The most accurate way to check your floor is with a laser level. Set your laser level on a tripod in the center of the room or in a corner where it has a clear line of sight across the entire space. Turn it on so it projects a perfectly level, horizontal line of red or green light across the base of your walls.
Grab a tape measure. Go to various spots around the room and measure the distance from the floor straight up to the laser line. If your floor is perfectly flat, that measurement will be exactly the same everywhere. If the measurement is smaller in one spot, that means the floor is higher there. If the measurement is larger, that indicates a low spot or a dip.
If you do not want to buy a laser level, a high-quality 6-foot aluminum straightedge or a long spirit level will work. Lay the straightedge across the floor. Get down on your hands and knees and look under it. If you see daylight shining in the middle of the metal bar, you have found a dip. If the straightedge rocks back and forth like a seesaw, it is resting on a high spot.
Your ultimate goal is to have less than 1/8 inch of variation over any 10-foot span.
Creating Your Topographic Floor Map
As you measure, do not just trust your memory. Grab a thick permanent marker and physically write on the subfloor.
Circle the high spots and write “HIGH” or draw a minus sign, indicating these areas need to be ground down. Circle the low dips and write “LOW” or draw a plus sign, indicating these areas need to be filled. Write the exact measurements (e.g., “-1/4 inch” or “+1/2 inch”) right on the floor.
You should also sketch this out on a piece of paper. Having a floor map helps you plan exactly how many bags of compound you need to mix and where you need to pour the bulk of the liquid. Figuring out how to level the bathroom floor before tiling accurately requires you to treat your bathroom floor like a topographic map. By clearly marking your elevations, you take the guesswork out of the next steps.
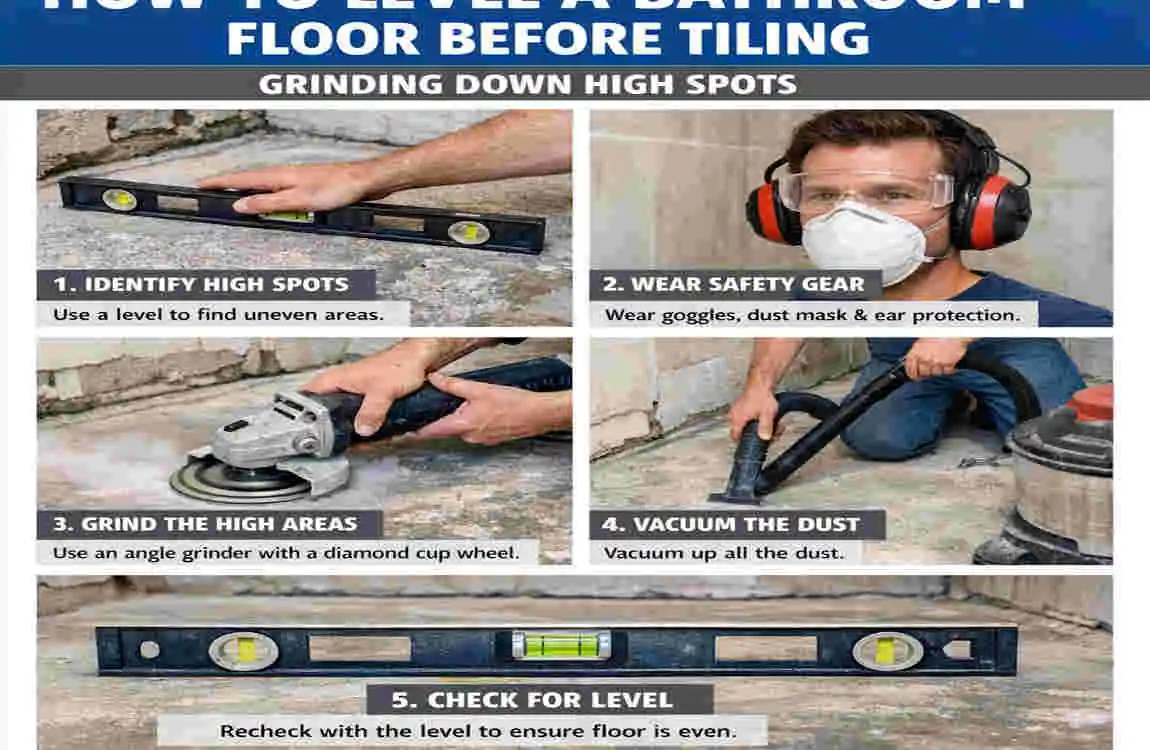
Grinding Down High Spots Safely
Many beginners assume that self-leveling compound fixes everything. They think they can pour a thick layer over the entire room to hide the high spots. This is a massive mistake. Pouring compound too thick can lead to cracking, it wastes expensive material, and it raises your floor height so much that your bathroom door might no longer close.
The correct method is to knock down the high spots first and then fill the remaining low spots.
Gearing Up for Dust Control
Let me be incredibly clear: grinding concrete or wood subfloors creates a tremendous amount of dust. If you are grinding an uneven concrete floor, you will be kicking up silica dust, which is hazardous to your lungs.
Before you even plug in your tool, put on a tight-fitting respirator mask, safety goggles that seal around your eyes, and heavy gloves.
You will need an angle grinder equipped with a diamond cup wheel. Do not use a regular sandpaper flap disc; it will disintegrate in minutes. You must also use a dust shroud attachment for your grinder. This shroud covers the grinding wheel and features a port that connects directly to the hose of your shop vac. Turn the vacuum on while you grind, and it will suck up 90% of the dust before it ever hits the air.
The Grinding Technique
Hold the angle grinder firmly with both hands. Turn it on and let it reach full speed before letting it touch the floor.
Gently lower the spinning diamond wheel onto the marked high spots. Do not press down hard; let the weight of the tool and the sharp diamonds do the heavy lifting. Keep the grinder moving constantly in tight, overlapping circular motions. If you hold the grinder still in one spot for too long, you will dig a deep trench into your floor, creating a brand-new low spot that you will have to fix later.
Stop frequently. Put your grinder down, sweep away the remaining dust, and check your progress with your straightedge. You want to slowly feather the edges of the high spot so it blends smoothly into the surrounding floor.
Depending on the size of your bumps, this process can take some time. For a 50-square-foot bathroom, expect to spend a few hours grinding and checking. Once you are satisfied that the worst peaks have been flattened, vacuum the entire room meticulously. Wipe the floor with a damp sponge to pick up the invisible microdust.
When you master how to level the bathroom floor before tiling, you learn that patience during the grinding phase makes the pouring phase infinitely easier.
Applying Primer: The Secret to Perfect Adhesion
You have flattened the hills. Now it is time to fill the valleys. But before you open a single bag of self-leveling compound, you must prime the floor. Skipping this step is the number one reason DIY flooring projects fail.
Choosing the Right Bonding Agent
Your subfloor—whether it is raw concrete or plywood—is porous. It acts like a giant sponge. If you pour a liquid cement compound directly onto a porous floor, the floor will instantly suck all the moisture out of the compound. This causes the leveling compound to dry too fast, leading to severe cracking, shrinking, and a complete lack of structural strength.
Primer stops this from happening. It seals the pores of the subfloor and creates a sticky, tacky surface that allows the new compound to grip tightly.
You need to purchase a high-quality, acrylic-based liquid floor primer specifically designed for use with self-leveling underlayments. Check the bottle to ensure it is compatible with your specific subfloor material. Most universal primers work beautifully on both concrete and wood.
Rolling It On and Waiting It Out
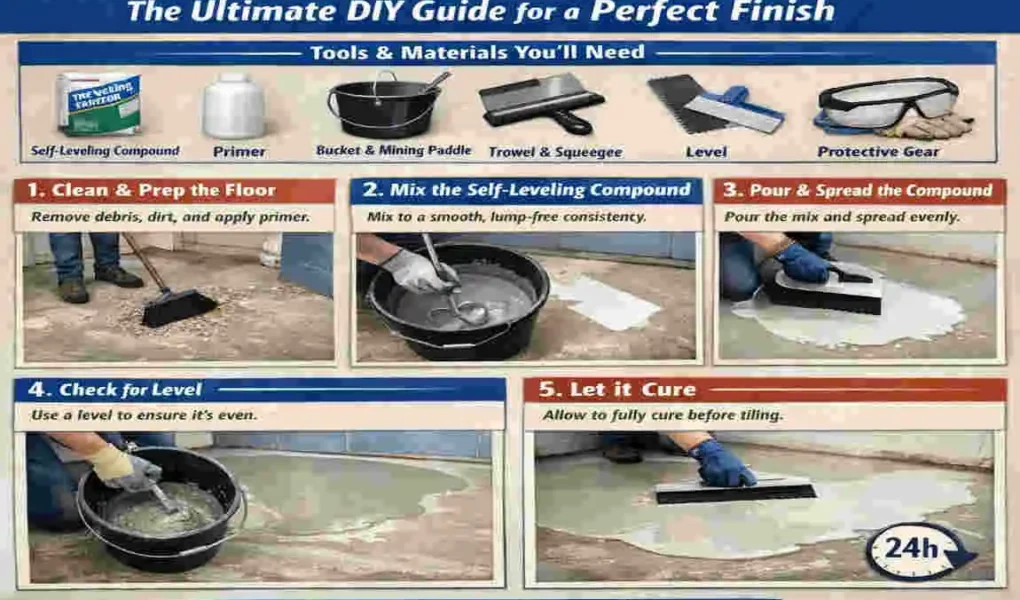
Applying primer is the easiest part of the whole project. Pour the milky liquid into a paint tray. Grab a standard 3/8-inch nap paint roller attached to an extension pole.
Dip the roller into the primer and roll it evenly across the entire floor, just like you are painting a wall. Make sure you get 100% coverage. Do not let the primer pool up in heavy puddles in the low spots; spread it out evenly so it forms a thin, uniform film. Use a small paintbrush to cut in around the edges of the walls and the toilet drain flange.
Once the floor is coated, you have to wait. Depending on the humidity in your home and the specific brand of primer, drying time can take anywhere from 1 to 4 hours. You will know it is ready when the liquid turns clear and feels slightly tacky to the touch, like the back of a sticky note.
Applying primer properly prevents pinholes and bubbles in your how to level bathroom floor before the tiling process. If you notice any spots that look exceptionally dull or dry after the first coat, your floor might be highly porous. In that case, apply a second coat just to be safe.
Mixing and Pouring the Self-Leveling Compound
This is the main event. Mixing and pouring self-leveler is fast-paced, slightly stressful, and incredibly rewarding. You cannot pause once you start, so you must have everything staged and ready to go.
The Importance of Small Batches and Exact Ratios
Self-leveling compound has a very short “pot life.” Pot life refers to the amount of time the mixture remains liquid and workable in the bucket before it starts to harden. For most brands, you only have about 10 to 15 minutes.
Because of this short window, you must work in small, manageable batches. Unless you have a team of three people helping you, only mix one bag at a time.
The ratio of water to powder is the most critical factor in this entire project. Read the back of the bag and measure your water exactly. Do not guess. Do not eyeball it. Use a measuring bucket. If you use too much water, the compound will be weak, chalky, and prone to cracking. If you use too little water, the compound will be too thick to flow and level itself, defeating the entire purpose of the product.
Always pour the measured, clean, cold water into your 5-gallon bucket first. Then, slowly add the dry powder while running your mixing drill. If you put the powder in first, you will end up with unmixed, dry clumps stuck to the bottom of the bucket.
Mix the compound continuously for 2 to 3 minutes, moving the paddle up and down and scraping the sides of the bucket. The final texture should look exactly like smooth, lump-free pancake batter.
The Pouring Strategy
As soon as the bucket is mixed, do not wait. Carry it immediately to the farthest corner of the bathroom, away from the door.
Slowly pour the liquid onto the floor, aiming directly for the marked low spots on your floor map. As you pour, the liquid will naturally fan out and seek the lowest points, guided by gravity. Pour in a continuous ribbon, working your way backward toward the exit.
If you have a helper, this is the climax of how to level a bathroom floor before tiling. The ideal workflow is a relay race: your helper stays outside the bathroom mixing the next bucket while you are inside pouring and spreading. As soon as you finish one bucket, they hand you a fresh one, ensuring you maintain a “wet edge” so the pours blend seamlessly together.
Spreading and Rolling with Spiked Shoes
While the compound levels itself to a degree, it needs a little encouragement to break surface tension and reach the corners.
As soon as you pour a bucket, use a gauge rake or a flat trowel to coax the liquid into the corners and edges gently. You are not trying to trowel it flat like frosting on a cake; you are simply pushing the puddle where it needs to go.
Next, grab your spiked roller on an extension pole. Roll this strange-looking tool back and forth through the wet compound. The spikes pop any microscopic air bubbles trapped in the mix, preventing pinholes from forming on the surface. It also helps agitate the liquid, encouraging it to lie perfectly flat.
If you have to walk into the wet compound to reach a far corner, you must wear spiked shoes (cleats that strap over your work boots). These allow you to walk through the liquid without leaving large footprints.
Remember, when learning how to level the bathroom floor before tiling, you must work fast. Keep pouring, spreading, and rolling until you have backed yourself completely out of the bathroom door and your temporary door dam is holding the liquid safely inside.
If your floor has massive dips deeper than 1 inch, you may not be able to fill them all in one go. Check your product guidelines; you should pour one layer, let it cure, prime it again, and pour a second layer to reach the desired height.
Curing and Final Checks
You have made it through the stressful pour. Now, the hardest part is simply keeping your hands off it.
Practicing Patience During the Cure
Self-leveling compound looks dry long before it actually is. In most cases, the floor will be “walkable” in 4 to 24 hours. This means it is solid enough to carefully step on without leaving a footprint.
However, being walkable is not the same as being fully cured. To reach its maximum strength and for all the internal moisture to evaporate, the floor usually needs 48 to 72 hours of full curing time.
During this curing window, keep the bathroom well-ventilated but avoid pointing fans directly at the floor, which can cause the top layer to dry too fast and shrink. Keep the room temperature moderate, and absolutely prevent any water or moisture from getting on the fresh floor.
The Final Level Test
After 72 hours have passed, step back into your bathroom with your laser level or your 6-foot straightedge.
Place the straightedge across the floor in multiple directions. If you followed the steps correctly, you should see no daylight underneath the metal bar. The floor should be flawlessly flat, hard as a rock, and completely smooth.
If you do spot a tiny ridge where two pours overlapped, or a small bump, do not panic. While the compound is fully cured, you can still use a sanding block or your angle grinder (very gently!) to smooth out minor surface imperfections.
At this point, your subfloor is officially ready for the next phase. You have created the perfect base for your ” How to Level Bathroom Floor Before Tiling project. Whether you plan to install an uncoupling membrane, a waterproofing layer, or spread thinset directly onto the compound, you can proceed with total confidence knowing your tiles will lie perfectly flat.
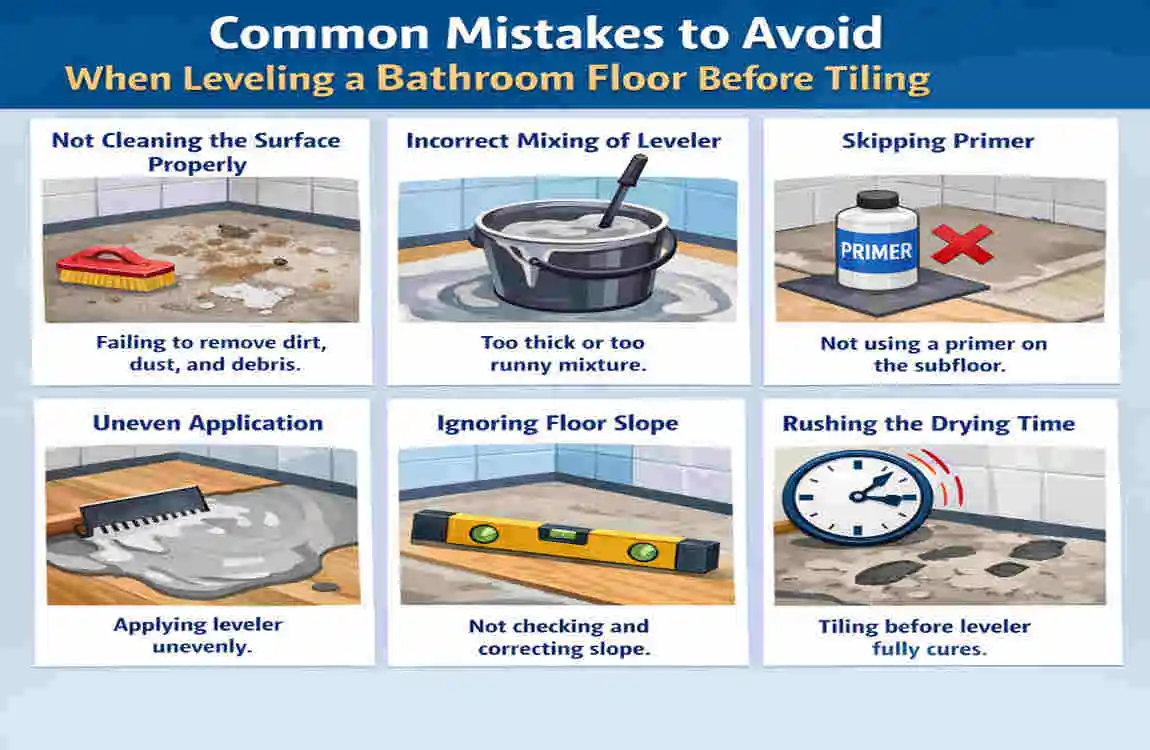
Common Mistakes to Avoid
Even with a detailed guide, first-time DIYers can trip up on a few easily avoidable hurdles. Keep these common pitfalls in mind so your project goes off without a hitch.
The Danger of Over-Grinding
When using the angle grinder, it is very easy to get carried away. The diamond wheel eats through concrete and wood very quickly. If you push down too hard or stay in one spot, you will grind a deep divot into the floor. Now, instead of just fixing a high spot, you have created a brand-new low spot that requires more self-leveler to fix. Let the tool do the work, keep it moving, and check your progress constantly.
Messing Up the Mix
We cannot emphasize this enough: water ratios matter. Rushing the mix is a guaranteed way to ruin the job. If you add the powder to the bucket before the water, you will get dry lumps that will show up as hard rocks in your finished floor. If you add too much water to make it easier to pour, the compound will cure with a powdery, weak surface that thinset mortar cannot stick to. Follow the bag instructions as if it were a strict scientific formula.
Ignoring the Importance of Primer
Skipping primer is the ultimate DIY sin. If you pour self-leveler onto unprimed concrete, it will dry in 5 minutes and crack into a spiderweb pattern. If you pour it onto unprimed wood, the moisture will warp the wood, and the leveling compound will eventually peel right off in large chunks. Primer is cheap; replacing a failed floor is incredibly expensive.
By taking your time and avoiding these errors in your DIY how to level bathroom floor before tiling journey, you guarantee a professional result. Remember, mastering how to level the bathroom floor before tiling requires avoiding shortcuts at all costs.
Frequently Asked Questions
Even with a comprehensive guide, you might still have a few specific questions regarding your unique bathroom setup. Here are some of the most common questions DIYers ask.
How much self-leveler do I need for a standard 10×10 bathroom? This heavily depends on how deep your low spots are. However, as a general rule of thumb, a 100-square-foot room usually requires between 2 and 4 bags of compound to achieve a thin, smooth layer over minor dips. Always buy one or two bags more than you think you need. You can always return unopened bags, but you cannot run to the store in the middle of a 15-minute pour.
Can I use extra mortar to tile over an uneven floor instead of leveling it? No. This is a common shortcut that leads to disaster. Thinset mortar shrinks as it dries. If you build up one side of a tile with an inch of mortar to compensate for a sloping floor, that thick mortar will shrink significantly more than the thin mortar on the other side. This will pull the tile out of alignment as it dries, causing terrible lippage. The maximum allowable variation for large tiles is 1/8 inch. Always level the floor first.
Is it okay to pour self-leveling compound over a wood plywood subfloor? Yes, absolutely. Most modern self-leveling compounds are engineered with polymers that allow them to flex slightly, making them perfect for wood subfloors. Just ensure the wood is firmly screwed down to the joists (no squeaks!), block all gaps with caulk so the liquid does not leak, and use a high-quality primer formulated for wood.
Need more help? If you have a unique subfloor situation or need more specific final tips on how to level a bathroom floor before tiling, drop a comment below! We would love to help you achieve the perfect, flat foundation for your dream bathroom renovation.