transforming your backyard into a professionally lit oasis. Picture a soft, welcoming glow leading up your driveway, elegant path lights illuminating your garden walkways, and dramatic spotlights highlighting your favorite trees. Now, imagine achieving all this stunning ambiance by learning exactly how to wire multiple outdoor lights on your own.
Does the idea of working with electricity make you slightly nervous? You are definitely not alone. Many homeowners search for ways to upgrade their exterior lighting but quickly back away, fearing electric shocks, ruined landscapes, or accidental code violations. However, this ultimate guide is here to simplify the entire process, breaking it down so you can tackle it like a seasoned pro electrician.
You do not need any prior electrical experience to follow this guide. By taking it one step at a time, you can save thousands of dollars compared to hiring someone to do the job. Plus, did you know that installing high-quality exterior illumination can boost your home’s perceived value by 15 to 20 percent? It is an investment that pays off beautifully.
| Material | Purpose | Recommendation |
|---|---|---|
| Low-voltage transformer | Steps down house power to 12V/24V | 200W+ capacity (20% over total fixture watts) |
| Direct-burial cable | Outdoor-rated wire for runs | 12-14 gauge; thicker for 100+ ft |
| Waterproof connectors | Splice fixtures to main cable | Twist-on or clamp-style; silicone-filled |
| Shovel/trenching tool | Bury wires 6+ inches deep | For trenches avoiding utilities |
| Wire stripper/tester | Prep and check connections | Voltage tester for safety |
Tools and Materials Needed
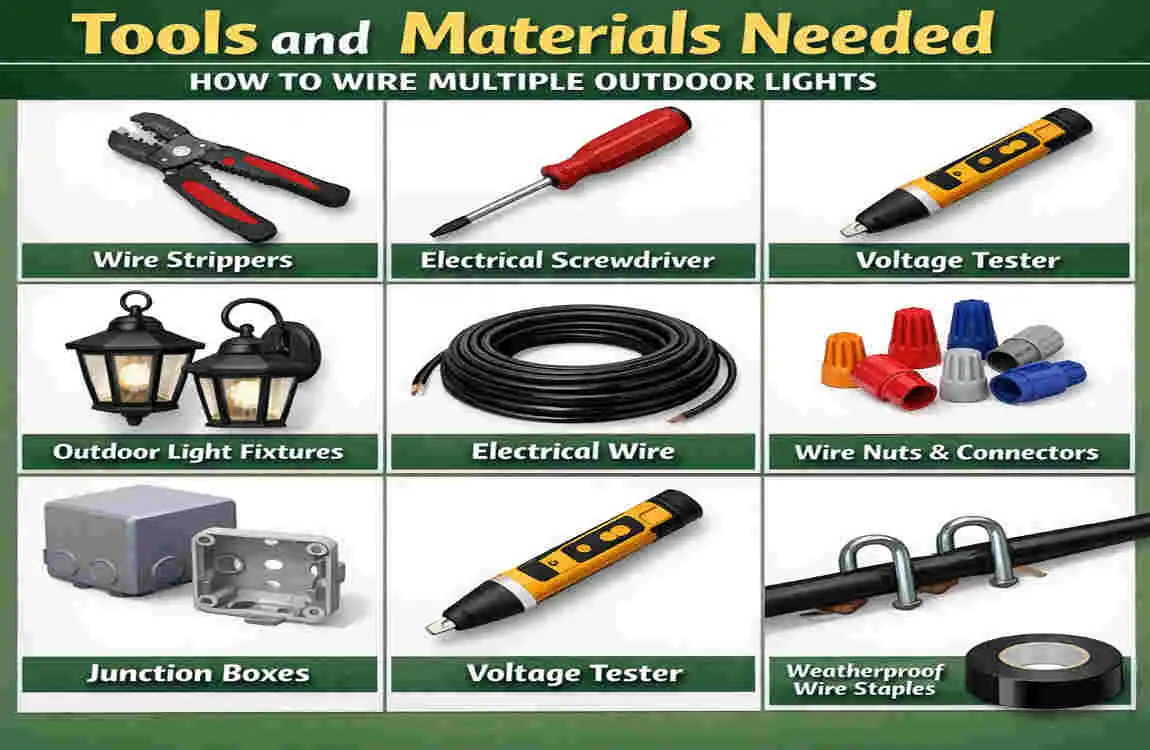
You cannot build a masterpiece without the right paintbrushes, and you cannot master wiring multiple outdoor lights without the proper gear. Gathering everything you need before you step foot in your yard will save you countless frustrating trips to the hardware store. Let’s break down your shopping list into easy-to-understand categories.
Your Essential Toolkit
Before you dig a single trench, you need to arm yourself with the right hand tools. You will want a sturdy pair of wire strippers. These are absolutely vital because they let you remove the plastic coating from your wires without accidentally snipping the conductive copper core. You will also need a reliable voltage tester. This little device is your best friend—it tells you if a wire is “live” (carrying electricity) or dead, keeping you safe at all times.
Grab a trusty pair of pliers for twisting wires together securely. For the actual landscaping part, a narrow spade shovel or a rented trenching machine will make burying your cables infinitely easier. Finally, if you are running lines through PVC pipes, a flexible metal fish tape will help you pull those wires through smoothly.
The Core Materials
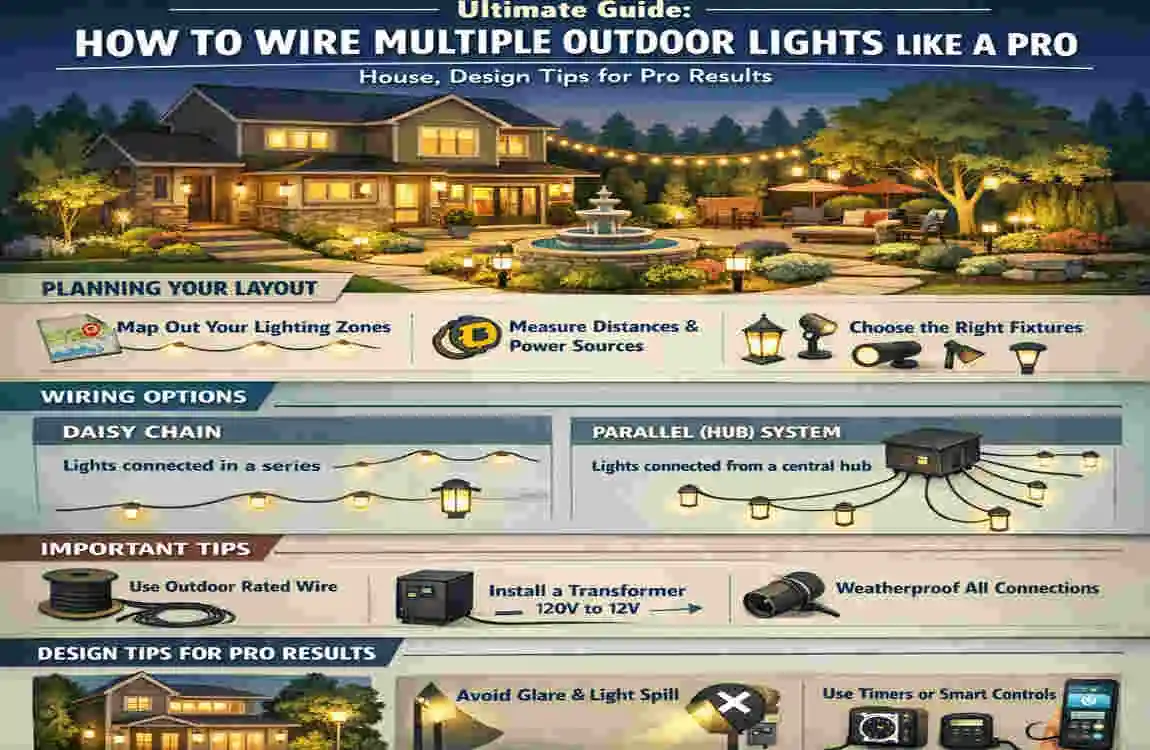
The materials you choose will determine how long your system lasts in harsh conditions. You will need durable, outdoor-rated electrical cables. Look for 12-2 or 14-2 UF-B cable, which stands for Underground Feeder. This means it is specifically designed to be buried directly in the dirt.
To connect everything, you’ll need waterproof wire connectors. We highly recommend QuickWire splitters, which make branching to multiple fixtures incredibly easy and moisture-resistant. If you are opting for a safer, DIY-friendly setup, you will need a low-voltage transformer (usually 12V or 24V) to step down the power from your home’s main circuit. Lastly, consider buying PVC conduit pipes to protect your wiring in areas where a shovel might accidentally hit it later.
Keeping Yourself Safe
Never compromise on your safety gear. A good pair of insulated work gloves will protect your hands from blisters while digging and offer a minor barrier against electrical mishaps. Safety goggles are a must when clipping wires or digging in dry, dusty soil. You should also ensure every screwdriver in your tool belt has an insulated, rubberized handle to prevent shocks.
Choosing Your Fixtures
This is the fun part! You will need to select your lights. Look for LED path lights, spotlights, or floodlights. Why LED? Because they consume a fraction of the power of old halogen bulbs, allowing you to connect far more lights to a single system. Always check the packaging to ensure the fixtures are IP65-rated or higher, meaning they are completely weatherproof and sealed against rain and sprinklers.
Tools and Materials Cheat Sheet
Category Items Purpose
Tools Wire strippers, voltage tester, pliers, shovel/trencher, fish tape Stripping plastic, testing power, digging narrow trenches, pulling wires safely.
Materials 12-2 or 14-2 UF-B direct bury cable, waterproof connectors (QuickWire splitters), low-voltage transformer, PVC conduit Providing durable outdoor wiring; splitters allow branching to multiples safely.
Safety Gear Insulated work gloves, safety goggles, insulated screwdriver Preventing nasty shocks and physical injuries during the wiring process.
Fixtures Weatherproof LED path, spot, or flood lights (IP65+ rated) Providing illumination; LEDs help manage and lower your total wattage load.
Planning Your Outdoor Lighting Layout
Success in wiring multiple outdoor lights always starts on paper, long before you ever pick up a shovel. A solid plan is the bridge between a chaotic, messy yard and a breathtaking nightscape.
Sketching Your Masterpiece
Grab a piece of grid paper and sketch a bird’s-eye view of your yard. Mark down the permanent features: your house, the driveway, the patio, large trees, and garden beds. Now, decide where you want your lights to live. A great rule of thumb for path lights is to space them about 10 to 15 feet apart. You want their pools of light to gently overlap, creating a continuous guiding glow without looking like an airport runway.
Next, locate your power source. You will be looking for an exterior GFCI (Ground Fault Circuit Interrupter) outlet. This is the outlet with the small “Test” and “Reset” buttons. From this power source, draw a line on your map to each light fixture. This line shows where you will need to dig your trenches, which should be 6 to 12 inches deep.
Doing the Wattage Math
You cannot just hook up fifty lights and expect them to shine brightly. You have to calculate your electrical load. Every light fixture uses a certain amount of power, measured in watts. You need to add up the wattage of every single light you plan to install.
For example, if you buy 20 LED path lights that each use 5 watts, your total load is 100 watts. You must purchase a transformer that can handle more than this number. A 150-watt or 300-watt transformer would be perfect here, leaving you room to add more lights in the future.
Understanding the Wiring Method
When planning, you must design your layout using parallel wiring. This is the secret sauce for multiple fixtures. In a parallel setup, every single light taps directly into the main power cable. This ensures that every light receives the same voltage and shines equally bright. Compare this to “series wiring” (like old-school Christmas lights), where if one bulb burns out, the whole yard goes dark. We want to avoid that entirely!
Checking the Rulebook
Before you finalize your plan, check your local building codes. Do you need a permit for outdoor electrical work in your county? How deep does the city require you to bury your specific type of cable? Taking ten minutes to check your local city hall website can save you from hefty fines later. You can even use modern smartphone apps like Landscape Lighting Planner to virtually map out your yard and check spacing.
Safety Precautions First
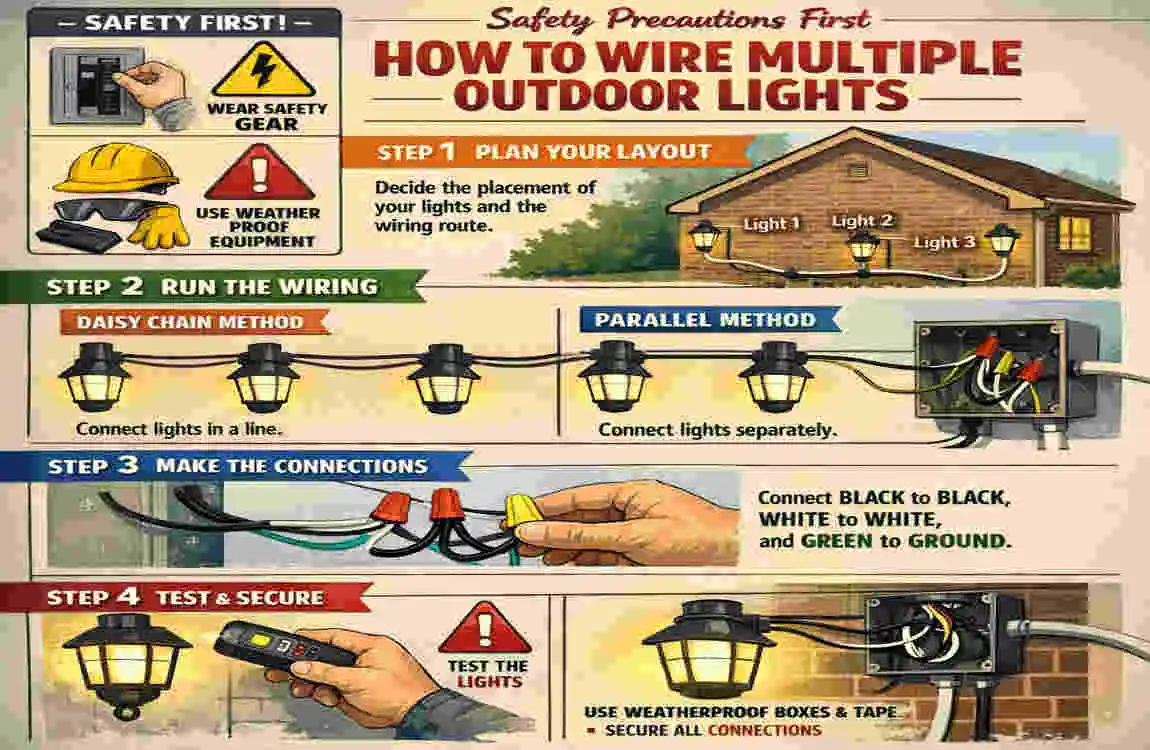
Let’s have a serious talk. You should never, ever skip the safety steps when learning how to wire multiple outdoor lights. The risks of electrocution are very real, but they are also 100 percent preventable if you respect the power you are working with.
Kill the Power
The absolute first thing you must do is locate your home’s main electrical panel. Find the breaker switch that controls the outdoor outlet you will be using, and flip it to the “Off” position. But do not just trust the switch. Take your handheld voltage tester, walk outside, and stick it into the outlet. If the tester stays quiet and unlit, you can proceed. Never guess whether the power is off.
Gear Up and Dry Off
Electricity and water are mortal enemies. Never attempt to install wiring if it has just rained, if the grass is wet with morning dew, or if your hands are damp. Wait for a dry afternoon. Put on your thick rubber-soled shoes, your insulated gloves, and your safety glasses. This personal protective equipment (PPE) is your physical shield.
The Magic of GFCI
Any time you run electricity outdoors, it must originate from a GFCI outlet. What does this do? A GFCI outlet constantly monitors the electricity flowing out and the electricity flowing back in. If it senses even a microscopic leak (like power escaping into a puddle of water, or worse, into you), it cuts the power in milliseconds. It is a life-saving device. Ensure all your outdoor outlets are GFCI-protected and housed in heavy-duty, weatherproof boxes that keep rain out even when a cord is plugged in.
Grounding and Load Limits
If you are working with any metal light fixtures, they must be properly grounded to prevent the metal casing from becoming electrified in the event of a loose wire. Furthermore, a very common mistake eager beginners make is overloading their circuits. A golden rule in electrical work is never to load a circuit past 80% of its total capacity. If your transformer is rated for 100 watts, only put 80 watts of lights on it. This prevents the system from overheating.
Our pro rule? Double-check every single twisted connection, every waterproof cap, and every splitter before you bury the wire. Once it is underground, fixing a loose wire becomes a muddy, frustrating chore.
Step-by-Step: Wiring Low-Voltage Systems
When homeowners ask us how to wire multiple outdoor lights, we almost always steer them toward a low-voltage (12V or 24V) system. Why? Because it is incredibly safe, highly energy-efficient, and wonderfully DIY-friendly. A low-voltage system steps down the dangerous 120 volts from your house to a harmless 12 volts. If you accidentally nick a 12-volt wire while gardening, you won’t get a dangerous shock.
Here is exactly how to install this system from start to finish.
install the Transformer
The transformer is the brain and the heartbeat of your new lighting system. Its job is to plug into your standard home outlet and reduce the power flow.
First, find your outdoor GFCI outlet. You want to mount the heavy metal or plastic transformer box on the wall right next to it. Grab your drill and secure the transformer to your siding or brickwork. Ensure the transformer is mounted at least 18 inches above the ground. This protects the unit from deep puddles, snow buildup, or aggressive weed whackers.
Once it is securely mounted on the wall, you can plug its thick cord directly into your GFCI outlet. Most modern transformers come equipped with a built-in timer or a photocell. A photocell is a tiny sensor that detects sunlight, automatically turning your beautiful lights on at dusk and off at dawn without you ever having to lift a finger.
Dig the Trenches and Lay the Cable
Now it is time to get your hands dirty. Grab your spade shovel and start digging along the pathways you sketched out on your plan. For low-voltage wire, you do not need to dig to the center of the earth. A shallow trench about 6 to 8 inches deep is perfectly fine to protect the cable from lawnmowers and casual gardening tools.
Once your trenches are dug, take your spool of UF-B or low-voltage landscape cable and begin unrolling it into the trench.
Crucial tip: Do not pull the wire tight like a guitar string! You need to leave slack. For every location where you plan to install a light fixture, pull up a loop of wire about 1 to 2 feet above the ground. This extra slack gives you room to strip the wires comfortably and lets you move the light fixture a few inches if you need to adjust your landscaping. Take your time to gently curve the wire around corners; avoid bending it sharply, which can snap the copper inside.
Connect Using Parallel Wiring or Splitters
This is the most critical step in learning how to wire multiple outdoor lights. You are going to connect your lights in parallel so they all shine brightly.
Start by preparing your main cable. Use your wire strippers to carefully remove about half an inch of the tough plastic insulation from the ends of the wires, exposing the shiny copper.
The easiest and most professional way to branch multiple lights is with a QuickWire splitter. Here is how it works:
- You cut the main power cable running through your trench where you want a light.
- You strip the ends and push them into the weatherproof splitter block’s input ports.
- The splitter block has multiple output ports. You can plug the wire for your nearby path light into one port, and plug another wire to continue down the trench into the next port. It eliminates the need for messy twisting.
If you prefer to do a direct parallel connection without a block, you will need to manually splice the wires. You will take the positive wire from the main line, the positive wire continuing down the trench, and the positive wire from your light fixture, and twist all three copper ends together tightly.
Once twisted, you must cap them with grease-filled wire connectors. These special caps contain a thick, waterproof gel. When you twist the cap onto your exposed wires, the gel surrounds the copper, making it 100 percent impervious to rain, sprinklers, and soil moisture.
Can you just “daisy-chain” lights by connecting one directly to the back of the other? You can, if the run is very short. But utilizing a main trunk line with splitters branching off is far more reliable and prevents you from fumbling with too many wires in one tiny hole.
Mount the Fixtures
With your connections made, it is time to stand your lights up. Most low-voltage path lights come with a sharp ground stake. Press the stake firmly into the ground, ensuring it stands perfectly vertical. Use a small level if you want to be precise!
For spotlights aimed at trees or the side of your house, adjust the swivel head so the beam points exactly where you want it. Take the small wires coming out of the bottom of the fixture and connect them to your main line (or your splitter) following the color codes: usually black-to-black (the hot wire) and white-to-white (the neutral wire).
Test and Bury
Do not pick up your shovel yet! First, walk back to your transformer and turn the system on.
Walk your yard and check every single light. Are they all shining? Is one flickering? If a light is out, turn the system off and double-check your twisted connection at that specific light.
Once you are satisfied that your yard looks like a high-end resort, adjust the light angles one last time. Gently push the slack wire down into the trench and use your shovel to backfill the dirt. Tamp the soil down lightly with your boot and replace any grass sod you removed.
Series vs. Parallel Wiring Comparison
Wiring Method The Pros The Cons Best Used For
Parallel Wiring Delivers full voltage to every light; if one bulb breaks, the rest stay on. Requires slightly more wire and careful planning. Multiple outdoor lights, landscape paths, whole-yard designs.
Series Wiring Uses less wire; very simple linear connection. Severe voltage drop at the end; if one fails, all fail. Single lights or temporary string lights only.
Wiring Line-Voltage (120V) Systems
While low-voltage is great for pathways, sometimes you need serious, blinding power. If you want to install massive security floodlights or towering street-style lamps, you need to step up to a line-voltage (120V) system.
This means you are running the same high-powered electricity outside that powers your indoor appliances. A quick warning: if you are unsure about this, hire a professional. A mistake with 120 volts can be fatal.
To do this correctly, you will need to run heavy-duty 12-2 NM-B wire. Because 120V is so powerful, building codes almost universally require this wire to be fully encased in rigid PVC conduit underground. You will run this conduit directly from a dedicated 15-amp or 20-amp circuit breaker in your main electrical panel.
Whenever you need to split the wire to add multiple lights, you cannot just bury a splitter in the dirt. You must install heavy-duty, weatherproof metal junction boxes above ground. Inside these boxes, you will make your parallel connections using heavy wire nuts.
You must strictly follow the National Electrical Code (NEC). Everything must be GFCI protected, all boxes must have watertight rubber gaskets, and every metal fixture must be heavily grounded. The physical steps of digging and connecting mirror the low-voltage process, but you must treat the live wires with extreme caution.
Troubleshooting Common Issues
Even the best DIYers run into hiccups when learning how to wire multiple outdoor lights. Don’t panic if things aren’t perfect on the first try. Here is how to fix the most common gremlins.
Are your lights flickering? Flickering is usually a sign of a loose connection. Go back to the flickering light, turn off the power, and re-twist the wires inside the waterproof cap. If all the lights are flickering, check the main connection at the transformer.
Are the lights at the end of the yard dim? This is the dreaded “voltage drop.” The electricity simply runs out of steam before it reaches the end of a long wire. You have two fixes: shorten the wire run by moving the transformer closer to the middle of the yard, or upgrade your main trunk line to a thicker 12-gauge or even 10-gauge wire, which allows electricity to flow more freely.
Is a section of lights completely dead? If the first three lights work, but the last four are dead, you likely have a bad splitter or a broken wire between light three and four. Use your voltage tester or a multimeter (set to continuity test) to pinpoint exactly where power stops flowing.
Did you find water in your connectors? Standard indoor wire nuts will fail in outdoor conditions. If moisture got in, the copper will corrode and turn green. Snip off the corroded ends, strip fresh copper, and reseal the connection using Premium grease-filled caps or a tube of exterior silicone sealant.
Design Tips for Pro Results
Now that you know the technical side of wiring multiple outdoor lights, let’s talk aesthetics. You don’t want your yard looking like a prison yard; you want depth, drama, and elegance.
The secret to professional lighting design is layering. Do not just use one type of light. Start with a base layer of downlighting (path lights) to illuminate your path. Then add a layer of uplighting (spotlights) at the base of large oak trees or architectural pillars on your house. Finally, mix in accent lights softly washing over stone walls or garden beds.
To truly modernize your home, invest in smart controls. You can buy transformers that connect to your home’s WiFi network. This allows you to turn your backyard lights on from your smartphone while you are sitting at a restaurant, or set them to change colors during the holidays.
Lastly, always choose LED bulbs over traditional halogens. Not only do they emit a crisper, more beautiful light, but they also use roughly 80% less electricity, cutting your monthly utility bills drastically.
Cost Breakdown
How much will this project impact your wallet? Let’s look at the numbers.
If you take the DIY route for a standard low-voltage setup with about 10 beautiful LED lights, you can expect to spend between $200 and $800. Roughly 60% of that budget will go toward the materials—the high-quality brass or aluminum fixtures, the transformer, and the heavy-duty wire. The remaining 20% to 40% will go toward purchasing the necessary tools if you don’t already own them.
If you were to hire a professional landscaping company to install those same 10 lights, you would easily be looking at a bill starting at $1,000 and climbing well over $2,500 depending on your location. By taking a weekend to wire it yourself, you keep a massive amount of money in your pocket!
Typical Budget Options
Setup Type Estimated Cost Number of Lights
Low-Voltage Basic (DIY) $250 – $400 8 to 12 simple path lights.
Low-Voltage Premium (DIY) $500 – $800 : 10 to 15 brass fixtures, smart transformer.
Line-Voltage Pro install : $1,200+ ; 10 to 20 heavy-duty security and floodlights.
FAQs
How do I wire multiple outdoor lights in parallel?
To wire in parallel, you must ensure every individual light fixture connects directly to the main power line. You take the positive wire from the power source and connect it to the positive wires of all the lights. Then, you connect all the negative wires. This creates individual loops for each light, ensuring they all receive full, un-dropped power from the transformer.
Can I just daisy-chain outdoor lights together?
Technically yes, you can connect wire from fixture A to fixture B, and fixture B to fixture C. However, doing this repeatedly over a long distance will cause a severe voltage drop, making the last lights very dim. Using a central main wire with splitters branching off to each light is a much better, more professional method for multiple fixtures to avoid overloads.
What type of wire is best for outdoor lights?
For low-voltage landscape lighting, you should use specifically rated 12V direct-bury landscape cable (usually 12-gauge or 14-gauge). For high-voltage (120V) residential systems, you must use UF-B (Underground Feeder) wire, which features a tough, solid plastic sheath that withstands dirt and moisture.
Is a city permit needed to install outdoor lighting?
If you are simply plugging a low-voltage transformer into an existing outdoor outlet, you rarely need a permit. However, if you are burying 120V line-voltage cables, adding new breaker switches to your main panel, or installing new exterior outlets, local building codes generally require a permit and an official inspection. Always verify with your local municipality!