Did you know that improper nail penetration is cited as a contributing factor in nearly 20% of all residential roofing failures? It is a startling statistic, but one that highlights a crucial reality: the strength of your roof isn’t just about the quality of the shingles you buy, but how securely they are fastened to your home.
When a storm rolls in, the only thing keeping your roof from peeling apart like a deck of cards is the grip of the roofing nails. This brings us to the critical question that every homeowner and DIY enthusiast needs to ask: how far should house roofing nails penetrate?
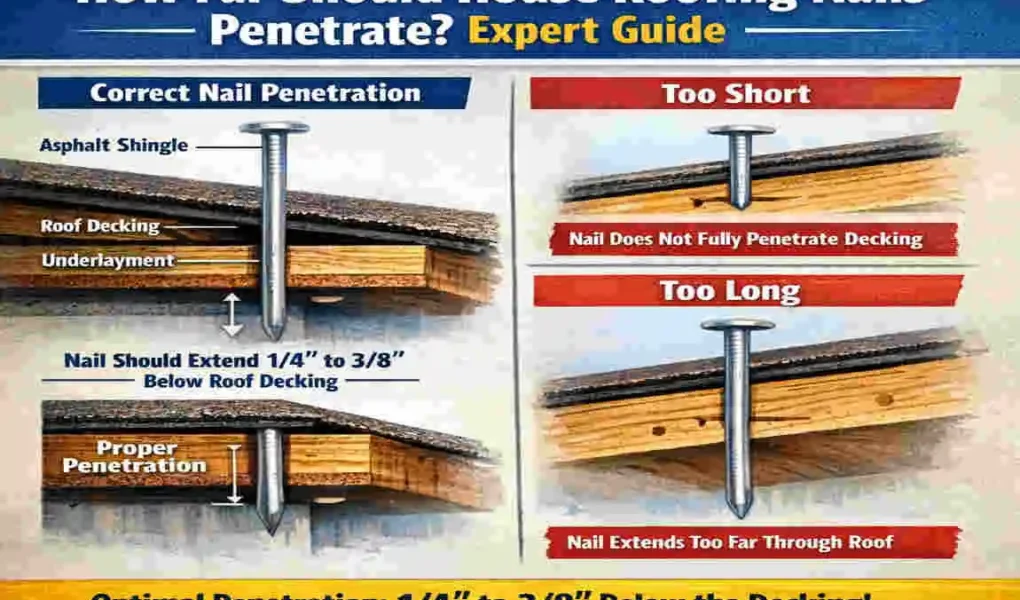
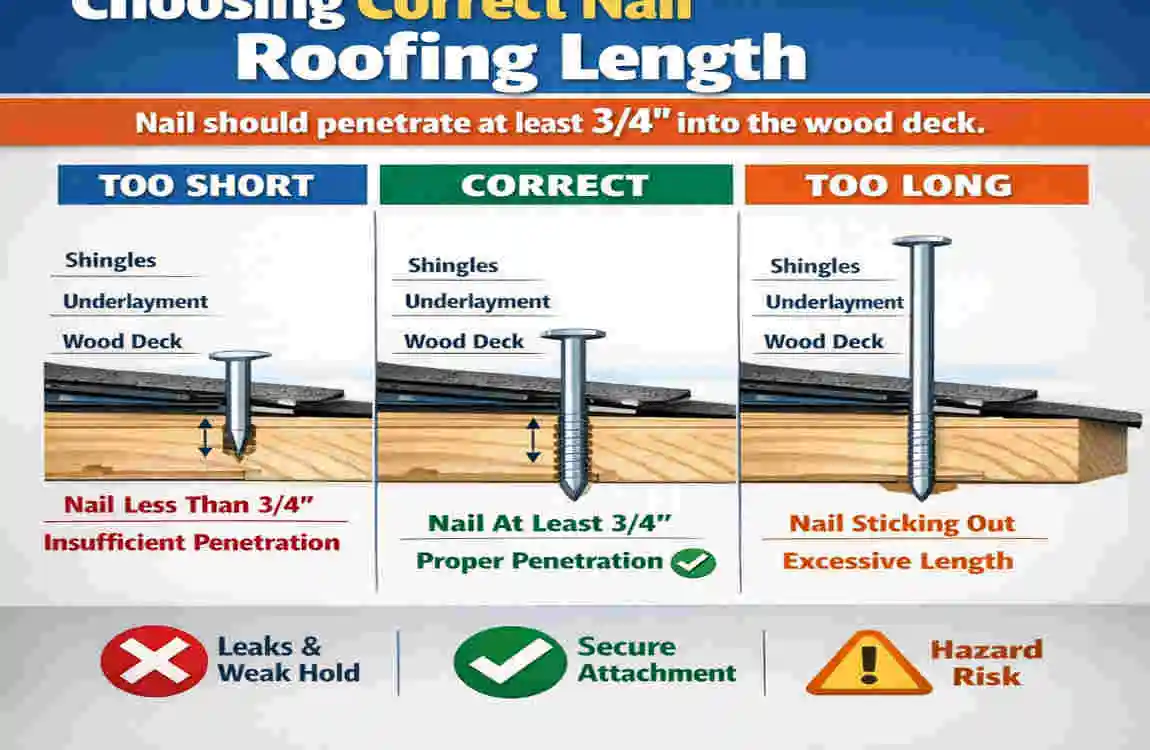
If they are too short, they won’t grip the wood decking, leading to blown-off shingles. If they are too long, you might risk damaging what’s underneath or dealing with moisture issues in your attic and finding that “Goldilocks” zone of penetration depth is essential for the durability and longevity of your roof.
Standard Penetration Depth: The Rules of the Road
To understand how to fasten a roof correctly, we have to look at the rules set by building codes and manufacturers. These aren’t just suggestions; they are the physics-backed requirements that ensure your roof stays put.
Minimum Requirements by Code
The International Residential Code (IRC) serves as the bible for home construction in the United States, and it has very specific things to say about roof deck nail requirements.
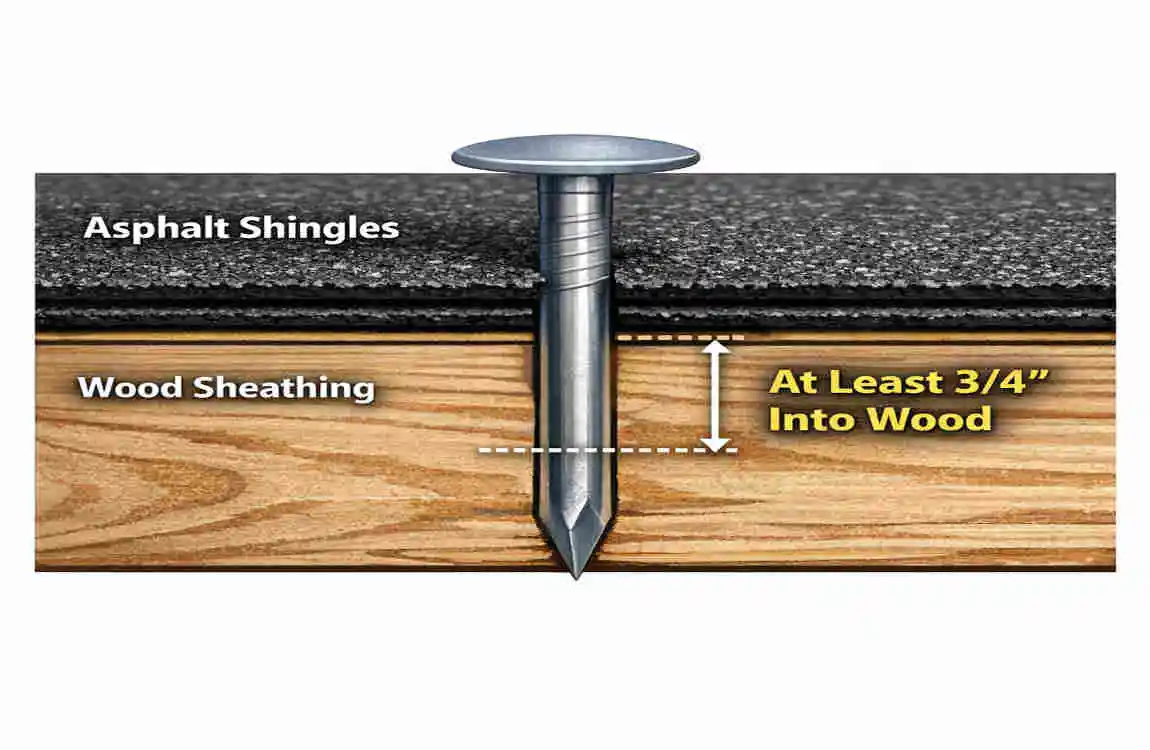
The general rule of thumb is straightforward but allows for nuance depending on the materials you are using. For a secure hold, roofing nails must penetrate at least 3/4 of an inch (19 mm) into the roof sheathing.
However, there is a catch. This rule assumes you have a thick roof deck. If your roof sheathing (the plywood or OSB boards under the shingles) is less than 3/4 inch thick—which is very common in modern homes—the code changes. In these cases, the nail must penetrate fully through the sheathing.
Why is full penetration required for thinner wood? If a nail only goes halfway into a thin piece of Oriented Strand Board (OSB), the tip of the nail forces the wood fibers apart, creating a “blowout” on the underside. This damages the wood’s structural integrity and drastically reduces the nail’s holding power (its withdrawal resistance). By driving the nail all the way through, the head clamps the shingle tight against the top of the deck, while the shank engages the full thickness of the wood.
Variations by Shingle Type
Not all roofs are created equal. The material you choose will dictate the proper roofing nail length and penetration depth.
Asphalt Shingles
For the vast majority of homes in North America, asphalt shingles are the standard. The shingle nailing depth requirement here adheres strictly to the IRC code: 3/4 inch into the deck or fully through.
- The Grip: Asphalt shingles are relatively light compared to tile. The nail needs to hold the shingle flat against wind uplift.
- The Shank: You typically use a smooth shank or ring shank nail. The friction between the nail shank and the wood fibers is what provides the holding power.
Metal and Wood Shingles
Metal roofing and wood shakes/shingles often require a deeper bite. Because these materials effectively act as “sails” in high wind and are heavier, the fasteners often need to penetrate 1 inch to 1.25 inches into the wood to ensure they don’t back out over time due to thermal expansion and contraction.
Tile Roofs
Tile is heavy. Really heavy. The fasteners here aren’t just resisting wind; they are supporting the sheer weight of the tile on sloped surfaces. Consequently, the requirements for tile often call for much longer fasteners to achieve a deep, secure embedment.
To make this easier to visualize, here is a breakdown of the requirements:
Shingle Type Recommended Penetration Typical Nail Length
Asphalt 3/4 inch min (or through deck) 1″ – 1.5″
Metal 1 inch min 1.5″ – 2.”
Tile 3/4 inch+ (heavy duty hold) 2″ – 3.5″
Factors Affecting Nail Depth
You might be tempted to buy the longest nails available and call it a day. However, how far house roofing nails should penetrate is influenced by several variables that change from house to house.
Sheathing Thickness Impact
The type of wood under your shingles changes everything.
OSB (Oriented Strand Board): Most modern homes use OSB sheathing, typically ranging from 7/16 inch to 5/8 inch in thickness. Because this is thinner than the standard 3/4-inch penetration requirement, your nails must protrude fully through the bottom.
- Expert Note: If you go into your attic and look up, you should see the sharp tips of the nails poking through the wood. If you don’t, your roof might be installed incorrectly.
Plywood and Plank Decking: Older homes often have solid wood plank decking (1×6 or 1×8 boards) or thick plywood (3/4 inch).
- In this scenario, you do not need to penetrate all the way through. You need to hit that 3/4 inch embedment depth.
- Driving nails all the way through 1-inch-thick solid planks is unnecessary and can actually split the old, dry wood, reducing its strength.
Underlayment and Climate Factors
We often forget that between the wood and the shingle, there are other layers adding to the thickness.
The “Stack” Thickness: When calculating proper roofing nail length, you must account for:
- The Shingle: Standard architectural shingles are thicker than old 3-tab shingles.
- The Underlayment: Synthetic underlayment is thin, but if you are using a self-adhered “Ice and Water Shield,” it adds about 1/16 to 1/8 of an inch of rubberized asphalt.
- Flashings: If you are nailing near a valley or a chimney, you might be nailing through metal flashing, which adds height.
Climate Considerations:
- High Wind Zones: In hurricane-prone areas (like Florida or the Gulf Coast), local codes often supersede general codes. They may require ring-shank nails (which have ridges on them like a screw) and deeper penetration (often 1 inch) to prevent the roof from being ripped off in a Category 3 storm.
- Cold Climates: In areas with heavy snow loads, the roof deck flexes more. A deeper nail penetration ensures that this flexing doesn’t work the nail loose over time.
Choosing Correct Nail Length
So, you are at the hardware store. Which box do you grab? Choosing the right size is a math equation.
The Formula:
Total Nail Length = (Shingle Thickness x 2) + Underlayment + Required Penetration
Let’s break down a real-world scenario. You are installing architectural asphalt shingle nails on a roof with 5/8 inch OSB decking.
- Shingles (2 layers at the overlap): Roughly 1/4 inch.
- Underlayment: Negligible, but let’s say 1/16 inch.
- Sheathing Penetration: You need to go through the 5/8 inch deck plus a little extra to ensure the tapered tip clears the wood.
The Calculation: 1/4″ (Shingles) + 5/8″ (Deck) + 1/4″ (Extra for tip) = 1 1/8 inches.
Since nails aren’t sold in 1/8th increments generally, you would round up.
- The Verdict: A 1-1/4 inch nail is usually the absolute minimum for this setup, but a 1-1/2 inch nail is the safer, professional choice. It guarantees you meet the roofing nail penetration depth requirement without cutting it too close.
Gauge and Head Size
It’s not just about length; girth matters too.
- Gauge: You want an 11 or 12-gauge nail. Thin nails bend easily and don’t hold as well.
- Head Size: The head of the nail acts as the anchor. Look for a head diameter of 3/8 inch to 7/16 inch. This wide surface area clamps the shingle down. If the head is too small, the shingle can tear right through it during a strong wind gust.
Tools and Installation Tips
Knowing the theory is great, but applying it on the roof is where the work happens. Here is how to ensure you are nailing it right every time.
Measuring Penetration
How do you know if you are hitting the mark?
- The Attic Check: Before you start the bulk of the work, drive a few test nails. Go into the attic and look. Can you see the tips? If you are going into OSB and can’t see the tips, stop immediately. You need longer nails.
- The Gauge Test: Professional roofers sometimes use a nail gauge card to measure the thickness of the existing deck during the tear-off process so they know exactly what length to buy before the shingles arrive.
Step-by-Step for DIYers:
- Mark Your Nail: If you are hand-nailing, hold the nail against the side of the shingle and the deck. Visually confirm it will pass through.
- Drive Flush: Drive the nail until the head is flush with the shingle surface.
- Inspect: Check that you haven’t crushed the shingle granules.
Pro Techniques: The Pneumatic Gun
Most roofs today are installed with pneumatic nail guns. These are powerful tools, but they can be dangerous to your roof’s health if not calibrated.
The Air Pressure Balance: If your compressor is set too high, the nail will shoot right through the shingle mat. This is called a “blow-through.” A nail that has blown through the shingle holds nothing—it’s effectively useless.
- The Fix: Set your compressor to roughly 90-100 PSI (depending on the gun) and test on a scrap shingle. The nail head should sit flush with the surface, not sunk into it.
The “Angle of Attack”: Always hold the gun perpendicular (90 degrees) to the roof deck. If you shoot at an angle, the nail head won’t sit flat. One side will dig in, and the other will stick up. This crooked nail can cut the shingle above it, leading to leaks.
Common Mistakes and Fixes
Even experienced roofers make mistakes. Here are the top errors related to roofing nail penetration and how to fix them.
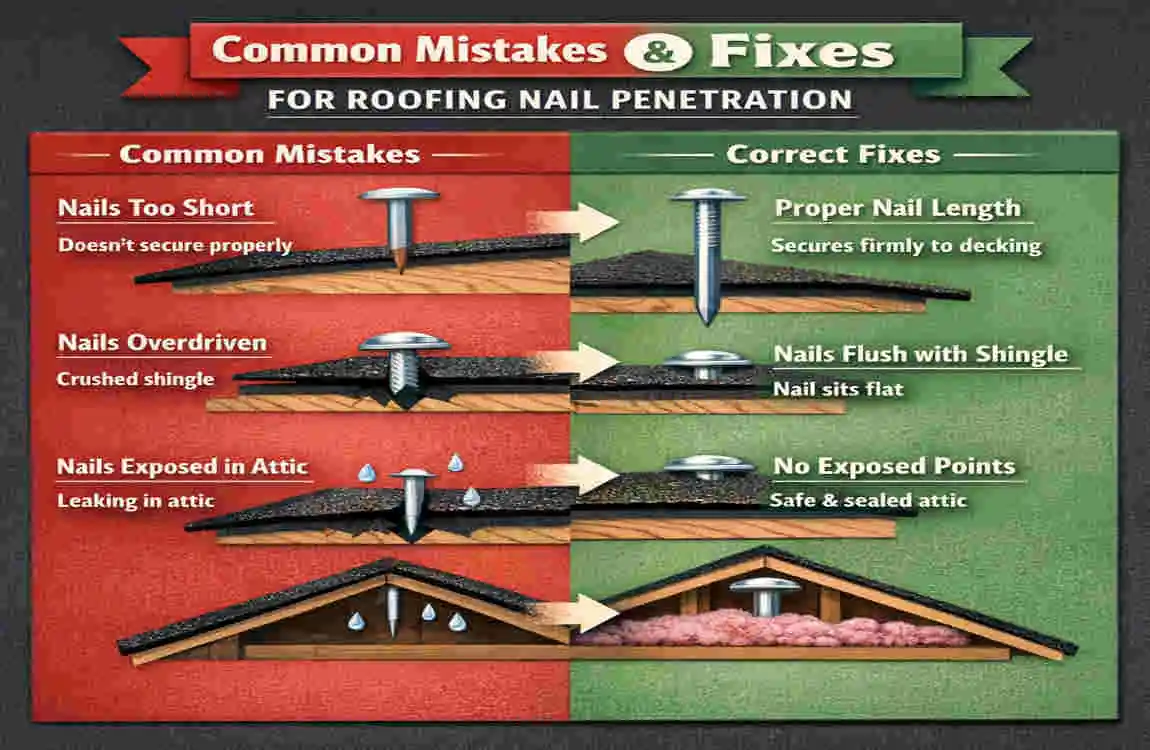
Under-Penetration (The “High Nail”)
This happens when the nail doesn’t go deep enough.
- The Symptom: The nail head sits above the shingle surface. When you lay the next shingle on top, it creates a small hump or bump.
- The Risk: These humps wear out faster and can poke through the top shingle over time. Plus, the nail has no holding power.
- The Fix: Do not try to pound it down if it’s bent. Remove the nail, seal the hole with roof cement, and drive a new nail nearby.
Over-Penetration (The “Blow Through”)
As mentioned, this is when the nail goes too deep.
- The Symptom: The nail head has broken the fiberglass mat of the shingle.
- The Fix: This nail is a loss. You must drive a new nail slightly adjacent to it to secure the shingle properly. You should also dab a little sealant on the blown-through spot.
Missing the Sheathing
Sometimes, you hit a gap between deck boards or a rotted spot.
- The Symptom: The nail goes in with zero resistance and spins freely.
- The Fix: Pull it out. It is holding nothing. Move the nail a few inches to find solid wood and seal the bad hole.
Over-Shiners (The Attic Dangers)
While we want penetration, nails that are too long (e.g., using 3-inch nails for asphalt shingles) can be a hazard.
- The Risk: Long nails in the attic are a danger to anyone doing electrical work or HVAC repair. They can also transfer cold directly into the attic, attracting condensation and frost in the winter, which then melts and looks like a leak.
- The Fix: Stick to the 1/4 inch to 1/2 inch protrusion rule. There is no structural benefit to having 2 inches of nail hanging in your attic.
Inspection and Maintenance
Once your roof is installed, the job isn’t quite done. Periodic inspections ensure those nails stay where they are supposed to be.
Annual Checks: You don’t need to climb on the roof to check penetration, but you should check the attic. Grab a flashlight and look at the underside of the deck.
- Look for Rust: Rusty nails indicate moisture is getting past the shingle.
- Look for White Frost: In winter, frost on nail tips means your attic ventilation might be poor, or the nails are acting as thermal bridges.
Exterior Signs of Failure: If you see shingles sliding down the roof, it is almost always a nailing failure. It could be that the nails were too short and didn’t bite into the sheathing, or they were placed too high on the shingle (missing the “nailing strip”).
FAQs
How far should house roofing nails penetrate asphalt shingles?
For standard asphalt shingles, nails should penetrate at least 3/4 of an inch into the roof deck. If your roof deck (sheathing) is less than 3/4 inch thick (like standard OSB), the nail must go all the way through the wood and extend slightly out the bottom (typically 1/8 to 1/4 inch).
Do nails need to go through the roof deck?
Yes, but it depends on the thickness of the deck. If you have modern plywood or OSB sheathing (which is usually 7/16″ or 5/8″), the building code requires the nail to penetrate fully through the sheathing. If you have older, thick plank decking (1 inch or more), the nail only needs to penetrate 3/4 of an inch and does not need to poke out the other side.
What nail length is best for 5/8 OSB?
For 5/8 inch OSB, a 1-1/4 inch or 1-1/2 inch roofing nail is ideal.
- 1-1/4 inch: This is usually sufficient to pass through the shingle (1/4″) and the deck (5/8″), totaling 7/8″, which clears the bottom.
- 1-1/2 inch: This offers a safer margin of error to ensure full penetration without being excessively long.
Is 1-inch penetration always required?
Not always. The International Residential Code (IRC) mandates a minimum of 3/4 inch. However, some local codes in high-wind regions (like Miami-Dade in Florida) or manufacturers of specific heavy-duty shingles may require deeper penetration, often up to 1 inch, to ensure maximum wind uplift resistance. Always check your local jurisdiction’s amendments to the code.
Why should I worry about “shiners” or protruding nails?
A “shiner” is technically a nail that missed the framing member, but in roofing, people often worry about long nails in the attic. While long nails aren’t a structural problem for the roof, they can be a safety hazard for anyone working in the attic (head injuries are common!). Furthermore, in very cold climates, long metal nails can collect frost (condensation), which melts and drips onto your insulation, mimicking a roof leak.