Is there anything more stressful than watching storm clouds gather right after you’ve patched a leak on your roof? You find yourself constantly checking the window, wondering if your hard work is about to be washed away. One question is racing through your mind: how long does it take roof tar to dry before it’s safe from the rain?
If you are a homeowner or a contractor dealing with roof repairs, knowing the drying and curing times of roofing tar is not just a detail—it’s the difference between a successful seal and a messy failure. Whether you are fixing a flat roof in a humid climate or patching a shingle in the cold, timing is everything.
What Is Roof Tar?
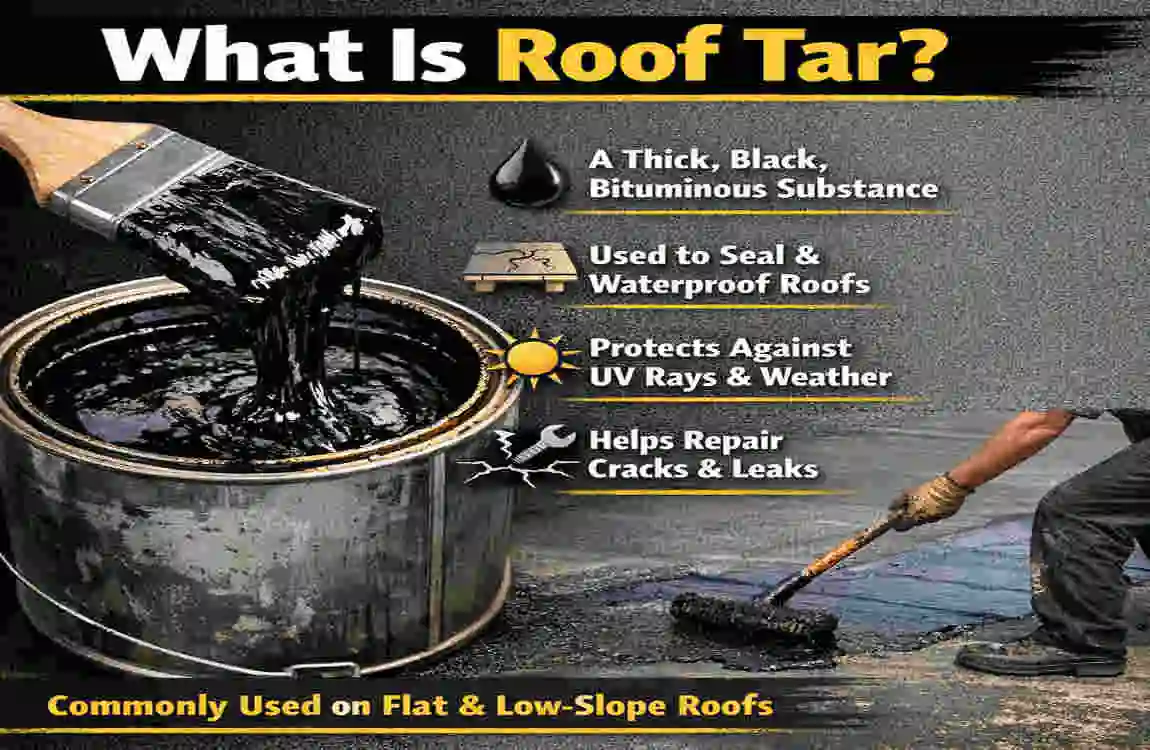
Before we dive into the clock, it is important to understand exactly what we are working with. Roofing tar is a dark, oily, and extremely sticky substance used primarily to seal roofs. It is the heavy hitter of the roofing world, known for its ability to waterproof flat roofs and fix leaks in shingles and flashing.
But not all tar is created equal. The “drying time” often depends heavily on the specific chemical makeup of the product you are using. Generally, roof tar is formulated to be tough, capable of withstanding UV rays, standing water, and extreme temperature shifts.
Types of Roofing Tar
To predict how long your project will take, you need to identify which type of tar you are using. Here is a breakdown of the most common varieties:
Asphalt-Based Tar
This is the most common type found in hardware stores. It is made from refined petroleum and is often mixed with solvents to make it spreadable.
- Pros: It is affordable, easy to find, and works exceptionally well on flat roofs and standard shingles.
- Cons: It can become brittle in extreme cold if not formulated correctly.
- Best Use: General leak repairs and flat roof coating.
Coal Tar
As the name suggests, this is a byproduct of coal processing. It has a distinct smell and is incredibly resistant to water.
- Pros: It has a unique “self-healing” property that allows it to melt slightly in hot weather, resealing minor cracks.
- Cons: It takes longer to cure, and the fumes can be strong.
- Best Use: Industrial waterproofing and low-slope roofs.
Fiberglass-Reinforced Tar
This is your heavy-duty option. It is essentially asphalt tar mixed with fiberglass strands.
- Pros: The fibers act like rebar in concrete, preventing the tar from cracking or running when it gets hot.
- Cons: It is thicker, making it harder to spread and slightly slower to cure.
- Best Use: Vertical surfaces (like flashing) and large patches.
Comparison of Tar Types
Type Best Use case Average Touch-Dry Time Average Cost
Asphalt-Based Flat roofs, Shingles 12-24 Hours Low
Coal Tar Deep Waterproofing 24-48 Hours Medium
Fiberglass Vertical Flashing 12-24 Hours Medium-High
Common Myths About Roof Tar
There is a major misconception that roof tar dries instantly. Many homeowners assume that once the black goop is out of the can and on the roof, the job is done.
In reality, roof tar does not “dry” as water evaporates from a sidewalk. It goes through a chemical process. If you walk on it too soon, you will not only ruin your shoes but potentially break the waterproof seal, leading to leaks exactly where you just applied the patch.
The Science: Drying vs. Curing Process
To truly understand the timeline, we need to separate two terms that are often used interchangeably but mean very different things: drying and curing.
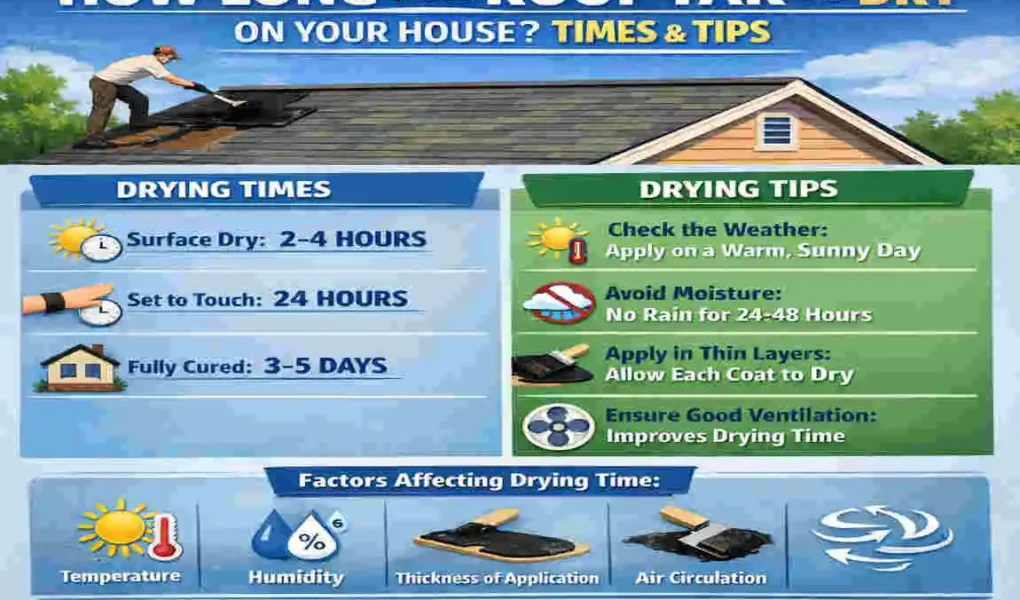
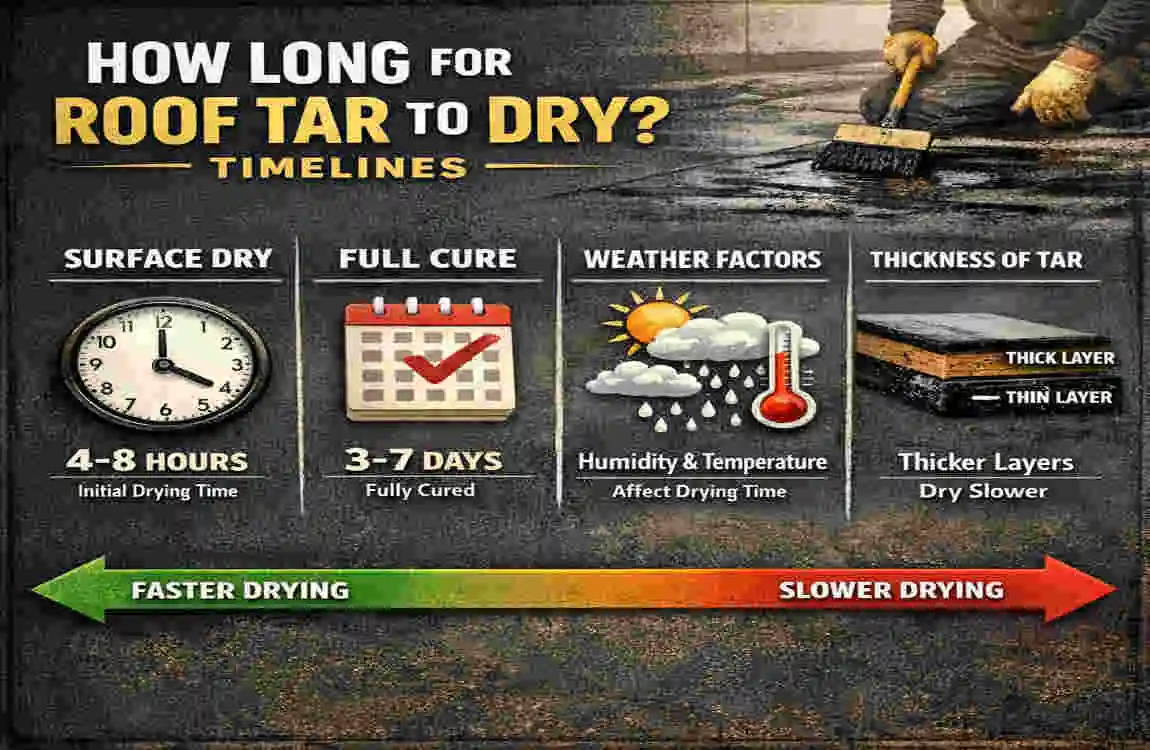
The Drying Phase (2 to 8 Hours)
Drying refers to the evaporation of the solvents. Manufacturers add solvents to the tar to keep it liquid in the can. Once you spread the tar on the roof and expose it to the air, those solvents begin to evaporate into the atmosphere.
During this phase, a “skin” forms on the top layer of the tar.
- What it looks like: The surface loses its wet sheen and becomes duller.
- Touch Test: If you touch it lightly, it might feel tacky or sticky, but it won’t transfer wet liquid to your finger.
- Warning: Just because it is “skin dry” does not mean it is hard underneath. If you press down, you will break the skin and come into contact with wet tar.
The Curing Phase (24 to 72 Hours)
Curing is the chemical hardening process that happens after the solvents have mostly evaporated. This is when the tar reaches its full structural integrity.
- What happens: The molecules in the tar bond together tightly to create a waterproof barrier.
- Full Strength: While it might be cured enough to withstand rain after 24 hours, it can take up to 7 days to reach 100% maximum hardness.
- The Result: A rubber-like, flexible seal that can expand and contract with the weather without cracking.
Visualizing the Stages
Imagine baking a brownie.
- Wet Stage: This is when you first apply the tar. It is liquid and movable.
- Tacky Stage: A crust forms on top (like a brownie), but the inside remains soft.
- Cured Stage: The center is firm, and the material is stable.
How Long for Roof Tar to Dry? Detailed Timelines
This is the answer you came here for. While every product mentions a generic time on the label, real-world conditions dictate the actual speed.
The Optimal Scenario
In perfect conditions—which we define as a sunny day, 70-85°F, and low humidity—you can expect:
- Touch-Dry: 6 to 12 hours.
- Safe for Rain: 24 hours.
- Walkable: 48 hours.
However, we rarely do roof repairs in perfect conditions. Often, we are fixing leaks because the weather is bad. Here is how different variables shift the timeline.
Detailed Drying Conditions Table
Weather Condition Time to Touch-Dry Time to Full Cure Important Notes
Ideal (70-85°F, Low Humidity) 6-12 Hours 24-48 Hours The “Gold Standard” for application.
Cold (Below 50°F) 24+ Hours 3-7 Days The cold thickens the tar, making solvent evaporation very slow.
High Humidity / Cloudy 12-24 Hours 48-72 Hours Moisture in the air prevents solvents from escaping.
Direct Sunlight 4-6 Hours 24 Hours UV rays bake the surface quickly (sometimes too quickly, causing cracks).
Thick Application +4-8 Hours +24 Hours Thicker layers trap solvents underneath the skin.
Regional Considerations
If you live in a region like Lahore or other areas with intense monsoon seasons, humidity becomes your biggest enemy. High humidity (above 80%) can literally double the drying time. In these environments, the air is already saturated with water vapor, so the solvents in the tar have nowhere to go. If you are applying tar in a humid region, always add a 12-24-hour buffer to your expected cure time.
Key Factors Affecting Dry Time
Why does one patch dry in an afternoon while another stays sticky for three days? It comes down to five critical factors.
Temperature
Heat is the engine of drying.
- Above 70°F: The solvents become volatile and evaporate quickly. The tar is thinner and spreads more easily, allowing for a more even coat that dries uniformly.
- Below 50°F: The tar becomes viscous (thick like molasses). It is hard to spread, often resulting in thick globs that take days to cure.
- Pro Tip: If you must work in the cold, keep your tar bucket in a warm room until the very last minute before heading up to the roof.
Humidity and Airflow
Humidity acts like a blanket over the tar.
- Low Humidity: Allows the solvents to lift off the surface efficiently.
- Wind: A gentle breeze is fantastic for drying. It sweeps away the layer of evaporated solvent sitting just above the tar, making room for more evaporation. However, be careful of high winds, which can blow dust and debris into your wet tar, ruining the adhesion.
Application Thickness
This is the most common mistake DIYers make. They think “more is better.”
- The Reality: If you apply a layer that is too thick (over 1/4 inch), the top will dry and form a hard skin. This skin seals the wet tar underneath, preventing the solvents from escaping. The result is a patch that stays soft and mushy for weeks.
- The Fix: Apply multiple thin coats (about 1/16 to 1/8 inch thick). Let the first coat cure before adding the second.
Surface Preparation
You cannot stick tape to a dusty table, nor can you stick tar to a dirty roof.
- Dirty Surfaces: If the roof has moss, dirt, or wet leaves, the tar sits on the debris rather than on the roof itself. This not only causes leaks but also slows drying because the debris holds moisture against the bottom of the tar patch.
- Wet Surfaces: Applying tar to a wet roof is usually futile (unless using specific “wet-patch” products). The water repels the oil-based tar, preventing a bond from forming.
Tar Quality
Premium formulas often contain “drying accelerators.” While they cost 20-30% more, they can shave hours off the cure time. Generic, budget-friendly brands often use cheaper solvents that evaporate more slowly.
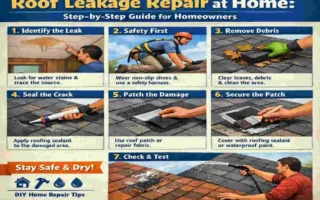
Step-by-Step Application Guide for Faster Drying
Want to ensure your tar dries as fast as possible? Follow this professional workflow.
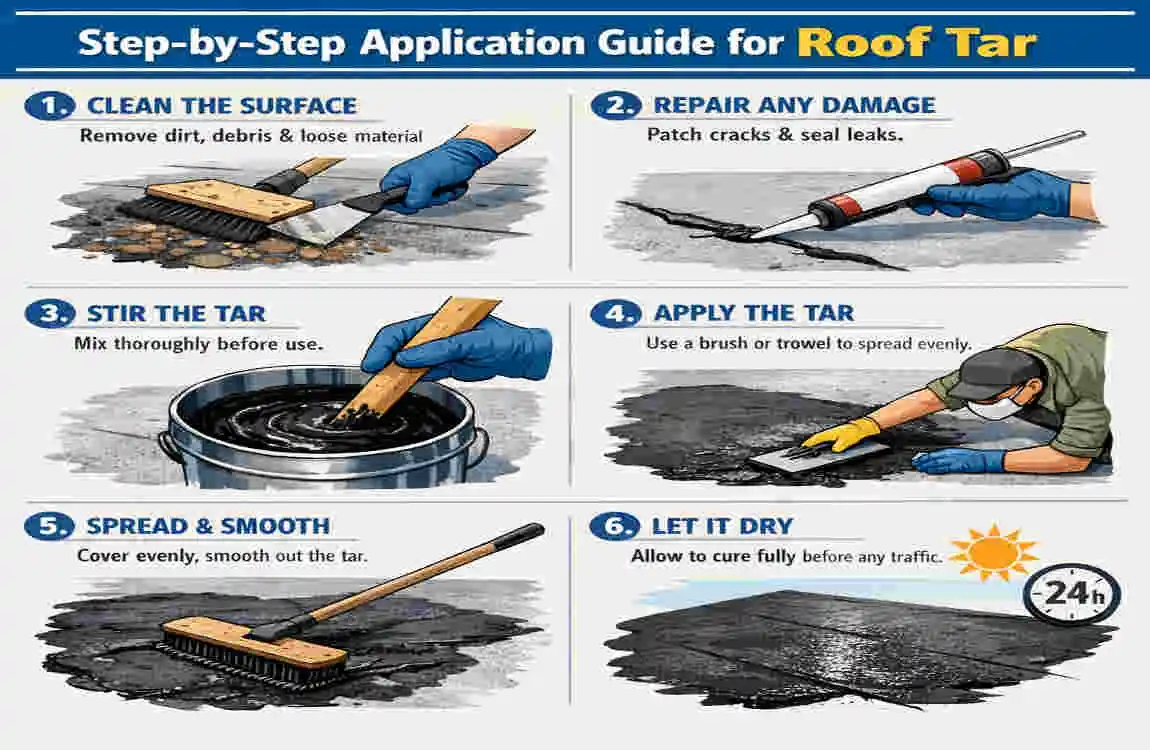
Phase 1: Preparation
- Check the Forecast: Look for a window of at least 24 hours of clear weather. If rain is expected in 8 hours, cover the repair area with a tarp rather than applying tar immediately.
- Safety Gear: Roof tar is nasty stuff. Wear disposable gloves, safety goggles, and old clothes. The fumes can be strong, so a respirator is recommended if you are sensitive to smells.
- Clean the Area: Use a stiff brush to remove loose gravel, dirt, and moss. If you power wash the area, you must wait for the water to dry completely before applying the tar.
Phase 2: Application
- Heat the Tar: If it is chilly, leave the can in the sun or a warm room. Warm tar spreads thinner.
- The “Butter” Method: Use a trowel or putty knife. Spread the tar like you are buttering toast—smooth and even. Avoid leaving ridges or mountains of tar.
- Reinforce (Optional): For larger cracks, apply a thin layer of tar, lay down a strip of roofing mesh/fabric, and then apply a second thin layer over it. This adds incredible strength without requiring a thick, slow-drying glob.
Phase 3: Post-Application
- Check the Edges: Feather the edges of your patch out by a thin amount. This ensures water flows over the patch rather than getting stuck against a thick ridge.
- Protect It: If rain threatens unexpectedly, you can gently place a piece of plywood or a tarp over the area, but ensure it doesn’t touch the wet tar (prop it up with bricks).
Troubleshooting Common Issues
Even with the best plans, things go wrong. Here is how to handle common drying disasters.
“It Rained on My Wet Tar!”
If it rains before the tar has formed a skin (usually within the first 2-4 hours):
- The Risk: The rain might wash some of the tar away or create “craters” in the surface.
- The Fix: Do not panic. Wait for the rain to stop and the area to dry. Inspect the patch. If it looks pitted or thin, apply a second thin coat over the top once the water is gone.
“The Tar Is Cracking or Bubbling”
- Cause: This usually happens because the application was too thick, or because it was applied in extremely hot, direct sunlight,, which dried the skin too quickly.
- The Fix: You need to seal the cracks. Apply a very thin “maintenance coat” over the cracked area to fill in the gaps.
“It’s Been 3 Days, and It’s Still Soft”
- Cause: Likely cold weather or trapped solvents (too thick).
- The Fix: You can try to accelerate drying using a heat gun (on a low setting) or a hair dryer. Keep it moving continuously to avoid igniting the solvents. Alternatively, set up a fan to increase airflow over the patch.
Maintenance After Drying
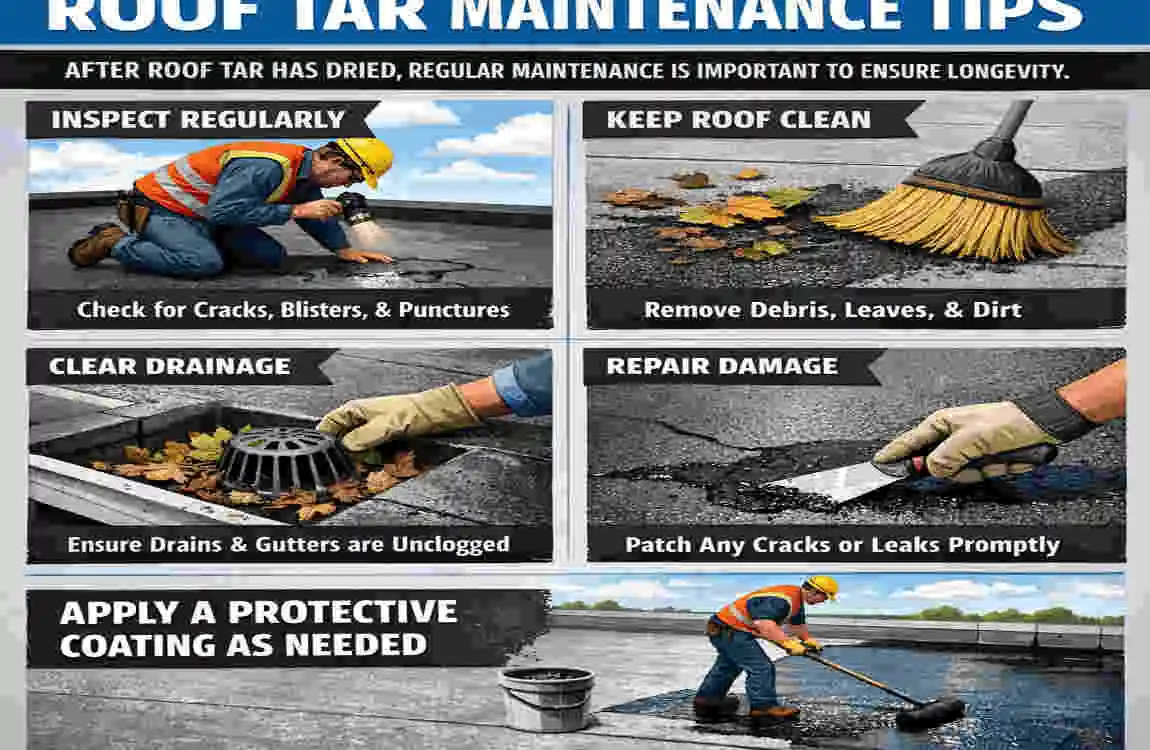
Once your roof tar is dry to the touch, your job isn’t quite finished. Proper maintenance ensures that the patch lasts its full 20-25-year potential.
When Can I Walk on It?
We recommend waiting a full 48 hours before walking on a tarred area. Even then, tread lightly. In high heat (summer days), cured tar can soften slightly. Avoid twisting your feet on the patch, as this can tear the material.
Annual Inspections
Roof tar is durable, but it is not invincible. UV rays eventually dry out the oils, making them brittle. Inspect your patches once a year. If you see small spiderweb cracks, a simple “re-coating” with a fresh, thin layer of tar can extend the life of the repair by another 5 years.
Frequently Asked Questions (FAQs)
Can I apply roof tar in the rain?
Generally, no. Standard roof tar needs a dry surface to bond. However, there are specific “Wet/Dry” or “Emergency” cements formulated to stick underwater. Unless they can specifically say “Wet Application,” wait for the rain to stop.
Can I paint over dried roof tar?
Yes, but you must be patient. If you paint too soon, the solvents in the tar will bleed through and stain the paint yellow or brown. Wait at least 72 hours (preferably a week) before painting. Use an oil-based primer first to seal the tar.
How do I remove roof tar from my hands?
Water won’t work. You need an oil-based cleaner. Baby oil, olive oil, or specific citrus-based hand cleaners work best. Rubbing alcohol or paint thinner can also work, but they are harsh on the skin.
Why is my roof tar turning gray?
This is normal oxidation. As the surface cures and is exposed to the sun, it may fade from jet black to a dark gray. This does not mean it is failing; it is just the surface layer reacting to UV light.