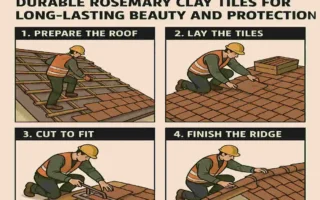
Have you ever looked up at a house under construction and wondered exactly what holds that massive roof up? Or better yet, are you currently planning a home build or a major renovation and finding yourself asking, “how much are roof trusses?” If you are deep in the budgeting phase of your construction journey, you have certainly come to the right place.
Building a home is a massive undertaking, and the roof is arguably the most critical component of the entire structure. Not only does it protect you from the elements, but it also defines the aesthetic appeal of your property. Today, builders heavily rely on roof trusses. These are pre-engineered, factory-built frames designed specifically to support the immense weight of your roof. They are incredibly efficient, significantly faster to install than traditional rafters, and they are mathematically engineered to safely span impressive distances—sometimes up to 60 feet without the need for interior load-bearing walls!
| Span (feet) | Cost Per Truss (Materials) |
|---|---|
| 20 | $70–$190 |
| 30 | $100–$280 |
| 40 | $140–$370 |
| 50 | $170–$460 |
| 60 | $210–$560 |
What Are Roof Trusses?
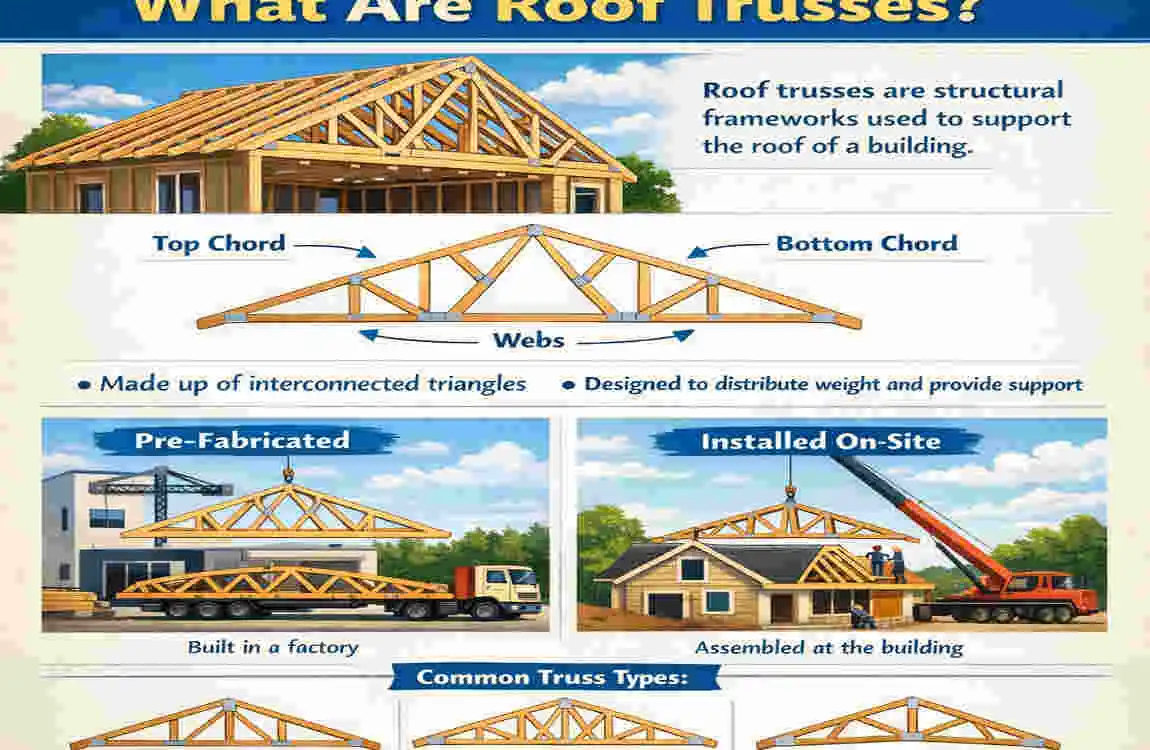
Before we start calculating costs, let us take a moment to understand what we are actually paying for. What exactly is a roof truss?
In the simplest terms, a roof truss is a rigid, prefabricated framework designed to support the roof load of a building. If you look at them closely, you will notice they are essentially made up of interconnected triangles. Why triangles? In the world of structural engineering, the triangle is the strongest, most stable geometric shape. It naturally resists tension and compression, distributing the heavy downward force of your roofing materials (such as shingles, tiles, or snow) evenly to the exterior walls of your home. These frameworks can be constructed from strong timber, heavy-duty steel, or even engineered wood products.
Trusses vs. Traditional Rafters
To really appreciate the value of roof trusses, you need to compare them to the old-school alternative: stick framing with traditional rafters.
Traditional rafters are built on-site, one piece of lumber at a time, by highly skilled carpenters. It is a slow, meticulous, and labor-intensive process. Roof trusses, on the other hand, are designed by computer software and manufactured in a climate-controlled facility. This means they arrive at your construction site ready to go.
The incredible benefits of choosing roof trusses include:
- Quicker Installation: A professional crew can often install an entire truss system in just 1 to 2 days, whereas stick framing can take weeks.
- Significant Cost Savings: Because they require far less on-site labor and use materials more efficiently, trusses can save you 20% to 30% compared to traditional stick framing.
- Ultimate Design Flexibility: Want a massive open-concept living room or a specialized attic space? Trusses make it happen by eliminating the need for pesky interior support pillars.
Whether you are building a modern minimalist home or a sprawling estate in Lahore or the greater Punjab region, roof trusses are quickly becoming the industry standard. Local builders in these areas increasingly prefer them because they can perfectly withstand regional weather conditions when engineered correctly.
Types of Roof Trusses
Not all roofs are created equal, and therefore, not all roof trusses are the same. The architectural style of your home, the climate you live in, and your budget will dictate the type of truss you need. Let’s explore the most popular options available today.
The King Post Truss
The King Post truss is the most basic design available. It consists of a simple outer triangle with a single vertical post (the king post) running down the center. Because of its straightforward design, it requires the least amount of material.
- Best For: Small spans, such as sheds, simple garages, or short home additions (typically 10 to 20 feet).
- Pros: Very affordable and easy to manufacture.
- Cons: Not suitable for wide homes.
The Queen Post Truss
Think of the Queen Post truss as the larger sibling to the King Post. Instead of one vertical post in the center, it features two vertical posts. This slight adjustment significantly increases the structural integrity and allows the framework to stretch further.
- Best For: Larger garages, residential additions, and moderately sized homes.
- Pros: Reliable, cost-effective, and handles slightly wider spans perfectly.
- Cons: Still limited compared to more complex engineered web designs.
The Fink Truss
The Fink truss is an absolute staple in modern residential construction. If you look inside the triangle, you will see a distinct “W” shape made by the interior wooden webs. This clever design distributes weight effectively, enabling highly efficient use of lighter lumber.
- Best For: Standard residential homes and widespread subdivisions.
- Pros: Excellent strength-to-weight ratio, very economical to produce.
- Cons: The “W” webbing takes up a lot of interior space, leaving no room for an attic.
The Scissor Truss
If you have ever walked into a beautiful home and gasped at the stunning vaulted ceilings, you can likely thank the Scissor truss. Instead of a flat bottom chord (the piece that forms the ceiling of the room below), the bottom chords of a scissor truss slope upward, creating an inverted “V” space inside the home.
- Best For: Homes with vaulted ceilings, aesthetic living spaces, and custom builds.
- Pros: Eliminates the need for a load-bearing interior wall while providing a dramatic architectural feature.
- Cons: They are more expensive due to the complex engineering required.
The Howe Truss
The Howe truss is a powerhouse of a design. It features vertical webbing mixed with diagonal webs that point upward toward the center. This design is exceptionally strong and is uniquely suited for materials like heavy timber or steel.
- Best For: Commercial buildings, agricultural barns, and extremely wide residential spans.
- Pros: Can hold immense amounts of weight.
- Cons: Overkill and unnecessarily expensive for a standard family home.
The Pratt Truss
Similar to the Howe truss but inverted, the Pratt truss features diagonal webs that slope downward toward the center. This specific arrangement is brilliant at handling downward pressure, making it a favorite in regions with heavy roof loads.
- Best For: Homes in snow-prone areas where winter weather adds literal tons of weight to the roof.
- Pros: Incredible resistance to heavy top-loads.
- Cons: Requires more material, driving the cost up slightly.
The Attic Truss
Do you need extra storage space or a bonus room? The Attic truss (sometimes called a room-in-roof truss) is built with a large, open rectangular space right in the middle. The bottom chord is significantly beefed up to act as a floor joist for the room above.
- Best For: Homes needing a loft, extra storage, or future expansion space.
- Pros: Adds valuable, usable square footage to your home.
- Cons: One of the most expensive wooden trusses on the market due to the thick lumber required.
Steel Trusses
While wood is the most common, Steel trusses are an incredibly durable alternative. They are manufactured from galvanized steel and offer unparalleled strength.
- Best For: Coastal properties, modern commercial designs, or areas prone to severe termite damage.
- Pros: Highly corrosion-resistant, fireproof, and rot-proof.
- Cons: They are heavy, require specialized labor to install, and carry a premium price tag.
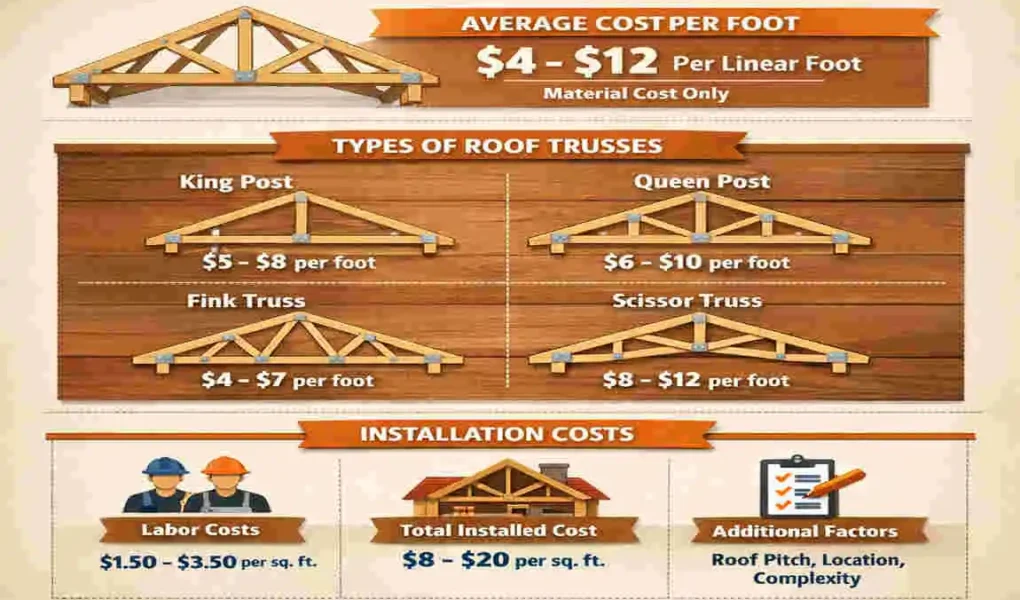
Truss Type Comparison Table
To make your planning easier, here is a quick reference guide comparing these popular types alongside their average material costs per foot or unit.
Type Description Best For Cost Per Foot (Materials)
King Post Simple triangle with vertical king post Small spans (10-20 ft) $3 – $5
Queen Post Two vertical posts for wider spans Garages, home additions $4 – $6
Fink W-shaped webbing for maximum efficiency Residential homes $35 – $55 per truss
Scissor Sloped bottom chord for vaulted ceilings Attics, aesthetic spaces $4.40 – $5.78
Howe Strong design with diagonal webs Commercial or large builds $5 – $7
Pratt Counter-diagonals built for heavy loads Snow-prone climates $4 – $6
Attic Open center for built-in storage space Homes needing a loft $100 – $400 per truss
Steel Heavy-duty, corrosion-resistant framing Coastal or modern builds $7 – $9 per board foot
When choosing between wood and steel, it often comes down to budget and regional climate. For example, homes built in Pakistan’s monsoon-heavy areas greatly benefit from wood treated for high humidity or steel frames that naturally resist moisture-induced warping.
How Much Are Roof Trusses? Costs Per Foot Breakdown
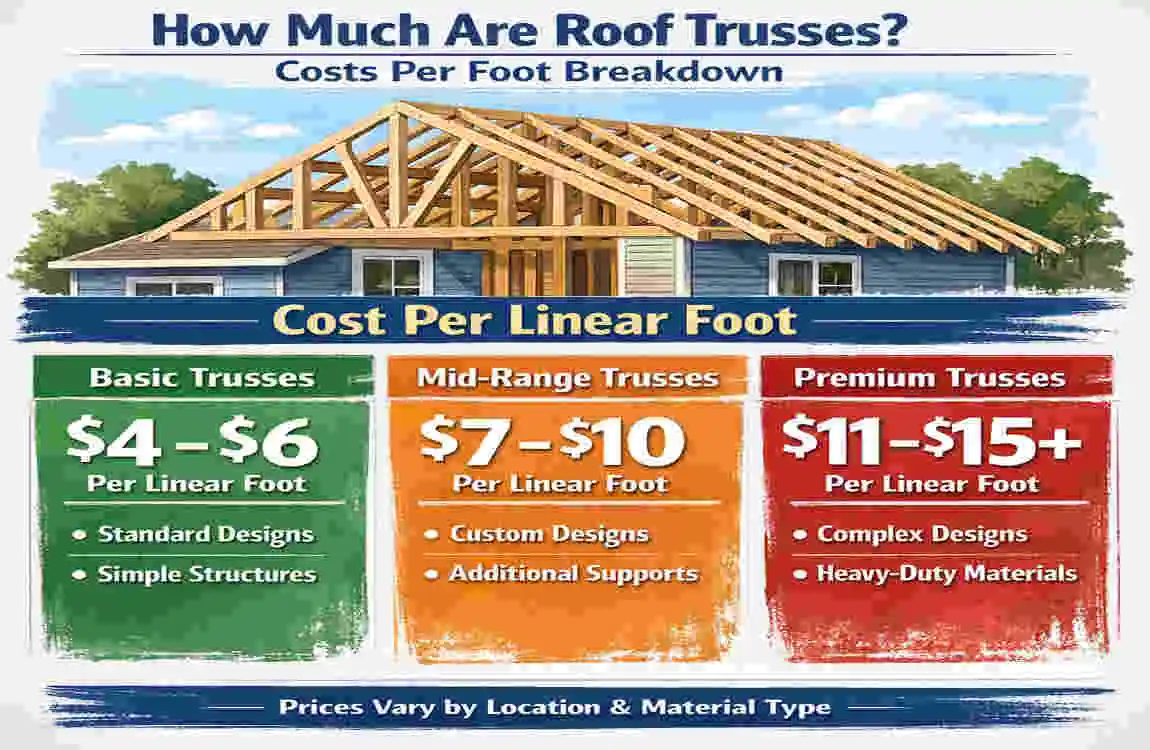
Now, let us tackle the core question directly: how much are roof trusses in 2026?
Understanding the pricing breakdown requires examining the numbers from several angles. You are not just buying a piece of wood; you are buying engineered support. On average, the material costs for residential roof trusses range from $3.50 to $9.25 per linear foot.
To put that in a real-world perspective, imagine you are building a home that requires a truss spanning 40 feet. At that rate, you are looking at roughly $140 to $370 per individual truss for materials alone.
Breaking Costs Down By Span
The length the truss needs to span (the span) heavily influences the price, as longer spans require significantly more lumber, thicker wood, and more complex engineering to remain stable. Let’s look at how spans change the cost per linear foot:
- 26-Foot Span: You can expect to pay around $3.30 to $4.40 per linear foot.
- 30-Foot Span: The price creeps up slightly to $3.58-$4.68 per linear foot, as thicker webbing is required.
- 60-Foot Span: When you reach commercial or massive residential sizes, engineering becomes more intensive. These massive units can cost between $210 and $560 per truss.
Breaking Costs Down By Type
Let’s use the most popular residential option, the Fink truss, as a practical example. Say you are building a standard-sized, rectangular home. A typical Fink truss might cost around $185 each. If your roof’s length requires 42 trusses spaced out every 24 inches, your total material cost for the framework alone would be roughly $7,770.
The Full System Cost
If you are budgeting for an average 2,000-square-foot home, you need to look at the big picture. When you combine the materials (the trusses themselves, the metal connector plates, the bracing lumber) with the professional labor required to lift and secure them, the total project generally lands between $7,500 and $12,000.
Factors That Inflate These Base Costs
While these averages are a great starting point, several project-specific factors will push your price higher:
- Roof Pitch: The pitch is the steepness of your roof. A steeper pitch (like an 8/12 or 10/12) requires much taller trusses. Taller trusses mean more wood, which equals a higher price tag.
- Custom Designs: Standard Fink trusses are cheap because they are mass-produced. If your architect designs a complex, multi-tiered roof requiring custom-engineered frames, expect to pay a 20% premium.
- Location and Logistics: Delivering oversized trusses is difficult. If you are building in a congested urban center like Lahore, the delivery truck may struggle to access the site. You might have to pay an extra $950 or more just for specialized delivery routing and the crane required to hoist them off the truck.
Installation Prices and Labor Costs
Buying the trusses is only half the battle. Getting them safely from the ground to the top of your walls is a major operation. Because trusses are heavy and awkwardly shaped, professional installation is essential for most projects.
What Does Labor Cost?
When hiring a professional framing crew, you will typically see labor charged in one of two ways: either by the hour or by the square foot.
- Hourly Rates: Professional carpenters and framers generally charge between $25 and $75 per hour, depending on their experience and your location.
- Square Foot Rates: Many crews simplify things by charging a flat $4.50 per square foot of installed roofing area.
For an average-sized home, you should budget between $7,200 and $12,000 for the complete installation.
The Installation Timeline and Steps
One of the greatest advantages of roof trusses is their fast installation. While traditional rafters might take weeks to cut and place, a professional crew armed with a crane can install an entire truss system in just 1 to 3 days.
Here is a step-by-step breakdown of how that process unfolds:
- Site Preparation and Delivery: The trusses are delivered on a flatbed truck. The crew ensures the job site is clear and safe for heavy machinery to operate.
- Crane Placement: Trusses are simply too heavy for workers to carry up ladders. A crane is rented to lift them. Hiring a crane and a dedicated 2-person operating crew usually costs around $1,600 per day.
- Hoisting and Securing: The crane lifts each truss individually. The framing crew, positioned on the walls, catches the truss, aligns it perfectly, and secures it to the wall plates using specialized metal brackets known as hurricane ties.
- Bracing and Sheathing: Once all trusses are standing, they are braced together with lateral wood planks to prevent them from tipping over like dominoes. Finally, plywood sheathing is nailed over the top, locking the entire system together.
- Final Inspection: A local building inspector must review the structural connections to ensure everything is up to code before the shingles go on.
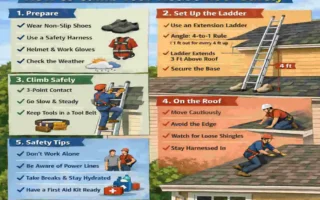
A Quick Tip: Always hire certified installers. Attempting to cut corners with uncertified laborers can result in failed inspections. Also, do not forget to factor in building permits, which can add 5% to 10% to your total installation budget. If you are ready to get started, you can easily link up with our professional business services to secure a skilled local crew.
Factors Affecting Roof Truss Prices
To accurately answer “how much are roof trusses,” we have to acknowledge that the construction market is dynamic. Several moving parts will dictate your final quote. Let’s look closely at the variables you need to monitor.
Span and Pitch Requirements
As we touched on earlier, the geometry of your roof is the biggest price driver. Wider homes require longer spans, which necessitate denser, higher-grade lumber to prevent sagging in the middle. Furthermore, the pitch (the angle of the roof) changes everything. A standard 4/12 pitch uses significantly less wood than a dramatic, steep 12/12 pitch found on Victorian-style homes. More wood equals more money.
Material Selection: Wood vs. Steel
The material you choose is a massive variable.
- Wooden Trusses are the standard. They are affordable, ranging from $60 to $500 per truss depending on size, and they are relatively easy to customize.
- Steel Trusses are the premium upgrade. Ranging from $150 to $700 per truss, they are favored for commercial applications or extreme environments where rot, pests, or high winds pose a severe threat.
Geographic Location
Where you build matters just as much as what you build. If you are constructing a home in urban Lahore, you might face premium urban labor rates and difficult delivery logistics. Conversely, building in rural areas might mean lower labor costs but higher transportation fees to get the trusses out to your remote site. Additionally, regions heavily reliant on imported lumber will pass import duties and taxes directly to consumers.
Level of Customization
If you want standard Fink trusses, you will get standard pricing. But the moment you start asking for specialized Scissor trusses for a vaulted master bedroom or Attic trusses for a hidden playroom, the manufacturer has to reprogram their machinery and re-engineer the load paths. Expect custom features to add 15% to 30% to your bill.
Market Fluctuations and Lumber Trends
We cannot discuss construction costs without discussing the commodities market. In 2026, we have seen lumber prices trend upward by roughly 10% following the volatile market shifts of late 2025. Keeping an eye on global lumber markets can help you time your project for maximum savings.
DIY vs. Professional Installation
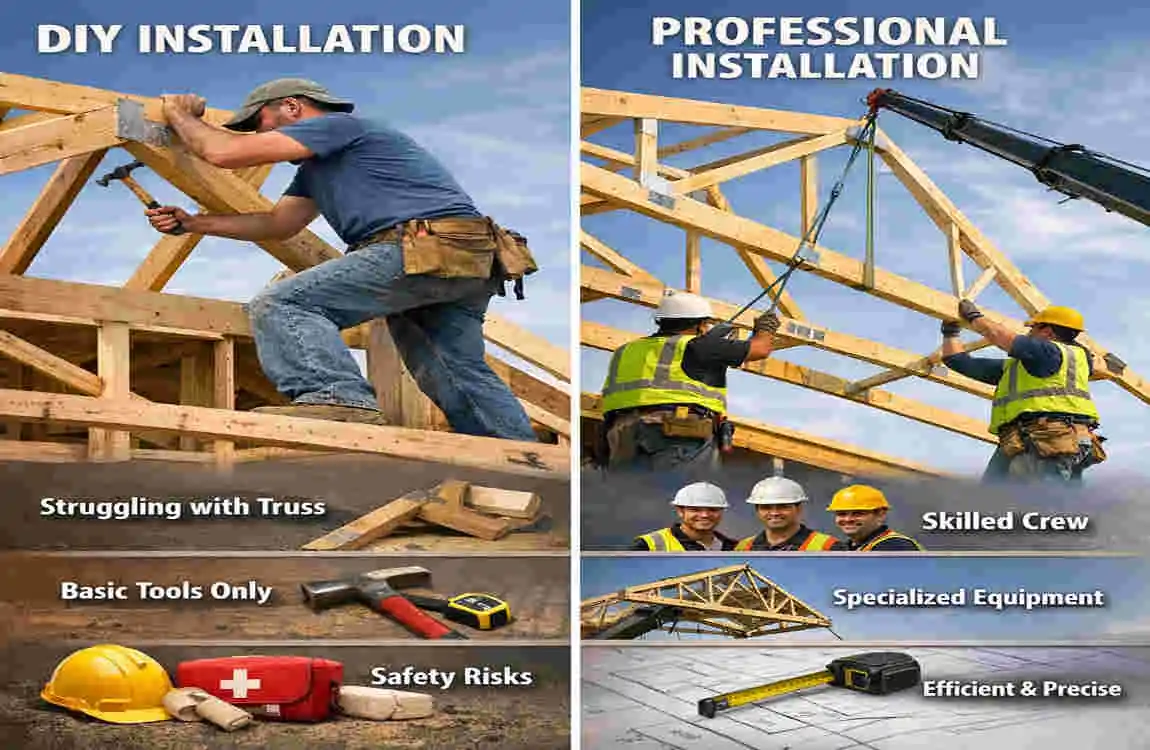
With the high cost of labor, many ambitious homeowners inevitably ask: “Can I install roof trusses myself?”
On paper, the DIY route looks tempting. By acting as your own general contractor and providing the labor, you could theoretically pocket 30% to 50% in savings. However, when it comes to the structural integrity of your roof, the risks far outweigh the financial benefits.
Installing roof trusses is incredibly dangerous work. It requires operating heavy machinery, balancing on high, narrow walls, and understanding complex engineering codes. A single mistake—such as misaligning a truss or failing to install the correct bracing—can cause the entire roof system to collapse, resulting in catastrophic property damage or fatal injuries. Furthermore, professional installers offer warranties on their work and guarantee that the installation will pass strict municipal building codes.
Cost and Risk Comparison Table
Option Estimated Cost Estimated Time Level of Risk
DIY Installation $4,000 – $10,000 5 – 7 days High (Safety hazards, code violations)
Professional Install $7,500 – $35,000 1 – 3 days Low (Warrantied, code-compliant, fast)
We strongly recommend leaving this phase of your home build to the professionals to avoid massive liability issues down the road.
Savings Tips and ROI
Just because you are hiring professionals does not mean you have to pay top dollar. There are several strategic ways to keep your truss budget under control.
- Buy in Bulk: If you are building a large home or multiple structures (like a house and a detached garage), order all your trusses from the same manufacturer at once. You can often negotiate a 10% to 15% discount for bulk orders.
- Stick to Standard Designs: Keep your roofline simple. A standard gable or hip roof using basic Fink trusses will always be cheaper than a complex roof with multiple valleys, dormers, and intersecting angles.
- Seek Energy-Efficient Rebates: Sometimes, using “raised-heel” energy-efficient trusses allows for thicker attic insulation. This lowers your heating bills and may qualify you for local green-energy tax rebates.
What is your Return on Investment (ROI)? While the upfront cost is significant, a professionally installed roof truss system will easily last 50+ years. Furthermore, a modern, structurally sound roof significantly boosts buyer confidence, potentially increasing your home’s overall resale value by 5% to 10%.
Frequently Asked Questions (FAQs)
As we wrap up our deep dive, let’s quickly summarize the answers to the most common homeowner questions during this process.
How much are roof trusses per foot? For residential materials alone, expect to pay between $3.50 and $9.25 per linear foot. You will then need to factor in professional labor, which typically runs an additional $25 to $75 per hour.
What is the average cost for a 2,000 sq ft roof? When you combine custom design, materials, crane rental, and professional labor, the entire installed system for a 2,000-square-foot home will range from $7,500 to $35,000, heavily depending on your geographic location and the complexity of the roof design.
Are wood or steel trusses cheaper? Wood is significantly cheaper and remains the absolute standard for most residential homes. Steel is a premium material generally reserved for commercial buildings or specialized architectural projects.
How long does it take to install? If you hire a professional framing crew equipped with a crane, a standard residential roof truss system can usually be hoisted and secured in just 1 to 2 days.
Do I need permits in Pakistan? Yes. Whether you are building in Pakistan, the US, or anywhere else, installing a roof requires significant structural changes. You must secure the proper municipal building permits before work begins.