Are you tired of feeling a chilly draft snake its way across your living room floor every winter? Or maybe you’re just sick of looking at a front door that’s faded, dented, or stuck in a design era you’d rather forget.
We’ve all been there. The front door is the face of your home, and when it’s looking tired, the whole house feels a bit run-down. But here is the good news: installing a new exterior door is one of the most impactful home improvement projects you can tackle this weekend.
Now, you might be thinking, “Can I really do this myself?” The answer is a resounding yes. While it might look intimidating, learning how to install an exterior door is entirely doable for the average DIY enthusiast. By choosing to install the exterior door yourself, you can save anywhere from $500 to $2,000 in professional labor fees. That’s money you can put right back into buying a higher-quality door or upgrading your entryway hardware.
Why Upgrade Your Exterior Door?

Before we start ripping out hinges, let’s talk about why this project is worth your sweat equity. It’s not just about a fresh coat of paint or a new handle; replacing an exterior door is a functional upgrade that pays dividends immediately.
Energy Efficiency and Comfort
Old doors are notorious energy wasters. If your current door is warped or the weatherstripping is disintegrating, you are essentially throwing money out the window—or rather, out the door. Modern doors come with superior insulation cores and tighter manufacturing tolerances. They keep your conditioned air inside, lowering your monthly utility bills.
Enhanced security
Let’s be honest: security is a priority for every homeowner. Older doors, especially those with hollow cores or rotted frames, are weak points. New exterior door installation steps often involve reinforced strike plates and solid construction (like steel or fiberglass) that make forced entry significantly more difficult.
Assessing the Options: What Door is Right for You?
When you head to the hardware store, you’ll be faced with three main choices: Wood, Fiberglass, and Steel. Here is a quick breakdown to help you decide on the best doors for exterior door installation:
Door MaterialProsConsBest For
Fiberglass is extremely durable, energy-efficient, resists dents and rot, and can mimic wood grain. Can be pricey upfront; requires specific installation care to avoid cracking: high-traffic entrances and harsh climates.
Steel: High security, strongest material, very affordable, low maintenance. Can dent and rust if scratched; conducts heat and cold better than fiberglass. Budget-conscious homeowners prioritize security.
Wood has unmatched beauty and a high-end look, and scratches can be easily repaired. Expensive, requires regular maintenance (painting/staining), and can rot or warp. Historic homes or protected entryways (porches).
The Cost Factor
If you hire a pro, you are paying for the door, a hefty markup, and labor. If you do a DIY exterior door replacement, your costs are strictly materials. You can expect to spend between $200 and $1,500 for the door unit itself, depending on the material and glass inserts. The tools and extra materials (shims, screws, foam) might run you another $100 if you’re starting from scratch. Compare that to a pro quote of $2,500+, and the effort suddenly looks very appealing!
Tools and Materials Needed
You cannot do a professional job with amateur preparation. Having the right tools for how to install an exterior door laid out and ready will save you from making five frustration-filled trips to the hardware store in the middle of the project.
Essential Tools List
Here is what you need to have in your toolbox:
- Tape Measure: Accuracy is everything here.
- 4-foot and 2-foot Levels: You need to check plumb (vertical) and level (horizontal) constantly.
- Power Drill/Driver: For removing old hardware and driving long screws.
- Hammer and Pry Bar: For removing the old trim and door frame.
- Utility Knife: For cutting caulk lines and trimming shims.
- Caulk Gun: For sealing the exterior against water.
- Square: To ensure corners are true.
- Safety Gear: Always wear safety glasses (wood splinters fly!) and sturdy gloves.
Materials Checklist
- Pre-hung Exterior Door: This comes pre-mounted in a frame, making life 100 times easier than hanging a slab door.
- Wood Shims: You will need several packs of these wedge-shaped wood pieces to level the door.
- 3-inch Exterior Screws: Essential for security (we will explain why later).
- Galvanized Finish Nails: For reattaching the trim.
- Insulating Foam Sealant: Make sure it says “Window and Door” or “Low Expansion.” High-expansion foam can bow your frame and ruin door operation.
- Exterior Caulk: Silicone or high-quality paintable latex.
- Flashing Tape: To waterproof the sill.
Preparation Steps Before Installation

This is the phase that separates a squeaky, drafty door from a solid, professional result. Do not rush the prep work.
Measure, Measure, Measure
Before you even buy the new door, you must measure the existing one correctly. You aren’t just measuring the door slab; you need the dimensions of the Rough Opening.
- Remove the interior casing (trim) so you can see the actual studs.
- Measure the width between the studs at the top, middle, and bottom. Use the smallest measurement.
- Measure the height from the subfloor to the header.
- Measure the jamb width (thickness of the wall). Common sizes are 4-9/16 inches (for 2×4 walls) or 6-9/16 inches (for 2×6 walls).
Your new door unit should be about 1/2 inch narrower and 1/2 inch shorter than this rough opening to allow room for adjustment.
Clear the Workspace
Safety first! If there are any electrical switches or outlets right next to the door trim, turn off the power at the breaker just to be safe. Move rugs, furniture, and curious pets away from the area.
Remove the Old Door
- Score the paint: Use your utility knife to cut the paint seal between the trim and the wall. This prevents the paint from peeling off the drywall when you pry the trim.
- Remove the door: Tap the hinge pins out with a hammer and screwdriver, then lift the door slab away.
- Remove the frame: Unscrew or pry out the old jambs and threshold. This can be messy—expect some resistance.
Inspect and Prep the Opening
Once the old door is gone, look at the subfloor and the studs. Is there any rot? Mold? Softwood?
- Do not install a new door over rotted wood. It will only get worse. Replace any damaged subfloor.
- Check the level: Place your level on the subfloor where the threshold will sit. If it’s not perfectly level, you will need to level it using shims or a bevel board later. If the floor isn’t level, the door won’t swing right.
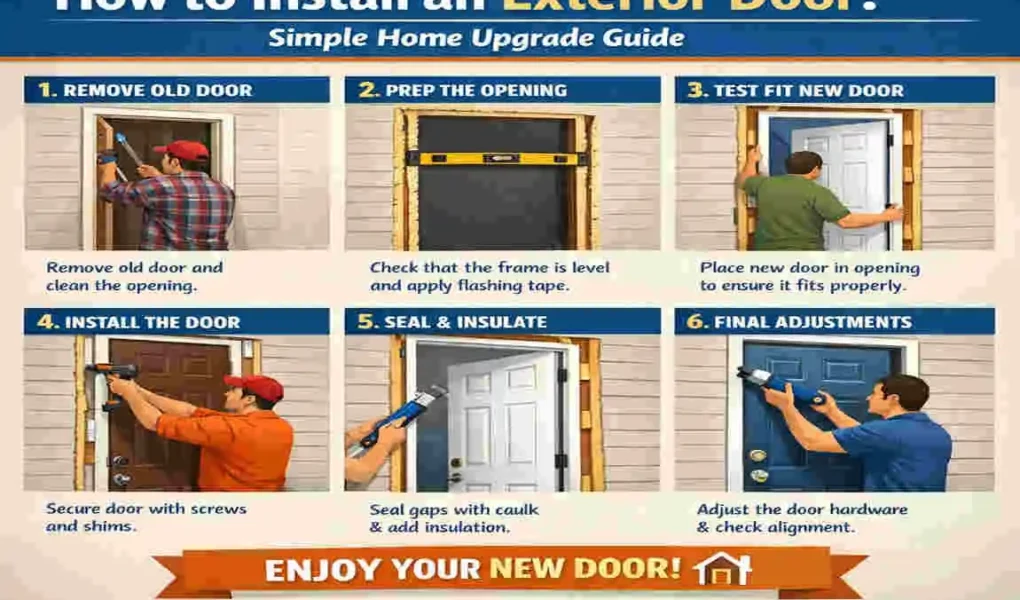
Step-by-Step Guide: How to install an Exterior Door
Alright, the hole in your house is ready. Let’s fill it with something beautiful. Here is your step-by-step guide to installing an exterior door.
Dry-Fit the New Door
Before applying any glue or caulk, pick up the new pre-hung door (you might need a helper) and set it into the rough opening.
Why do we do this? You want to make sure it actually fits. Check that there is a gap of about 1/4 to 1/2 inch on all sides.
- If the opening is too tight, sand down a stud or remove some drywall.
- If the opening is too loose, you need to nail a strip of plywood to the stud to build it out.
Once you confirm it fits, take the door back out and set it aside.
Weatherproof the Sill
Water is the enemy. To prevent rot, apply a heavy bead of caulk along the subfloor where the threshold will sit.
- Pro Move: Use self-adhesive flashing tape over the subfloor sill. This acts as a pan to catch any water that sneaks in and directs it outward.
- Apply three thick lines of caulk on top of the flashing: one near the front, one in the middle, and one near the back.
Insert the Door and Shim
Lift the door unit and place the bottom onto the caulk, tilting the top into place.
Now comes the art of shimming.
- Center the door: Ensure there is an even gap on both the left and right sides.
- Hinge side first: This is critical. Place shims behind the hinges between the door frame and the wall stud.
- Check for Plumb: Place your 4-foot level on the face of the hinge-side jamb. It must be perfectly vertical. Adjust the shims until the bubble is dead center.
- Tack it in: Drive a screw loosely through the jamb and shims near the top hinge to hold it in place. Do not tighten it fully yet.
Square and Fasten the Frame
Now that the hinge side is plumb, look at the gap between the door slab and the top of the frame (the head jamb). This gap should be even across the entire width.
- If the gap is wider on the handle side, you need to shim up the bottom of the jamb on that side.
- Once the top gap is even (“reveals” are consistent), shim the lock side of the door. Place shims near the top, middle, and bottom.
- Check the swing: Open and close the door. Does it bind? Does it swing open or closed on its own? (It shouldn’t).
Once everything is square, plumb, and swinging smoothly, drive 3-inch screws through the hinges and shims, and deep into the solid wood stud of the house. This provides your security. Short screws only hold the door to the flimsy frame; long screws hold it to the house.
Insulate and Seal
You now have a gap between your new door frame and the wall studs.
- Don’t stuff it with fiberglass: Fiberglass insulation doesn’t stop air; it just filters it.
- Use Expanding Foam: Grab your can of “Window and Door” foam. Gently fill the gap about 50% full. The foam will expand to fill the rest.
- Warning: Do not overfill! Too much foam can create pressure that bows the door frame inward, making the door stick.
install Hardware and Finish
While the foam cures, you can install your new lockset and deadbolt according to the manufacturer’s instructions.
- Reinstall the Trim: Measure, cut, and nail up your interior and exterior molding (brickmold) to cover the gap.
- Caulk the Exterior: Run a bead of high-quality exterior caulk along the perimeter where the trim meets the siding. This keeps the rain out. Do not caulk the bottom of the threshold on the outside—water needs a way to escape if it gets in!
Common Mistakes to Avoid
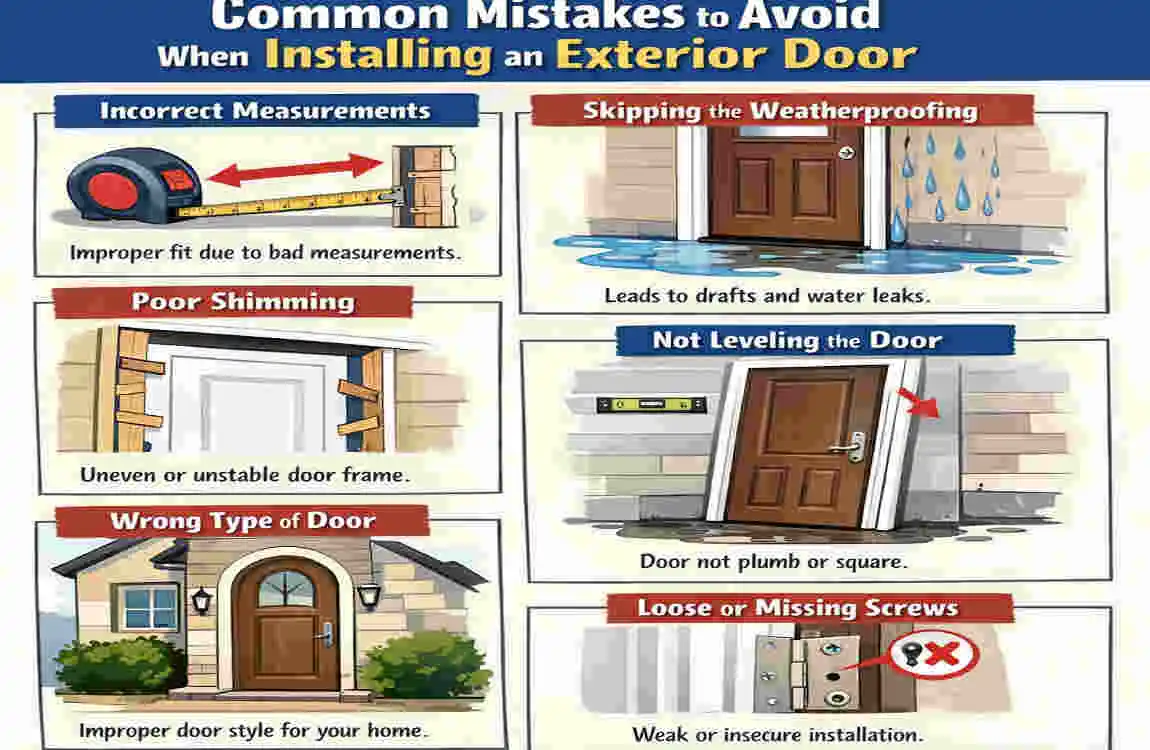
Even seasoned DIYers can stumble. Here are the most common pitfalls in exterior door installation steps and how to dodge them.
- Buying the Wrong “Handing”: Doors are “Left Hand” or “Right Hand.” Stand with your back to the hinge side of the door jamb. If the door swings open to your left, it’s a left-hand door. Double-check this before leaving the store!
- Ignoring the Subfloor Level: If you install a door on a sloped floor, it will eventually drag or leak. Always level the floor with shims or a board before setting the door.
- Over-tightening Screws: Power drills are strong. If you zip a screw in too hard, you can pull the door frame out of square. Use a low torque setting or finish tightening by hand.
- Using the Wrong Foam: We can’t stress this enough—standard “Gap Filler” foam expands with massive force. It will warp your door jambs. Only use low-expansion foam designed for doors.
- Skipping the Long Screws: Most pre-hung doors come with tiny 1-inch screws in the hinges. These are for shipping, not security. Replace the center screw of each hinge with a 3-inch screw to anchor the door to the house structure.
Maintenance and Long-Term Tips
Congratulations! You have successfully learned how to install an exterior door. To keep it looking and working great for decades, a little maintenance goes a long way.
Seasonal Checks: Once a year, preferably before winter, check the weatherstripping. If it’s torn or compressed, peel it out and replace it (it usually just slides into a groove).
Lubrication: A squeaky hinge is annoying. A quick spray of silicone lubricant or white lithium grease keeps things silent. Also, squirt a little graphite powder into your locks to keep them turning smoothly.
Finish Protection: If you have a wood door, check the varnish or paint. Suppose it’s cracking, sand and refinish it immediately to prevent water damage. For fiberglass and steel, a gentle wash with soapy water keeps the finish fresh.
Consider a Storm Door: If your door faces the brunt of the weather (rain, direct hot sun), installing a storm door can protect your investment and add another layer of insulation.
Frequently Asked Questions (FAQs)
Q: Can I really install an exterior door myself? A: Absolutely. If you are comfortable using a tape measure, a level, and a drill, you can handle this project. It is intermediate-level, but totally doable with patience.
Q: How long does it take to install an exterior door? A: For a first-timer, plan on it taking a full day (6–8 hours). This accounts for removing the old door, prepping the opening, and installing the new door. A pro can do it in 2–4 hours.
Q: Do I need a permit to replace an exterior door? A: In most cases, if you are replacing an existing door with one of the same size, you do not need a permit. However, if you are cutting a new hole in the wall or widening the opening, you likely will. Always check your local building codes to be sure.
Q: What is the hardest part of installing an exterior door? A: Most people find getting the door plumb and square to be the trickiest part. Using shims correctly takes a little patience. If you rush this step, the door won’t close properly.
Q: My door is installed, but it sticks. What happened? A: You likely either over-tightened the mounting screws (pulling the frame) or used high-expansion foam (pushing the frame). Check the reveals (gaps) around the door to see where it’s tight and adjust the screws or sand the frame slightly.