You are standing in the aisle of your local hardware store, staring at a sleek, modern dimmer switch. You think to yourself, “I could install this in ten minutes.” But then, a nagging doubt creeps in. Is it actually legal? Is it safe? Or will you accidentally burn down your biggest investment?
The question “Can I do electrical work on my own house?” is one of the most common queries homeowners have. It is also one of the most important. According to fire safety statistics, electrical malfunctions cause over 50,000 home fires every single year, resulting in more than $1 billion in property damage. That isn’t meant to scare you away from holding a screwdriver; it is meant to emphasize that electricity demands respect.
The Big Question: Can I Do Electrical Work on My Own House?
When you ask, “Can I do electrical work on my own house?” you are usually asking two things: “Am I physically capable?” and “Am I legally allowed?” The physical part depends on your skills, but the legal part depends entirely on where you live.
In many jurisdictions, specifically across the United States, there is a legal concept known as the “Homeowner Exemption.” This rule typically allows the owner of a single-family, detached home to perform electrical work on their own property without holding a professional electrician’s license. The key here is that you must own the home and live in it. You generally cannot do unpermitted electrical work on a rental property you own, a condo where walls are shared, or a house you are flipping for resale.
However, just because you can do it doesn’t mean you can do whatever you want.
Local Variations Matter
Electrical codes are not universal. While the National Electrical Code (NEC) sets the standard in the US, local municipalities adopt these codes at different times and often add their own amendments.
- United States: Most states allow DIY work for “branch circuits” (the wires running to your outlets and lights). However, work on the main service panel often requires a pro.
- United Kingdom/EU: Rules are stricter. In the UK, “Part P” of the Building Regulations requires that most electrical work be either done by a certified professional or inspected by the building control office.
- Pakistan/India: While enforcement varies, regulations from bodies like WAPDA or local supply companies (like LESCO or K-Electric) generally require certified professionals for new connections and load extensions, though internal minor repairs are often unregulated DIY territory.
List: Legal Factors by Region
- United States: Permits are almost always required for adding new circuits or extending existing ones. Swapping a like-for-like device (an old outlet for a new one) often does not require a permit, but you must check your local city hall website.
- Australia: It is famously illegal to do almost any DIY electrical work. You can change a lightbulb, and that is about it. Doing your own wiring can result in massive fines.
- Permit Threshold: A good rule of thumb is that if you are touching the wiring behind the wall, you likely need a permit. If you are changing the device attached to the wire, you might not need to.
What Electrical Work Can Homeowners Legally Do?
So, where is the line drawn? If you want to tackle a project, you need to know whether it falls into the “Green Light” or “Red Light” zone. Generally, maintenance and repair are fair game for homeowners. New installations and heavy-duty upgrades are where the line blurs.
The goal of these restrictions isn’t to make your life difficult; it is to ensure that the wiring in your walls doesn’t overheat and that the next family who buys your house is safe.
Table: Allowed vs. Pro-Only Tasks
Allowed DIY (Often)Pro-Only (Usually)Why?
Replace outlets/switches. Service panel upgrades. Replacing a device is low risk; messing with the main panel has a high arc-flash and death risk.
Install ceiling fans—new circuit wiring. : Fans use existing boxes; new circuits require calculating load, voltage drop, and proper breaker sizing.
Change light fixtures. , GFCI additions >10. Swapping a chandelier is standard; wiring complex GFCI banks requires advanced code knowledge.
Smart device installs: Whole-house rewiring: Smart switches are essentially standard switches; rewiring requires a permit and a rough-in inspection.
Doorbell repair, moving the meter. Low voltage (under 50V) is generally unregulated; the meter belongs to the utility company.
The “Like-for-Like” Rule
A great guiding principle is “Like-for-Like.” If you are replacing a 15-amp outlet with a new 15-amp outlet in the same spot, you are usually in the clear. If you are trying to change a 110V outlet to a 220V outlet for a new dryer, that is a circuit modification, and “can I do electrical work on my own house” becomes “I need a permit and maybe a pro.”
Legal Rules & Permits: Navigating “Can I Do Electrical Work on My Own House”
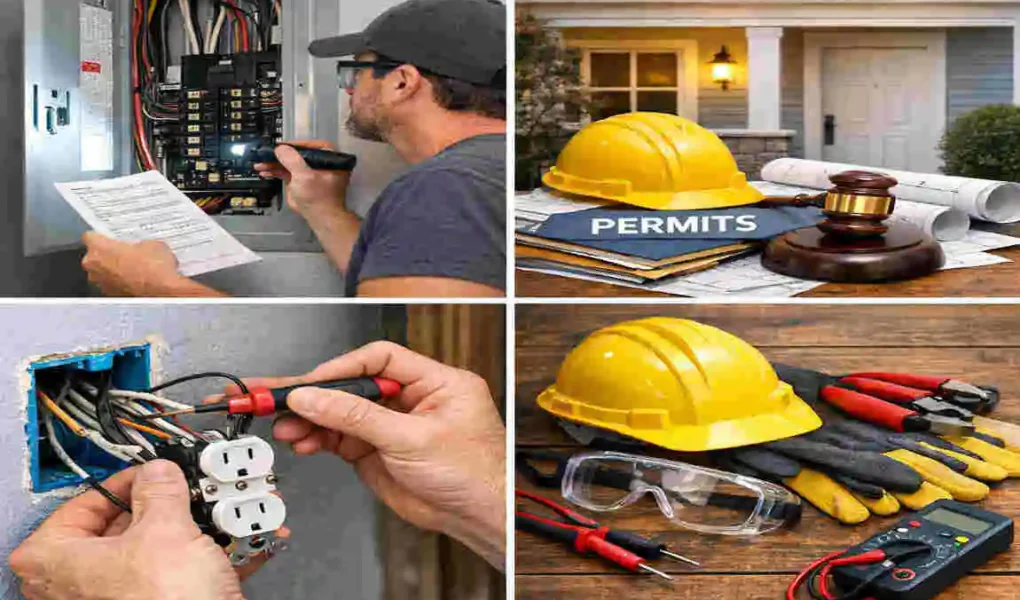
One of the biggest myths in the DIY world is that permits are only for contractors. This is false. Homeowners can, and should, pull permits for their own work. In fact, if you do unpermitted work and a fire occurs, your homeowners’ insurance may deny your claim, leaving you with a burnt house and zero payout.
Permit Requirements
Permits generally fall into two categories:
- Minor Work: This covers repairs or simple replacements. In many towns, a project cost under $500 (labor and materials) might be exempt, but never assume.
- Major Work: This includes adding a new breaker to your box, running a new dishwasher line, or building an addition. These always require a permit.
Inspections & Codes
When you pull a permit, you are hiring a second set of eyes to check your work. You are paying for safety. The inspector will check your work against the National Electrical Code (NEC). The NEC is updated every 3 years (2020, 2023, etc.), and it dictates everything from how many staples you need per wire to how far an outlet can be from a sink.
List: Steps to Get Permits
- Plan Your Project: Draw a simple diagram of what you intend to do. Show where the wire runs, what gauge wire you are using (e.g., 14/2 or 12/2), and what breaker size you will install.
- Submit to Local Authority: Go to your local building department. Fill out the “Electrical Permit Application.” Check the box that says “Homeowner/Owner-Occupant.”
- Pay the Fee: Fees vary wildly, but expect to pay between $50 and $300, depending on the scope of the project.
- Do the Rough-In: Install your boxes and wires, but do not cover them with drywall yet.
- Schedule Rough Inspection: The inspector comes to look at the open walls. If you pass, you can close up the walls.
- Final Inspection: Once the outlets and switches are on, the inspector returns to test the system.
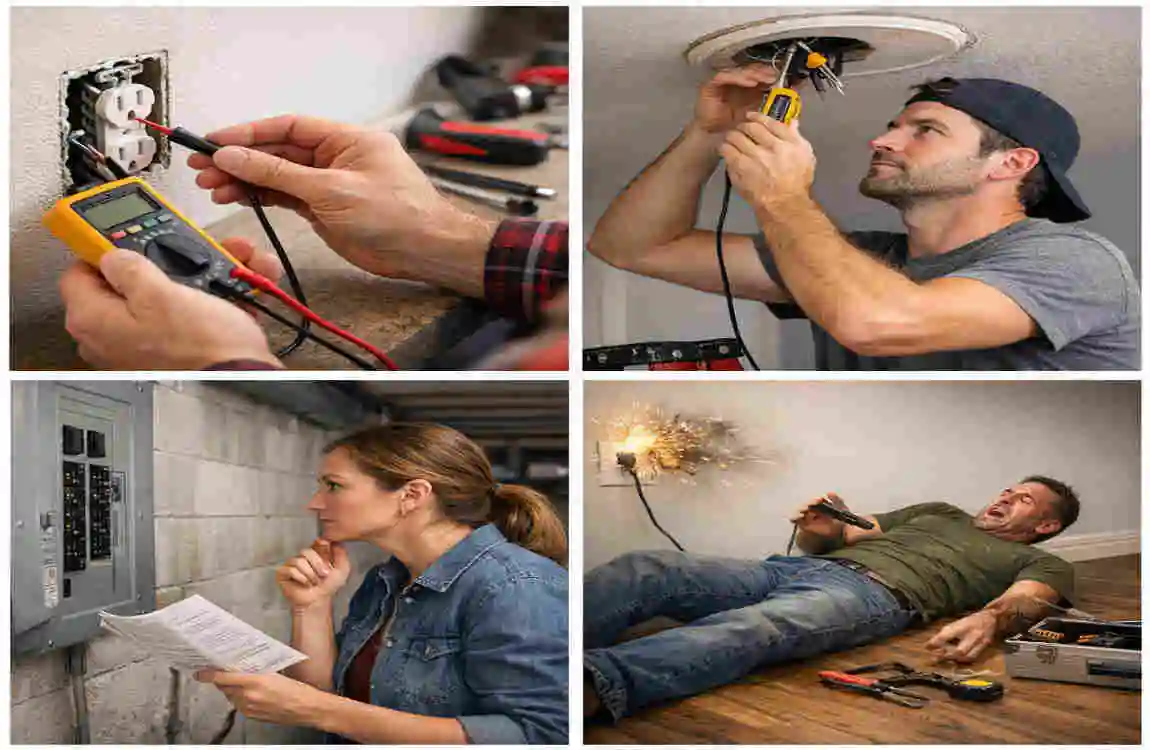
Safety First: Essential Tips Before DIY Electrical Work
Before you strip a single wire, we need to talk about safety. Electricity is unique because it is invisible, silent, and instant. You cannot see the danger until it is too late. However, if you follow strict protocols, you can virtually eliminate the risk of shock.
The golden rule is: Never work on live circuits. There is no reason for a homeowner to ever work on a hot wire.
The Tools of the Trade
You cannot do safe work with a butter knife and a pair of office scissors. You need insulated tools. Look for screwdrivers and pliers that have thick rubber handles rated for voltage protection.
Safety Rules
- Lock Out / Tag Out: When you turn off a breaker, put a piece of tape over it that says “DO NOT TOUCH.” This prevents a spouse or kid from accidentally flipping it back on while you are holding the wires.
- Use a Non-Contact Voltage Tester: This $20 tool is a lifesaver. Touch it to a wire; if it beeps, it’s live. Never trust a label in a panel; always test.
- Wear Rubber-Soled Shoes: Never do electrical work barefoot or in socks. Rubber insulates you from the ground.
- The One-Hand Rule: When possible, keep one hand in your pocket while testing or touching circuits. If you touch a hot wire and a ground wire with opposite hands, the current flows across your chest (and heart). Keeping one hand tucked away prevents this path.
- No Aluminum Wiring Hacks: If your house was built in the late 60s or early 70s, you might have aluminum wiring. You cannot just twist copper wire onto aluminum; it causes a chemical reaction and can start a fire. You need special connectors.
- Eye Protection: Cutting wires sends copper snippets flying. Wear safety glasses.
- Check for Water: Never do electrical work if the floor is wet or if you are sweating profusely.
- Use the Right Wire Gauge: 14-gauge wire goes with 15-amp breakers. 12-gauge wire goes with 20-amp breakers. Never mix them up.
- Don’t Overstuff Boxes: Electrical boxes have “fill calculations.” Cramming too many wires into a small box causes heat buildup.
- Fire Extinguisher Nearby: Keep a Class C (electrical) fire extinguisher handy, just in case.
Step-by-Step Guide to Safe DIY Electrical Projects on Your Own House
Now that we are legal and safe, let’s look at how to actually do the work. Here are three common projects that answer the question “Can I do electrical work on my own house?” with a resounding “Yes.”
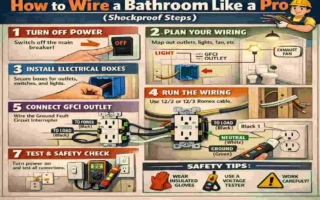
Replace an Outlet Receptacle
This is the most common DIY task. Your old outlets may be beige and ugly, or painted over.
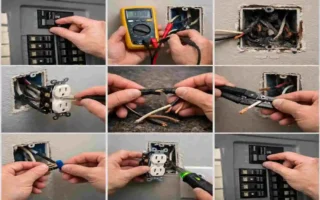
- Kill the Power: Go to your breaker panel. Flip the breaker for the room you are in. Plug a lamp into the outlet to make sure it turns off. Then, use your non-contact voltage tester to double-check.
- Remove the Plate and Outlet: Unscrew the cover plate. Then remove the two screws holding the outlet to the box. Gently pull the outlet out.
- Inspect the Wiring: You will typically see a black wire (Hot), a white wire (Neutral), and a bare copper or green wire (Ground).
- Disconnect Wires: Loosen the terminal screws and unhook the wires.
- Connect the New Outlet:
- Gold Screw: Connect the Black (Hot) wire here. (Memory trick: Black Gold).
- Silver Screw: Connect the White (Neutral) wire here.
- Green Screw: Connect the bare copper (Ground) wire here.
- Pro Tip: Always wrap the wire clockwise around the screw. This way, when you tighten the screw, it pulls the wire tighter rather than pushing it off.
- Secure and Test: Push the wires back into the box neatly. Screw the outlet in. Attach the faceplate. Turn the power back on and test with an outlet tester.
Install Recessed Lights Wafer Lights
Old “can” lights were huge and hard to install. New LED “wafer” lights are incredibly thin and can be installed almost anywhere.
- Layout: Measure your ceiling and mark where you want the lights. Ensure they are aligned.
- Cut the Holes: Use the template provided with the light to trace a circle. Cut the drywall with a jigsaw. Be careful of joists above.
- Run the Wire: This is the hardest part. You need to “fish” standard NM-B (Romex) cable from your switch to the first light hole, and then from that hole to the next.
- Connect the Junction Box: Wafer lights come with a separate little box. Open it up. Connect black to black, white to white, and ground to ground using push-in connectors or wire nuts.
- Clip it In: Connect the light to the box, push the box into the ceiling hole, and then snap the light into place using the spring-loaded clips.
Add a Smart Switch
Smart switches let you control lights with your phone, but they have a catch: they usually require a “Neutral” wire.
- Check Your Box: Turn off the power and open your switch box. Do you see a bundle of white wires tucked in the back? If yes, you are good. If you only see a black and a white wire connected to the switch (and no other wires in the back), you might not have a neutral. You may need a specific “No-Neutral” smart switch.
- Identify the Line vs. Load: Standard switches don’t care which wire is which, but smart switches do.
- Line: The wire bringing power from the panel.
- Load: The wire takes power to the light.
- Wire it Up: Connect the Line wire to the Line terminal, Load to Load, Neutral to Neutral (the white bundle), and Ground to Ground.
- Pairing: Restore power, then use the app to pair the switch to your Wi-Fi.
Common Mistakes & Risks When Homeowners Do Electrical Work
Even smart people make dangerous mistakes. When you are asking, “Can I do electrical work on my own house?” you also need to ask, “What usually goes wrong?”
Costly Errors
- Loose Connections: This is the #1 cause of electrical fires. If a wire nut is loose or a screw isn’t tightened, the electricity can “arc” (jump) across the gap. This creates intense heat (thousands of degrees) that melts insulation and ignites wood studs.
- Reversed Polarity: Putting the hot wire on the neutral side. The outlet will still work, but it keeps the socket energized even when it shouldn’t be, creating a shock hazard for appliances.
- Ignoring Grounding: Never cut off the ground wire just because you don’t know what to do with it. Grounding provides a safe path for electricity if something shorts out.
- Wrong Wire Gauge: Using a thin 14-gauge wire on a 20-amp circuit creates a bottleneck. The wire will heat up like a toaster element inside your walls.
- Skipping GFCIs: Any outlet within 6 feet of water (kitchen sinks, bathrooms, laundry, outdoors) must be GFCI-protected to prevent electrocution.
- Buried Junction Boxes: You cannot splice wires and then drywall over them. All connections must remain accessible in a junction box with a removable cover.
- No Labels: If you change what a breaker does, label it in the panel. In an emergency, you don’t want to be guessing which switch turns off the kitchen power.
When to Call a Pro for Electrical Work on Your House
There is no shame in calling for backup. In fact, knowing when to stop is the mark of a good DIYer. There are certain situations where the risk outweighs the savings.
If you ever smell burning plastic or fish (which is often what melting insulation smells like) coming from an outlet, turn off the main power and call a pro immediately. If your lights flicker when the wind blows, that is a loose service connection outside—call the utility company.
Table: DIY vs. Electrician
FactorDIY ApproachProfessional Electrician
Skill Needed Basic to Intermediate Expert / Master
Warranty None (You are liable) , typically 1 to 5 years on labor
Insurance Risky (Policy may void) Covered by their liability insurance
Time Weekends / Evenings Done in hours
Cost Materials only $100 – $150 per hour + materials
Cost Breakdown: DIY Electrical vs. Hiring Out

Money is the main driver for DIY. Let’s look at the real numbers.
- Replacing an Outlet:
- DIY: $3 for the outlet + $0 labor = $3 total.
- Pro: $3 for the outlet + $150 minimum service call = $153 total.
- Verdict: DIY wins easily.
- Installing a Ceiling Fan (Existing Box):
- DIY: $150 for fan + $0 labor = $150 total.
- Pro: $150 for fan + $250 installation = $400 total.
- Verdict: DIY is worth it if you are comfortable on a ladder.
- Adding a New Circuit:
- DIY: $50 materials + $100 permit = $150 total. (High risk of failure/rejection).
- Pro: $600 – $1,000.
- Verdict: While the pro is expensive, the complexity and danger make it a solid investment.
FAQ: Can I Do Electrical Work on My Own House?
Can I do electrical work on my own house without a license? In most US states, yes, provided you own and live in a single-family home. You do not need a trade license, but you usually need a permit for anything beyond basic repairs.
Which electrical work in my home requires a permit? Typically, running new wires, installing new circuits, upgrading your breaker panel, or adding permanent fixtures, such as a built-in dishwasher, requires a permit. Changing a light fixture usually does not.
Is it safe to do electrical work on my own house? It is safe only if you follow safety procedures, specifically turning off the main power and testing circuits before touching them. If you skip these steps, it is potentially fatal.
Can homeowners replace breakers? Technically, yes, homeowners can replace a bad breaker. However, because you have to take the cover off the panel—exposing the main “bus bars” which are always live—this is considered a high-risk task better left to pros.
What are the fines for illegal electrical work? Fines vary by city but can range from $500 to $1,000 per day for code violations. More importantly, you may be forced to rip open your walls to have the work inspected, costing you thousands in repairs.