If you are nodding your head right now, please know that you are definitely not alone. Many homeowners find themselves incredibly frustrated when their gorgeous new floors lose their out-of-the-box shine. They constantly wonder how to clean LVP flooring without accidentally causing permanent scratches, haziness, or stubborn streaks.
Luxury Vinyl Plank, commonly known as LVP, has completely taken the home improvement world by storm. It is highly water-resistant, incredibly affordable, and widely praised as a low-maintenance dream for busy households. Whether you have messy toddlers, shedding pets, or just a highly active home, LVP stands up to the challenge beautifully.
The way you care for your floors dictates how long they will last and how stunning they will look. While the core of these planks is incredibly durable, the topmost protective barrier—known as the wear layer—is surprisingly delicate. Improper cleaning techniques, harsh chemicals, and the wrong tools can easily damage this transparent protective shield. Once that wear layer is compromised, your floors become vulnerable to permanent stains, deep scratches, and irreversible fading.
What is LVP Flooring?
Before we dive into the exact methods of how to clean LVP flooring, it helps tremendously to understand exactly what this material is.
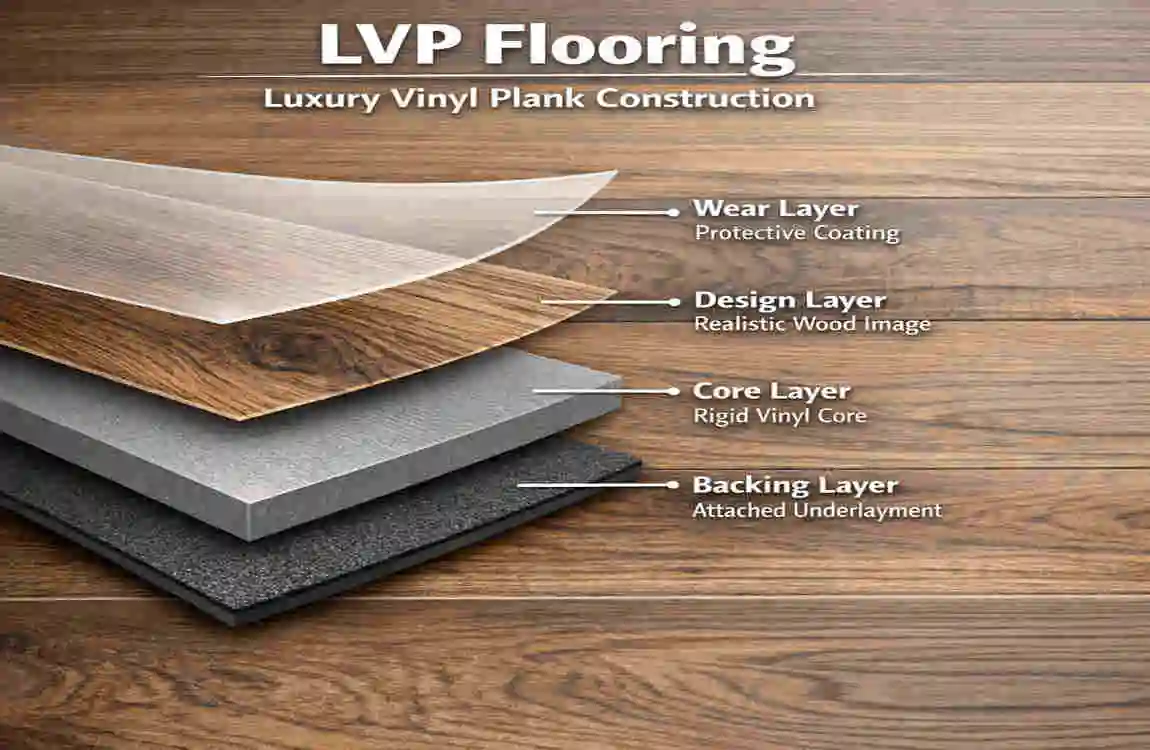
Luxury Vinyl Plank (LVP) is a highly innovative, multi-layered flooring product designed to flawlessly mimic the natural, rich appearance of hardwood or stone. Unlike traditional solid wood, LVP is constructed using several distinct layers pressed together under extreme heat.
At the very bottom, you have a sturdy backing layer for stability. Above that sits a rigid, waterproof core. Next comes the highly realistic photographic print layer—this is what gives the plank its beautiful wood or stone aesthetic. Finally, the manufacturer seals the entire plank with a clear, protective topcoat known as the wear layer.
This topmost wear layer is the unsung hero of your home. It acts as an invisible shield against daily foot traffic, accidental spills, and minor impacts.
However, this unique construction also presents specific cleaning challenges. The textured surfaces that make LVP look so realistic can unfortunately, trap fine dust. The microscopic, porous edges where the planks meet can hold onto dirt and grime. Furthermore, while the top of the plank is highly water-resistant, flooding the floor with excess water risks seeping down into the seams, which can cause the underlying subfloor to warp or the plank’s adhesive to fail.
Why should you care so much about these details?
Because using the correct, safe cleaning methods will directly extend the life of your floors up to 20 years or more! For homeowners looking to boost the aesthetic appeal and overall property value of their Lahore homes, maintaining pristine flooring is an absolute must.
When you treat your LVP correctly, it rewards you with decades of flawless performance. Master how to clean LVP flooring by starting with basic prevention and arming yourself with the correct tools.
Essential Tools for LVP Cleaning
You would never try to paint a masterpiece with a broken, dirty brush. The same logic applies to cleaning your floors. To properly clean luxury vinyl plank flooring, you need to gather the right supplies.
Throw away those heavy, abrasive scrub brushes and toss out those harsh chemical cocktails. To protect your floor’s sensitive wear layer, you need gentle, effective tools that lift dirt without causing microscopic scratches.
Here is a quick, scannable breakdown of the absolute must-have tools for your cleaning arsenal:
Tool: Why It Works: Pro Tip
Microfiber Mop: Completely lint-free; it magnetically traps dirt and dust without leaving annoying streaks behind. Rinse the mop pad frequently during your cleaning session.
Soft-Bristle Broom Gently sweeps away large, loose debris without scratching the clear wear layer. Never use a vacuum cleaner that has an active beater bar!
pH-Neutral Cleaner Chemically balanced to be completely safe for the sensitive protective wear layer. A highly diluted vinegar and water mix is a great DIY alternative.
The Bucket & Wringer helps you strictly control the amount of moisture on your mop head. Always use warm water, never scalding hot water.
Dry Microfiber Cloths are perfect for rapid drying to ensure absolutely no water residue is left behind. Buff the floor gently with the dry cloth to reveal a brilliant shine.
The best part about this essential toolkit? It is incredibly budget-friendly. You do not need to spend a fortune on specialized, expensive machinery. In fact, you can easily gather all of these starter items for under PKR 2000 total.
By investing just a little bit of money into the right microfiber mop LVP experts recommend, you will save yourself thousands in potential floor replacement costs down the road.
Daily Maintenance Routine
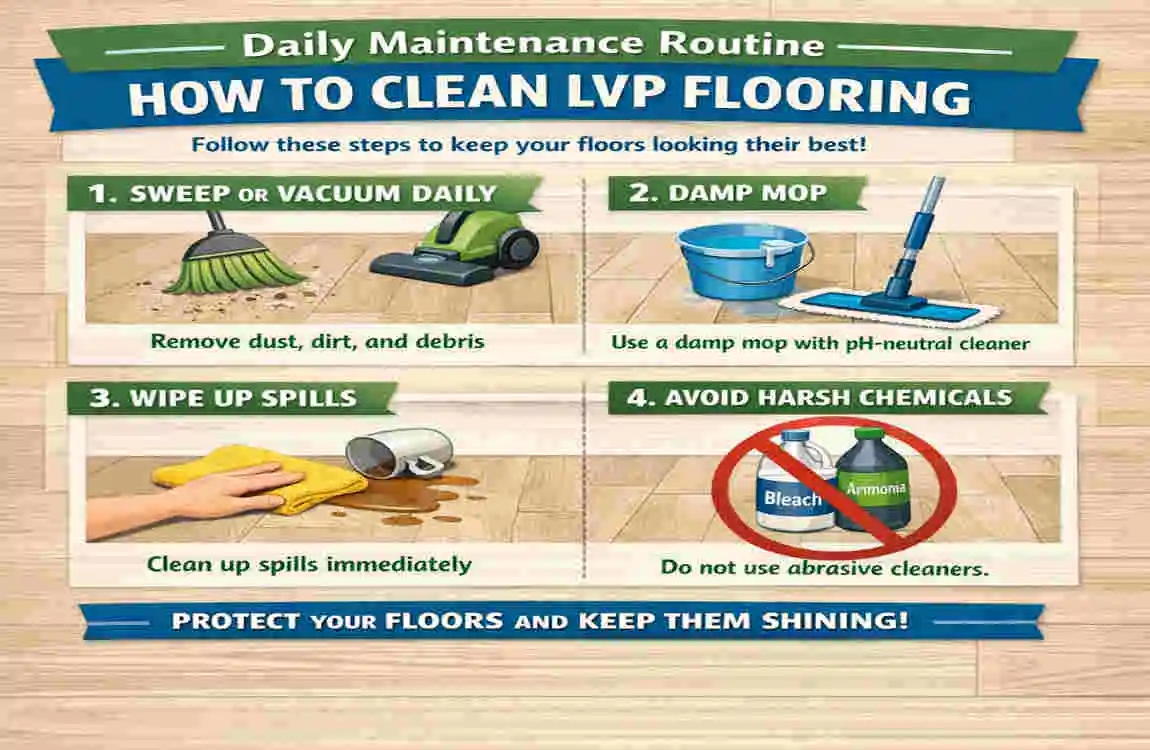
The absolute best way to clean LVP flooring is to prevent it from getting deeply filthy in the first place. Think of your daily maintenance routine as a protective barrier for your beautiful home.
By dedicating just five to ten minutes a day to simple upkeep, you will save yourself hours of backbreaking deep-cleaning on the weekends.
- Sweep or vacuum daily: Every day, grit, sand, and tiny dirt particles act exactly like rough sandpaper on your LVP floors. Every time you walk over that dirt, you are unknowingly grinding it into the protective wear layer, causing microscopic scratches that eventually make the floor look dull. A quick daily sweep removes this threat entirely.
- Wipe up spills immediately: LVP is water-resistant, but it is not completely waterproof if water is left sitting for days. Whether you drop a glass of water, spill some cooking oil, or your pet has an accident, grab a damp cloth and wipe it up the second it happens. Letting liquids sit can lead to stubborn stains or seep into the seams.
- Place doormats strategically: Stop dirt at the door! Place high-quality, non-rubber-backed mats at every entrance of your home. This simple step catches the majority of the abrasive dirt before it ever touches your vinyl.
Pro tip: Use soft, dry dust mop pads for high-traffic Lahore homes. Because the city can get quite dusty, running a dry microfiber dust mop over the main living areas every evening will dramatically prolong the lifespan of your LVP.
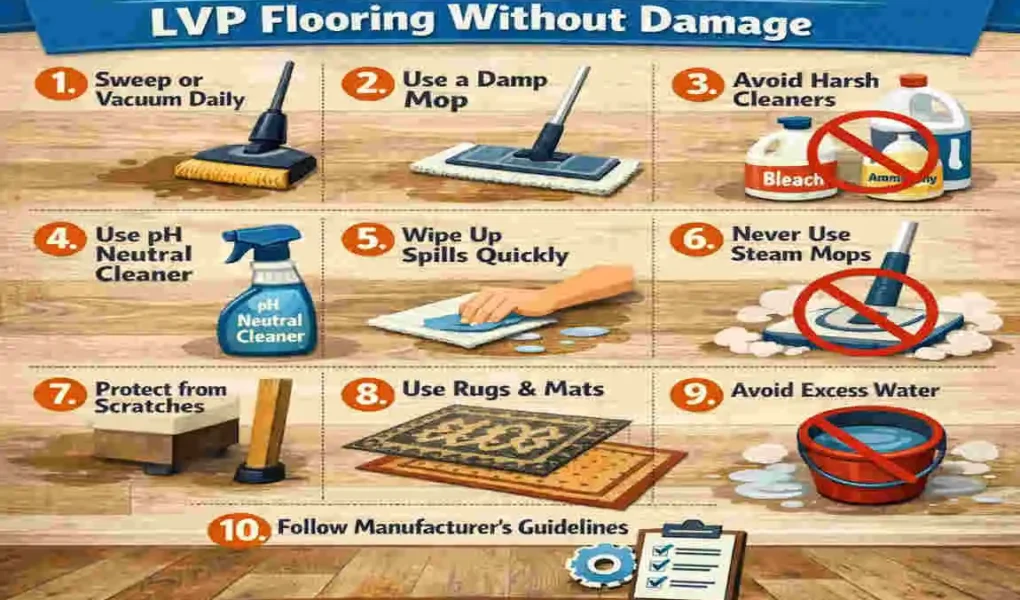
10 Pro Tips to Clean LVP Flooring Without Damage
Now that we have covered the basics of LVP anatomy and gathered our essential tools, it is time to dive into the core strategies.
If you want to know the absolute best LVP flooring cleaning tips, you must follow these expert-approved methods. We have divided these into 10 understandable, easy-to-follow segments.
Tip : Always Dry Sweep First
Never, ever start mopping a floor that has not been properly swept or vacuumed first. This is the golden rule of floor care!
If you introduce a wet mop to a floor covered in loose dirt, dust, and pet hair, you are simply turning that loose debris into sticky, muddy sludge. You will end up pushing this dirty sludge around your floor, driving it deep into the textured grooves of the LVP and straight into the seams between the planks.
Instead, start by removing all the loose dirt so you do not accidentally grind it into the finish.
Grab your soft-bristle broom or your favorite dry microfiber dust mop and meticulously go over the entire floor. Pay special attention to the corners, under the kitchen cabinets, and along the baseboards, as dust bunnies love to hide there.
If you prefer to use a vacuum, you must exercise extreme caution. Ensure you turn off the rotating beater bar (the spinning brush roll used for carpets). The stiff bristles of a rapidly spinning beater bar will ruthlessly scratch and dent your luxury vinyl over time. Always use the bare-floor setting or a soft brush attachment. Empty your vacuum canister frequently to maintain optimal suction power.
Tip : Pick pH-Neutral Cleaners Only
When you walk down the cleaning aisle at the grocery store, you are bombarded with hundreds of brightly colored bottles promising miraculous cleaning results. Ignore them.
Harsh soaps, heavy-duty detergents, bleach, and ammonia-based cleaners are the sworn enemies of your LVP floor’s delicate wear layer. These aggressive chemicals will aggressively strip away the floor’s protective finish, leaving your beautiful planks looking permanently cloudy, hazy, and dull. Once that finish is chemically burned away, you cannot get it back.
To properly clean luxury vinyl plank flooring, you must exclusively use pH-neutral cleaner vinyl products.
What does pH-neutral mean? It simply means the cleaner is perfectly balanced—it is neither highly acidic nor highly alkaline. It is gentle enough to protect the floor, yet effective enough to break down grease and grime.
Look for commercial cleaners specifically branded and formulated for luxury vinyl plank. Alternatively, a few drops of mild, original dish soap mixed into a large bucket of warm water works wonders. If you prefer a DIY approach, a highly diluted mixture of white vinegar and water is an excellent, safe alternative that will not damage your investment.
Tip : Wring Your Mop Like a Pro
Water is a necessity for cleaning, but excessive water is a catastrophic hazard for luxury vinyl planks.
While the top surface of the plank repels liquid, the seams where the planks click together are vulnerable. If you slop buckets of soaking wet water onto the floor, that moisture will inevitably find its way down into those microscopic joints. Over time, standing water will break down the adhesive holding the floor down, encourage mold growth in the subfloor, and cause the edges of the planks to curl visibly and warp.
To avoid this costly disaster, you must learn to wring your mop like a seasoned professional.
The goal is to use a mop that is slightly damp, never dripping wet. When you lift your mop out of the bucket, you should wring it out until absolutely no water drips from the pad.
If you run the mop across the floor and it leaves a heavy, visible puddle that takes more than a minute or two to dry, your mop is way too wet. Stop immediately, wring the mop out again, and go over the wet area to absorb the excess moisture. You only need the bare minimum amount of moisture to activate your cleaner and lift the dirt.
Tip : Microfiber Mops Beat Traditional Cotton
If you are still using an old-school, heavy, stringy cotton mop, it is time to throw it in the trash politely.
Cotton string mops and heavy sponge mops are notoriously terrible for LVP flooring. Why? Instead of actually picking up and removing the dirt, they push the dirty water around the room. Furthermore, sponge mops hold entirely too much water, directly violating our “damp, not wet” rule from Tip 3.
If you want to master how to clean LVP flooring, you must upgrade to a high-quality microfiber flat mop.
Microfiber technology is specifically designed with millions of microscopic, split fibers that act like a giant dirt magnet. Instead of pushing the dirt, the microfiber physically grabs the grime, traps it within its fibers, and completely removes it from your floor.
Additionally, microfiber pads hold the perfect, minimal amount of moisture needed for a safe, streak-free shine. They are incredibly gentle on the wear layer, ensuring you never accidentally scratch the surface. Plus, they are eco-friendly! You can toss the dirty microfiber pads into your washing machine, clean them, and reuse them hundreds of times.
Tip : Rinse and Dry Immediately
Have you ever finished mopping, waited an hour for the floor to dry, only to discover a terrible, cloudy film covering the entire room?
This hazy residue happens because you left the dirty, soapy water to air dry on the surface of the floor. As the water evaporates, the soap scum and suspended dirt are left behind, completely ruining the beautiful shine of your LVP.
To prevent this frustrating issue, you must adopt the two-pass mopping method.
First, mop your floor using your damp mop and your chosen pH-neutral cleaning solution. Once you have gently scrubbed away the dirt, immediately follow up with a second pass using a completely clean mop pad lightly dampened with plain, fresh water. This crucial “rinse pass” removes any lingering soap residue.
Finally, do not let the floor air dry! Take a few clean, dry microfiber cloths and manually towel-dry the floor. You can attach a dry cloth to your flat mop head and quickly glide it over the damp areas. Towel drying immediately halts water spots in their tracks and gently buffs the floor to a brilliant, streak-free shine.
Tip : Skip Steam Mops Forever
This is the most important warning in this entire guide: never, under any circumstances, use a steam mop on your LVP flooring.
Steam mops are aggressively marketed as the ultimate deep-cleaning, sanitizing tool. While they might be fantastic for ceramic tile or porcelain, they are an absolute death sentence for luxury vinyl planks.
Steam mops operate by blasting highly pressurized, scalding hot steam directly onto the surface of the floor. The intense heat of that steam is completely incompatible with vinyl materials. The extreme temperature will literally warp the physical structure of the plank, causing it to bend, bubble, and buckle permanently.
Furthermore, the pressurized steam forces superheated moisture directly down into the seams of the planks. This melts and destroys the adhesive glue holding your floor down.
If you want to avoid steam mop LVP damage, you must banish this tool from your vinyl rooms entirely. Stick to the gentle, room-temperature damp mopping techniques outlined in this article to keep your floors safe and beautiful.
Tip : Baking Soda for Stubborn Scuffs
Even if you follow all the rules, life happens. Your kids drag their heavy toys across the room, or someone drags a heavy rubber-soled shoe across the hallway, leaving a nasty, dark scuff mark right in the middle of your beautiful floor.
Your first instinct might be to grab a harsh, abrasive scrubbing pad or a strong chemical solvent. Stop right there! Abrasive pads will permanently scratch the wear layer, leaving a dull patch that looks even worse than the scuff mark.
Instead, head to your kitchen pantry and grab some simple baking soda.
Baking soda is a miracle worker for LVP. It acts as an incredibly mild, gentle abrasive that breaks down the scuff without scratching the plastic finish.
Mix a few tablespoons of baking soda with a tiny splash of warm water to create a thick, toothpaste-like paste. Apply a small amount of this paste directly onto the dark scuff mark. Take a soft, clean microfiber cloth and gently rub the paste over the mark using soft, circular motions.
You will notice the scuff mark magically lift away. Once the mark is gone, use a damp cloth to thoroughly wipe away the remaining baking soda residue, and dry the area completely.
Tip : Absolutely No Wax or Polish
Many homeowners mistakenly believe that luxury vinyl needs to be waxed or polished to maintain its beautiful shine, just like traditional, old-school hardwood floors. This is a massive, very common misconception.
Your LVP flooring was manufactured with a specialized, built-in protective clear coat (the wear layer). This layer is designed to look beautiful all on its own.
If you apply commercial floor waxes, acrylic polishes, or “mop-and-shine” products to your LVP, you are actually doing severe damage to its appearance. These wax products are designed to adhere to porous surfaces like real wood. Because LVP is non-porous, the wax sits on top of the surface, creating a sticky, cloudy, unnatural film.
Over time, this wax buildup traps dust, turns a disgusting shade of yellow, and makes your floors look permanently dirty. Stripping this thick wax buildup off of vinyl is an absolute nightmare and often damages the floor in the process.
If your floor is looking dull, do not reach for the wax. Instead, give it a thorough, deep clean with a pH-neutral cleaner to remove whatever dirt is currently hiding the natural shine.
Tip : Furniture Pads Prevent Dents
Cleaning your floors is only half the battle; protecting them from physical damage is equally important.
Luxury vinyl is incredibly tough, but it is not indestructible. Heavy pieces of furniture—like massive dining room tables, heavy couches, solid wood bookshelves, and grand pianos—concentrate hundreds of pounds of weight into tiny, pointed legs. Over time, this extreme, concentrated pressure will push down into the vinyl, creating deep, permanent dents and gouges that no amount of cleaning can fix.
To prevent this tragedy, you must utilize high-quality furniture pads.
Head to your local hardware store and purchase a large pack of thick, felt furniture protectors. Stick these soft felt pads onto the bottom of every single chair leg, table leg, and couch foot in your home.
Not only do these felt pads evenly distribute the weight to prevent denting, but they also allow you to safely and smoothly slide your furniture across the room when you need to clean underneath it. Never drag heavy, unprotected furniture across your LVP! Always lift or use felt sliders.
Tip : Deep Clean Quarterly
While your daily sweeping and your weekly damp mopping will keep your home looking generally fantastic, your LVP flooring still requires a thorough, meticulous deep clean about four times a year (roughly every three months).
A quarterly deep clean targets the hidden, built-up grime in high-traffic areas, like the main entryways, the busy kitchen triangle, and the main hallway.
To execute a perfect deep clean, you will use a multi-round mopping technique.
Start by doing a very thorough dry sweep and vacuum. Next, mix up a fresh batch of your pH-neutral cleaner. Mopping in small, manageable sections, apply your damp mop. For the deep clean, apply a tiny bit more elbow grease to lift any microscopic, stuck-on dirt.
Once you have scrubbed a section, use a separate bucket of clean, warm water to rinse that section thoroughly. Finally, immediately towel-dry the area before moving on to the next section.
Yes, a quarterly deep clean takes extra time and effort. However, this meticulous, section-by-section approach guarantees that no hidden dirt or soap residue is left behind, completely restoring the factory-fresh look of your LVP.
Common LVP Cleaning Mistakes
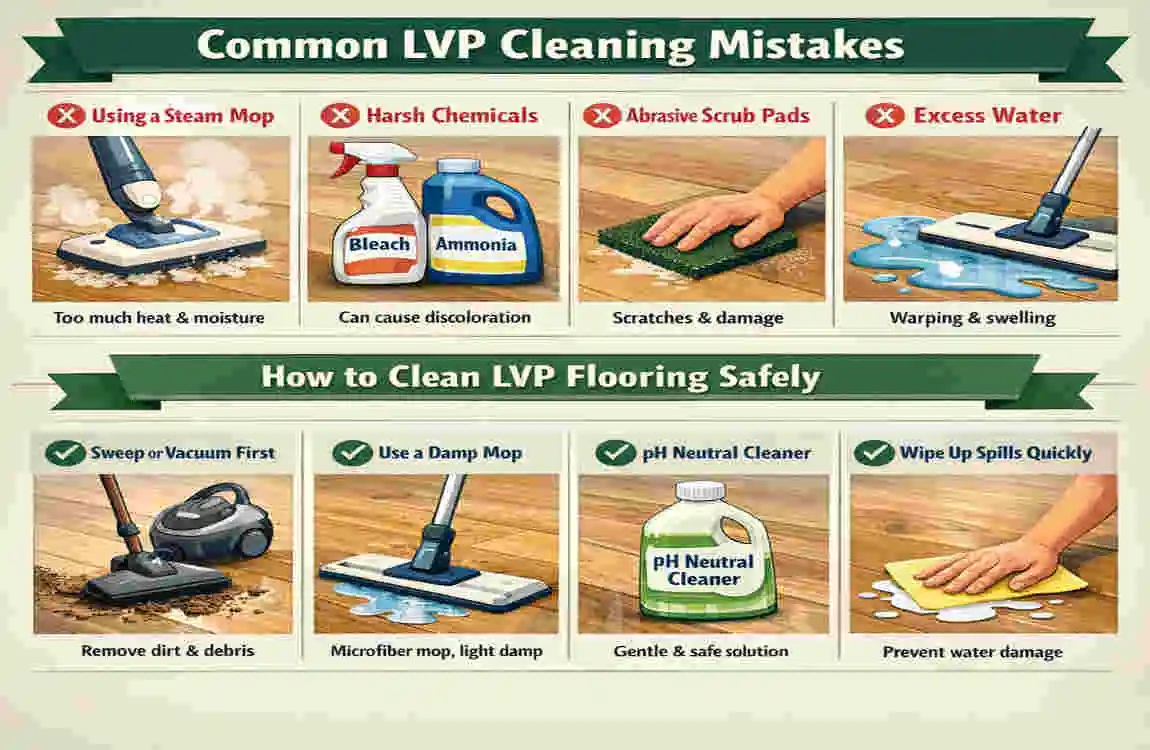
Even well-meaning homeowners can accidentally damage their beautiful floors. When learning how to clean LVP flooring, knowing what not to do is just as important as knowing what to do. Here is a quick FAQ-style breakdown of the most common cleaning disasters you must actively avoid:
- Using Excess Water: Flooding your vinyl planks is a massive mistake. As we discussed earlier, pooling water easily seeps into the microscopic joints between the planks. This degrades the glue, swells the subfloor, and causes irreversible warping. Always stick to the “damp, not wet” rule.
- Reaching for Abrasive Tools: Step away from the steel wool, the hard-bristled scrub brushes, and the heavy-duty scouring pads. These abrasive tools act exactly like sandpaper, permanently scratching and tearing through the delicate, transparent wear layer. Once scratched, the floor will forever look dull in that spot.
- Using Undiluted Vinegar: While a tiny splash of vinegar mixed into a large bucket of water is a fantastic, safe DIY cleaner, pouring pure, undiluted vinegar directly onto your floor is disastrous. Vinegar is highly acidic. At full strength, that acid will literally eat away at the protective topcoat of your LVP over time. Always dilute!
Eco-Friendly LVP Cleaning Hacks
If you are a homeowner who prefers to keep harsh chemicals out of the house, you are in luck! LVP flooring responds incredibly well to simple, green cleaning methods. These eco-friendly hacks are not only safe for your family and pets, but they are also incredibly cost-effective for everyday Pakistani homes.
Instead of buying expensive, imported commercial floor cleaners, you can make your own brilliant solution right in your kitchen. Mix one cup of basic white vinegar or standard apple cider vinegar into one full gallon of warm (not hot!) water.
The mild acidity of the diluted vinegar gently cuts through stubborn kitchen grease, lifts hard water stains, and removes sticky residue without leaving a cloudy film behind. As mentioned in Tip 7, simple baking soda is your best friend for safely buffing out dark scuff marks. By relying on these basic household staples, you can maintain absolutely spotless floors while keeping your cleaning budget near zero!
FAQ: How to Clean LVP Flooring
Q: What’s the first step before wet cleaning LVP floors?
Always start by dry mopping or vacuuming (without a beater bar) to remove loose dirt, dust, and hair. This prevents scratching when you mop later .
Q: What kind of mop should I use?
Use a microfiber mop or a soft-bristle broom. Avoid heavy string mops or stiff brushes that can damage the floor .
Q: How wet should the mop be?
The mop should be damp, not soaking wet. Wring it out well to avoid excess water seeping into seams and causing damage .
Q: What cleaning solution is safe for LVP?
Use a pH-neutral cleaner designed for vinyl floors or a homemade mix of one cup vinegar per gallon of water. Avoid harsh chemicals that can break down the protective layer .
Q: Can I use a steam mop on LVP?
No. Steam mops can warp and damage LVP due to extreme heat and moisture .
Q: How often should I clean my LVP floors?
Sweep or vacuum daily to prevent grit buildup. Damp mop weekly or as needed, and do a deep clean quarterly for best results .
Q: How do I handle tough stains or scuffs?
Use a gentle paste of baking soda and water applied with a soft cloth to scrub scuffs without scratching .
Q: Should I wax or polish LVP floors?
No. Wax and polish can cause buildup and dull the floor’s finish .
Q: How can I protect my floors from dents?
Use felt furniture pads under heavy furniture and always lift rather than drag items across the floor .
Q: What’s the best drying method after mopping?
After mopping, rinse with clean water and dry immediately with a microfiber cloth to avoid streaks and water spots .