Have you ever looked at a home improvement project and thought, “I could probably do that myself and save a ton of money?” If you are currently staring down a roof repair or a brand-new installation, you are likely wondering how to handle the materials without calling in an expensive contractor. Tackling home upgrades yourself is incredibly rewarding, but it comes with unique challenges.
Accurate cuts are not just about making your project look good. When it comes to learning how to cut metal house roofing, precision is absolutely critical for weatherproofing. If your cuts are jagged or uneven, the panels will not overlap properly. This leaves tiny gaps where wind, rain, and snow can sneak in, eventually causing massive water damage to your home’s structure. You want a roof that acts as an impenetrable shield, and that starts with knowing exactly how to cut your materials properly.
Safety First: Protecting Yourself Before You Cut
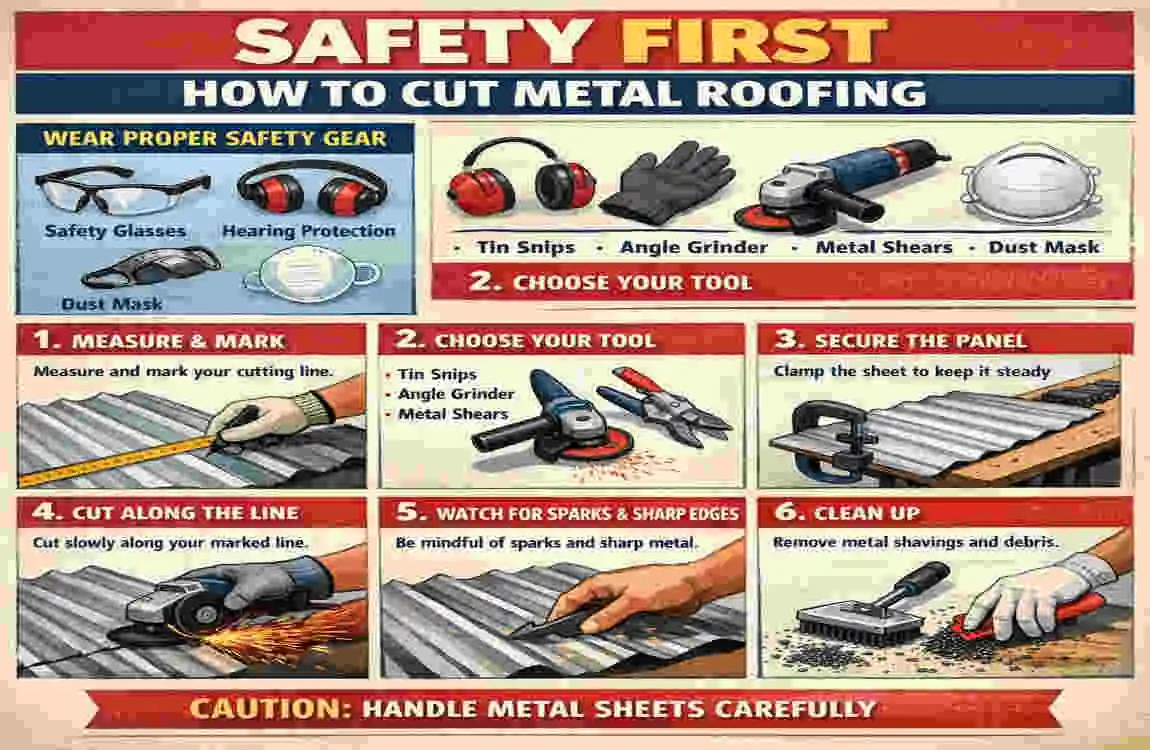
Before we even think about picking up a tool, we need to have a serious conversation about safety. When you cut metal house roofing, you are dealing with materials that can quickly become hazardous if handled incorrectly. Freshly sliced steel is razor-sharp, and power tools can turn tiny metal shards into fast-moving projectiles. Prioritizing your protection will give you peace of mind and keep your DIY project from turning into a trip to the emergency room.
Essential Safety Gear You Cannot Skip
Do not skip this step! Your personal protective equipment is your first line of defense. Here is what you need to wear every single time you slice into a metal panel:
- Heavy-Duty Gloves: The raw edges of cut metal act exactly like razor blades. Standard gardening gloves will not cut it here. You need thick, cut-resistant leather or Kevlar-lined gloves to keep your fingers safe when handling the sheets.
- Safety Goggles: When using power tools, metal chips and sparks will fly through the air. A wraparound pair of safety goggles is non-negotiable to protect your eyes from permanent damage.
- Ear Protection: Have you ever heard a circular saw tear through steel? The noise is deafening. Protect your hearing with high-quality earplugs or over-ear defenders.
- Dust Mask: Cutting metal, especially painted or coated metal, releases fine dust and particles into the air. A proper dust mask prevents you from inhaling these harsh irritants.
- Non-Slip Boots: You will likely be moving heavy panels around and, eventually, walking on a slanted surface. Sturdy, steel-toed work boots with excellent grip will keep you grounded and protect your toes from dropped materials.
Setting Up a Secure Workspace
Your environment plays a massive role in how safe and accurate your cuts will be. You should never try to cut a metal panel while it is balancing on your knee or hanging off the edge of a messy workbench.
Find a large, flat, and highly stable surface to act as your cutting station. A pair of sturdy sawhorses with a thick piece of plywood laid across them works beautifully. Make sure your workspace is entirely clear of flammable materials, such as dry grass, sawdust, or gasoline containers, as sparks from power tools can easily ignite them. Finally, always use heavy-duty C-clamps to secure your metal panels to your workstation before cutting. A shifting panel is dangerous and will ruin your straight lines.
Understanding and Managing Key Risks
The three biggest risks when cutting metal roofing are sparks, sharp burrs, and power tool kickback.
Sparks are inevitable with high-speed blades, so always point your tool away from your body and your property. Sharp burrs are the jagged little teeth left behind on the edge of the metal after a cut; never run your bare hand over a fresh cut. Finally, kickback happens when a power tool gets bound up in the material and violently jerks backward. To avoid this, let the tool do the work at its own pace—never force a blade through the metal.
Pro Tip: Always unplug your power tools or remove their batteries when you are changing blades or adjusting settings. It only takes a second for an accidental trigger pull to cause a disaster. Also, grab a piece of scrap metal and practice a few test cuts to get a feel for the tools before slicing into your expensive roofing panels.
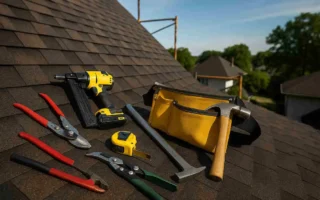
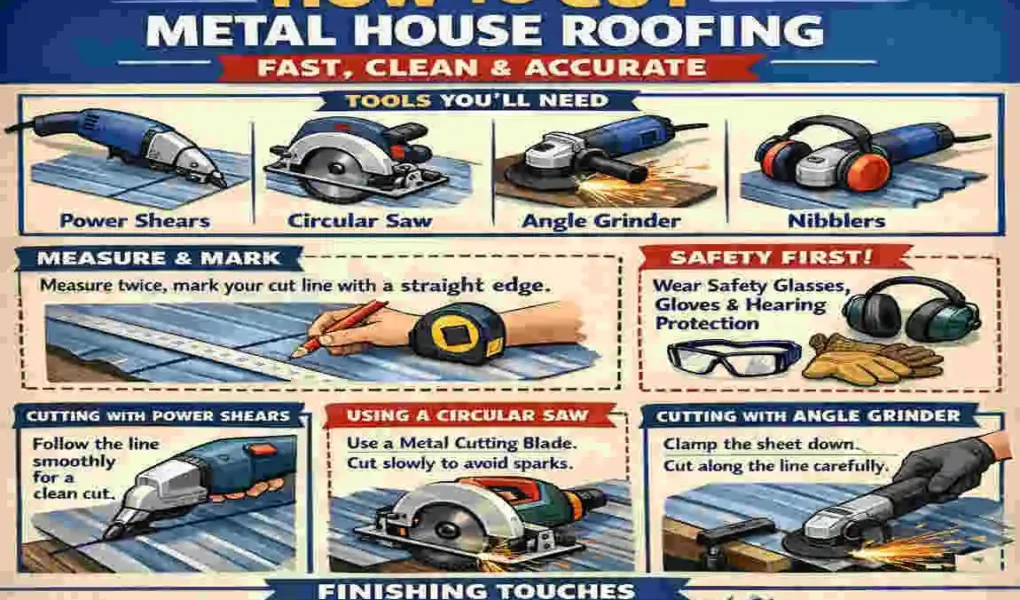
Tools You’ll Need for Fast and Clean Cuts
Having the right tool for the job is half the battle won. If you are looking for the best way to cut metal roofing quickly and cleanly, you need to understand that different cuts require different tools. You do not need a massive, expensive arsenal of professional gear, but you do need to pick the right instrument for the specific shape you are trying to create.
Here is a breakdown of the most beginner-friendly options, ranked by speed, cost, and the quality of the cut.
Tin Snips (Aviation Snips)
Think of tin snips as heavy-duty scissors designed specifically for metal. They are entirely manual, relying solely on your hand strength.
Tin snips are essential for making short cuts, trimming edges, and cutting delicate curves. When shopping, you will notice they usually come in sets of three, color-coded for specific tasks. Red snips cut to the left, green snips cut to the right, and yellow snips cut straight ahead. Having all three allows you to navigate complicated angles without bending the metal.
While tin snips give you incredible control and produce no heat or sparks, they are very slow. Trying to cut a ten-foot panel in half with hand snips will leave your hands cramped and exhausted.
Electric Shears and Nibblers
If you want to speed up the process without losing control, electric shears and nibblers are a fantastic upgrade.
Electric shears operate just like automated scissors. They slice through the metal rapidly and leave a relatively clean edge. They are perfect for long, straight cuts across flat metal sections.
Nibblers, on the other hand, operate a bit differently. Instead of slicing, they act like tiny, high-speed punches, rapidly biting small crescent-shaped pieces out of the metal. Nibblers are the absolute best tool for corrugated metal panels because they can ride up and down the ridges without flattening or distorting the roof panel’s profile.
Circular Saw with a Metal-Cutting Blade
When you need to make long, straight cuts quickly, nothing beats a circular saw. However, you cannot use your standard wood-cutting blade. You must replace it with a specialized metal-cutting blade.
For the cleanest edges and the safest experience, invest in a carbide-tipped, cold-cut metal blade. Unlike abrasive discs that melt their way through the steel (creating tons of heat and sparks), a cold-cut blade actually shears the metal away. This keeps the panel cool, protects the factory paint coating, and drastically reduces the amount of jagged burrs left behind. It is the go-to method for bulk cuts.
The Angle Grinder: Proceed with Caution
You will often see people using angle grinders with abrasive cut-off wheels to slice through metal panels. While an angle grinder will certainly get the job done, it is generally frowned upon for high-quality roofing projects.
Angle grinders generate massive amounts of heat. This heat can literally melt the protective galvanized coating and singe the paint on your metal panels, leaving them highly vulnerable to rust. Additionally, grinders send hot sparks flying everywhere, which can burn into the surface of nearby panels. Reserve your angle grinder for rough cuts on hidden flashing, and avoid using it on the main visible panels of your roof.
Handy Accessories to Keep Nearby
To complement your cutting tools, you will need a few basic accessories to ensure accuracy and a clean finish.
Make sure you have a reliable measuring tape, a long metal straightedge (like a carpenter’s square or a chalk line), and a fine-tip permanent marker for drawing your guidelines. You will also need a metal file, heavy-grit sandpaper, or a specialized deburring tool to smooth the sharp edges after your cuts.
Budget and Tool Comparison Table
To help you decide which tool fits your specific needs and budget, check out this quick comparison guide:
Tool Average Cost Best Used For Speed Rating Cut Quality
Tin Snips Low ($20 – $50) Curves, short trims, notches Slow Very Clean
Electric Shears/Nibblers Medium ($60 – $150) Long straights, corrugated ridges Fast Clean
Circular Saw (Metal Blade) High ($100 – $250+) Bulk cuts, long straight lines Fastest Very Clean (with carbide blade)
Angle Grinder Low to Medium Rough trims, thick metal bolts Fast Rough / High Heat
Preparation Steps: Setting Up for Perfect Accuracy
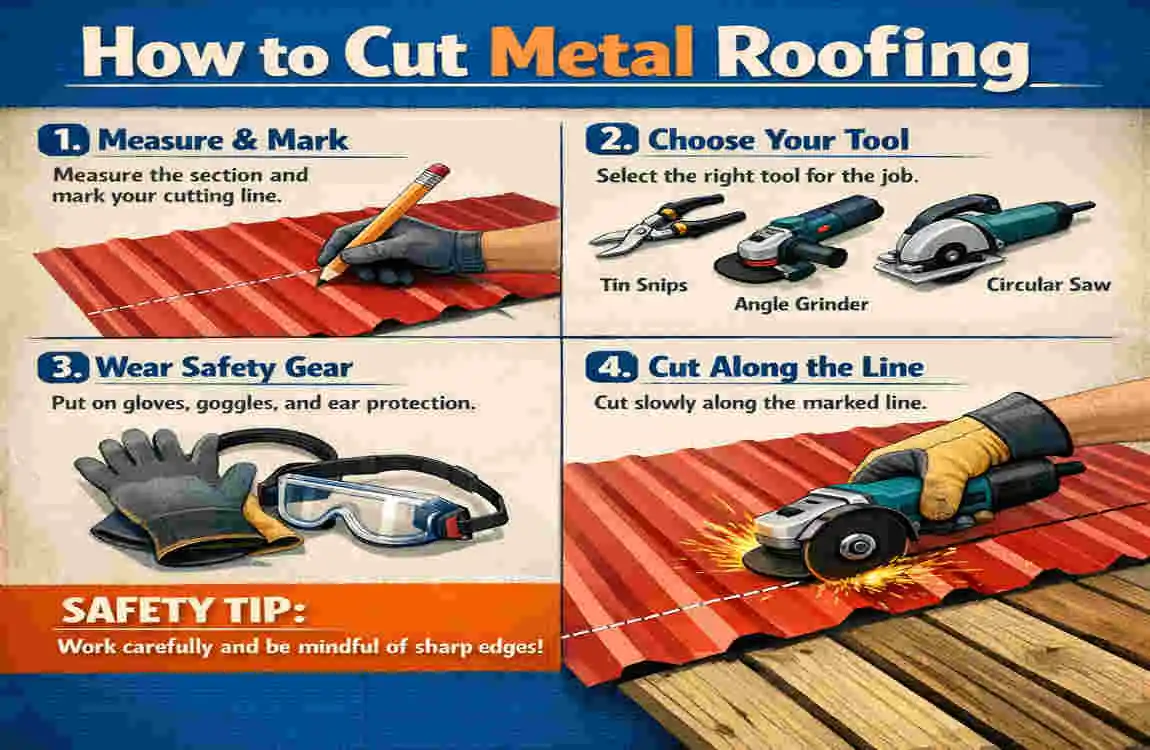
You have your safety gear on, and your tools are laid out. Now it is time to prep your materials. Metal roofing panels are expensive, and a single bad cut can waste an entire sheet. The preparation phase is where you secure your investment and ensure your cuts are perfectly aligned. Do not rush this process!
Measure Twice, Cut Once (and Factor in Overlaps)
The golden rule of carpentry applies just as strictly to metalwork: measure twice, cut once.
When figuring out how to cut metal roofing, you have to account for how the panels will interact with one another on the roof. Metal roof panels do not sit flush against each other edge-to-edge; they overlap. Depending on the pitch of your roof and the specific panel brand, this overlap is typically 6 to 12 inches.
If you forget to add this overlap measurement to your calculations, your panels will be too short, and your roof will leak. Always double-check your numbers. Use a chalk line to snap a perfectly straight, highly visible line across long panels to guide your saw.
Marking Your Lines Clearly
A dull pencil will not work on shiny steel. You need a fine-tip permanent marker in a contrasting color (like black or silver) to draw your cut lines.
Lay your metal panel flat on your sturdy workstation. Place a long metal straightedge across the surface, align it with your measurements, and draw a solid, bold line.
Pro Tip: If you are using a circular saw, the metal shoe (the flat base) can scratch the beautiful paint job on your roofing panel as you slide it forward. To prevent this, place a thin strip of cardboard under the saw’s shoe, or apply a wide strip of painter’s masking tape directly onto the metal panel, drawing your cut line directly on the tape.
Securing the Panel Tightly
A panel that vibrates or shifts while you are cutting it will result in a wavy, ugly edge. Worse, it can cause a power tool blade to bind up and kick back.
Once your line is marked, use C-clamps or specialized locking grip pliers to secure the metal panel to your sawhorses. You should place a clamp every two feet along the edge of the workstation. If you are working with incredibly long panels (like 16-footers), do not try to manage the whole thing at once. Clamp the section you are currently cutting, and as you move down the line, pause to move your clamps along. Support the overhang so the metal doesn’t bend under its own weight as you near the end of the cut.
Adjusting for Different Metal Types
Keep in mind that preparation looks a little different depending on your roof’s style.
If you are dealing with classic corrugated metal (the wavy ‘S’ pattern panels), marking a straight line across the ridges requires patience, as the tape measure will want to dip into the valleys.
If you are cutting standing seam metal roofing (flat panels with tall, vertical interlocking ribs), you have to plan your cuts around the seams. Often, you will need to use hand snips to carefully cut through the thick vertical seam before using a power tool to handle the flat pan section of the panel.
Step-by-Step Cutting Guide: Clean and Accurate Results
This is where the magic happens. We are going to break down exactly how to cut metal roofing fast, clean, and accurately. Because different cuts require different approaches, we have divided this tutorial into four steps: straight lines, power tool use, tricky curves, and bulk trimming.
Follow these instructions closely, take your time, and remember to let the tools do the heavy lifting.
Making Straight Cuts with Snips or Shears
When you need to make a short, straight cut—perhaps trimming a few inches off the bottom edge of a panel to fit the eaves—tin snips or electric shears are your best friends.
Start by ensuring your panel is clamped tightly. If you are using manual hand snips, align the blades directly over your marker line. Open the snips’ jaws as wide as they will go, slide them onto the metal, and squeeze the handles firmly.
Here is the secret to a clean edge: do not close the snips all the way down to the very tip of the blades. If you snap the jaws entirely shut, it creates a tiny tear or dimple at the end of the cut. Instead, squeeze the handles until the blades are about 80% closed, then open them up, slide them forward, and take the next bite. This continuous, overlapping biting motion prevents the metal from warping.
If you are using electric shears, the process is even easier. Rest the guiding edge of the shears against the metal, pull the trigger to get the motor running at full speed, and slowly push the tool forward along your line. Keep your wrist stiff and let the motor dictate the pace. Do not force it forward faster than it wants to cut.
As you cut, the thin off-cut piece of metal will start to curl away. Use your heavy-duty gloves to gently bend this scrap piece away from your hand so it does not interfere with your tool.
Powering Through with a Circular Saw
For long, straight cuts across the width or length of a panel, a circular saw equipped with a cold-cut carbide blade is the ultimate time-saver.
First, ensure your panel is fully supported on both sides of the cut line. If the off-cut piece sags heavily as you reach the end of your cut, it will tear the final inch of metal and leave a massive, bent burr.
Set the depth of your circular saw blade so that it just barely extends past the thickness of the metal. You only want the teeth protruding about a quarter of an inch below the panel. This reduces friction, limits sparks, and gives you much better control.
Position the saw at the edge of the panel, align the blade with your marker line, and pull the trigger. Wait for the blade to reach its maximum RPM before you let it touch the metal.
Push the saw forward with slow, incredibly steady pressure. You will hear a loud, high-pitched whine—this is normal. Keep your eye strictly on the guide notch at the front of the saw, ensuring it tracks perfectly over your line. If you feel the saw bogging down or struggling, you are pushing too fast. Ease up slightly and let the sharp teeth of the blade chew away the steel at their own pace.
Because you are using a cold-cut blade, heat distortion will be minimal, but you should still expect a small shower of metal chips. Keep your safety goggles on tight and maintain a firm, two-handed grip on the saw from start to finish.
Tackling Curved and Notch Cuts
Not every cut on a house roof is a perfectly straight line. You will inevitably need to cut circles to accommodate plumbing vent pipes or trim complex notches to fit panels around chimney corners.
For these intricate shapes, you have to abandon the circular saw. Your best bet is to use a combination of tin snips and an electric nibbler.
Let’s say you need to cut a circle in the center of a panel for a vent pipe. Start by drawing your circle perfectly. Next, use a drill with a large metal bit to drill a hole directly in the center of the drawn circle. This is your starting point.
Insert the head of your electric nibbler into that drilled hole. Pull the trigger and slowly guide the nibbler outward in a spiral motion until you reach your marker line, then carefully follow the line around to complete the circle.
If you are only using hand snips to cut a notch out of a corner, you need to use a technique called “relief cutting.” Do not try to turn the snips at a sharp 90-degree angle; the metal will bind and bend. Instead, cut straight into the corner of the notch from one side. Then, remove your snips, go to the other side of the notch, and cut straight in to meet your first cut. The scrap piece will pop right out, leaving a perfectly clean inner corner without any bent edges.
Bulk Panel Trimming for Efficiency
If you are tackling a massive roofing project, you might find yourself needing to trim exactly two inches off the bottom of twenty different panels. Cutting them one by one is tedious and time-consuming.
To speed up the process, you can stack up to three or four flat panels on top of each other. Ensure the edges are perfectly flush and squared up, and clamp them together aggressively so they act as a single, thick block of metal.
Using your circular saw with a fresh metal-cutting blade, slowly cut through the entire stack at once. You must move much slower than you would for a single panel, keeping a tight grip to prevent the blade from wandering.
We highly recommend avoiding the angle grinder for bulk trimming. While a grinder can easily slice through a stack of panels, the intense heat it generates can fuse the painted edges, ruining the finish on all of them at once. Stick to the cold-cut saw for clean, professional bulk results.
Quick Troubleshooting Guide
Even with the best preparations, things can occasionally get tricky. Here is a quick table to help you troubleshoot common cutting issues on the fly:
Issue You Are Facing The Likely Cause How to Fix It Fast
Heavy Burrs / Ragged Edges Your saw blade or snips are dull. Swap in a fresh blade immediately. File the edge smooth and apply rust sealant.
Metal is Warping or Bending You are forcing the tool forward too quickly. Back off the pressure. Let the tool dictate the speed. Use relief cuts on corners.
Excessive Sparks / Burnt Paint Too much friction (often from using an abrasive grinder blade). Switch to a cold-cut carbide saw blade. If safe, you can mist the area with water to keep temperatures down.
Finishing Touches: Ensuring Pro-Level Results
Congratulations! You have successfully cut your metal panels. However, the job is not quite done yet. If you want to master cutting metal house roofing like a true professional, you have to pay attention to the finishing details. Leaving a panel raw right after a cut is a recipe for injury and long-term weather damage.
Deburring the Edges
No matter how clean your tool is, cutting metal leaves behind tiny, microscopic shards along the edge called burrs. These burrs are incredibly sharp and can easily slice through your gloves during installation, or scratch the paint off adjacent panels when you stack them.
Grab a fine-toothed metal file or a block wrapped in heavy-grit emery cloth. Run it gently back and forth along the freshly cut edge at a 45-degree angle. You do not need to apply heavy pressure; you simply want to knock down those sharp microscopic teeth until the edge feels relatively smooth to a gloved touch. You can also purchase a specialized deburring tool—a small handle with a swiveling curved blade—that zips down the edge and removes burrs in seconds.
Protecting the Raw Metal from Rust
When you cut a metal roofing panel, you expose the raw steel core that lives beneath the protective factory paint and galvanized coatings. If you install the panel with this raw edge exposed to the rain, it will begin to rust almost immediately. That rust will quickly spread, eating away at the integrity of your beautiful new roof.
To prevent this, you must seal the cut edge. Use a small brush to apply a layer of rust-inhibiting metal primer, followed by a manufacturer-approved touch-up paint that matches your roof’s color. Make sure you thoroughly coat the entire raw edge, and let it dry completely before you take the panel up to the roof. This small extra step extends your roof’s lifespan by decades.
The Dry Test Fit
Before you permanently screw the panel down and penetrate it with fasteners, always perform a dry test fit.
Carry the panel up to the roof, slide it into place, and ensure your cut aligns perfectly with the valleys, edges, or vent pipes. It is much easier to bring a panel back down to the sawhorses to trim off an extra quarter-inch than to remove 20 screws because you realized the fit was slightly off. Once you confirm the cut is perfect, you are clear to secure it permanently.
Common Mistakes to Avoid
Even eager DIYers can stumble if they aren’t paying close attention. Let’s look at a few relatable pitfalls so you can avoid making these frustrating errors yourself.
First, rushing the measuring process is a guaranteed way to waste money. Imagine spending five minutes carefully cutting a 12-foot panel, carrying it up the ladder, and realizing you cut it two inches too short because you misread the tape measure. Take a deep breath, slow down, and verify your numbers. The extra thirty seconds it takes to measure twice will save you hundreds of dollars in ruined materials.
Second, using the wrong tool for the job always leads to disaster. We often see beginners try to force a circular saw to cut a curved line around a chimney. The blade binds, the metal violent twists, and the panel is left permanently bent and creased. If the line curves, put the saw down and pick up the tin snips.
Finally, never ignore the risk of sparks. It is easy to get tunnel vision when focusing on a straight cut, forgetting that a stream of hot sparks is bouncing off the dry leaves accumulating in your gutters. Always be aware of where your tool is pointing, and keep a fire extinguisher nearby just in case.
Frequently Asked Questions (FAQs)
As you dive into your roofing project, you might still have a few lingering questions. Here are the answers to the most common voice search queries about cutting metal roofs.
Can beginners successfully cut corrugated metal? Absolutely! While the wavy ridges look intimidating, beginners can easily navigate them. The best approach is to use a pair of high-quality manual tin snips or an electric nibbler, as these tools can ride up and down the contours without flattening the panel’s structural ridges.
What is the fastest tool for cutting straight lines? Without a doubt, a circular saw equipped with a cold-cut, carbide-tipped metal blade is the fastest way to slice through metal panels. If you prefer a lighter hand tool, electric shears are a close second for speed.
Is the cost of buying tools to cut it yourself worth it compared to hiring a pro? Yes! Even if you have to buy a brand new circular saw, a specialty blade, and safety gear, you are likely spending less than $250. Hiring a professional roofing contractor can easily add $500 or more to labor costs alone for a medium-sized project. DIY saves you serious money.