You have picked out the perfect color. You have calculated the square footage. You have even cleared out the furniture and prepped the subfloor. But now, you are standing in the doorway of your bedroom with a box of Luxury Vinyl Plank (LVP) in your hands, and a sudden question hits you: “Wait, which way do these actually go?”
Why Direction Matters in Bedrooms

Before we dive into the technical “how-to,” let’s talk about the “why.” You might be thinking, “It’s just a floor, does it really matter?”
Unlike high-traffic areas like kitchens or entryways where utility is king, a bedroom is a sanctuary. It is a place of rest, relaxation, and visual calm. The flooring sets the foundation—quite literally—for the room’s atmosphere.
Visual Space Perception
Your eyes naturally follow lines. When you walk into a room, the seams of the vinyl planks act like arrows, guiding your gaze. If you lay the planks properly, you can visually “stretch” the room, making a small 10×12 bedroom feel significantly larger. If you lay them incorrectly, you might inadvertently create a “ladder effect” that boxes the room in, making it feel stunted or claustrophobic.
Light and Texture
Vinyl plank flooring is designed to mimic real wood, complete with grain textures and micro-bevels. The way natural light interacts with these textures depends on the angle of incidence. If the light hits the seams at an angle, it casts tiny shadows that make the floor look more rugged and the seams more visible. If the light runs parallel to the planks, the floor looks smoother and more seamless.
Furniture Alignment
Bedrooms are unique because they are dominated by one massive piece of furniture: the bed. The relationship between your flooring direction and your bed placement plays a huge role in the room’s “Feng Shui.” Clashing lines can make the room feel busy or chaotic, while harmonious lines create a sense of order.
The Standard Rule: Longest Wall or Light Source
If you ask ten flooring contractors which direction to lay vinyl plank flooring in bedroom spaces, nine of them will give you the same golden rule. It is the industry standard for a reason, and it is the safest bet for most homes.
The Longest Wall Method
The most common and practical advice is to lay the planks parallel to the longest wall of the room.
Imagine a standard rectangular bedroom. By running the planks along the length of the longest wall, you create a sense of continuity.
- Why it works: It creates long, uninterrupted lines. This reduces the number of “chops” or cuts you have to make at the ends of the rows, which saves you material and money.
- The visual effect: It draws the eye through the room, emphasizing the length and making the space feel expansive.
The Main Light Source Method
The second school of thought—often preferred by interior designers—is to lay the planks toward the primary light source.
In a bedroom, this usually means the main window.
- Why it works: As mentioned earlier, when sunlight streams in from a window, it interacts with the floor. By running the planks perpendicular to the window (so the light runs down the length of the boards), you minimize the appearance of joints and seams.
- The visual effect: The light cascades down the grain, highlighting the vinyl’s natural look rather than its artificial edges.
What if the Rules Conflict?
Sometimes, the longest wall and the main window are on different sides. In this case, you have to choose your priority.
- Choose the Longest Wall if the room is narrow and you need to maximize space.
- Choose the Light Source if the room is large and you want the highest aesthetic quality.
Bedroom-Specific Layouts: Tailoring the Approach
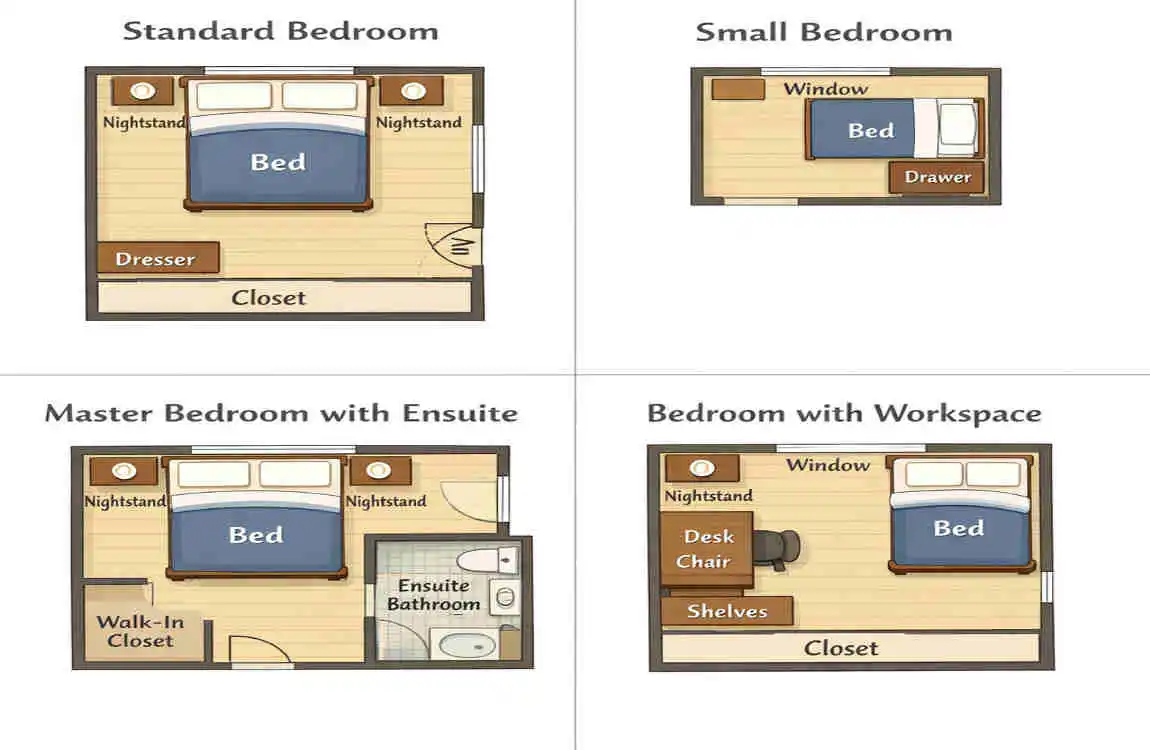
While the standard rules are a great starting point, every bedroom is different. A rule that works for a sprawling main suite might look terrible in a boxy guest room. Let’s break down exactly which direction to lay vinyl plank flooring in bedroom layouts based on specific shapes.
Narrow Bedrooms
Narrow bedrooms, often found in older homes or converted spaces, can feel like hallways if you aren’t careful.
- The Recommendation: Always lay planks lengthwise (parallel to the long walls).
- The Logic: If you lay planks horizontally across a narrow room (widthwise), you create a “ladder” effect. It looks like the rungs of a ladder, which visually chops the room into tiny segments, making it feel even shorter and choppier.
- The Result: By going lengthwise, you lean into the room’s shape, creating a seamless flow that tricks the eye into seeing more square footage than is actually there.
Square or Small Bedrooms
Square rooms (like a standard 12×12 ft spare room) are tricky because there is no “longest wall.”
- The Recommendation: Lay the planks towards the primary light source or consider a diagonal layout.
- The Logic: Since the dimensions are equal, the “longest wall” rule is void. Prioritize the window. However, square rooms can sometimes feel static or boring.
- The Diagonal Option: Laying flooring at a 45-degree angle in a square room is a secret designer weapon. It draws the eye outward to the corners, expanding the perceived size of the room massive amounts. It adds energy and dynamism to a boring box.
Wide or Master Bedrooms
Master bedrooms often feature complex layouts, including en-suite bathrooms and walk-in closets.
- The Recommendation: Parallel to the bed’s headboard wall or parallel to the main entry door.
- The Logic: In a large room, you want a sense of stability. Usually, the bed is placed against the main feature wall. Running planks parallel to this wall frames the bed beautifully.
- Transitions: You also need to consider the main bathroom. If you are continuing the vinyl into the bathroom, keep the direction consistent to avoid a jarring transition strip at the bathroom door.
Quick Reference Guide
To make this easier to visualize, here is a breakdown of different room types and the pro-recommended layouts.
Bedroom Type Recommended Direction Visual Effect Pro Tip
Narrow (e.g., 10×14 ft) Parallel to length (Longest Wall) Elongates the room, reduces “choppiness.” Align the start of your plank with the closet doors to keep it straight.
Square (12×12 ft) Perpendicular to Window Maximizes light flow, hides seams. Stagger your end joints by 12+ inches to avoid a “grid” look.
Diagonal Install 45-degree angle from entry Adds massive visual interest and movement. This wastes about 15% more material, so buy extra boxes!
Master Suite Parallel to the Bed / Longest Wall Creates a calm, anchored feel. Ensure the direction flows seamlessly into the en-suite bathroom.
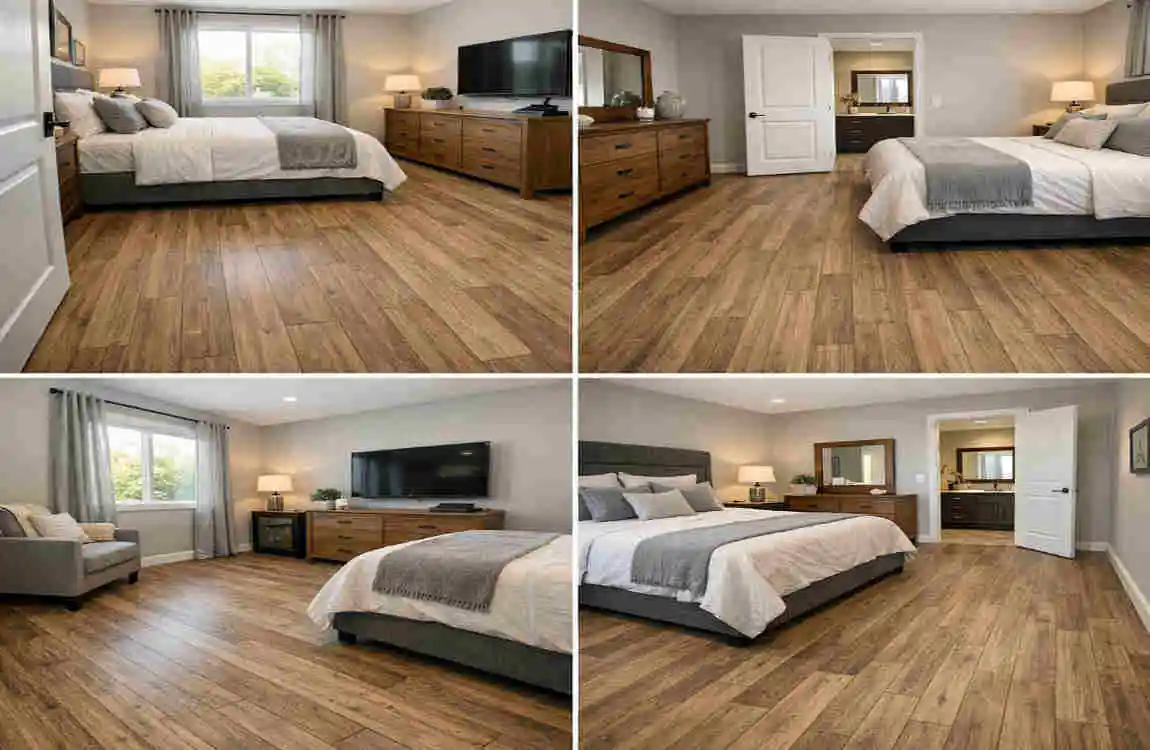
Light and Furniture Influence
When deciding which direction to lay vinyl plank flooring in bedroom renovations, you cannot ignore the things that will actually be in the room.
The “Golden Hour” Test
Before you start gluing or clicking, perform a light test.
- Take two or three planks out of the box.
- Lay them on the floor in one direction.
- Wait for the time of day when sunlight is strongest (or turn on your evening lamps).
- Rotate the planks 90 degrees.
- Observe: Which angle hides the seams better? Which angle makes the grain pop?
You will often find that one direction looks significantly more “high-end” simply because the light bounces off the vinyl’s wear layer.
Bed Placement Strategy
The bed is the king of the bedroom. A common mistake is laying flooring that fights with the bed placement.
- Parallel Flow: Generally, running planks parallel to the sides of the bed (lengthwise from the foot of the bed to the headboard) looks best. It elongates the room and leads the eye toward the headboard, which is usually the focal point.
- Perpendicular Flow: Running planks across the width of the bed can work in very wide rooms, but in smaller rooms, it can make the floor look like a raft the bed is floating on, which can feel slightly disconnected.
Pros and Cons by Direction
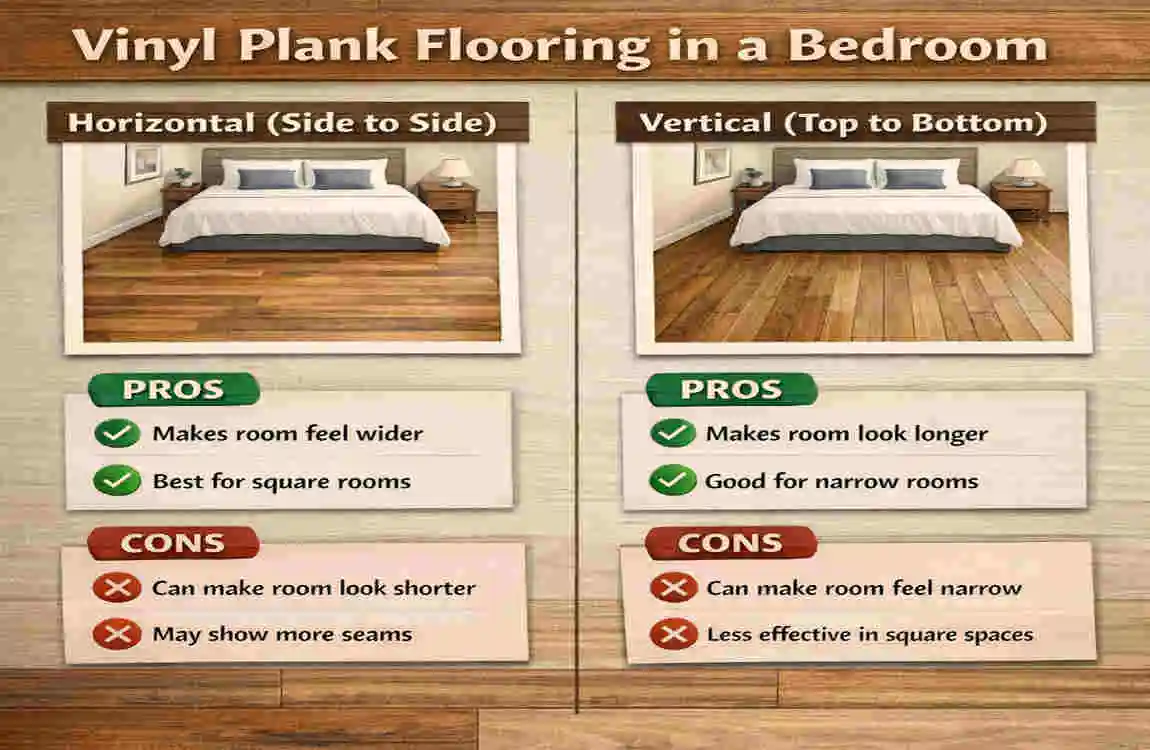
Every choice has a trade-off. Laying flooring is a balance between aesthetics, budget, and difficulty. Here is a detailed look at the pros and cons of each orientation to help you decide which direction to lay vinyl plank flooring in bedroom projects.
Lengthwise (Parallel to Longest Wall)
-
- Pros:Maximizes Space: This is the best way to make a room feel bigger.
- Easiest Install: You will need fewer cuts, meaning less time bending over a saw.
- Less Waste: Because you have fewer cuts, you waste less material (usually around 5% waste factor).
- Cons: Highlights Wall Flaws: If your long wall isn’t perfectly straight (bowed), long straight planks running next to it will make that curve very obvious.
Widthwise (Cross-Room)
-
- Pros: Widening Effect: In a very long, skinny room, this can visually push the walls out, making the room feel wider (though still shorter).
- Distinct Zone: It can help separate a bedroom visually from a hallway if you want a distinct “threshold” feel.
- Cons: Choppy Look: As discussed, this often creates an unappealing “ladder” effect.
- More Cutting: You will be cutting the ends of every row more frequently, increasing labour time.
Diagonal (45-Degree Angle)
-
- Pros:Designer Look: It looks custom, expensive, and unique.
- Hides Wall Imperfections: If your walls are crooked (common in old houses), diagonal flooring hides this completely because there are no parallel lines to compare against the wall.
- Expands Space: Pushes the eye to the corners, opening up the room.
- Cons:Complex Install: This is not for first-time DIYers. Measuring and cutting angles is difficult.
- High Waste: You need to purchase 15-20% extra flooring to account for all the cutoff waste at the edges.
Herringbone (Patterned)
-
- Pros:Ultimate Luxury: This is a massive trend in 2024-2025. It looks like a Parisian apartment.
- Cons:Requires Specific Planks: You generally cannot do this with standard LVP; you need specific “A” and “B” planks or smaller parquet-style vinyl.
- Very Expensive: High labour and material costs.
Installation Best Practices for Bedrooms
Once you have decided which direction to lay vinyl plank flooring in bedroom, it is time to install. Here are some pro-tips to ensure the layout you chose actually looks good in practice.
The “Dry Fit” is Mandatory
Never start gluing or clicking immediately. Open 3-4 boxes of flooring and mix them up (to ensure color variation). Lay out a loose row across the width of the room.
- Why? You want to avoid having a tiny sliver of plank (less than 2 inches) at either wall. If your math shows you’ll end up with a 1-inch strip on the far wall, shift your starting row over so you have equal-sized planks on both sides.
Undercut the Door Jambs
Nothing screams “amateur” like cutting the vinyl around the shape of the door frame and filling the gap with caulk.
- The Pro Way: Take a scrap piece of flooring, lay it next to the door casing, and use an oscillating saw to cut the bottom of the wood casing off. Slide your vinyl plank underneath the door frame for a seamless look.
Stagger Your Seams
When laying the planks, never let the end joints line up with the row next to it.
- The Rule: Keep joints at least 6 to 12 inches apart from row to row. Avoid “H” joints (where the seams line up every other row) and “Stair Steps” (a predictable pattern). Random staggering looks the most natural and provides the best structural integrity for the locking mechanism.
Sound dampening
Since this is a bedroom, consider the sound. Even if your LVP has an attached pad, adding a dedicated cork or high-density foam underlayment can dampen the “click-clack” sound of footsteps, making the bedroom quieter and more restful.
Multiple Room Consistency
A common dilemma is how to handle the transition from the hallway into the bedroom.
Scenario A: The Continuous Flow. If you are re-flooring the hallway and the bedrooms at the same time, the most modern look is to run the flooring continuously without any transition strips (T-moulds) at the doorways.
- The Look: This is seamless and clean.
- The Catch: You have to commit to one direction for the whole floor. usually, you determine the direction based on the longest run of the house (like the main hallway) and let that dictate the bedroom direction.
Scenario B: The Threshold Break If you are only doing the bedroom, or if the hallway is a different material (like carpet or tile), you will have a transition strip at the door.
- The Look: Defined and compartmentalized.
- The Benefit: This gives you the freedom to choose the optimal direction for the bedroom, regardless of the hallwayis direction. If the hallway runs North-South but the bedroom looks best East-West, a transition strip lets you make that switch.
Cost and Material Savings
Your choice of direction directly impacts your wallet.
As mentioned in the pros and cons, laying planks parallel to the longest wall is the most budget-friendly option.
- The Math: For a standard 150 sq ft bedroom, purchasing premium LVP at $4.00/sq ft.
- Straight Install: 5% waste = ~$630 total material cost.
- Diagonal Install: 15% waste = ~$690 total material cost.
While $60 might not seem like much, if you are doing three bedrooms and a hallway, that waste adds up to hundreds of dollars. Furthermore, intricate patterns like herringbone can double the installation labour cost if you are hiring a professional, as they take twice as long to lay.
When budgeting, always measure your room, calculate the square footage, and add 10% for standard cuts and 20% for diagonal cuts just to be safe. It is always better to have an extra box leftover for future repairs than to run out halfway through the job.
FAQs
Which direction should vinyl plank flooring be laid in a bedroom? The best direction is generally parallel to the longest wall of the room. This elongates the space and reduces cutting waste. Alternatively, lay the planks toward the main window to minimise seam visibility and maximise the natural wood look.
Should bedroom vinyl match the hallway direction? Ideally, yes. Running the flooring in the same direction from the hallway into the bedroom creates a seamless, open-concept feel. However, if you use a transition strip at the door, you can change the direction in the bedroom to suit that specific room’s shape.
Can I lay vinyl plank flooring diagonally in a bedroom? Yes, diagonal installation is excellent for small or square bedrooms as it visually expands the space and adds a unique design element. However, be prepared for more complex cuts and about 15% more material waste.
Which direction should flooring run under a bed? For the best aesthetic, flooring should typically run parallel to the length of the bed (from the foot of the bed toward the headboard). This creates a sense of alignment and stability in the room.