If this sounds familiar, you are likely dealing with a frustrating but incredibly common household problem. When you experience low water pressure, strange noises from your pipes, or sinks that take forever to fill, clogged water lines are usually the culprit.
Over time, sediment, mineral buildup, rust, and everyday debris can accumulate inside your pipes. These blockages often mimic standard drain clogs, but they are entirely different. Drain clogs prevent water from leaving your sink, while water supply line clogs prevent fresh water from reaching your faucet in the first place.
The good news is that you do not need to panic. Learning how to unclog water lines in the house is a highly valuable skill that every homeowner should know. Quick DIY pipe fixes can save you upward of $200 on an emergency plumber visit. More importantly, tackling these issues early prevents much bigger disasters down the road, such as completely blocked pipes, intense pressure buildup, or even burst lines that cause massive water damage.
Signs of Clogged Water Lines
Before you start tearing apart your plumbing, you need to make sure you are actually dealing with a blocked water line. Sometimes, the issue might be an isolated problem with a single faucet. Other times, it could be a massive blockage deep within your home’s main water system.
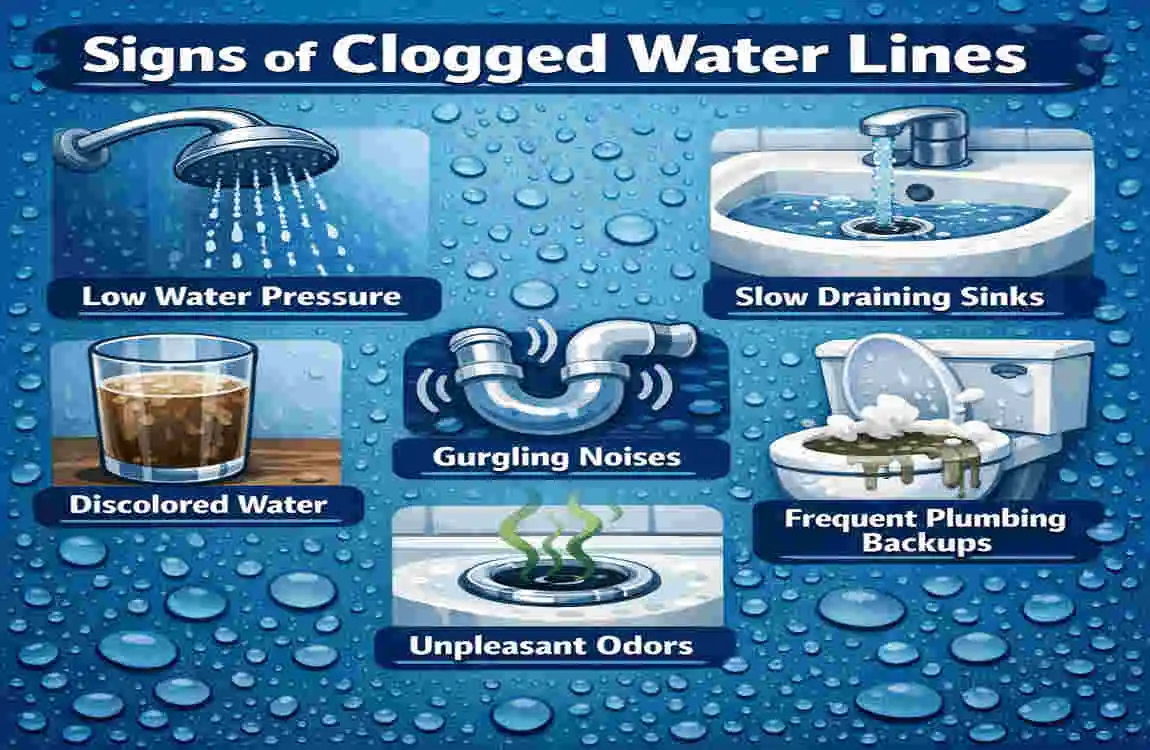
How can you tell the difference? Your plumbing system will usually give you a few warning signs when things are starting to get choked up. Look out for the following common symptoms:
Low Water Pressure Everywhere
If you turn on your kitchen sink, your bathroom sink, and your shower, and they all have terrible water pressure, you likely have a significant problem. This usually points to a blockage in your main water supply line. When the main line is clogged, every single fixture in your house will suffer.
Discolored or Murky Water
Does your tap water look brown, yellow, or slightly orange? This is a major red flag. Discolored water usually means that rust, dirt, or mineral sediment has built up inside your pipes. When water forces its way past this gunk, it picks up particles and brings them right out of your faucet.
Sputtering and Gurgling Sounds
Your water should flow smoothly and quietly. If you turn on a faucet and the water spits, sputters, or aggressively shoots out bursts of air, you have a flow issue. Additionally, if you hear deep gurgling sounds coming from inside your walls when you run the water, it means the water is struggling to push past a heavy blockage.
Slow Filling Appliances
Pay attention to your toilets and your washing machine. If your toilet tank takes ten minutes to fill up after a flush, or if your washing machine takes unusually long to start a cycle, your supply lines are likely restricted.
Here is a quick reference table to help you diagnose your specific issue and determine how fast you need to act:
Symptom Likely Cause Urgency
Low pressure everywhere , main line sediment blockage , high
Single faucet weak flow , Local aerator block or small clog , Low
Rusty or murky water , iron and mineral buildup , medium
Gurgling noises , air trapped behind a blockage , medium
Tools and Materials Needed
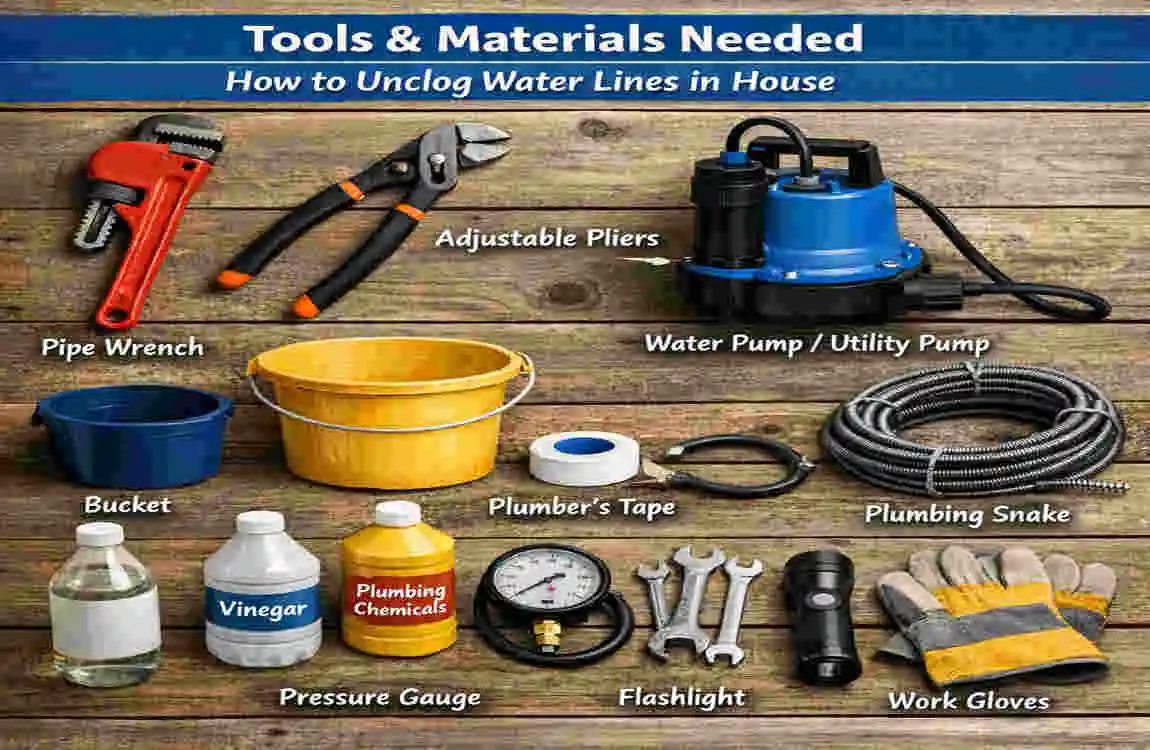
To successfully unclog blocked pipes, you need to prepare the right equipment. You do not need a professional plumbing truck, but gathering a few essential household items will make the job much easier.
Before you start any of the DIY pipe fixes below, go to your garage or utility closet and gather these basic supplies.
Your Plumbing Toolkit Essentials
- A sturdy bucket: You will need this to catch water when you disconnect pipes.
- An adjustable wrench: Crucial for loosening tight nuts and fittings.
- Slip-joint pliers: Great for gripping and turning stubborn plumbing parts.
- A standard cup plunger: Excellent for creating suction on flat surfaces like sinks.
- A manual drain snake or auger: You can buy a basic one at any hardware store for about $20. It is a lifesaver for deep clogs.
- Natural cleaners: Grab baking soda, white vinegar, and have a kettle ready for boiling water.
- A wet/dry shop vacuum: If you have one, this is a secret weapon for pulling out tough clogs.
- Thick rubber gloves: Plumbing can get messy, and you want to protect your hands from grime.
Essential Safety Tips
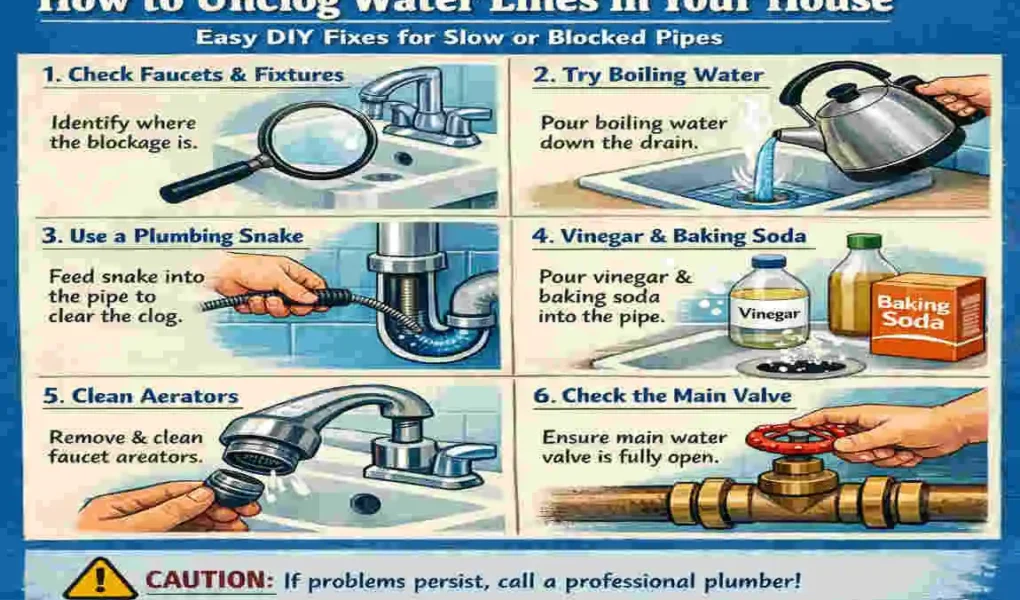
Safety should always be your top priority. Before you touch a wrench, you must shut off the main water valve to your house. If you take a pipe apart while the water is still on, you will flood your home in seconds.
You can usually find the main shut-off valve in your basement, in a utility closet, or outside near your water meter. Turn it clockwise until it is completely tight. Finally, throw on a pair of safety goggles. When you are unclogging pipes, trapped water and debris can easily splash up into your eyes.
Flush Lines with Hot Water
If you are wondering how to unclog water lines in the house without buying any special tools, this is the best place to start. A hot water flush is the simplest, most fundamental first step for clearing out minor sediment buildup.
Over time, small particles of sand, dirt, and calcium can gather near the end of your faucets, completely choking the water flow. Flushing the system uses the power of heat and gravity to push this debris right out of the pipes.
Why This Method Works
Heat is a natural enemy of grease, soap scum, and loose sediment. When you run a continuous stream of hot water through an open line, it helps dissolve sticky substances that might be holding the blockage together. Pushing water through the pipes with the restrictive caps removed allows the system to eject trapped debris forcefully.
Step-by-Step Instructions
- Turn off the main water supply: Always start by turning off the main valve to your house to prevent accidental spraying.
- Drain the remaining water: Go to the highest floor in your home and open a faucet. Then, go to the lowest point in your home (like a basement sink) and open that faucet. This allows all the standing water in your pipes to drain out completely.
- Remove the aerator: Look at the tip of your affected faucet. You will see a small, round cap called an aerator. Take your adjustable wrench, wrap a rag around the aerator so you do not scratch it, and gently unscrew it.
- Clean the aerator: You will likely see tiny rocks and grit trapped inside the aerator screen. Rinse it out thoroughly under another working faucet.
- Perform the flush: Turn your main water supply back on. Let the hot water run forcefully out of the faucet (without the aerator attached) for about 10 to 15 minutes. This heavy flow will push out any remaining sediment in the supply line.
- Reconnect and test: Turn the water off, screw the clean aerator back on, and turn the tap on again. You should notice a massive improvement in water pressure.
Baking Soda and Vinegar
When a hot water flush is not enough, it is time to bring in some simple household science. The baking soda and vinegar method is incredibly popular for a reason. It is cheap, natural, and surprisingly powerful.
Unlike harsh chemical drain cleaners that can actually melt your pipes or ruin your septic system, baking soda and vinegar are completely safe for all types of plumbing.
The Science of the Fizz
When you combine a base (baking soda) with an acid (white vinegar), they create an immediate chemical reaction. This mixture vigorously foams and expands, releasing carbon dioxide gas. Inside a tight, enclosed pipe, this expanding fizz scrubs the interior walls, breaking down organic clogs, grease, and mineral deposits without causing any damage.
Step-by-Step Instructions
- Prep the drain: First, make sure there is no standing water in the sink. Use a cup to bail out any pooled water if necessary.
- Pour the baking soda: Measure out exactly ½ cup of dry baking soda. Pour it directly down the affected faucet drain or into the disconnected supply line if you are targeting the intake.
- Add the vinegar: Measure out ½ cup of standard white vinegar and pour it straight down on top of the baking soda.
- Seal and wait: The mixture will immediately start to bubble and fizz out of the top. Quickly cover the opening with a drain plug or a damp rag. This forces the expanding gas to travel downward into the clog, rather than escaping up into your sink. Leave it alone for 15 to 30 minutes.
- Flush with heat: After the time is up, carefully pour a kettle full of boiling water straight down the drain. The heat will wash away the broken-down gunk.
Variations for Tough Clogs: If you have a particularly stubborn blockage, try adding a half cup of regular table salt to the baking soda before you pour it in. The salt acts as an abrasive scrub, helping the mixture grind away harder blockages.
Plunger Technique
When most people think of plunging, they only think of clogged toilets. However, a standard cup plunger is an incredible tool for fixing blocked sink lines and shallow supply issues.
This method requires a bit of physical effort, but it is one of the fastest ways to dislodge a clog that is sitting close to the surface of your plumbing.
How Suction Saves the Day
A plunger works by creating a tight vacuum seal over a pipe opening. When you push down and pull up, you force water back and forth against the clog. This aggressive pushing and pulling motion eventually breaks the blockage apart, allowing the water to carry the pieces away.
Step-by-Step Instructions
- Choose the right plunger: Do not use a toilet plunger (the kind with a funnel on the bottom) for your sinks. You need a standard cup plunger with a flat rim to get a proper seal on a sink basin.
- Seal the overflow: If you are working on a bathroom sink, you will notice a small hole near the upper rim. This is the overflow drain. You must plug this hole with a wet rag, or the air pressure from your plunger will escape through it.
- Create a water seal: Fill the sink with about an inch or two of water. The rim of the plunger needs to be completely submerged in water to create an airtight suction seal.
- Plunge vigorously: Place the rubber cup directly over the drain. Push down firmly, and then pull up sharply. Repeat this vigorous up-and-down motion 10 to 15 times without breaking the seal.
- Check the flow: Lift the plunger. If the water quickly drains away, you have successfully broken the clog! If the water sits there, repeat the plunging cycle a few more times.
Keep in Mind: This method is fantastic for sink lines and immediate drain clogs, but it will not work for deep main supply line issues. If you are trying to figure out how to unclog water lines in your house that are buried deep in your walls, you will need a different method.
Boiling Water Pour
Sometimes, the most effective DIY pipe fixes are the simplest ones. If you suspect that your clog is made of congealed soap scum, cooking grease, or fat, boiling water is your best friend.
Grease is tricky because it goes down the drain as a liquid when it is hot, but as soon as it hits your cool pipes, it solidifies into a hard, sticky mess. That sticky mess grabs onto hair and debris, creating a massive wall in your water lines.
Melting the Blockage Away
You cannot push solid grease out easily, but you can melt it. Sending a large volume of boiling water down the pipe raises the temperature of the blockage, turning it back into a liquid so it can flush out to the sewer.
Step-by-Step Instructions
- Clear standing water: Boiling water will not work if it has to pass through a pool of cold water first. Bail out as much standing water from your sink or tub as possible.
- Boil the water: Fill a large kettle or a stovetop pot with water and bring it to a rolling boil.
- Pour in intervals: Do not dump the entire pot down the drain at once. Pour the boiling water slowly and steadily in three separate intervals. Pour a third of the water, wait a few seconds for it to work on the clog, and then pour the next third.
- Test the flow: Turn on your faucet to see if the water runs smoothly.
Crucial Warning: You must know what kind of pipes you have before you try this. If your home uses PVC (plastic) pipes, do not use boiling water. Water that is 212 degrees Fahrenheit can easily warp, melt, or weaken plastic joints. If you have PVC pipes, use the hottest water you can get directly from your tap instead. Boiling water is only safe for metal pipes.
Drain Snake or Auger
When natural cleaners and plunging fail, it means your clog is hard, stubborn, and located deep down in your plumbing. To fix this, you need to physically reach into the pipe and pull the blockage out. This is where a drain snake (also called a plumbing auger) becomes essential.
A drain snake is a long, flexible metal cable with a coiled spring at the end. It is specifically designed to navigate the twists and turns of your water lines.
Breaking the Barrier
The coiled tip of the snake acts like a corkscrew. As you push the cable down the pipe and turn the handle, the tip burrows into the nasty clog of hair, lint, and debris, allowing you to either break it into tiny pieces or pull it entirely out of the line.
Step-by-Step Instructions
- Access the line: You can feed the snake straight down the sink drain, but for a better angle, place a bucket under your sink and disconnect the P-trap (the curved pipe) to access the pipe opening going straight into the wall.
- Insert the cable: Push the tip of the drain snake into the pipe opening. Continue feeding the cable by hand until you feel physical resistance. That resistance is your clog.
- Crank and twist: Tighten the lock on the snake’s handle. Turn the handle clockwise while applying firm, steady pressure forward. You will feel the cable bite into the blockage.
- Retrieve the clog: Once you feel the tension break, or you feel the cable firmly grab the clog, slowly pull the cable back out of the pipe. Have a trash bag ready, because what comes out will look and smell terrible.
- Flush the residue: Reassemble your pipes and run hot water for five minutes to flush away any leftover particles.
Budget Option: If you do not want to spend $20 on a metal auger, you can buy a plastic “Zip-it” tool for about $5 at any hardware store. It is a flexible piece of plastic with backward-facing barbs that works wonders for pulling hair clogs out of shower drains.
Wet/Dry Vacuum Method
If you own a wet/dry shop vacuum, you actually have one of the most powerful unclogging tools on the market sitting right in your garage.
When you are figuring out how to unclog water lines in the house, you usually focus on pushing the clog down. However, sometimes it is much easier and safer to suck the clog straight up and out. A wet/dry vac provides incredible suction power that can pull out blockages that snakes and plungers leave behind.
Sucking the Clog Free
By creating an airtight seal over your drain, the vacuum’s motor creates immense negative pressure inside the pipe. This vacuum force literally rips the clog backward, pulling it out of the plumbing entirely.
Step-by-Step Instructions
- Prepare the vacuum: This is the most important step. You must set your shop vacuum to liquid Mode. Remove the dry paper filter from the inside of the vacuum so it does not get ruined.
- Create an airtight seal: Take the vacuum hose and place it directly over the clogged drain. To get a perfect seal, pack a wet washcloth or an old rag tightly around the gap where the hose meets the drain opening. You can even buy cheap rubber attachment cups specifically designed for this.
- Turn it on: Hold the hose and the rag firmly in place and turn the vacuum on to its highest setting.
- Listen and feel: Let the vacuum run for about two to three minutes. You will often hear a distinct popping sound, or you will hear the rush of water and debris shooting up the hose and into the vacuum canister.
- Clean up: Turn the vacuum off, pull the hose away, and dump the nasty contents of the canister into your outside trash.
This method is ideal for accessible lines and shallow clogs where you can get a really good seal.
P-Trap Cleaning
If your bathroom or kitchen sink is draining slowly, or if you notice a foul odor coming from the water lines, the culprit is almost always hiding right underneath the basin.
Take a look under your sink. You will see a pipe that curves down and back up in a “U” or “J” shape. This is called the P-trap. Its job is to hold a small amount of water to block sewer gases from rising into your house. Unfortunately, its curved shape also makes it a prime location for heavy debris to settle and create a massive clog.
Going Straight to the Source
Sometimes, you cannot push or pull a clog out. You have to remove the pipe and clean it by hand. Cleaning the P-trap is a guaranteed way to remove blockages that are localized under your sink.
Step-by-Step Instructions
- Prepare your workspace: Clear out all the cleaning supplies from under your sink. Place a large bucket directly underneath the curved P-trap. Water and sludge will definitely fall out, and you want to catch it.
- Loosen the nuts: You will see a slip nut on both ends of the curved pipe. Try turning them counter-clockwise by hand. If they are too tight, grab your slip-joint pliers. Wrap a rag around the nuts so you do not strip the plastic, and gently loosen them.
- Remove the trap: Once the nuts are loose, carefully pull the P-trap straight down and wiggle it free. Dump any water and gunk inside it straight into your bucket.
- Clean the gunk: Take the curved pipe outside or to another sink. Use a stiff bottle brush, a wire hanger, or paper towels to push all the slimy buildup out of the pipe until the inside is completely clean.
- Reassemble and flush: Put the clean P-trap back into place, hand-tighten the slip nuts securely, and run hot water for a minute to ensure there are no leaks.
When to Call a Professional
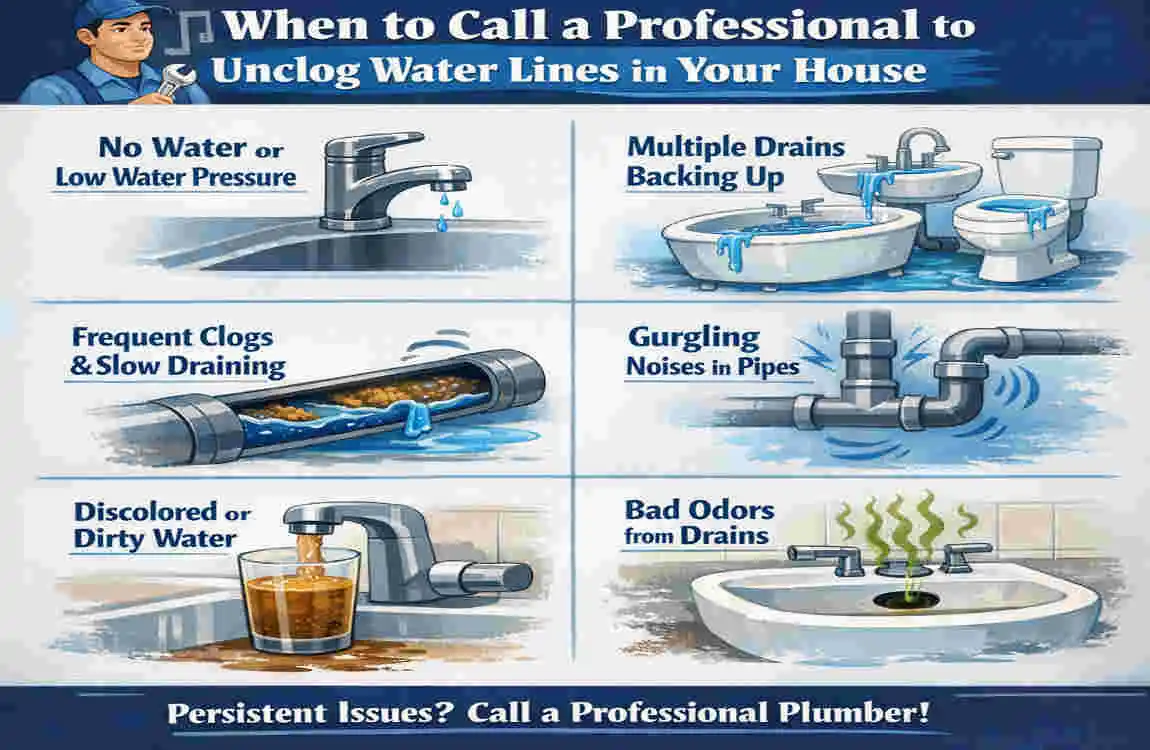
Learning how to unclog water lines in the house is empowering, and these DIY pipe fixes will solve about 90% of your everyday plumbing issues. However, it is vital to know your limits. Sometimes, a clogged pipe is actually a symptom of a much more dangerous, expensive problem.
If you attempt multiple methods from this guide and the water still will not flow, it is time to put the wrench down. Continuing to force a stubborn blockage can result in cracked pipes and massive indoor flooding.
Watch out for these severe red flags:
- Persistent clogs: The blockage keeps coming back every few days.
- Sewage smells: Foul odors indicate a blocked sewer main, not a standard water line.
- Visible leaks: If you see water pooling under cabinets or bubbling behind drywall, stop immediately.
- Whole-house issues: If no water is coming out of any fixture in your home, your main city line or well pump might be compromised.
Hiring a professional plumber typically costs between $150 and $400, depending on the severity of the issue. If DIY fails, do not hesitate to reach out for professional help. Contact us today to ask about our advanced hydro-jetting services. We use high-pressure water streams to blast away the toughest blockages and leave your pipes looking brand new inside!
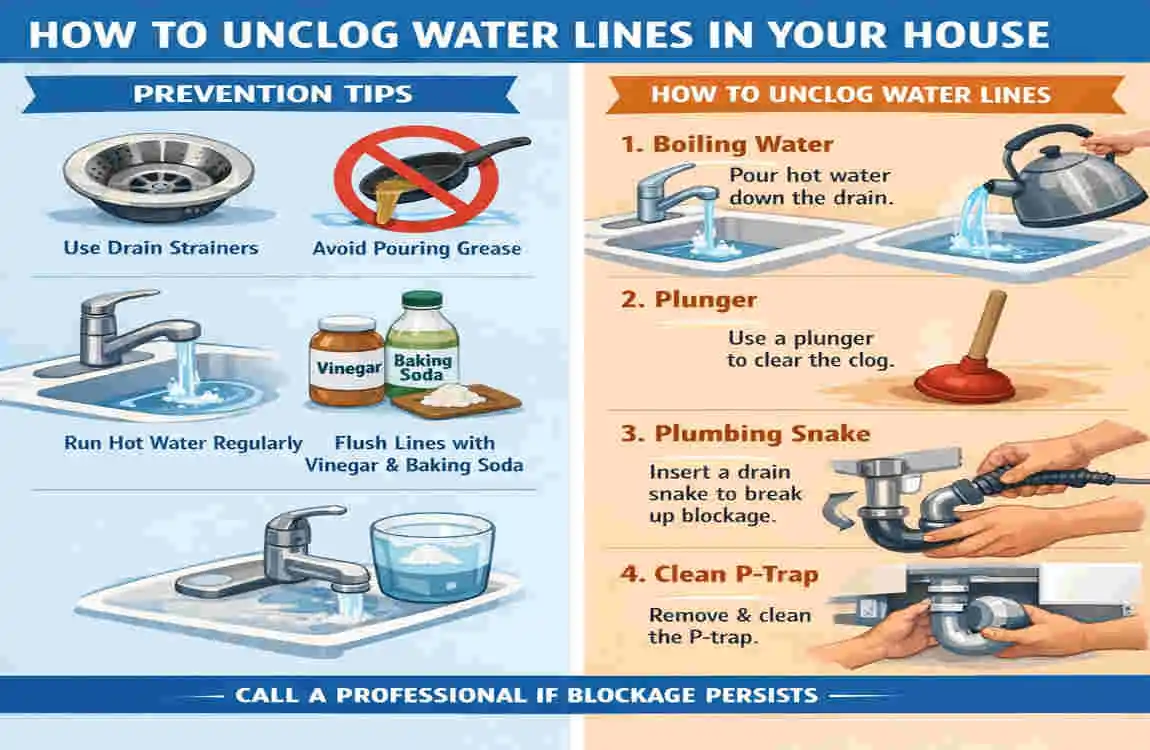
Prevention Tips
You have successfully cleared your pipes, and your water is flowing beautifully again. Congratulations! Now, your goal is to ensure you never have to deal with this messy, frustrating problem again.
Preventing clogs is incredibly easy if you adopt a few simple habits. Proactive maintenance goes a very long way in keeping your home’s plumbing healthy and efficient.
Install a Water Softener
If you live in an area with “hard water,” your water supply is filled with heavy minerals like calcium and magnesium. Over time, these minerals stick to the inside of your pipes, creating a thick, white scale that chokes water flow. Installing a whole-house water softener system removes these minerals before they ever enter your lines, permanently solving scaling clogs.
Flush Lines Quarterly
Do not wait for a clog to form. Make it a habit to perform the hot water flush (Method 1) every few months. Opening up your system and letting hot water forcefully clear out minor sediment buildup keeps your lines running at maximum capacity.
Use Screens on Drains and Aerators
The easiest way to stop a clog is to stop debris from entering your pipes in the first place. Ensure every sink has a working aerator screen on the faucet to catch hard minerals. Furthermore, buy cheap mesh drain catchers for your showers and sinks to trap hair and food scraps.
Avoid Harsh Chemical Cleaners
Stop buying commercial liquid drain cleaners. While they might offer a quick fix, these heavy chemicals generate intense heat that can warp PVC pipes and eat away at older metal pipes. Long-term use will destroy your plumbing system. Stick to natural enzyme cleaners or the baking soda and vinegar method.
Your Simple Plumbing Maintenance Schedule:
Frequency Maintenance Task
Monthly , unscrew and clean out faucet aerators
Quarterly : Perform a full hot water flush on major supply lines
Yearly , place a bucket down and inspect/clean all P-traps
FAQs
Even with a detailed guide, plumbing can still be intimidating. Here are some of the most frequently asked questions we get from homeowners trying to figure out how to unclog water lines in the house.
How to unclog water lines in the house fast? If you need immediate results, start with a hot water flush. Take off the faucet aerator and run hot water for 15 minutes. If that fails, move straight to the baking soda and white vinegar method to quickly dissolve organic buildup.
Can I use commercial chemical cleaners? We highly recommend using them sparingly, or better yet, avoiding them entirely. Chemical cleaners contain corrosive acids that eat through clogs but also slowly eat away at the interior lining of your pipes. Over time, this drastically increases your risk of pipe bursts and hidden leaks.
What is the difference between a main line and a branch line? A branch line is a smaller pipe that supplies water to a specific fixture, like your guest bathroom sink. A main line is the massive pipe that brings water into your entire home. You can easily DIY branch line clogs, but main line issues almost always require a professional plumber.
What is the cost of DIY pipe fixing? If you already own basic tools like a wrench and a bucket, the cost of DIY is incredibly low. Buying baking soda, vinegar, and a basic plastic snake tool will cost you under $20 total!