It’s pouring outside, and suddenly, you notice a steady drip from your ceiling. Water stains begin to appear, and you feel that sinking dread—your fibreglass roof is leaking. Don’t panic! You’re not alone. Fibreglass (GRP) roofs are popular in the UK and across Europe for their durability and low maintenance. But like anything exposed to the elements, even the best roofs can develop issues over time.
Understanding Fibreglass Roofs

What is a Fibreglass Roof?
Fibreglass roofs—also known as GRP (Glass Reinforced Plastic)—are constructed from layers of glass fibre matting saturated with a liquid resin, then sealed with a protective topcoat. This creates a seamless, waterproof membrane that’s both strong and lightweight.
Key advantages of fibreglass roofs:
- Waterproof and weather-resistant: No seams mean fewer leak points.
- Lightweight: Adds minimal load to your structure.
- Low maintenance: No need for regular painting or sealing.
- UV-resistant: Withstands sunlight better than some alternatives.
But no roof is perfect. Over time, weather, temperature changes, and simple aging can cause cracks, blisters, or leaks to appear—especially at joints or edges.
Why Do Fibreglass Roofs Need Repair?
While robust, fibreglass roofs can suffer from:
- Cracks and splits: Often from movement or impact.
- Blisters: Trapped moisture or air pockets.
- Dullness and chalking: UV exposure breaks down the topcoat.
- Leaks: Usually at seams, flashings, or where the roof meets walls.
Addressing these issues promptly can extend a fibreglass roof’s lifespan by many years—potentially 20 years or more.
Common Signs Your Fibreglass Roof Needs Repair
Top Warning Signs
If you’re not sure whether your roof needs work, look for these tell-tale signs:
- Water stains on ceilings or walls below the roof
- Blisters or bubbles on the roof’s surface
- Visible cracks or splits in the fibreglass
- Pooling water that doesn’t drain after rain
- Soft spots that feel spongy underfoot
If you spot any of these, it’s time for action!
Table: Fibreglass Roof Leak Signs & Causes
Sign Possible Cause Action Needed
Blisters, trapped moisture/air. Urgent repair needed
Water stains, leaks, or cracks. Immediate investigation
Pooling water, poor drainage, and low spots. Reshape, reinforce the area
Soft spots, water ingress, delamination. Replace the affected section
Visible cracks , Age, impact, movement , Patch and seal
Recognizing these symptoms early helps avoid bigger, more expensive problems down the line.
Tools and Materials Needed for Fibreglass Roof Repair
Essential Tools List
Before you start, gather the right tools to make your repair smooth and safe. Here’s what you’ll need:
- Grinder or sander – For removing damaged topcoat and preparing the area.
- Roller – For smooth resin and topcoat application.
- Paintbrush – For detailed regions and edges.
- Utility knife – For cutting glass matting to size.
- Mixing bucket and stirrer – For preparing resin mixtures.
- Vacuum or brush – To clear dust and debris.
- Personal protective equipment (PPE):
- Gloves
- Goggles
- Respirator mask
Materials for DIY Fibreglass Roof Fix
You’ll also need the right materials to get a professional-quality finish:
- Fibreglass matting: The structural base for patches.
- Resin (with catalyst): Bonds the matting and forms a waterproof seal.
- Topcoat: UV-resistant layer for finishing.
- Primer: Improves adhesion on older surfaces.
- Acetone: For cleaning tools.
Table: Materials Breakdown
Item Purpose Approx. Cost (£)
Fibre glass mat Patch/strengthen repairs 10-25
Resin (with catalyst) Bonds and waterproofs mat 30-60
Topcoat Final weatherproofing 20-35
Primer Ensures adhesion 10-20
PPE (gloves/mask) Safety 15-30
Mixing bucket/tools Prepare and apply materials 10-20
Total DIY kit cost: About £100–£200 (depending on area size and brand).
Where to Buy and Cost Breakdown
Most large DIY stores, specialist roofing suppliers, and online retailers carry fibreglass roof repair kits. These usually include all essentials, saving you time and money. For first-timers, a starter kit is often the best value.
Safety Precautions Before Starting Your Fibreglass Roof Repair
Key Safety Measures
Repairing your own roof can be straightforward, but it’s essential to put safety first. Here are the key steps to stay safe:
- Check the weather: Only work on dry, mild days. Wet roofs are slippery and dangerous.
- Use a harness or fall arrest system, especially on sloped roofs.
- Ventilate the area: Fibreglass resin and topcoat give off strong fumes. Keep windows open and wear a respirator.
- Wear protective gear: Gloves, goggles, and a mask protect you from chemicals and dust.
- Plan your work: Have everything ready before you start to avoid unnecessary trips up and down the ladder.
Remember: Improper attempts at how to repair a fibreglass roof can lead to injury. If ever in doubt, consult a professional.
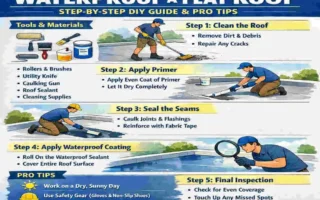
Step-by-Step Guide: How to Repair a Fibreglass Roof
This is the heart of your project. Take it slow, follow each step, and you’ll have a watertight roof in no time!
Inspect and Prepare the Area (Assess Damage)
- Clear the roof: Sweep away any debris, leaves, or loose dirt.
- Check for soft spots: Gently press across the surface. Mark any spongy or weakened areas with chalk.
- Locate all leaks: Look for visible cracks, blisters, or pooling water. Use a hose test (lightly spraying water) if needed.
- Document damage: Take clear photos before starting. These help track your progress and can be helpful if you need to consult a pro.
Remove Damaged Sections (Grinding and Cleaning)
- Suit up: Put on gloves, goggles, and a mask.
- Grind or sand away old topcoat and resin: Use a grinder or sander to remove loose, flaking, or blistered areas. Feather the edges for a smooth transition.
- Widen cracks if needed: Use a utility knife to slightly open narrow cracks, ensuring resin can penetrate.
- Clean thoroughly: Vacuum or brush away dust and debris.
- Wipe down with acetone: This removes any grease or contaminants.
Apply Primer and New Glass Mat
- Apply primer: Brush a thin layer onto the prepared area. Wait for it to become tacky (usually 30–60 minutes).
- Cut fibreglass matting: Measure and cut pieces that overlap the damaged area by at least 50mm (2 inches) on all sides.
- Mix resin and catalyst: Follow the manufacturer’s instructions (usually around 2% catalyst by weight). Don’t over-mix—it can cure too quickly.
- Saturate matting: Dip the matting into the resin mix, ensuring it’s thoroughly soaked but not dripping.
- Layer the matting: Lay the first piece onto the primed area and smooth it with a roller to remove air bubbles. Add additional layers if needed for strength.
Add Resin and Catalyst for Waterproof Seal
- Prepare the resin mix: For most jobs, a 2% catalyst ratio works (e.g., 20ml catalyst per 1kg resin). Mix thoroughly, but only what you can use in 10–15 minutes.
- Apply resin: Pour or brush it onto the matting. Use a roller for even coverage, pressing out trapped air.
- Overlap edges: Ensure new resin and matting overlap slightly onto undamaged areas.
- Allow to cure: Depending on temperature, initial cure takes 1–2 hours.
Finish with Topcoat and Cure
- Mix topcoat: Stir well (some require a small amount of catalyst). Always follow the manufacturer’s guide.
- Apply topcoat: Use a brush or roller to cover the entire repaired area, feathering out the edges.
- Sand smooth (if needed): After curing, lightly sand for a seamless finish.
- Let cure: Full curing can take 24–48 hours. Avoid walking on the roof until it is fully hardened.
Test and Inspect Your Fibreglass Roof Repair
- Visual check: Look for any missed spots, pinholes, or unevenness.
- Hose test: Once fully cured, gently spray water over the repair. Check for leaks inside.
- Touch up as needed: If you spot any issues, repeat the resin/topcoat process.
Congratulations! You’ve just completed a full DIY fibreglass roof fix.
How to Prevent Future Fibreglass Roof Leaks and Extend Lifespan

Maintenance Tips for Long-Lasting Fibreglass Roofs
To keep leaks at bay and extend your fibreglass roof’s lifespan:
- Inspect annually: Check for cracks, blisters, or pooling water every spring and autumn.
- Clear debris: Leaves and moss trap moisture—remove them regularly.
- Clean gutters and drains: Blockages cause water to pool and increase the risk of leaks.
- Reapply topcoat every 5–10 years: Keeps the surface UV-resistant and waterproof.
- Address minor damage early: Small cracks are easy to fix—don’t wait for big problems.
Common Mistakes to Avoid in Fibreglass Roof Repair
Avoid these DIY pitfalls:
- Skipping primer: Reduces adhesion and leads to early failure.
- Working in bad weather: Moisture can ruin resin and lead to poor bonding.
- Using cheap materials: Low-quality resin or matting won’t last.
- Over-mixing resin: Causes it to set before application.
- Ignoring safety gear: Always protect your skin, eyes, and lungs.
A little care goes a long way in safeguarding your investment.
When to Call a Professional for Fibreglass Roof Repair
Sometimes, it’s best to let the experts handle it. Call a professional if:
- The damage covers a large area (over 2m²)
- There are structural issues, such as sagging or rot
- You have no DIY experience, or feel unsafe performing the repair
Table: DIY vs. Pro Fibreglass Roof Repair Costs
Method Estimated Cost (£)Best For
DIY Repair 100–300 Small leaks, confident DIYers
Professional 500–2000+ Large/structural repairs, peace of mind