It is a scorching hot summer afternoon outside, and you have just stepped indoors, expecting a wave of refreshing, icy air to wash over you. But instead, you are greeted by stuffy, warm air. Suddenly, your luxury home feels exactly like an oven. We have all been there, and it is incredibly frustrating. There are a few things worse than realizing you have a major cooling problem right in the middle of a brutal heatwave.
Why is it so important to tackle these issues immediately? Timely fixes do more than restore your comfort; they protect your wallet. General industry statistics show that neglected AC issues can cause a massive 20% to 50% loss in energy efficiency. That means your system is working twice as hard, using more electricity, and leaving you with a massive utility bill at the end of the month.
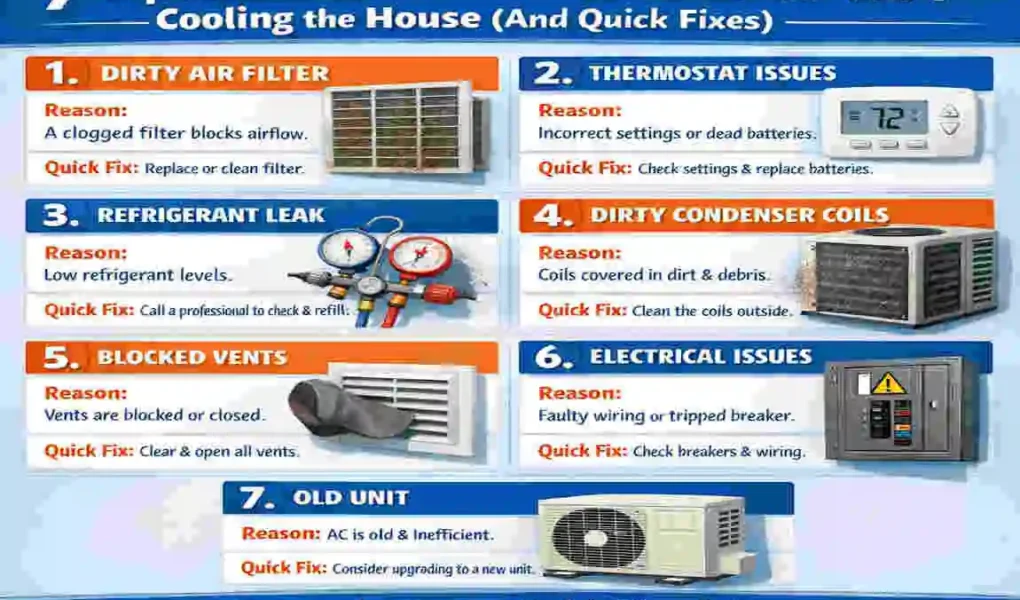
Discover the top causes and fixes when the air conditioner is not cooling the house right here in this guide. We have broken down complex technical jargon into everyday language so you can easily understand what is happening behind the scenes of your HVAC system.
The Menace of Dirty Air Filters

One of the absolute most common reasons your AC stops blowing cold air is also the easiest one to overlook. We are talking about dirty filters. When you notice weak airflow from your vents or feel your energy bills steadily climbing, a clogged air filter is usually the prime suspect.
So, what exactly happens when an an air conditioner isn’t cooling the the house because the filter is dirty? It all comes down to airflow. Your air conditioning system needs to pull in warm air from your stunning home, cool it down, and push it back out. The air filter sits right in the middle of this process, catching dust, pollen, and pet hair.
However, when that filter becomes completely packed with debris, it acts like a thick, dirty wall. It severely restricts the amount of air that can flow through the system. Because the unit cannot pull in enough air, it cannot cool enough air. Your system then works overtime, desperately trying to push air past the blockage.
This overworking leads to massive inefficiency. In fact, running your AC with a highly clogged filter can reduce its energy efficiency by up to 15%. Not only does this leave you sweating in your living room, but it also causes unnecessary wear and tear on the blower motor. Industry standards dictate that standard one-inch filters should be changed every single month, especially during peak summer usage or if you have fluffy pets running around.
If you were to hold a brand-new filter next to a clogged one, the visual difference is shocking. The new one is bright white and semi-transparent, while the old one is a heavy, matted, dusty, gray mess.
Signs of Dirty Filters Blocking Your AC
- Weak Airflow: You hold your hand up to the vent and barely feel a breeze.
- Dusty Vents: You notice a buildup of gray dust on the grilles of your AC vents.
- Longer Cooling Cycles: The AC runs for hours, but the room never quite reaches the temperature you set on the thermostat.
Quick Fix for Dirty Air Filters
Thankfully, resolving this issue is incredibly simple and highly cost-effective. You can absolutely do this yourself in less than five minutes.
Step-by-step DIY Fix: First, turn off your air conditioner at the thermostat. You never want to run the system without a filter, as it will suck raw dust directly into the sensitive machinery. Next, locate your filter housing. This is usually found in a wall return vent, in the ceiling, or directly next to the indoor air handler unit.
Slide the old, dirty filter out and throw it directly into the trash. Slide the new one in, making sure the printed arrows on the edge of the filter point toward the machinery (indicating the airflow direction).
Prevention: To stop this from happening again, set a recurring quarterly or monthly reminder on your smartphone. Consistent changes are the secret to a long-lasting AC!
Struggling with Low Refrigerant Levels
If you have changed your filter and your home is still feeling like a sauna, you might be dealing with a low refrigerant level. Refrigerant is the lifeblood of your cooling system. It is the chemical compound that cycles through your AC lines, absorbing the heat from inside your home and dumping it outside.
Here is the science, simplified: Refrigerant acts like a heat sponge. When it is pumped inside, it expands and becomes very cold, soaking up the heat from your indoor air. When it travels to the outdoor unit, it is compressed, heated, and then released into the outdoor air.
If your system is short on this vital fluid, the “heat sponge” is too small. The air coming out of your vents will feel lukewarm at best. This is a massive red flag when the air conditioner is not cooling the house effectively.
Many people mistakenly believe that air conditioners “use up” or “burn” refrigerant like a car burns gasoline. That is not true. Your AC is a closed-loop system. If you are experiencing low refrigerant, it means you leak the lines.
These leaks are incredibly common, especially in systems over 10 years old. Years of vibrating, temperature fluctuations, and normal wear and tear can cause tiny pinhole leaks in the copper coils. Poor initial installation can also lead to weak joints that eventually give out and leak.
When a leak occurs, the system loses pressure. You might start to notice strange hissing or bubbling sounds coming from your indoor or outdoor unit. Another major symptom is a buildup of solid ice on the copper pipes outside or on the indoor evaporator coils.
Quick Fix for Refrigerant Issues
When it comes to refrigerant, this is one area where you absolutely must step back and let the experts handle things.
DIY Check: What you can do is inspect your system visually. Go outside and look at the copper lines connected to your condenser. Do you see any dark, greasy spots? Refrigerant is mixed with a special oil, so a leak often leaves behind an oily residue. If you see this or hear a faint hissing sound, you have found your problem.
Do Not Refill it Yourself: Handling AC chemicals requires specialized training and an EPA certification. It is illegal and dangerous to vent these chemicals into the atmosphere.
Instead, you need to call a licensed HVAC professional. They will use specialized dyes or electronic sniffers to locate the exact source of the leak. They will repair and seal the hole, then recharge the system with the exact amount of liquid it needs. This professional service typically costs between $200 and $500, depending on the severity of the leak and the type of chemical your system uses.
Prevention: The best way to prevent leaks from catching you off guard is by scheduling annual professional maintenance. A technician will catch vibrating parts and pressure drops before they turn into major mid-summer breakdowns.
What to do when the air conditioner is not cooling the house? Check for Frozen Coils!
Frozen Evaporator Coils
It might sound completely wild, but your air conditioner can actually get too cold. In fact, it can turn into a block of solid ice in the middle of a 100-degree summer day! We are talking about frozen coils, specifically the indoor evaporator coils.
Your evaporator coil is the part of your indoor unit that actually gets cold, cooling the air passing over it. However, this process relies on a delicate balance. The coil needs a constant supply of warm, unconditioned air from your house blowing over it to keep it from dropping below freezing.
If that steady flow of warm air is blocked, the coil’s temperature plummets. The natural humidity and moisture in the air surrounding the coil will suddenly freeze directly onto the metal. Within hours, a thin layer of frost turns into a thick, solid block of ice.
Once the coil is encased in ice, it can no longer exchange heat. The ice acts as an insulator, blocking the refrigerant from absorbing the heat from your home. This is a primary reason the air conditioner is not cooling the house, despite the unit running constantly.
What causes this bizarre freezing effect? It almost always ties back to restricted airflow. Remember Reason 1 and Reason 2? A severely dirty air filter will block the warm air from reaching the coil, causing it to freeze. Similarly, low refrigerant levels cause a pressure drop, forcing the chemical to become unnaturally cold and rapidly freeze the surrounding moisture.
Signs of Frozen Evaporator Coils
How do you know if you have an ice problem? Look for these glaring signs:
- Zero Cold Air: The system is blowing, but the air is completely warm.
- Water Puddles: You notice unusual dripping water or pooling around your indoor furnace or air handler unit as the bottom layer of ice slowly melts.
- Visible Ice: If you open the access panel to your indoor unit or look at the copper pipe leading into it, you will literally see white frost or solid ice.
Quick Fix for Frozen Coils
If you discover a block of ice in your unit, your immediate goal is to safely melt it without damaging the coil fins.
Step-by-Step Fix: First and foremost, turn your air conditioning to the “OFF” position at the thermostat immediately. Continuing to run the AC while it is frozen can destroy your compressor, leading to thousands of dollars in repairs.
Next, switch your thermostat fan setting from “AUTO” to “ON”. This forces the blower motor to constantly push warm indoor air over the frozen coil, rather than trying to cool it. This is the fastest, safest way to thaw the system.
Leave the fan running for about two to three hours. Place some old towels around the base of the indoor unit to catch any water that may overflow as the heavy ice melts. Never use a hairdryer, a hammer, or any sharp tools to chip away at the ice, as you will easily puncture the delicate copper pipes and cause a massive leak.
Once the ice is completely melted, take a moment to wipe away any visible dirt from the coils gently. Finally, replace your air filter, turn the AC back on, and run a test for about 30 minutes. If cold air returns, you have solved the airflow issue. If it freezes again, you likely have a leak and need a professional.
Annoying Thermostat Problems
Sometimes, the main piece of machinery cooling your home is working flawlessly, but the “brain” controlling it is highly confused. Thermostat issues are incredibly common and often misdiagnosed as major mechanical failures.
Your thermostat is the command center of your climate control. It reads the ambient temperature of your living room and sends electronic signals to the outdoor unit, telling it when to turn on and when to shut off. If the thermostat is malfunctioning, your air conditioner does not know what to do.
Professional HVAC technicians note an incredible statistic: nearly 50% of their service calls ultimately trace back to simple thermostat problems. That is a massive number of unnecessary service fees!
So, what goes wrong with these little devices?
First, a simple user error or incorrect settings. If someone bumps the settings from “COOL” to “HEAT”, or switches the fan from “AUTO” to “ON” (which blows uncooled air continuously between cycles), your home will feel uncomfortably warm.
Second, the batteries might be dead or dying. When the power fades, the thermostat loses its connection to the main unit, resulting in intermittent or zero cooling.
Finally, poor placement is a massive factor. If your thermostat is installed in a spot that receives direct, blinding sunlight from a window for 3 hours a day, the sensor will be tricked. The sun bakes the plastic casing, making the thermostat think the whole house is 90 degrees. Conversely, if it is placed right next to a chilly draft or an AC supply vent, it will think the house is freezing and prematurely shut the system off before the rest of your home is adequately cooled. This creates a highly uneven environment when the air conditioner is not cooling the house evenly.
Quick Fix for Thermostat Issues
Before you panic and call for a massive repair, play around with your command center.
DIY Steps: Start with the basics. Pop the faceplate off your thermostat and replace the old batteries with fresh, high-quality AA or AAA batteries. While the cover is off, gently blow away any accumulated dust that might be interfering with the delicate temperature sensor inside.
Check your settings closely. Ensure it is set strictly to “COOL” and that the fan is set to “AUTO”.
If you suspect your thermostat is reading the room incorrectly because of its location, recalibrate it or consider moving it.
Pro Placement Tip: A thermostat should always be placed on an interior wall, in a central hallway, completely out of direct sunlight, and far away from the kitchen (where cooking heat can confuse it).
If your current unit is old and yellowing, treat yourself to an upgrade! Installing a smart thermostat, like a Google Nest or an Ecobee, takes about 30 minutes. These smart devices learn your habits, automatically correct temperature swings, and can be controlled right from your phone.
The Nasty Clogged Condensate Drain
Air conditioners do two major things: they lower the temperature, and they remove humidity from your indoor air. Have you ever wondered where all that sticky, humid moisture goes?
As warm air blows over the cold indoor coils, condensation forms, much like the water droplets that bead up on the outside of a cold glass of lemonade on a summer day. This water drips down into a sloped drain pan and is then funneled outside through a small white PVC pipe known as the condensate drain line.
However, because this pipe is constantly dark, damp, and filled with dust particles, it is the absolute perfect breeding ground for thick, slimy algae and mold. Over time, this biological growth accumulates, forming a massive clog in the narrow PVC pipe.
When the pipe gets clogged with slime, the water has nowhere to go. It backs up into the drain pan. Modern air conditioners are equipped with a clever little safety feature called a float switch. When the water level in the pan reaches a dangerous level, this switch triggers an immediate shutdown of the entire air conditioning system to prevent water from overflowing and flooding your ceilings or floors.
You might notice that your thermostat screen goes completely blank, or the system refuses to turn on, no matter what you press. This abrupt safety shutdown is a common reason the air conditioner is not cooling the house on highly humid days.
Symptoms of Clogged Drains
- Sudden System Shutoff: The AC turns off and will not respond to thermostat commands.
- Indoor Water Leaks: You find puddles of water around your indoor unit, or notice a sudden, ugly brown water stain spreading across your ceiling beneath the attic unit.
- Musty Odors: A smell resembling dirty, wet socks coming through your air vents.
Quick Fix for Clogged Drains
Clearing out a drain line sounds gross, but it is actually a very satisfying and easy DIY project.
Step-by-Step Fix: First, locate the PVC drain pipe near your indoor unit. There is usually a small, vertical access pipe with a removable cap. Take the cap off.
Next, pour a mixture of warm water and plain white vinegar down the pipe. The vinegar’s acidity will kill the algae and break up the sludge. Let it sit for about thirty minutes, then flush it with a bucket of clean water.
For highly stubborn, dense clogs, head outside to where the pipe empties into your yard. Attach a standard wet/dry shop vacuum to the end of the pipe. Use your hands or a rag to create a tight seal, and turn the vacuum on for about a minute. You will hear a loud “thump” as the gross clog is sucked out of the line and into the vacuum canister!
Prevention: To stop this slime from coming back, make a habit of dropping a specially formulated AC bleach tablet (available at any hardware store) into the drain pan every single month during the cooling season.
A Failing Compressor or Capacitor
Now we move outside to the heavy hitters. Your outdoor condenser unit houses the most critical and expensive components of your entire system. If the indoor unit is blowing air, but the air is completely warm, the problem usually lies out back with a faulty capacitor or a dying compressor.
Let us break down what these parts do using a simple car analogy.
The compressor is the engine of your AC system. It is a large, heavy black motor that physically pumps the refrigerant through the copper lines, compressing the gas and forcing the heat out into the yard. It is the literal heart of the cooling cycle.
The capacitor, on the other hand, is like the car’s battery and starter. The compressor requires an absolutely massive jolt of electricity to kick on—far more power than your luxury home‘s standard wiring can provide at once. The capacitor stores up a huge reserve of electrical energy and dumps it all at once to “jump-start” the heavy compressor motor.
Because the capacitor handles high voltage and extreme outdoor summer heat, it is often the first part to fail. If the capacitor dies, it cannot send that vital jolt of power. You will hear the outdoor unit make a distinct “clicking” or humming sound as the compressor desperately tries to start, but ultimately fails. The large fan on top might not spin, either.
If the capacitor is fine, but the compressor itself is mechanically failing, you are facing a much larger issue. Compressors have moving parts that wear down over time. Age is the biggest factor here; failures are extremely common after 12 to 15 years of heavy usage.
When these outdoor components break down, the refrigerant stops moving completely. This results in zero heat transfer, which is exactly what happens when the air conditioner is not cooling the house despite the indoor fans running at full speed.
Quick Fix for Compressor and Capacitor Issues
Dealing with the electrical components of your outdoor unit requires extreme caution.
Visual Inspection (DIY): You can start by looking through the grates of your outdoor unit with a flashlight. Look for the capacitor; it looks like a large, silver metallic soda can with wires attached to the top. Does the top of the “can” look swollen, domed, or bulging outward? Is there a sticky fluid leaking out of it? If so, the capacitor has blown and is completely dead.
The Professional Fix: Do not touch the capacitor yourself! Even when the power is turned off, a capacitor holds a lethal electrical charge that can severely shock you.
Call a licensed electrician or an HVAC professional. Replacing a blown capacitor is a very quick, routine job for a pro, typically taking less than an hour. The part and labor usually cost between $150 and $300, and it will immediately bring your system back to life.
However, if the technician discovers that the compressor motor itself has seized up and died, you are looking at a major repair. A professional compressor replacement can easily cost $1000 or more. If your AC is over 12 years old, it is usually more cost-effective to replace the entire outdoor unit rather than sink money into a dying system.
Blocked Outdoor Unit or Poor Airflow
Finally, let us talk about the environment surrounding your system. Air conditioners need space to breathe. If your system is suffocating, it cannot do its job properly.
As we mentioned earlier, the outdoor condenser unit’s entire purpose is to release the heat it absorbed from inside your house into the outside air. It does this by pulling outside air through the metal fins on the sides of the unit, blowing that air over the hot refrigerant coils, and exhausting the heat out of the top via the large fan.
But what happens if those metal fins are choked with thick layers of dirt, grass clippings, dog hair, or fluffy cottonwood seeds? Or what if you have planted a beautiful, dense row of bushes right up against the unit to hide it from view?
The airflow becomes severely restricted. The unit cannot pull in enough air to cool the hot coils. The heat stays trapped inside the system. As a result, the refrigerant traveling back into your house is still warm. The system will overheat, struggle, and pump warm air into your living room.
Similarly, poor airflow can happen inside your house due to hidden ductwork issues. The vast network of metallic or flexible tubes running through your hot attic or basement delivers the cold air to your rooms. If those ducts have large tears, holes, or disconnected joints, all the beautifully cooled air is spilling out into your dusty attic instead of reaching your bedroom.
Leaky ducts can account for a staggering 30% of cooling energy loss! This invisible air loss is an incredibly frustrating cause when the air conditioner is not cooling the house evenly, leaving some rooms freezing and others boiling.
Quick Fix for Airflow Blocks
Giving your system room to breathe is a highly effective, zero-cost fix.
Outdoor DIY Fix: Head out to your yard and perform a thorough landscaping cleanup around your condenser. You need to maintain a strict 2-foot radius of completely clear space around all four sides of the unit. Trim back any overgrown bushes, cut down tall weeds, and rake away piles of dead autumn leaves.
Use a garden hose (set to a gentle shower spray, not a high-pressure nozzle) to gently wash down the outside of the metal fins to remove surface dirt and grass clippings.
Indoor Fan Test & Duct Fix: Turn your AC fan on and walk from room to room. Hold your hand over the vents. Is the airflow strong in the living room but practically non-existent in the main bedroom? This points directly to a duct leak on that specific branch.
If your ductwork is exposed in an unfinished basement or attic, visually inspect the joints. If you see gaps or feel cold air blowing against your face in the attic, seal the leaks! Do not use standard gray cloth “duct tape”—it dries out and fails quickly. Instead, purchase a tub of mastic sealant or specialized foil HVAC tape from the hardware store and paint it heavily over the leaky joints to trap the cold air inside the pipes where it belongs.
Prevention and Maintenance Tips for Long-Lasting Cooling
We have covered the seven biggest reasons why your system might be failing you. But as the old saying goes, an ounce of prevention is worth a pound of cure. You should not wait until you are sweating on the couch to think about your air conditioner.
Implementing a proactive maintenance routine is the absolute best way to ensure your system runs silently, efficiently, and effectively for well over a decade. Maintaining your system not only keeps you comfortable, but it drastically lowers your monthly electricity bills by ensuring the machinery never has to overwork.
Here is a straightforward checklist to keep your home feeling like an icebox all summer long.
Annual Maintenance Checklist
- Filter Vigilance: Inspect your indoor air filters once a month. Replace them as soon as they look gray or opaque.
- Outdoor Cleanliness: Keep the 2-foot perimeter around your condenser free of yard debris year-round.
- Coil Care: Gently wash the outdoor unit’s fins with a hose at the beginning of spring.
- Drain Maintenance: Drop a specialized bleach tablet into the indoor condensate pan once a month to prevent sludge buildup.
To make things incredibly easy to remember, we have put together this handy schedule. Take a screenshot or print this out and tape it next to your thermostat!
Quick Maintenance Schedule
TaskFrequencyWho Should Do It (DIY / Pro)Impact on Cooling
Filter Change Monthly DIY Very High – Prevents frozen coils
Clear Drain Line Monthly DIY High – Stops safety shutoffs
Coil Wash (Outdoor) Biannual DIY Medium – Helps with heat exhaustion
Refrigerant Check Yearly Pro High – Ensures max cooling power
Full System Service Yearly Pro Very High – Catches failing parts early
Smart Energy Hacks
Aside from mechanical upkeep, how you use your modern home impacts how well your AC cools. Try these simple energy hacks to help your system out:
- The 78°F Rule: The Department of Energy recommends setting your thermostat to 78°F when you are at home and awake. Every degree you lower it below 78°F increases your energy bill by up to 8%!
- Embrace Ceiling Fans: Air conditioning cools the air, but fans cool people. The wind-chill effect created by a ceiling fan running counter-clockwise allows you to comfortably raise your thermostat setting by 4 degrees without feeling any warmer.
- Block the Sun: Close your blinds, shades, or curtains on south and west-facing windows during the hottest parts of the afternoon. Preventing solar heat from baking your rooms takes a massive load off your AC unit.
Long-Term Strategy: If your current air conditioner is constantly breaking down and is over 12-15 years old, consider the big picture. Stop pouring money into expensive band-aid repairs. Upgrading to a modern, high-SEER (Seasonal Energy Efficiency Ratio) unit can result in massive, immediate savings. Modern units are so advanced that a new installation can slash your summer cooling bills by 20% to 30%, easily paying for itself over its lifespan.
When to Put Down the Tools and Call a Professional
We highly encourage homeowners to tackle the easy DIY fixes we have outlined above. Changing filters, clearing weeds, and flushing a drain line are incredibly empowering tasks that save you money.
However, an HVAC system is a complex, high-voltage, pressurized piece of heavy machinery. Knowing your limits is crucial for your safety and the longevity of your equipment.
So, when is it time to admit defeat, put down the tools, and dial up your local HVAC technician? Watch out for these serious red flags:
- Persistent Issues Post-DIY: You changed the filter, you melted the ice, and you washed the outdoor unit. Yet, 24 hours later, the coils are frozen solid again. This points to a hidden refrigerant leak that only a pro can seal.
- Strange, Burning Smells: If you turn on your AC and smell melting plastic, burning rubber, or electrical smoke coming through the vents, turn the system off immediately at the breaker box. This is a severe electrical fault and a major fire hazard.
- Screeching or Grinding Noises: While a clicking sound points to a capacitor, a violent grinding, shrieking, or metal-on-metal banging noise from the outdoor unit means the compressor motor is tearing itself apart internally. Turn it off to prevent further destruction.
- Electrical Faults: If your AC trips the circuit breaker on your main electrical panel every time it tries to turn on, do not keep flipping the breaker back. Your system is pulling an excessive amount of amperage, indicating a short circuit or a failing compressor.
What to Expect Professionally: When you call a reputable company, expect to pay a standard diagnostic fee, typically ranging from $100 to $200. This fee covers the technician’s time to travel to your luxury home and accurately pinpoint the exact mechanical failure.
Local climate plays a massive role in your system’s health, too. For instance, in Lahore’s highly humid, blistering summers, AC units are pushed to their absolute maximum limits for months on end. In extreme climates like that, trusting professionals for preventative maintenance is not just a luxury; it is an absolute necessity to prevent sudden, catastrophic breakdowns during the peak of the heatwave. Do not risk your family’s comfort—when in doubt, let the pros handle the heavy lifting!