You have just stepped out of a warm, relaxing shower. You reach for your hair dryer, plug it into the vanity outlet, and flip the switch. Suddenly, a sharp, terrifying jolt of electricity shoots up your arm. Your heart races, the breaker trips, and you are left standing in the dark, wondering what went wrong. Unfortunately, this frightening scenario is far too common. In fact, bathrooms account for nearly 70% of all electrical shocks in the home, almost entirely due to outdated or improper wiring near water sources.
But it does not have to be this way. You can take control of your home’s safety and upgrade your space without breaking the bank. If you want to master how to wire a bathroom yourself, you are in the right place. By following these shockproof, code-compliant steps, you can save upwards of $2,000 on professional electrician fees while ensuring your family’s absolute safety.
| Topic / Step | What to Do | Safety / “Shockproof” Tips |
|---|---|---|
| Permits & Planning | Draft a layout: outlets, switches, lights, fan, GFCI locations; check local code. | Never skip permits; NEC‑style rules require GFCI‑protected circuits in bathrooms. |
| Circuit Choice | Use a dedicated 20‑amp circuit for bathroom outlets; separate or shared for lights/fan if allowed locally. | Avoid overloading; too many devices on one old circuit = overheating and shock/fire risk. |
| GFCI Protection | Install GFCI outlet near the sink and protect all bathroom receptacles (often via “load” side feed). | GFCI trips within milliseconds if current leaks, greatly reducing shock risk in wet areas. |
| Outlet Location | Place at least one outlet within 3 ft of the sink, 12–54 in. above floor, not inside shower/tub. | Keep outlets away from direct water spray; avoid installing them where shoes/feet can touch water. |
| Lighting Circuits | Use separate or shared leg of the bathroom circuit for vanity lights, ceiling light, and exhaust fan. | If required, run lights/fan on GFCI‑protected circuit; never use non‑GFCI outlets in wet‑zone bathrooms. |
| Exhaust Fan Wiring | Run cable from switch to fan; connect properly to neutral, hot, and ground. | Always ground the fan body and box; use a switch near the entrance, not inside the shower. |
| Box & Wire Handling | Mount metal or plastic boxes at correct depth; use 12/2 NM cable for 20‑amp bathroom circuits. | No loose wires, scrap metal, or damaged insulation in boxes; clamped and supported cables prevent shorts. |
| Grounding | Bond all metal boxes, fan housing, and outlet grounds to the ground wire. | Proper grounding gives fault current a safe path instead of through your body. |
| Testing Before Power | Turn off power at main panel; check continuity and absence of shorts with a multimeter. | Never test live wires with bare hands; use insulated tools and wear dry rubber‑bottom shoes. |
| Final Inspection | Schedule a rough‑in inspection before closing walls; verify GFCI and circuit labels. | Code‑approved inspection catches wiring errors that could cause fire or shock later. |
Safety First: The Golden Rules of Bathroom Wiring
Before we touch a single wire, we need to have a serious conversation about safety. Water and electricity are a deadly combination. Because your bathroom is a high-moisture environment, the risk of a dangerous ground fault is significantly higher here than in your living room or bedroom.
First and foremost, you must consult your local electrical codes. The National Electrical Code (NEC), specifically the 2023 and 2026 updates, dictates strict rules for wet environments. Always check with your local municipality, as city codes often supersede national guidelines.
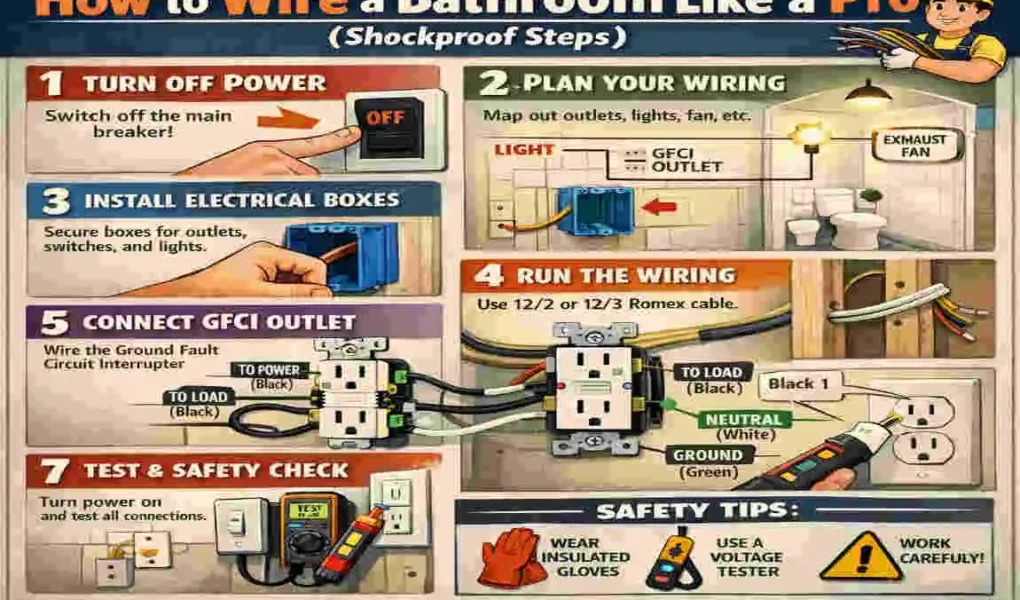
The absolute most critical rule when learning how to wire a bathroom is this: Turn off the power at the main breaker box. Never assume a circuit is dead just because a light switch is flipped off. Use a reliable non-contact voltage tester to double-check every single wire in the box before you reach in.
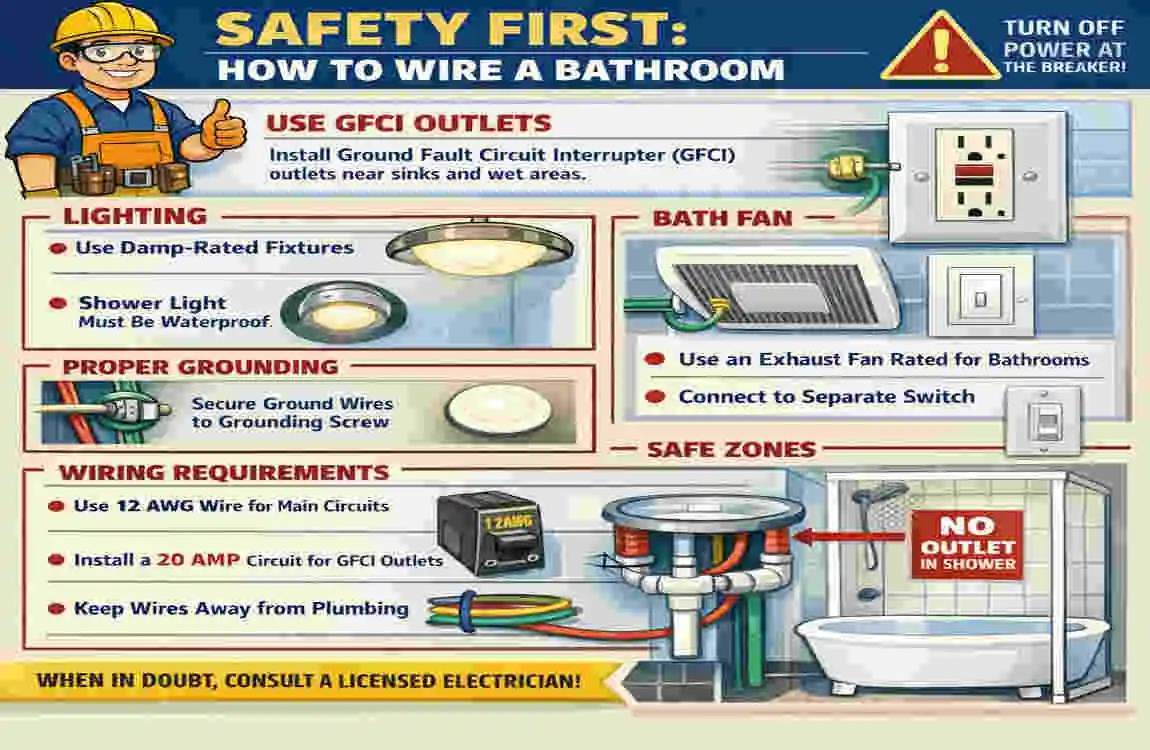
Next, let’s talk about the hero of bathroom electrical safety: the Ground Fault Circuit Interrupter (GFCI). The NEC mandates that all receptacles within six feet of a water source—which usually means every outlet in a standard bathroom—must be GFCI protected. A GFCI outlet monitors the electrical current flowing in and out. If it detects even the slightest imbalance (like current escaping through water or, heaven forbid, a person), it cuts the power in milliseconds, preventing a lethal shock.
To tackle this project safely, you need the right Personal Protective Equipment (PPE). Your must-have list includes:
- Insulated electrical gloves: To protect against accidental live wires.
- Safety goggles: To shield your eyes from drywall dust, wood splinters, and sparking wires.
- Rubber-soled boots: To ground yourself and prevent electrical currents from traveling through you.
Finally, do not skip the permitting process. Many DIYers fear the electrical inspector, but the inspector is actually your best friend. Pulling a permit ensures a professional will double-check your work. When you follow safe bathroom wiring steps and prep thoroughly, DIY rough-in electrical work passes inspections over 90% of the time!
Tools and Materials for the Job
To execute a flawless DIY bathroom electrical wiring project, you need to gather the right gear. Being prepared not only keeps you safe but also makes the job infinitely easier. Think of this phase like setting up your workstation—having the right tools on hand prevents frustrating mid-project trips to the hardware store.
Here is a detailed breakdown of the essentials you will need:
Category Items Why Needed
Tools Wire strippers, digital multimeter, fish tape, non-contact voltage tester, cordless drill, drywall saw. Precision cutting prevents wire damage, testers ensure shock detection, fish tape pulls wires cleanly through walls, and drills make paths through studs.
Materials 12/2 NM (Non-Metallic) cable, 20-amp GFCI outlets, single-gang junction boxes, metal nail plates. Code-compliant for bathrooms. 12-gauge wire is required for 20A circuits, which handle heavy loads like hair dryers and space heaters safely.
Extras Wire nuts (assorted sizes), high-quality electrical tape, 14/2 NM cable for lighting, cable staples. Wire nuts secure your connections, tape insulates bare spots, 14/2 is perfect for lighter 15A lighting loads, and staples prevent wire damage.
Planning Your Layout
Just like any major project, success is determined in the planning phase. Before drilling a single hole, you need to map out your entire room. The NEC has specific requirements for where outlets and fixtures must be placed.
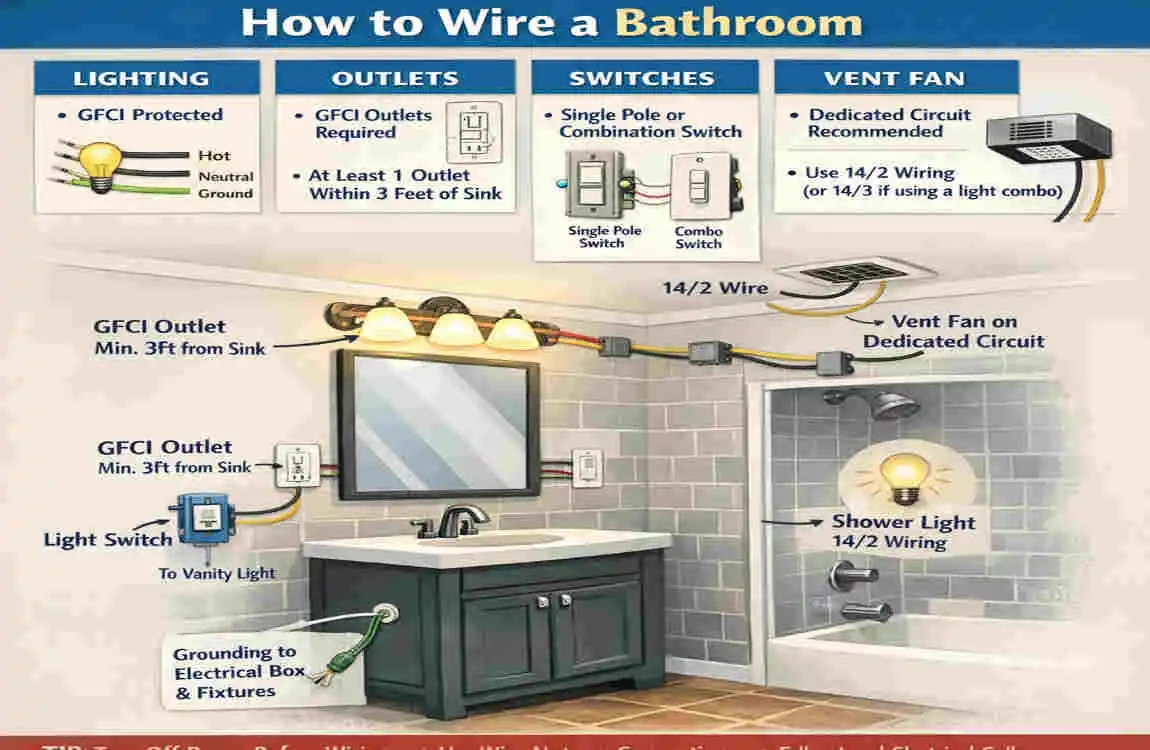
Start by sketching your bathroom floor plan. Code requires that you have at least one receptacle within 36 inches of the outside edge of every bathroom sink. If you have a double vanity, it is best practice to install a GFCI outlet near each basin. Next, map out your lighting. You will likely want ambient lighting (like recessed cans) and task lighting (like vanity sconces). If you are placing a light over the shower or tub, it must be wet-rated or damp-rated, depending on the ceiling height. Finally, plan for your exhaust fan, which must vent directly to the home’s exterior—never into an attic, as that causes mold.
Understanding Dedicated Circuits and Load Calculations
Bathrooms draw a massive amount of power. Think about it: a standard hair dryer pulls about 1800 watts, and a small ceramic space heater pulls 1500 watts. If you put both on the same circuit, you will trip the breaker immediately.
This is why modern codes require at least one dedicated 20-amp circuit strictly for bathroom receptacles. This circuit cannot share power with lights or fans, and it cannot share power with outlets in other rooms.
Your lights and your exhaust fan should run on a completely separate 15-amp circuit. By separating the lighting from the heavy-duty vanity outlets, you ensure that if your hair dryer trips the vanity breaker, you are not suddenly plunged into total darkness while holding a hot styling tool!
Before you begin, submit this sketch to your local building department when you apply for your electrical permit. Getting approval on your layout guarantees you won’t have to tear down drywall later.
Step-by-Step Wiring Guide
Now we get to the core of how to wire a bathroom. We are going to break this down into digestible, step-by-step phases. As a professional writer crafting engaging, informative pieces , I have organized this guide to flow logically from the breaker panel to the final switch. Let’s dive in.
Running the Power Feed
Your first task is bringing electricity from your home’s main breaker panel to the bathroom.
- Shut off the main breaker. Verify that the panel has no power using your multimeter. Safety always comes first.
- Drill pathways through the studs. You need to drill 1-inch to 1.25-inch holes through the center of your wooden wall studs to route your wires. The code requires these holes to be set back at least 1.25 inches from the edge of the stud. If your framing does not allow for this depth, you must install heavy-duty metal nail plates over the front of the stud. This prevents future drywall screws or picture-hanging nails from piercing the live wire.
- Run your NM Cable. For your dedicated 20-amp outlet circuit, pull the yellow 12/2 NM (Romex) cable from the breaker box to the bathroom vanity area. You need to secure this cable to the center of the studs using insulated cable staples every 4.5 feet, and within 12 inches of every junction box. Make sure you avoid damp areas like the inside of shower walls unless you are using UF (Underground Feeder) rated cable, though standard NM is perfectly fine for dry bathroom wall cavities.
Installing Boxes and Outlets
Once your cables are pulled into the room, it is time to set up your boxes.
- Mount the junction boxes. Secure your blue or grey plastic junction boxes to the studs. For standard outlets, set the boxes 12 to 18 inches above the finished floor. For your vanity GFCI outlets, place them about 40 to 48 inches from the floor (roughly 4 to 8 inches above the vanity countertop). Light switches should uniformly sit at 48 inches high.
- Wire the GFCI receptacle. This is the most crucial part of safe bathroom wiring steps. Strip about half an inch of insulation off your wire ends. Connect the black (hot) wire to the brass terminal on the “LINE” side of the GFCI. Connect the white (neutral) wire to the silver terminal on the “LINE” side. Finally, connect the bare copper (ground) wire to the green grounding screw.
- Daisy-chaining. If you have multiple outlets on this vanity wall, you can wire the first GFCI’s “LOAD” terminals to feed the subsequent standard outlets. This provides GFCI protection to every outlet down the line. Once the power is eventually turned back on, you must press the “Test” button on the receptacle; it should click loudly and cut the power.
Wiring Lights and the Exhaust Fan
Proper ventilation and lighting transform a bathroom from a dark cave into a spa-like retreat.
- Route the lighting wires. Fish your white 14/2 NM cable from your breaker panel to your bathroom switch box, and then run individual 14/2 lines from the switch box up to your ceiling fan and lighting locations.
- Wire the exhaust fan. Connect the fan to your dedicated 15-amp lighting circuit. It is highly recommended to install a humidity-sensing switch or a countdown timer switch for the fan. This ensures the fan runs long enough to pull all the moisture out of the room, preventing mildew. Crucially, run the fan’s exhaust duct completely through the roof or out a side wall to the exterior.
- Install recessed lighting. If you are installing recessed “can” lights in the ceiling, ensure you purchase fixtures that are IC-rated (Insulation Contact). This means the metal housing is safe to touch the fiberglass or cellulose insulation in your attic without causing a fire hazard. If they sit above a shower, they must feature a sealed, wet-rated trim.
Adding Luxury: Heated Floors and Towel Warmers
If you are tearing the walls down anyway, adding a heated floor is a phenomenal upgrade that makes cold winter mornings much more bearable.
- Run a new dedicated circuit. Floor heating mats draw continuous, heavy loads. You will need to run a separate, dedicated 20-amp circuit. Depending on the size of your bathroom and the specific product, you may need a 12/3 cable for a 240V system. Check the manufacturer’s manual carefully.
- Install the thermostat and mats. Mount the floor heating thermostat in a standard wall box. Then, embed the electric heating mats directly into the thin-set mortar before you lay your floor tiles.
- Waterproof everything. Ensure that the factory junction where the cold lead wire meets the heating element is completely embedded in the mortar and kept far away from the shower drain.
Common Mistakes to Avoid
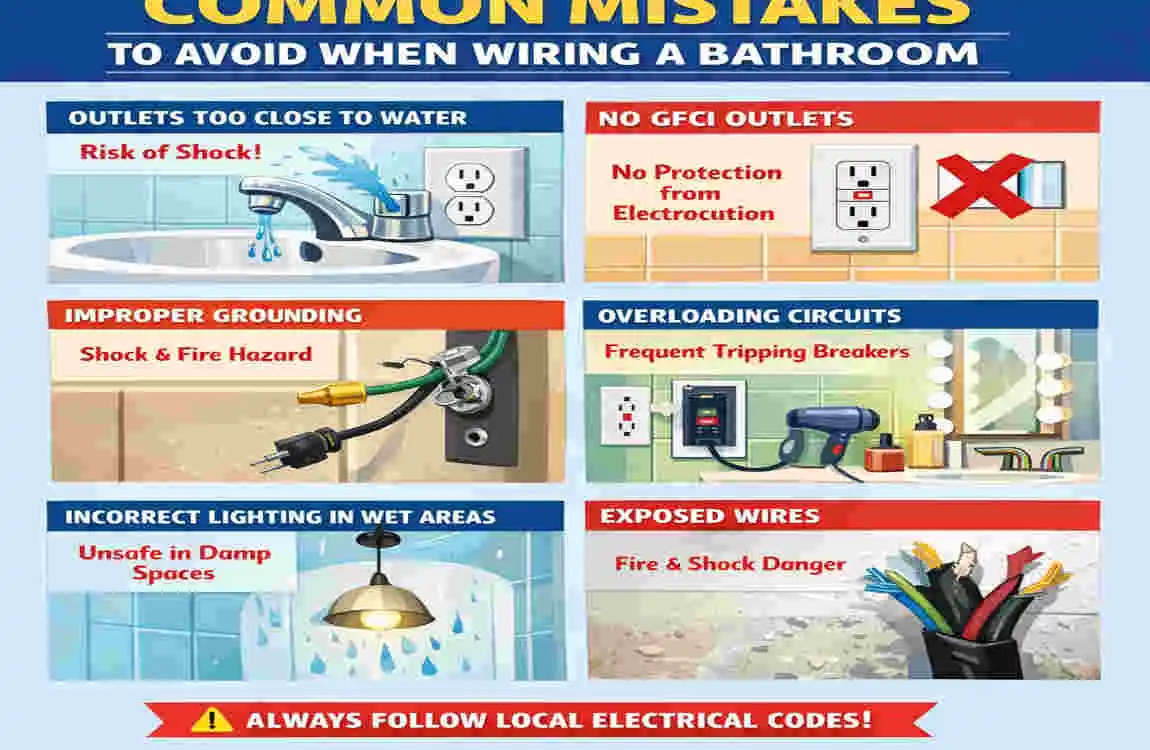
Even seasoned DIYers can stumble when it comes to the strict rules of bathroom electrical work. Avoiding these common pitfalls will save you from failed inspections, or worse, hazardous situations.
- Overloading the circuits: The most frequent mistake is tying the new bathroom outlets into an existing bedroom or hallway circuit. Bathrooms demand dedicated power. Sharing circuits guarantees tripped breakers when you run a vacuum in the hall and a hair dryer in the bathroom simultaneously.
- Skipping GFCI protection: Never, ever install a standard outlet near a sink without GFCI protection upstream. Electrical shocks kill roughly 400 people per year in the US, and many of these tragedies happen in wet areas with outdated, unprotected receptacles.
- Improper cable stapling: Securing your wires too tightly can crush the internal insulation, causing the hot and neutral wires to touch, which leads to arc faults and hidden wall fires. Drive the staples in just enough to hold the wire snugly without indenting the plastic sheathing.
To keep things clear, review this troubleshooting table of common mistakes and their immediate fixes:
Mistake FixRisk Avoided
Drilling holes too close to the stud edge. Install heavy-duty steel nail plates over the stud face. Prevents drywall screws from puncturing live wires.
Ignoring arc-fault requirements. Install Dual-Function AFCI/GFCI breakers in the main panel. Prevents hidden electrical wall fires from sparking.
Installing standard fixtures in wet zones. Use IP65+ or officially “wet-rated” sealed fixtures over tubs. Prevents internal shorts, corrosion, and blown bulbs.
Inspection and Finishing the Job
You have pulled the wires, mounted the boxes, and set up your circuits. Now comes the moment of truth: the electrical inspections.
First is the Rough-In Inspection. Do not put up any drywall yet! The local inspector will walk through to examine your exposed wiring. They will check that your holes are drilled correctly, that your wires are stapled at the proper intervals, that your junction boxes are securely mounted, and that all grounding wires are properly twisted and connected. If you followed this bathroom wiring guide, you will pass with flying colors.
Once you pass the rough-in, you can hang your drywall, tape, mud, paint, and install your vanity.
Finally, you reach the Trim-Out phase. This is where you connect the actual light fixtures, screw in the GFCI outlets, attach the faceplates, and hook up the switches. Once everything is buttoned up, turn the main breaker back on and use your multimeter to test each outlet for proper voltage and polarity.
If you feel overwhelmed at this final stage, there is absolutely no shame in hiring a licensed professional electrician to do the final panel hookups and testing. It is the smartest way to ensure your DIY bathroom electrical wiring is perfectly safe.
Pro Tips and Modern Upgrades
While you have the walls open, why not bring your bathroom into the modern era? Adapting your space to include smart technology ensures your bathroom serves your daily needs efficiently.
- Smart Switches: Swap standard switches for Wi-Fi-enabled smart switches. You can program your vanity lights to turn on at 10% brightness for middle-of-the-night bathroom trips, saving your eyes from blinding light.
- USB Receptacles: Consider installing a GFCI-protected outlet that includes built-in USB-C ports inside a vanity drawer. It is the perfect way to keep electric toothbrushes and razors charged without cluttering your beautiful new countertop.
- Low-Voltage LEDs: Run low-voltage LED strip lighting under the toe-kick of your floating vanity for an incredibly sleek, high-end hotel vibe.
By taking on this project yourself, you can achieve massive cost savings. A professional electrician typically charges $100 to $150 per hour, or prices the job at $100 per electrical drop (each switch, outlet, and light). Doing the labor-intensive wire pulling yourself keeps those funds in your pocket, allowing you to splurge on nicer tiles or higher-end fixtures!
Frequently Asked Questions (FAQs)
Do bathrooms really need their own dedicated circuits? Yes, absolutely. According to NEC Section 210.11(C)(3), every bathroom must have at least one dedicated 20-amp circuit supplying power solely to the bathroom receptacles. This ensures high-draw appliances like hair dryers do not overload the rest of the house.
What is the required distance between a GFCI outlet and a receptacle? The code states that any receptacle installed within 6 feet of the outside edge of a sink, bathtub, or shower stall must be GFCI protected. In a standard residential bathroom, it is highly recommended to make every outlet GFCI-protected to ensure maximum safety.
Can I put the bathroom lights and the bathroom outlets on the same circuit? Technically, the NEC allows a single 20-amp circuit to supply both outlets and lighting if it serves only a single bathroom. However, it is a very poor design practice. If a hair dryer trips the circuit, you will lose the lights. It is always better to put the lights on a separate 15-amp circuit.
What gauge wire should I use for a bathroom? For your 20-amp receptacle circuits, you must use 12-gauge wire (typically 12/2 NM cable). For your 15-amp lighting and exhaust fan circuits, you can safely use the slightly thinner 14-gauge wire (14/2 NM cable).
Does an exhaust fan need to vent outside? Yes! Never vent a bathroom exhaust fan into an attic, crawlspace, or ceiling joist cavity. The warm, damp air will quickly cause severe mold and wood rot. Always duct the fan directly through the roof or out an exterior side wall using insulated ducting.
Can I install a ceiling fan or chandelier over a bathtub? The NEC has strict “no-go” zones above bathtubs and showers. You cannot install any part of a ceiling fan, track light, or pendant luminaire within a zone measuring 3 feet horizontally and 8 feet vertically from the top of the bathtub rim. Recessed lights are allowed, but they must be wet-rated.
How can my electrical panel handle a new bathroom remodel? Before adding new circuits, you must perform a load calculation. If you have an older home with a 100-amp main service panel that is already full of breakers, you might need to hire an electrician to upgrade your entire panel to a 200-amp service before you begin your bathroom remodel.