Have you ever stepped out of a hot, relaxing shower only to find your bathroom mirrors completely fogged over, the walls dripping with condensation, and a lingering damp smell that just will not go away? Or perhaps you flip the switch, and instead of a gentle hum, you hear a loud, obnoxious rattling that disrupts the peace of your morning routine. If you are nodding your head, you are definitely not alone. The culprit is usually right above you: a dust-clogged, grimy bathroom exhaust fan.
Many homeowners overlook this essential fixture, assuming it will just keep working in the background. But over time, bathroom fans with integrated lights become magnets for dust, lint, and moisture. This toxic combination creates a thick layer of grime that drastically impacts air quality and efficiency. When your fan cannot pull moisture out of the air properly, you are leaving your bathroom vulnerable to black mold, peeling paint, stubborn odors, and poor overall ventilation.
That is exactly why learning how to clean bathroom fan with light is an essential skill for any homeowner. It is not just about aesthetics; it is about protecting your health, maximizing your home’s energy savings, and maintaining your property value. Did you know that when indoor humidity consistently exceeds 60%, it creates a perfect breeding ground for mold and mildew spores? A clean, efficient fan is your first line of defense against this issue.
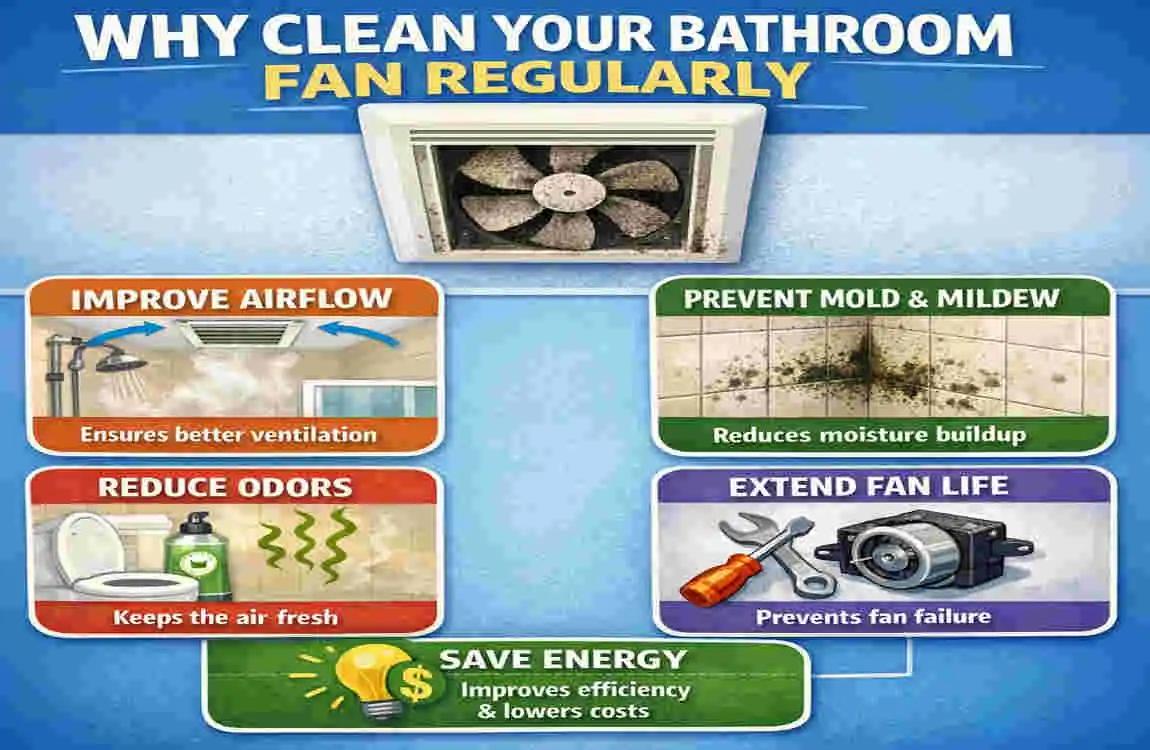
Why Clean Your Bathroom Fan Regularly
Before we get our hands dirty, let’s talk about why you should prioritize this easily forgotten chore. Understanding the benefits will give you the motivation you need to add this task to your regular home maintenance schedule.
First and foremost, a deep clean provides a massive improvement in airflow. When you remove the heavy blanket of dust from the fan blades and motor housing, you can achieve up to a 30% boost in ventilation efficiency. This means your fan works smarter, not harder, to pull thick steam out of your bathroom. Think of your exhaust fan like the lungs of your bathroom; when the airways are clear, it breathes easily.
This improved airflow leads directly to our next major benefit: mold prevention. Bathrooms are notoriously wet environments. Every time you shower, wash your face, or run the hot water, you are pumping moisture into the air. If that moisture has nowhere to go because your fan is clogged, it settles on your ceiling, walls, and grout lines. Regularly cleaning your fan helps prevent the costly, hazardous growth of black mold and mildew.
Another incredible perk is noise reduction. If your fan sounds like a small airplane taking off, it is likely because the fan blades are unbalanced due to uneven dust buildup. Cleaning off that grime restores the balance, resulting in a quiet, soothing hum.
Furthermore, routine maintenance drastically extends your fan’s lifespan. A motor struggling against the weight of dust will burn out prematurely. By keeping it clean, you can easily extend its life from a mere 5 years to a full 10 years or more, saving you the hassle and cost of a full replacement.
So, how does all this grime accumulate in the first place? It is a mix of airborne dust, lint from your towels, toilet paper particles, and even dead skin cells and hair. When combined with the high humidity of a bathroom, this debris forms a sticky paste. This same grime coats the plastic or glass lens of your light fixture, severely dimming the light and making your bathroom look dull and gloomy.
Here is a quick checklist of warning signs that indicate it is time to take action:
- Loud, rattling, or grinding sounds when you flip the switch.
- Weak suction (the fan cannot hold a single square of toilet paper against the grille).
- Mirrors that stay steamy for more than ten minutes after your shower.
- Lingering damp, musty odors that air fresheners cannot mask.
- Dim, yellowish lighting or frequently burnt-out bulbs.
If you are experiencing any of these issues, it is time to learn exactly how to clean bathroom fan with light for sparkling hygiene and peak performance.
Gather Your Supplies: Tools and Materials Needed
To make this process as smooth and frictionless as possible, gather all your supplies before you begin. There is nothing more frustrating than being halfway through a project, standing on a ladder, and realizing you forgot the screwdriver.
Here is a simple, scannable list of the essentials you will need:
ItemPurposeWhy It Works
Screwdriver set (Phillips and Flathead) To remove covers, screws, or the light housing. Provides precise access to internal components without damaging the plastic.
Vacuum with a brush or crevice tool attachment Heavy-duty dust and debris removal. Safely captures up to 90% of loose debris before you start wiping down surfaces.
Microfiber cloths Wiping down the fan blades, motor housing, and light fixture. Creates a lint-free, streak-free shine without scratching delicate surfaces.
Mild dish soap & warm water Soaking the plastic vent cover and light lens. The surfactants in dish soap safely and effectively cut through sticky bathroom grease and hairspray residue.
Compressed air can (optional but highly recommended) Blowing dust out of hard-to-reach spots. Forces fine dust out of the tiny crevices in the motor winding and light socket.
Sturdy ladder or step stool Safe, stable reach to the ceiling. Prevents slips, falls, and overreaching, keeping you perfectly safe.
Rubber gloves & safety glasses : Personal protection against falling dust and grime. Keeps your hands clean and prevents irritating dust bunnies from falling into your eyes.
A Quick Note on Safety Gear and Lights: While it might seem like overkill for a quick indoor chore, throwing on a pair of safety glasses is a game-changer. When you pull down a vent cover that hasn’t been cleaned in three years, gravity is going to send a shower of dust straight down toward your face.
Additionally, we must stress the importance of handling your lights with care. If your fan has integrated LED light panels rather than standard screw-in bulbs, you must never submerge them in water. Water and delicate electronic circuitry do not mix. We will cover safe alternatives for cleaning LEDs later in the guide.
Safety Precautions First
Before we start unscrewing anything, we need to have a serious conversation about safety. When you are learning how to clean bathroom fan with light, you are dealing with an appliance that combines two notoriously dangerous elements: electricity and a wet environment.
Your absolute priority is power shutoff. Do not simply rely on the wall switch. While turning off the wall switch cuts power to the unit under normal circumstances, a faulty wiring job by a previous owner or a shared neutral wire could mean live current is still running through the ceiling box. To completely avoid the risk of electrical shock, you must turn off the power at your home’s main breaker panel.
We also want to strongly warn against getting wet electrical parts near the motor or the light socket. Water should only touch the removable, non-electrical plastic covers.
Follow this quick safety checklist before you begin:
- Test the fan to ensure it is off: After flipping the breaker, go back to the bathroom and flip the wall switch. The fan and light should remain completely dead.
- Clear your workspace: Move rugs, bathmats, and wastebaskets out of the way so your ladder has a flat, secure surface.
- Ventilate the area: Open a bathroom window or leave the bathroom door wide open. You will be stirring up dust, and you want it to have an escape route rather than settling back onto your clean counters.
Taking these three minutes to prep builds confidence, ensures your safety, and makes the entire cleaning process stress-free.
Your Step-by-Step Cleaning Guide
Now that you are prepped, protected, and properly equipped, we arrive at the core of our tutorial. This section is heavily optimized for anyone searching for “how to clean bathroom fan with light.”
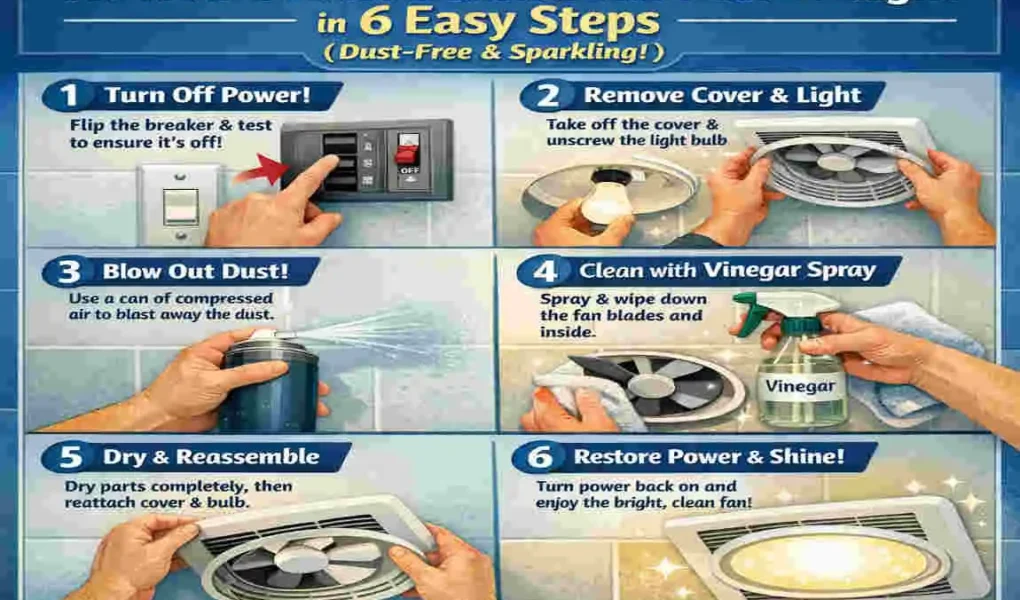
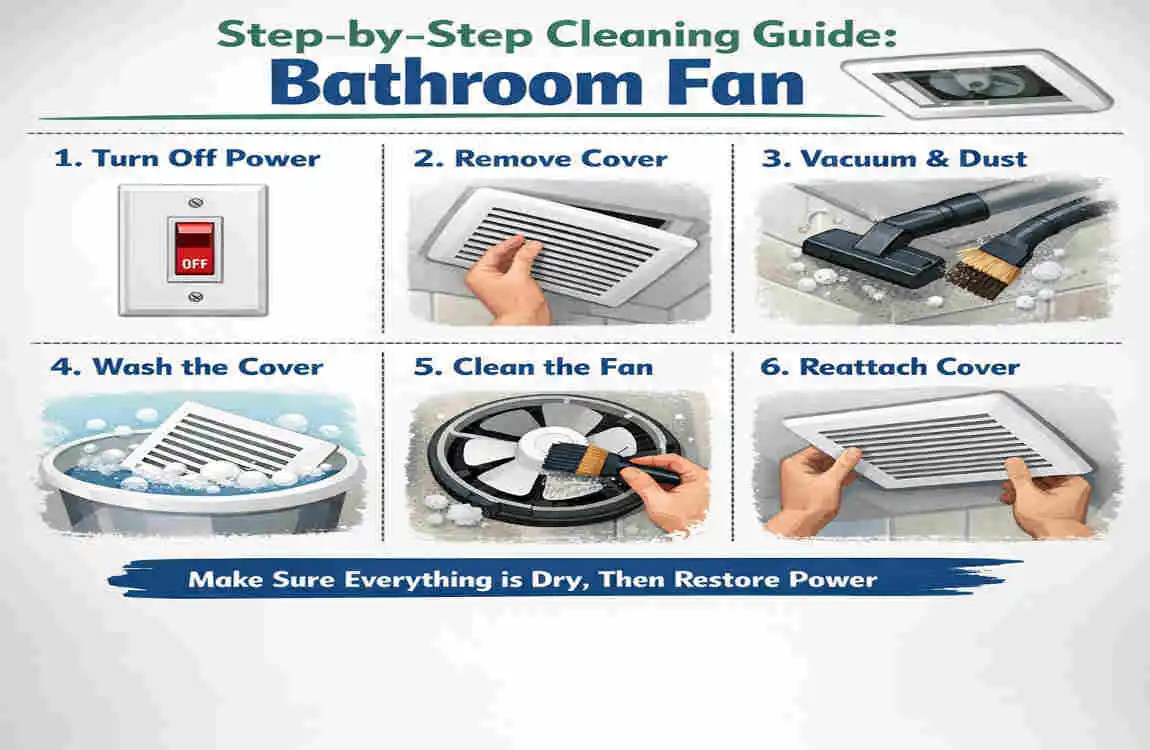
We have broken down this process into six manageable, detailed steps. Take your time, follow along closely, and do not rush. Let’s get that fan looking and sounding brand new.
Power Down Safely
As mentioned in our safety briefing, your journey begins far away from the bathroom. Walk over to your home’s electrical panel, which is usually located in the garage, basement, or a utility closet. Open the metal door and look for the breaker switch labeled “Bathroom,” “Master Bath,” or “Upstairs Lights/Fans.”
Once you locate the correct breaker, firmly flip it to the “Off” position. If your breaker box is a chaotic, unlabeled mess (as many are!), you may need a helper. Have someone stand in the bathroom with the fan running while you flip breakers one by one until they yell that the fan has stopped.
Why it matters: Turning off the breaker prevents 100% of electrical shocks. When you are reaching your hands into a metal housing box in the ceiling, the last thing you want to worry about is an accidental jolt of electricity. Your peace of mind is worth the extra trip to the garage.
Pro Tip: Once you figure out which breaker controls the bathroom fan, take a moment right then and there to label it with a permanent marker or a label maker. Your future self will thank you endlessly the next time you need to do electrical maintenance. Finally, walk back to the bathroom, flip the wall switch up and down a few times just to verify absolutely nothing happens. Now, you are ready to climb the ladder.
Remove Covers and Light
Position your ladder directly beneath the exhaust fan. Make sure the ladder is locked in place. Put on your safety glasses, because it is time to take the cover off.
Most modern bathroom exhaust fans have a plastic vent grille that is held flush against the ceiling by hidden metal tension clips (often called “butterfly clips”). To remove the cover, gently pull the plastic grille straight down from the ceiling. It should drop about 2 to 3 inches, then stop, suspended by two V-shaped metal wires.
Reach your fingers up into the gap, pinch the two prongs of the V-shaped wire together, and pull them down out of their designated slots in the metal housing. Repeat this for the other side, and the grille will come completely free. Set the dirty grille aside.
Next, you need to deal with the light fixture. If your fan uses a standard incandescent or LED screw-in bulb, carefully unscrew it and set it on a soft towel on the counter. Make sure the bulb has had time to cool down if it was recently on!
If your exhaust fan has an integrated LED light panel (which looks like a flat disc of lights), you will likely need to unplug a small quick-connect wire. Look for a small plastic plug connecting the light panel to the motor housing. Squeeze the sides of the plug and gently pull it apart. Unscrew any holding screws and remove the light housing.
Visual description: You are now looking at the exposed “guts” of the fan—a metal box recessed into the ceiling containing a plastic or metal blower wheel (the fan blades), a small motor, and a wiring compartment. It is probably covered in a thick, fuzzy layer of grey dust. Remember: avoid getting any water on these wired, ceiling-bound parts.
Vacuum Loose Dust
Now comes the most satisfying part of the entire process. Grab your vacuum cleaner. If you have a shop vac, that is fantastic. Still, a standard household vacuum with a hose attachment works perfectly fine too.
Attach the slender crevice tool to the end of your vacuum hose. Turn the vacuum on and carefully trace it along the interior corners of the metal ceiling box. Vacuum all around the motor housing, sucking up the large “dust bunnies,” cobwebs, and stray hairs that have gathered over the months.
Next, switch out the crevice tool for the soft brush attachment. Gently run the brush over the fan blades themselves. Because the blades are curved and often fragile, use a delicate touch. You do not want to press so hard that you bend the blades or misalign the motor shaft, which would cause the dreaded rattling noise we are trying to fix.
Use the brush attachment to gently vacuum inside and around the light socket housing. You will be amazed at how much debris falls out of these tiny crevices.
Before/after impact: This dry vacuuming step is crucial. If you skip this and go straight to using a damp cloth, you will instantly turn the loose dust into a thick, muddy smear that is infinitely harder to clean. Vacuuming captures the bulk of the debris quickly and neatly, drastically improving the fan’s suction power before you even pull out the cleaning solutions.
Deep Clean Components
While the ceiling housing is now relatively dust-free, the removable plastic grille and light cover you set aside earlier still look terrible. Take them down to your kitchen sink or bathtub.
Fill the sink with warm water and a generous squirt of mild dish soap. Submerge the plastic vent grille (and the glass light dome, if applicable). Allow them to soak for about five to ten minutes. The warm, soapy water is excellent for targeting the sticky, aerosol-based grease—like hairspray and air fresheners—that binds dust to the plastic.
After a good soak, use a soft-bristled brush (an old toothbrush is absolutely perfect for this) to scrub between every single slat and louver of the grille. Rinse thoroughly under warm water and inspect your work. The plastic should look brand new. Shake off excess water, then dry the cover completely with a clean towel. Dry thoroughly—you do not want to reintroduce wet plastic into an electrical fixture.
Now, return to the bathroom with a slightly damp microfiber cloth. Very carefully wipe down the individual fan blades up in the ceiling housing to remove the remaining thin layer of stuck-on grime. Wipe down the metal walls of the housing box as well.
Remember the golden rule: Do not soak the lights, the motor, or any wiring. Your cloth should be just barely damp, not dripping. This targeted cleaning cuts through the residual grease, leaving a sparkling finish that prevents new dust from clinging too quickly.
Tackle Light Fixture
A clean fan is great, but since we are focusing on cleaning a bathroom fan with a light, we cannot neglect the illumination aspect. Over time, the light fixture components become incredibly hazy.
If your fan uses a standard socket, take a dry microfiber cloth and wipe around the edges of the socket to remove any lingering dust. If you have a can of compressed air, give the socket a quick, short blast to blow out any microscopic dust particles that might interfere with the electrical connection. Do not ever spray liquids into the light socket.
Next, focus on the light lens or dome. If it is glass, you can wash it in the soapy water just like the vent cover. If it is a frosted plastic cover, wash it gently and dry it until it shines. Removing that yellowed layer of baked-on dust instantly restores your bathroom’s brightness, making the whole room feel larger and cleaner.
This is also the absolute perfect time to evaluate your light bulb. If you were using an old incandescent bulb, throw it away and replace it with an energy-efficient LED bulb. LEDs consume a fraction of the electricity, last for thousands of hours longer, and emit significantly less heat. Less heat means the plastic covers of your exhaust fan will not become brittle and crack over time.
Reassemble and Test
You have reached the final step! Everything is clean, dry, and ready to go back together.
First, reinstall the light housing or screw in your fresh light bulb. If you disconnected a quick-connect wiring plug for an LED panel, firmly push the two ends back together until they click.
Next, pick up your freshly cleaned and completely dry vent grille. Squeeze the two prongs of the metal butterfly clip together, and push them upward into the small rectangular slots on the metal housing. Repeat for the other side. Push the grille flat against the ceiling. It should snap securely into place with no sagging gaps.
With all parts secured, head back to your breaker box and restore the power. Now for the moment of truth: return to the bathroom and flip the wall switch.
Run the fan for about 5 minutes. Listen closely. You should hear a smooth, quiet, rushing sound of air—no rattling, no grinding, and no squeaks. Your light should shine brighter than it has in years.
Troubleshooting tip: If the fan is suddenly noisy after you clean it, do not panic. Turn the power back off, pull the cover down, and check to make sure the grille isn’t vibrating against the housing. Also, ensure you did not accidentally bump or bend the fan blade wheel so that it is scraping against the metal box. Repeat the vacuuming and check the clearance if necessary.
Maintenance Tips for Longevity
Congratulations, you have successfully mastered how to clean bathroom fan with light! But your job isn’t entirely done. To keep your bathroom fresh and prevent that massive dust buildup from happening again, you need a solid maintenance routine.
We highly recommend performing a light surface clean every three months (quarterly). You don’t need to take the whole thing apart for this—just run your vacuum’s brush attachment over the outside of the vent grille to suck away surface dust.
Then, schedule a comprehensive annual deep clean. The best way to remember this is to tie it to another yearly task. Add a recurring event in your digital calendar or smartphone app: “Spring Cleaning: Deep Clean Bathroom Exhaust Fan.”
Maintaining a clean fan doesn’t just keep your bathroom smelling nice; it has real financial benefits. A highly efficient, clean exhaust fan can result in 10-20% lower energy bills over the year because it clears humidity faster, allowing you to turn it off sooner.
Also, keep in mind the variations between integrated lights and separate bulbs. Integrated LED panels usually last the lifetime of the fan, meaning you rarely have to worry about replacing them—just keep their covers wiped down and enjoy the long-lasting, bright illumination.
Troubleshooting Common Issues
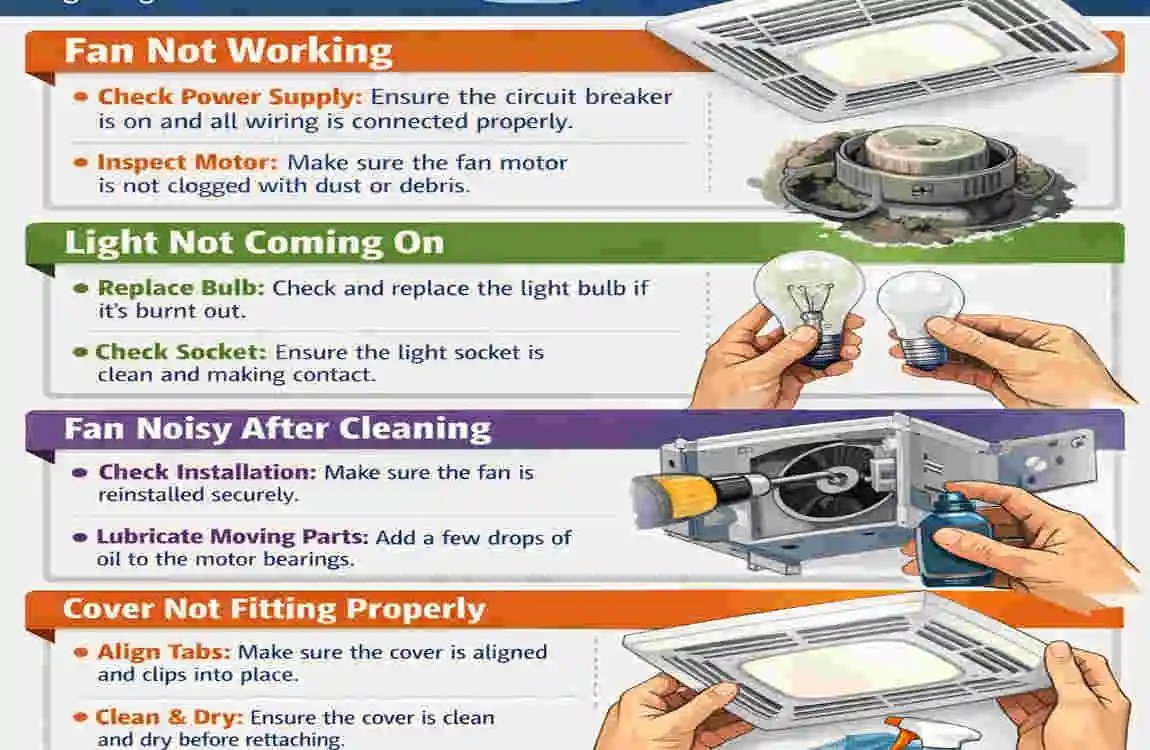
Sometimes, a deep clean reveals underlying issues that dust was masking. Here is a quick troubleshooting guide for common fan problems:
Noisy fan? If the fan hums but rattles loudly, you likely have bent blades or worn-out motor bearings. If adjusting the blades doesn’t fix it, you can often buy a cheap replacement motor cartridge rather than replacing the whole ceiling unit.
Weak light? If you put in a new bulb and it is still dim or flickering, you might have a dirty socket contact or you are using the wrong wattage. Always check the sticker inside the fan housing for the maximum wattage rating.
Won’t turn on? If you flip the breaker back on and nothing happens, check the fuse box, or ensure the quick-connect plug you reattached is snapped tightly.
When to call the pros: If you smell burning plastic, see sparking, or suspect serious wiring faults, stop immediately. Call a licensed electrician. Safety is non-negotiable.
Frequently Asked Questions:
Can I wash integrated LED lights in the sink? No. Never submerge LEDs or their attached wires. Wipe them exclusively with a dry or very slightly damp microfiber cloth.
What is the total time per clean? Once you know the steps, a standard deep clean takes only 20-30 minutes from start to finish.