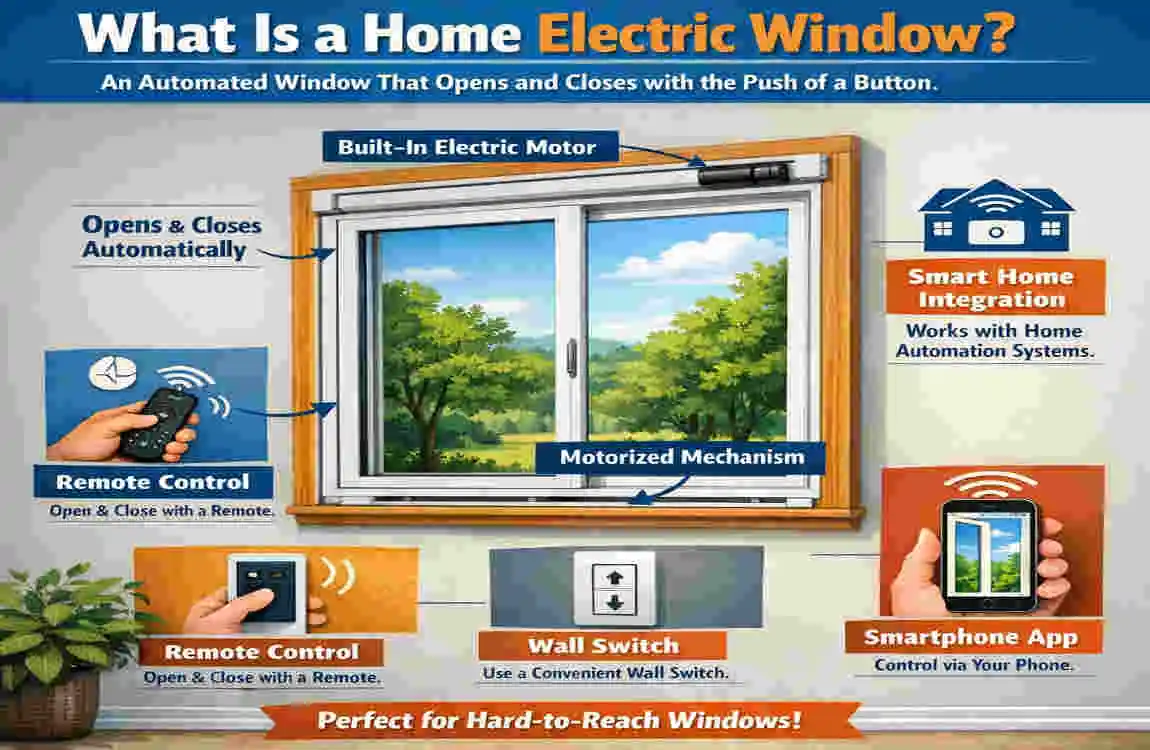
You are lounging on your comfortable living room couch after a long, exhausting day. The afternoon sun is glaring directly onto your television screen, ruining your favorite movie. In the past, you would have to pause your show, sigh heavily, get up, and physically crank a window closed or pull down a heavy blind. Now, imagine simply tapping a button on your smartphone or pressing a sleek remote, and watching as your windows smoothly glide shut, adjusting the sunlight instantly. That is the magic of home automation.
Upgrading to motorized windows is not just about showing off to your neighbors. It is a brilliant way to increase your energy savings by quickly venting hot air. Plus, it gives your property a massive home value boost. In fact, modern smart home upgrades can raise your property’s appeal by up to 5-10%. For homes in bustling areas like Lahore, where the weather can change from intensely hot to a sudden downpour, having remote-controlled, rain-sensing windows is an absolute game-changer.
What Is a Home Electric Window?
Before we dive into the nuts and bolts of the installation, let us take a moment to understand what exactly we are working with. What makes an electric window different from the standard glass panes you have had in your house for years?
At its core, a home electric window is a traditional window equipped with a small, powerful electric motor (often called an actuator) that handles the heavy lifting of opening and closing the sash. Instead of using your own muscle power to turn a crank or push a latch, the motor does the work for you.
Different Types of Electric Windows
When planning a DIY electric window installation, you will typically come across three main types of products on the market:
- Roof Skylights: These are incredibly popular for letting natural light into dark attics or upper-floor rooms. A Velux window setup is the most famous example here. Since skylights are often installed high up on a vaulted ceiling, reaching them manually is nearly impossible. An electric motor makes them accessible.
- Wall Casement Power Windows: These are your standard side-hinged or top-hinged windows installed in regular walls, but they are hooked up to a built-in motorized track.
- Retrofit Kits: If you already have great windows and want to automate them, you can buy a power window kit home conversion set. These bolt onto your existing manual windows to turn them into smart windows.
Manual vs. Electric: The Big Upgrade
Why go through the trouble of an electric skylight install? The perks of automation are hard to beat.
Manual windows offer basic ventilation. You open them when you are hot, and you close them when you are cold. But electric windows bring your home into the future. Many come with built-in rain sensors. If a sudden thunderstorm rolls in while you are at work, the window senses the first few drops of moisture and automatically shuts itself. No more coming home to a soaked carpet! Additionally, modern home automation windows connect to your Wi-Fi, allowing you to set schedules on your phone. You can program them to open slightly at night to let in a cool breeze and close before the morning heat sets in.
Relevance to Pakistan’s Climate
If you live in Pakistan, particularly in regions like Punjab, you know how brutal the summer heat can be. Hot air naturally rises, getting trapped against your ceiling and turning your house into an oven. By installing a high-placed electric skylight, you can easily vent that trapped heat with the push of a button, drastically reducing your air conditioning bills.
Furthermore, during the monsoon season, the sudden, heavy rains can catch anyone off guard. Having automated, rain-sensing windows is the ultimate monsoon-proofing hack for your home.
Let us look at a quick comparison to see how electric models stack up against traditional manual ones:
Feature: Electric Windows, Manual Windows
Operation: Remote control, smartphone app, or voice command. Hand crank, latch, or physical pushing
Cost $800 – $2500 (fully installed by a pro) $300 – $800
Efficiency: Excellent venting, smart insulation, automated climate control. Basic, relies entirely on human intervention
Maintenance requires occasional wiring and sensor checks. Simple, keep the tracks clean
Whether you are looking for an “electric window for home installation” to combat the summer heat or want to add a touch of luxury to your living space, the benefits clearly outweigh the initial effort.
Tools and Materials Needed
You cannot build a great house without a solid foundation, and you cannot pull off a successful DIY project without the right gear. Before you start tearing into your drywall or climbing onto your roof, you need to gather your arsenal.
Having the right tools on hand will not only make the job faster but will also keep you safe and prevent costly mistakes. Let us break down exactly what you need to bring this project to life.
Essential Power Tools
You do not need an entire commercial workshop, but a few reliable power tools are non-negotiable for this job.
- Power Drill and Impact Driver: You will need this for driving long screws into heavy wooden beams and pre-drilling holes to prevent the wood from splitting.
- Jigsaw or Reciprocating Saw: This is your cutting tool. You will use it to cut through your interior drywall and the wooden framing of your roof or wall to create the opening for the window.
- Digital Multimeter: This is a vital electrical safety tool. It allows you to test wires to ensure the power is truly off before you touch them, and it helps you verify that your new window is receiving the correct voltage once wired.
The Window Kit Components
When you open the box for your new electric window, you should find several key components. Always check your inventory before starting!
- The Window Frame and Glass: The main body of the unit.
- The Electric Motor (Actuator): The mechanical arm that opens and closes the pane.
- Wiring Harness: The bundled cables that will connect the motor to your home’s power supply and the wall switch.
- Flashing Kit: If you are doing a roof installation (like a Velux style), the flashing is the metal skirting that weaves into your roof tiles to keep water out.
Safety Gear
Never skip this section. Your health is worth more than any home improvement costs.
- Heavy-Duty Work Gloves: To protect your hands from sharp drywall edges, fiberglass insulation, and wood splinters.
- Safety Goggles: When you are looking up and cutting into a ceiling, a lot of dust and debris will fall directly toward your face. Protect your eyes.
- Sturdy Extension Ladder: Make sure it is tall enough to easily reach your work area without forcing you to stand on the dangerous top rungs.
Extra Materials to Grab
- Silicone Waterproof Sealant: For double-sealing the exterior edges against rain.
- Insulation Collar: To wrap around the window frame and prevent cold drafts in the winter.
- 30A Electrical Fuse: Depending on your home’s electrical panel, you may need a dedicated fuse for the window’s circuit.
Budget Breakdown
If you were to hire a professional contractor, you would easily be looking at a bill of over $2000. By doing it yourself, your total budget will likely land between $400 and $1200, depending heavily on the brand of window you choose and whether you need to buy any new power tools.
Sourcing Your Materials
If you are based in Lahore, you can find almost all the hardware, screws, and sealants you need at local markets like Sitara Market. For the specialty power tools or the window kits themselves, browsing online marketplaces like Daraz.pk can offer great deals and convenient home delivery.
Pro Tip: If you do not want to replace your entire window, look for “universal retrofit kits.” These kits allow you to attach a motorized arm to your existing non-Velux windows, saving you the hassle of cutting massive holes in your walls or roof!
Preparation Steps Before Installation
The secret to a flawless installation lies entirely in the preparation. If you rush through the planning phase, you are almost guaranteed to run into frustrating roadblocks later on. Let us walk through the crucial steps you need to take before you ever pick up a saw.
Conduct a Thorough Site Assessment
First, figure out exactly where this window is going to go. If you are installing a skylight, you need to get up into your attic space and look at the wooden skeleton of your roof. You are looking for the rafters—the thick wooden beams that support your roof. You want to place your window between these rafters if possible.
Once you have picked the spot, measure the dimensions of your window frame. Then, add exactly a 1/2-inch of clearance on all four sides. This extra breathing room ensures you can fit the window into the hole easily and make minor adjustments to get it perfectly level.
Safety First: Power and Weather
Before cutting into any wall or ceiling, you must turn off the power. Go to your main electrical panel and flip the breaker for the room you are working in. Use your multimeter on nearby outlets to guarantee the electricity is completely dead. You do not want your saw blade accidentally slicing through a live wire!
Next, check the weather forecast. This is incredibly important for roof installations. You are about to cut a giant hole in your house. Ensure you have at least three to four days of clear, sunny weather ahead of you.
Navigating Permits and Regulations
Depending on where you live, you might need permission to alter your home’s exterior. For instance, if you are altering the structural roof beams in Lahore, it is wise to check the local building codes or consult your housing society’s rulebook. Some residential areas have strict guidelines on roof modifications.
Set Up Your Workspace
Installing a window is a messy job. Drywall dust gets everywhere. Lay down heavy-duty plastic tarps over your floors and furniture.
Also, secure a helper. Electric windows, especially large double-glazed skylights, are incredibly heavy. You will absolutely need a second pair of hands to help lift the unit safely into the opening.
Avoiding Common Pitfalls
The two most common mistakes beginners make are:
- Cutting an undersized hole: Forgetting to add that 1/2-inch clearance means the window gets stuck.
- Ignoring the roof pitch angle: Most roof windows require a minimum slope (usually around 15 degrees) to allow water to run off properly. Check your kit’s manual to ensure your roof is steep enough.
Your Quick Prep Checklist:
- Verify kit compatibility: Make sure the window fits the space between your wall studs or roof rafters.
- Charge all batteries: Ensure your drill and saw batteries are at 100%.
- Test the motor on the ground: Plug the window into an extension cord in your garage first. Make sure the motor actually works before you glue it to your roof!
- Have temporary covers ready: Keep a large waterproof tarp and a staple gun handy just in case you don’t finish the job in one day and need to seal the roof overnight.
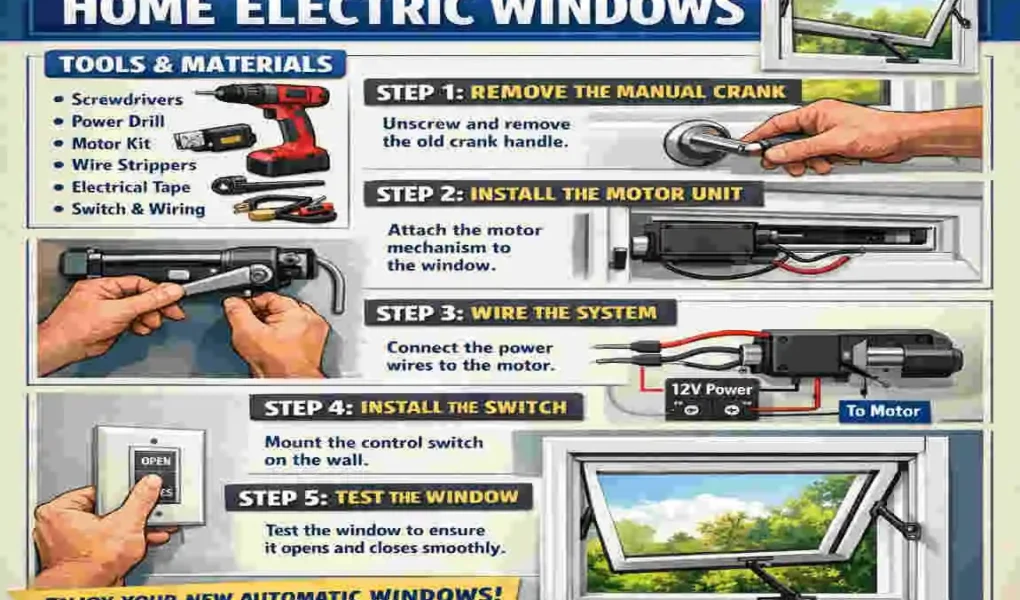
Step-by-Step Installation Guide
This is it. The main event. You have your tools, your workspace is prepped, and you are ready to tackle the big question: “How to install a home electric window?“
Take a deep breath. We are going to break this down into highly manageable, bite-sized steps. Take your time, follow the instructions, and do not rush.
Frame the Opening
Your first major task is to create the physical hole where the window will sit.
Start from the inside of the house. Mark your dimensions clearly on the drywall using a pencil and a long straightedge. Take your jigsaw or a simple hand drywall saw and carefully cut out the rectangle of drywall. Remove any fluffy pink fiberglass insulation you find hidden behind it.
Now you will see the wooden studs (in a wall) or rafters (in a roof). If your window is wider than the space between these beams, you will have to cut a beam out. Note: If you are cutting a structural beam, you must install horizontal support beams (called headers or battens) above and below the cut to carry the weight of the roof.
Cut your top and bottom battens from thick timber (like 2x4s or 2x6s) and nail them securely between the uncut rafters on either side. Use a spirit level constantly! If your framing is crooked, your window will never close properly. For electric Velux-style windows, the bottom batten is the most critical piece—it bears the vast majority of the window’s weight, so make sure it is perfectly level and heavily secured.
install Insulation and Felt Collar
Once your wooden frame is built, you need to weatherproof it before the window even goes in.
Modern window kits usually come with a specialized insulation collar—a thick band of foam that wraps around the edges of the wooden frame. Fit this collar snugly inside the hole. This acts as a thermal barrier, stopping the cold winter air from seeping into your warm living room.
Next comes the felt collar or underfelt. This is a waterproof membrane. You will drape it around the frame and fold it outward onto the roof decking, stapling it down firmly. Think of this as your primary defense against moisture. When the heavy monsoon rains hit, this airtight and watertight seal ensures that any water that manages to sneak under your roof tiles will be directed safely away from the window opening.
Mount the Window Frame
Now it is time for the heavy lifting. Call your helper over.
You need to detach the heavy glass pane (the sash) from the outer frame to make it lighter. Follow the manufacturer’s instructions to unclip the hinges and carefully set the glass aside on a soft blanket.
Carry the empty outer frame up to your opening. Slide it gently into the hole so it rests on your bottom mounting batten. Take your time to square it up. Measure diagonally from the top left corner to the bottom right, and then from the top right to the bottom left. If both measurements are identical, your frame is perfectly square.
Once square, secure the mounting brackets to your wooden battens using the heavy-duty screws provided in the kit. For windows with electric actuators, pay special attention to the bottom of the frame where the motor tracks sit. Ensure this area is completely flush and not pinched, or the motor will struggle to push the glass.
Wire the System
Since the power to this room is turned off at the breaker, you can work safely. You will need to route your home’s electrical wire (usually Romex cable) from a nearby power source—like a wall outlet or directly from a junction box—up through the wall cavity to your new window frame.
The wiring harness on the window motor will typically have three wires: a live wire (often brown or black), a neutral wire (blue or white), and a ground wire (green/yellow). Use wire nuts to twist the corresponding wires from your home’s power supply together with the motor’s wires. Wrap the connections tightly in electrical tape.
If your kit includes a dedicated wall switch, route a wire down the wall to where you want the switch to live. If you are integrating this into a smart home system, this is when you will connect the central control hub.
Add Flashing and Gutter
With the frame bolted in and wired up, you need to make the outside completely weatherproof.
Move to the exterior of the house. The flashing kit consists of overlapping metal strips that act like overlapping fish scales. You start at the bottom of the window, installing the bottom flashing piece over your roof tiles. Then you install the side pieces, and finally the top piece.
Because they overlap from top to bottom, rainwater will cascade down the metal and back onto the roof tiles without ever touching the window seams. You may need to use an angle grinder to cut your roof tiles so they sit neatly around the new flashing. A tight, seamless blend between the roof and the metal is your goal. Finish up by installing the small drainage gutter above the window to divert water away from the top edge.
Test and Calibrate
The hard physical labor is done! Now for the rewarding part.
Carefully reattach the glass sash to the frame hinges. Turn the main power breaker back on.
Grab your remote control or open your paired smartphone app. Hit the “Open” button. Watch as the motor hums to life and smoothly pushes the window open. Run it through three or four full open-and-close cycles to ensure there are no strange grinding noises or motor jams.
If your window has a rain sensor, grab a cup of water and sprinkle a few drops directly onto the sensor while the window is open. It should immediately detect the moisture and automatically shut off.
If the motor seems sluggish, double-check your wiring connections for shorts. If it stops halfway, check the physical tracks to ensure a stray screw or piece of wood isn’t blocking the hinges.
Visual Timeline
To help you plan your weekend, here is a quick visual timeline of what to expect:
Step Number Task Description Estimated Time Difficulty Level
1 & 2 Framing the opening, cutting beams, and installing the felt insulation collar. 2 to 3 hours Medium
3 & 4 Lifting the frame, squaring it, securing it, and performing the electrical wiring. 3 to 4 hours High
5 & 6 Installing exterior metal flashing, placing the glass, and testing the motor. 1.5 hours Low to Medium
By taking it one step at a time, you can easily complete this project over a single weekend.
Safety Tips and Common Mistakes
Even though we have broken the process down to make it simple, DIY construction is not without its risks. Keeping yourself safe and avoiding rookie errors will guarantee your project is a success rather than a stressful disaster.
Beware of the Hazards
The two biggest dangers in this project are electrocution and falling. When dealing with the electrical components, never assume a wire is dead just because a switch is off. Always use your multimeter. For roof installations, the risk of falling is very real. If your roof has a steep pitch, do not play the hero—wear a safety harness attached to a secure anchor point. A simple slip could be fatal.
Don’t Make These Mistakes
- Skipping the Insulation: It is tempting to skip stuffing foam around the frame because it is tedious. However, ignoring insulation will lead to massive condensation build-up in winter, which drips down and ruins your drywall.
- Loose Electrical Wires: If you don’t twist your wire nuts tightly, electrical arcing can occur behind your walls, which is a major fire hazard.
Working in the Lahore Heat
If you are doing this project in the height of a Punjab summer, the roof tiles will literally be hot enough to fry an egg. Working on a ladder or a roof in 40°C (104°F) weather is dangerous. Plan to do the exterior flashing work very early in the morning, between 6 AM and 9 AM. Avoid the midday sun entirely. Keep a large jug of ice water nearby and hydrate constantly.
When to Call the Pros
There is no shame in asking for help. If you open your ceiling and discover that your roof is built with complex engineered trusses rather than standard wooden rafters, stop immediately. Cutting a truss can compromise the structural integrity of your entire house. At that point, it is time to call a professional contractor.
Cost Breakdown and Savings
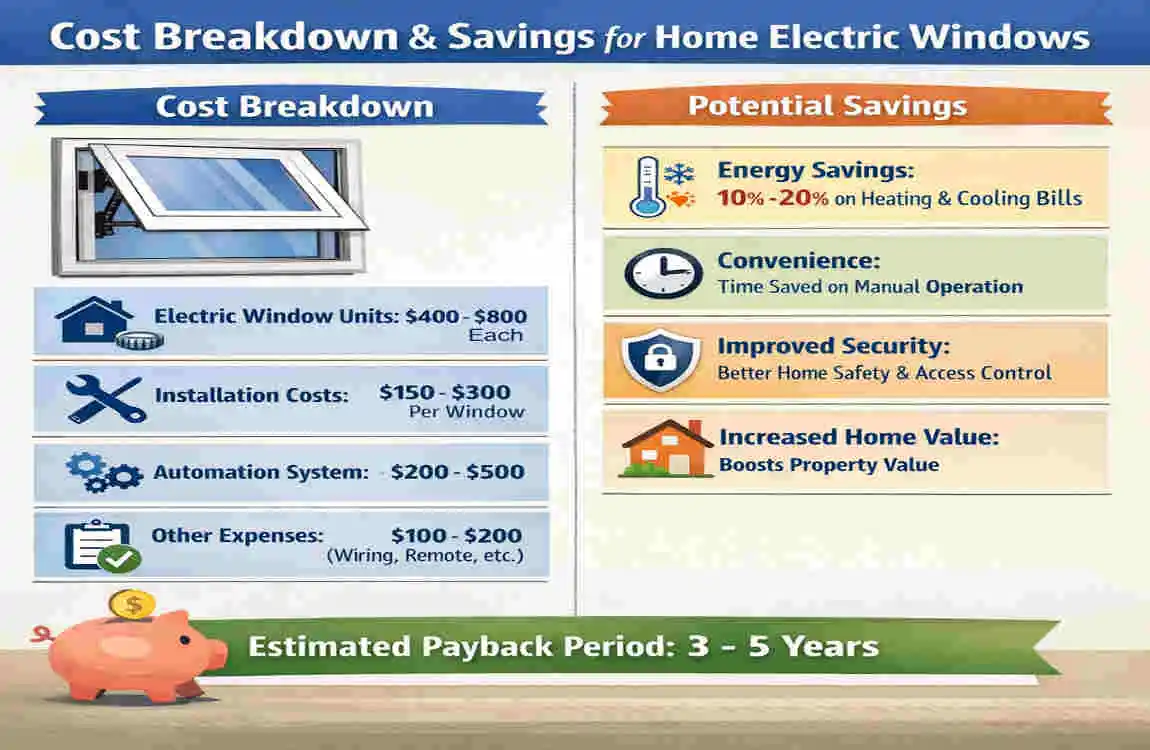
Let us talk numbers, because saving money is one of the best parts of any DIY project.
If you hire a high-end contracting company to install an automated smart window, they have to charge you for the window kit, the labor of two men for a full day, the electrician’s time, and the company’s profit margin. That easily pushes the bill over $2000.
By tackling the DIY electric window installation yourself, you strip away all those labor costs. You are saving roughly 60% of the total project expense, keeping easily $1000 or more directly in your pocket.
Pricing in Pakistan
For our readers in Pakistan, let us localize those numbers. A high-quality imported electric skylight kit, complete with a rain sensor and remote, will typically cost around PKR 150,000 to PKR 200,000, depending on the exchange rate and import duties. The timber for framing, silicone, and extra wires will run you another PKR 10,000. If you need to buy a good jigsaw and drill, add PKR 25,000.
The Return on Investment (ROI)
This is not just an expense; it is an investment. By strategically using your motorized window to vent hot air during the summer evenings, you can reduce your air conditioning reliance. Homeowners often see their monthly energy bills drop by up to 15%.
Furthermore, smart home features are highly sought after in the modern real estate market. When it comes time to sell your house, a beautifully installed, automated window is a Premium feature that increases your overall resale value.
Maintenance and Troubleshooting
Congratulations, your window is installed and working beautifully! But like a car, mechanical devices need a little bit of love to keep them running smoothly for years to come.
Annual Check-Ups
Once a year, before the heavy rain season begins, you should do a quick maintenance routine.
- Lubricate the Tracks: Use a silicone-based spray lubricant (never WD-40, as it attracts dirt) on the metal hinges and the motorized pushing arm. This keeps the movement silent and smooth.
- Clean the Sensors: Dust and bird droppings can cover the rain sensor on the roof. Wipe it down with a damp cloth so it can actually “feel” the rain when it falls.
Common Issues
- The motor is running very slowly: If you are using a solar-powered or battery-backup model, the internal battery might be dying. Check the charge.
- Water is dripping down the wall: This usually means the silicone sealant on the exterior flashing has cracked under the hot sun. Scrape away the old sealant and apply a fresh, thick bead of waterproof silicone.
Fun Upgrades
Once you have mastered the basic remote control, look into smart home bridges. By connecting the window’s receiver to a smart hub, you can unlock voice control. Imagine lying in bed and simply saying, “Alexa, open the bedroom skylight,” and feeling the fresh air rush in.
FAQs
Even with a detailed guide, it is normal to have a few lingering questions. Here are the most common things people ask before starting this project.
How long does the entire installation take? For a beginner working with a friend, you should budget about 6 to 8 hours from start to finish. If you run into structural surprises or complicated wiring, it might stretch into a two-day weekend project.
Can I DIY this on a heavily tiled roof? Yes, absolutely. The process is the same. The only difference is that you will spend extra time carefully removing the clay or concrete tiles around the hole, and you may need a specialized masonry blade for your angle grinder to cut the tiles to fit neatly around the new metal flashing.
Will doing this myself void my roof’s warranty? It depends on your specific roof warranty. However, cutting a hole in your roof generally voids the warranty for that specific section of the roof. Make sure your flashing is installed perfectly to avoid any leak-related headaches.
Does DIY installation void the window kit’s warranty? Usually, no. Most major brands like Velux design their products specifically with the DIYer in mind. However, if your wiring is faulty and burns out the motor, that specific damage will not be covered. Always read the fine print in your manual.
What happens if the power goes out in my house? This is a great question, especially in areas with frequent load shedding. Most modern electric windows have a manual override feature. They come with a special release tool or a manual crank slot so you can close the window by hand during a power outage.
Can I install an electric window in a bathroom? Yes! In fact, bathrooms are one of the best places for them. Hooking a motorized skylight up to a humidity sensor allows the window to open automatically after a hot shower, venting the steam and preventing harmful mold growth on your ceiling.