Is your garage floor showing signs of wear and tear? Do you notice cracks, stains, or even dust accumulating on the surface? If so, you’re not alone. Many homeowners face the challenge of maintaining their garage floors. Still, there’s a simple solution to protect and enhance their durability: sealing.
Sealing a garage floor is not just about aesthetics—it’s about extending the life of your concrete, protecting it from damage caused by oil, water, and chemicals. Moreover, a properly sealed garage floor can improve your home’s resale value and make it easier to clean and maintain.
Why Should You Seal Your Garage Floor?

Before we get into the “how,” let’s explore the “why.” Understanding the benefits of sealing your garage floor can help you see why it’s worth the effort.
Benefits of Sealing a Garage Floor
- Prevents Cracks and Surface Damage
- Concrete is porous, which means it absorbs moisture and chemicals over time. This can lead to cracks, chips, and deterioration. Sealing creates a protective barrier that keeps these elements out.
- Protects Against Stains
- Garage floors often face spills from oil, grease, and other substances. A sealed floor resists stains, making cleanup easier and keeping your garage looking neat.
- Improves Appearance
- A sealed floor has a polished and professional look. Whether you choose a shiny epoxy or a matte penetrating sealer, it can significantly enhance the appearance of your garage.
- Increases Resale Value
- A well-maintained garage is a selling point for potential buyers. A sealed floor not only looks better but also demonstrates that you’ve taken good care of the property.
Signs Your Garage Floor Needs Sealing
Not sure if your garage floor is overdue for sealing? Look for these signs:
- Visible Cracks or Chips: These indicate that the concrete is starting to deteriorate.
- Frequent Staining: If oil or other stains are becoming harder to remove, it’s time to seal.
- Dusty or Uneven Surface: This is a common issue with unsealed or aging concrete floors.
Addressing Misconceptions About Sealing Garage Floors
Some homeowners hesitate to seal their garage floors due to common myths. Let’s bust a few of them:
- “It’s too expensive.” Sealing your garage floor is an investment that prevents costly future repairs.
- “Sealing is only for professional garages.” Not true! Sealing is beneficial for all types of garages, including residential ones.
- “It doesn’t make a difference.” A sealed floor is easier to maintain, longer-lasting, and more resistant to damage.
Tools and Materials You’ll Need
Before starting the sealing process, gather the necessary tools and materials. Preparation is key to a successful project!
Essential Tools
- Pressure Washer or Garden Hose: To thoroughly clean the floor.
- Scrub Brush or Floor Cleaning Tool: For scrubbing away dirt and stains.
- Paint Roller or Sprayer: To apply the sealer evenly.
- Protective Gear: Gloves, safety goggles, and a mask to ensure safety during the process.
Materials
- Concrete Cleaner or Degreaser: To remove oil and grime.
- Concrete Sealer: Options include epoxy, acrylic, or penetrating sealers.
- Patch Repair Compound: For filling cracks and chips.
- Painter’s Tape: To mask off edges and protect walls.
Choosing the Right Sealer for Your Garage Floor
Here’s a quick comparison of the most common types of sealers:
Type of Sealer Pros Cons
Epoxy Durable, glossy finish, resists chemicals. More expensive, requires precise prep.
Acrylic: Easy to apply, affordable. Less durable than epoxy.
Penetrating Invisible finish, protects from within—minimal aesthetic improvement.
Choose a sealer based on your garage’s needs and the level of traffic it handles.
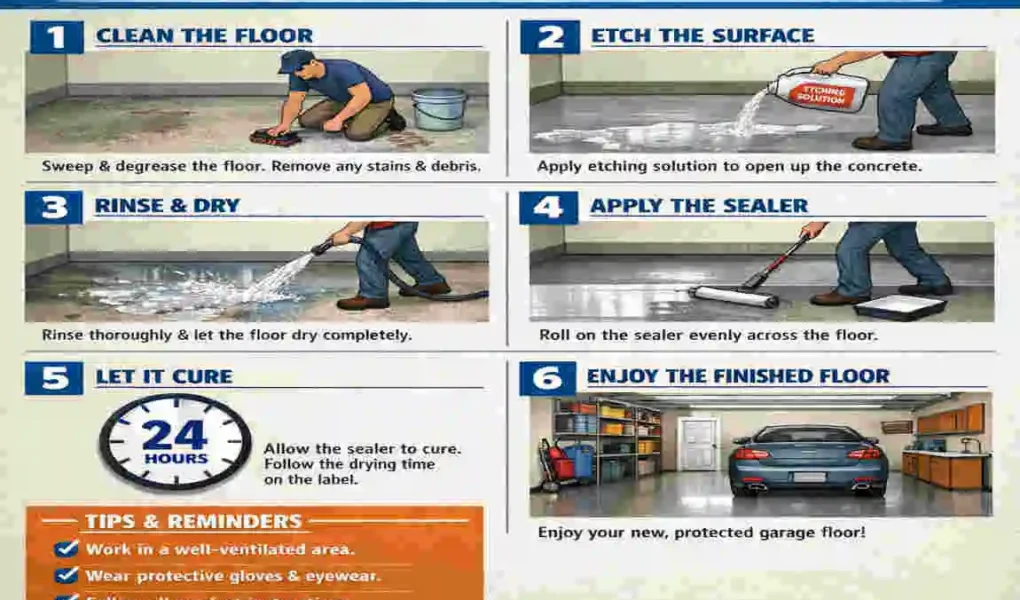
Step-by-Step Guide: How to Seal a Home Garage Floor
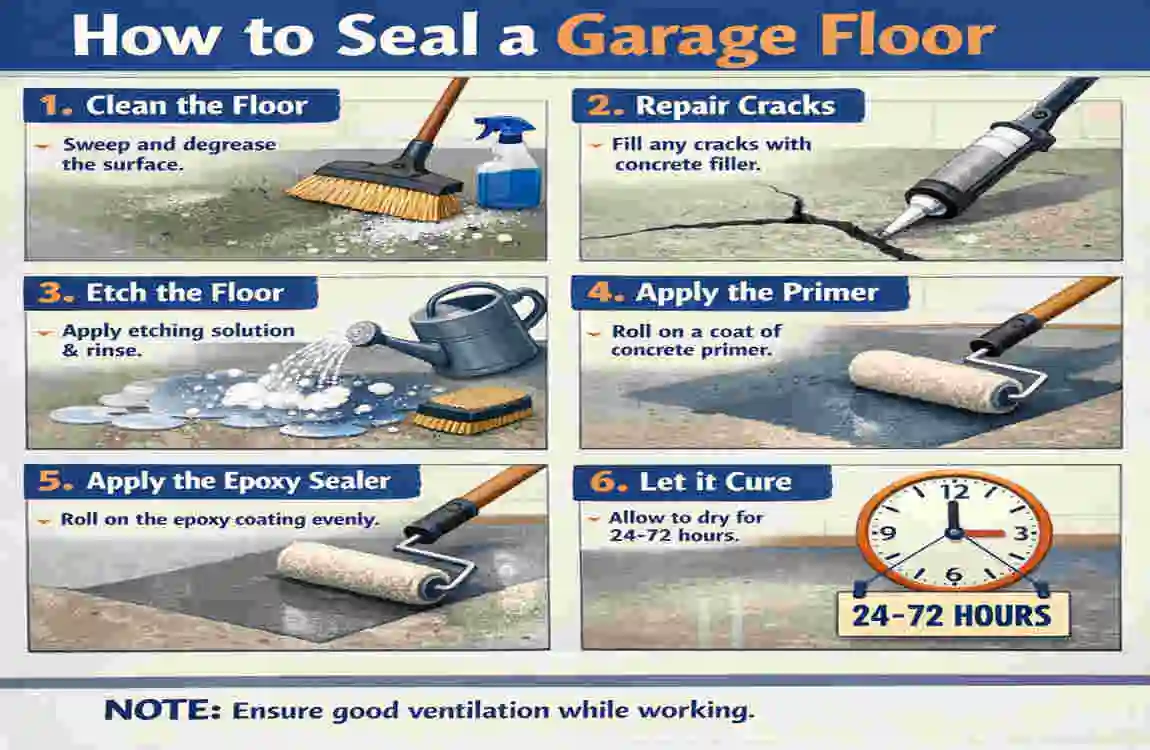
Now let’s get to the heart of the matter: how to seal a home garage floor. Follow these steps for a professional-quality finish.
Prepare the Surface
- Remove all items from the garage, including tools, vehicles, and storage items.
- Sweep and vacuum the floor to remove loose dirt and debris.
- Clean the floor with a concrete cleaner or degreaser. Use a scrub brush for tough stains.
- Rinse thoroughly with a pressure washer or garden hose.
- Allow the floor to dry completely before moving to the next step.
Inspect and Repair
- Examine the floor for cracks, chips, or uneven areas.
- Use a patch repair compound to fill in imperfections.
- Follow the manufacturer’s instructions for curing time before proceeding.
Mask Off Edges
- Use painter’s tape to protect walls, baseboards, and any areas you don’t want sealed.
- Double-check that all edges are properly masked before applying the sealer.
Apply the Sealer
- Mix or prepare the sealer according to the manufacturer’s instructions.
- Using a paint roller or sprayer, apply the first coat evenly across the floor.
- Work in small sections to ensure even coverage.
- Allow the first coat to dry (typically 24-48 hours).
Apply Additional Coats if necessary
- For extra durability, apply a second coat following the same method.
- Let the second coat cure completely before using the garage.
Clean Up and Maintenance Tips
- Remove painter’s tape carefully to avoid peeling the sealer.
- Clean your tools immediately to prevent the sealer from hardening on them.
- Avoid parking cars or moving heavy items back into the garage until the sealer is fully cured.
Common Mistakes to Avoid When Sealing Your Garage Floor
To ensure a smooth process, avoid these common pitfalls:
- Skipping Surface Preparation: Cleaning and repairing are crucial for proper adhesion.
- Applying Sealer on a Wet Floor: Always ensure the floor is completely dry.
- Using the Wrong Type of Sealer: Choose a product suited to your garage’s needs.
- Not Following Instructions: Manufacturer guidelines exist for a reason—follow them!
- Ignoring Safety Precautions: Always wear gloves, goggles, and a mask to protect yourself.
How to Maintain a Sealed Garage Floor
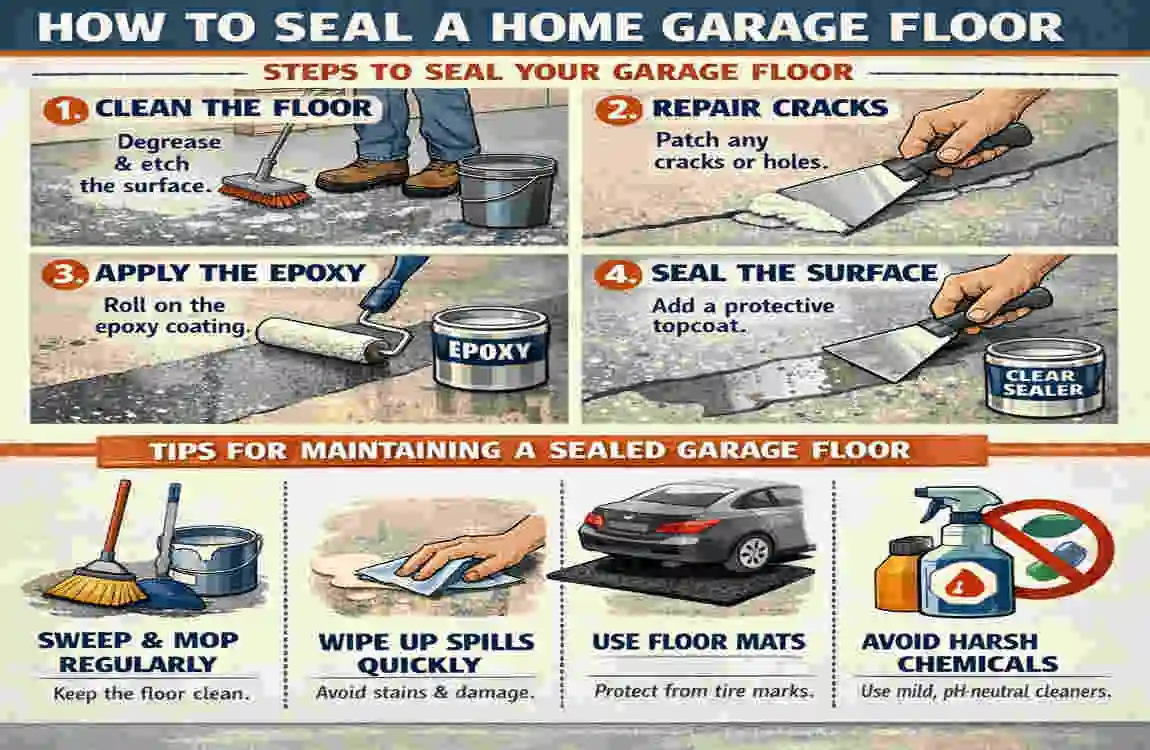
Once your garage floor is sealed, maintenance is simple:
- Regular Cleaning: Sweep or vacuum weekly to remove debris.
- Avoid Harsh Chemicals: Use mild cleaners to preserve the sealer’s integrity.
- Reapply Sealer Periodically: Depending on the product, reapply every 2-5 years.
- Monitor for Damage: Address cracks or wear promptly to maintain protection.
FAQs About Sealing a Garage Floor
How long does a sealed garage floor last?
With proper maintenance, a sealed floor can last 2-10 years, depending on the product used.
Can I seal my garage floor myself, or should I hire a professional?
DIY sealing is manageable with the right tools and preparation. However, professionals can save you time and ensure a flawless finish.
What’s the best type of sealer for a home garage floor?
Epoxy is great for durability, while acrylic is budget-friendly. Penetrating sealers offer invisible protection.
| Step | What to Do | Why It Matters |
|---|---|---|
| Prepare the Surface | Clean and dry thoroughly | Ensures sealer sticks well |
| Inspect & Repair | Fix cracks and chips | Prevents further damage |
| Mask Off Edges | Use painter’s tape on walls and trims | Protects areas you don’t want sealed |
| Apply Sealer | Use roller or sprayer, apply evenly | Creates protective, durable coating |
| Add Additional Coats | Apply second coat if needed | Increases longevity and resistance |
| Cure & Maintain | Let dry fully, clean regularly | Preserves seal and extends floor life |