If you want to protect your home from water damage, improve the look of your windows, and make your exterior finish last longer, learning how to install an exterior window sill is a smart skill to acquire. A good sill does more than sit under a window. It helps guide water away from the wall and keeps moisture from sneaking into the frame.
When a sill is installed poorly, problems can surface quickly. You may see peeling paint, rot, leaks, drafty windows, or damage around the wall below the opening. In some cases, the issue can even affect energy efficiency and raise repair costs later.
What Is an Exterior Window Sill?

An exterior window sill is the lower horizontal part that sits below the window on the outside of your home. Its main job is to help protect the wall and window opening from water. It also visually supports the window and gives the exterior of your house a finished look.
A well-made sill helps rainwater flow away from the wall rather than pooling near the frame. That small detail matters a lot. Water always looks for weak spots. If it finds one, it can slowly damage wood, insulation, and even the wall structure.
Types of Exterior Window Sills
There are several common sill materials, and each one has its own strengths:
- Wood: Easy to cut and shape, but needs regular sealing and care.
- Stone: Very durable and attractive, but heavier and harder to install.
- Aluminum: Lightweight, weather-resistant, and low maintenance.
- Vinyl: Affordable and simple to clean, but less strong than some other options.
- Composite: Made for durability and moisture resistance, with a clean, modern look.
Why the Material Matters
Choosing the right material affects both durability and appearance. A wood sill may look warm and classic, but it may not be the best choice for very wet climates unless it is sealed well. A stone sill can last a long time, but it may cost more and take more effort to fit.
Understanding the basics of exterior window sills is essential before learning how to install an exterior window sill. If you choose the wrong material, even a careful installation may not give you the result you want.
A Quick Comparison Table
Material Best For Main Benefit Main Drawback
Wood Traditional homes Easy to work with Needs regular maintenance
Stone Long-lasting finish Very durable Heavy and expensive
Aluminum Modern homes Weather-resistant Can dent
Vinyl Budget projects: Low maintenance, less sturdy
Composite Mixed climates Good balance of strength and care Can cost more
Tools and Materials You’ll Need
Before you start, gather everything you need. Having the right items nearby makes the job smoother and safer. It also helps you avoid stopping halfway through the work.
Having the right tools and materials ensures a seamless process when you’re ready to install an exterior window sill.
Tools
You will likely need:
- Tape measure
- Pencil
- Level
- Hammer
- Screwdriver or drill
- Screws
- Utility knife
- Caulking gun
- Saw for cutting the sill material
- Safety glasses
- Work gloves
Materials
You should also have:
- Exterior sill material
- Construction adhesive or sealant
- Caulk for outdoor use
- Flashing tape
- Wood filler, if needed
- Sandpaper
- Primer or paint, if the material needs finishing
Helpful Extras
If you want a more budget-friendly or eco-friendly setup, look for recycled composite materials or low-VOC sealants. These can reduce waste and still give you a strong, neat result.
Keep in mind that the best tools are not always the most expensive ones. They are the ones that help you do the job cleanly and safely.
Preparing for Installation
Preparation is a crucial step in installing an exterior window sill properly. If you rush this part, the final result may look fine at first, but it will fail later when rain, wind, or changing temperatures put pressure on it.
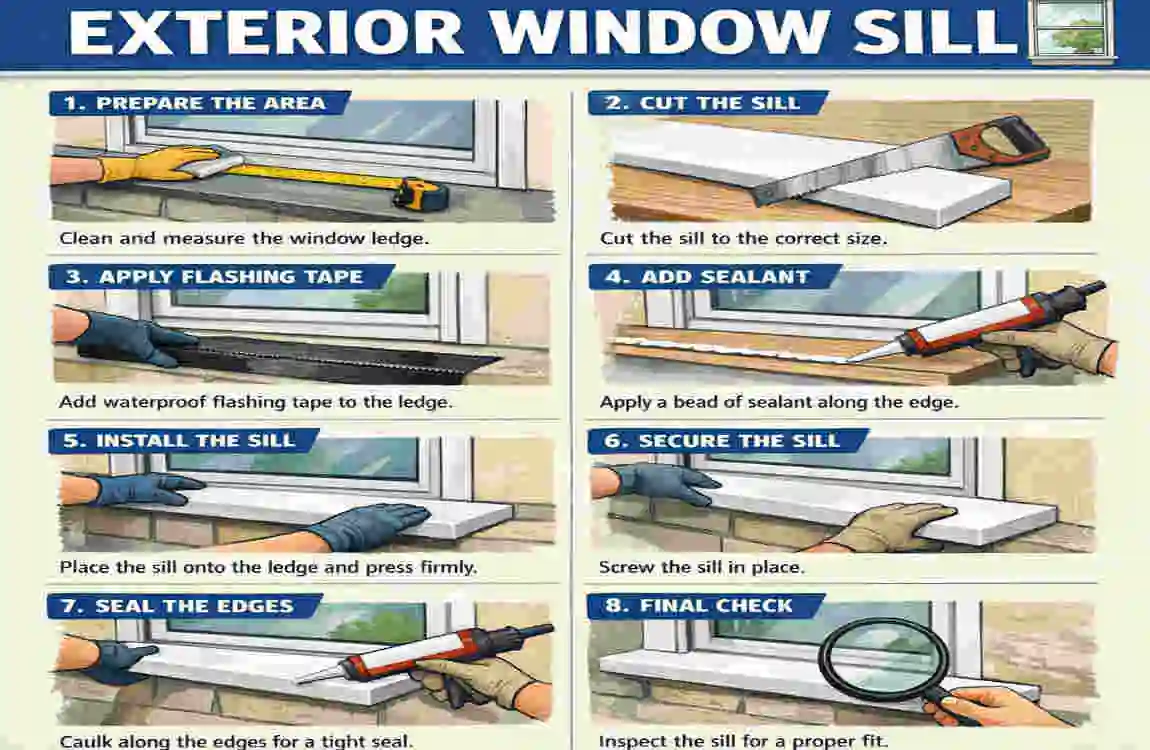
Measure the Window Opening
Start by measuring the width and depth of the sill area. Measure more than once to avoid cutting the material too short. A sill that is too small can leave gaps, while one that is too large may not fit at all.
Be sure to check both sides of the opening. Older homes are not always perfectly square, so careful measurements save time later.
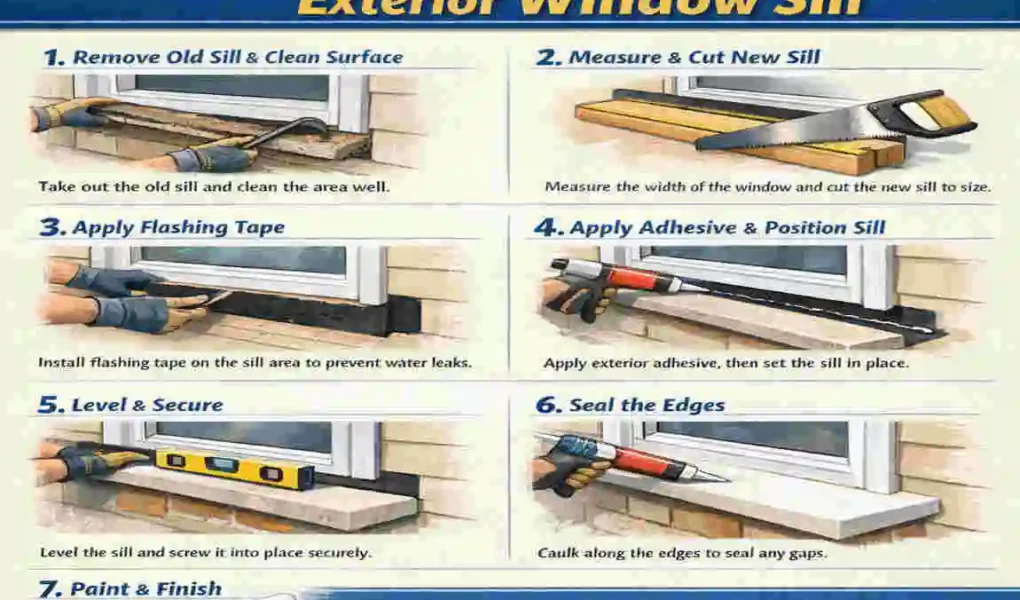
Remove the Old Sill and Clean the Area
If you are replacing an old sill, remove it carefully. Use a pry bar or screwdriver if needed, but try not to damage the frame around it.
Once the old sill is out, clean the area well. Remove dirt, old caulk, loose paint, and debris. A clean surface helps the new sill stick better and sit more evenly.
Check for Damage
Inspect the frame and surrounding wall for rot, cracks, soft spots, or signs of moisture. If you find damage, fix it before moving forward. Installing a new sill over a weak base is only a short-term fix.
If the wood feels soft or breaks easily, replace that section. If the frame is damaged, repair it with filler, patch material, or replacement wood, depending on the extent of the damage.
Apply Flashing Tape
Flashing tape helps protect against water intrusion. Apply it around the sill area according to the product instructions. Make sure it lies flat and covers the right sections.
This layer is important because it provides the window area with additional water resistance. It acts like a backup line of defense if rain reaches the sill.
Step-by-Step Guide to Installing an Exterior Window Sill
Now, let’s get into the main process. Follow these steps carefully to learn how to install an exterior window sill with precision.
Cut the Sill Material to Fit
Use your measurements to mark the sill material. Double-check the marks before cutting. If the design includes side overhangs or a slight slope, build that into your cut.
A clean cut matters because it affects both fit and appearance. If the piece is too long, trim slowly. If it is too short, you may need a new piece.
Dry-Fit the Sill
Before attaching anything, place the sill in position to test the fit. This is called a dry fit. It lets you see if the piece sits level, lines up with the opening, and leaves the right amount of overhang.
Check both ends and the front edge. The sill should feel solid, not loose or forced. If it does not fit well, make small adjustments until it does.
Dry-fitting saves time. It also helps you avoid mistakes that are harder to fix once the adhesive or screws are in place.
Apply Adhesive or Fasteners
Once the sill fits properly, apply construction adhesive or use screws, depending on the material and design. Some projects use both. The exact choice depends on the sill type and the surface it will attach to.
Spread adhesive in a steady line rather than in large, thick blobs. That gives a better bond and helps the sill sit evenly.
If you use screws, do not over-tighten them. Tightening too much can split wood or pull the piece out of position. Secure it firmly, but gently.
Seal the Edges With Caulk
After the sill is fixed in place, seal the edges with exterior-grade caulk. This step helps block water, air, and dirt from getting under the sill.
Apply a smooth, even bead along the seams. Use your finger or a caulk-smoothing tool to press it into the joint. A neat seal does not just work better; it works better. It also looks cleaner.
Make sure you seal all side edges and contact points. Any open gap is a possible entry point for moisture.
Check the Slope for Drainage
This is one of the most important parts of how to install an exterior window sill correctly. The sill should slope slightly outward so water runs away from the house.
If the sill sits flat or slopes inward, rainwater may collect near the frame. That can lead to leaks and long-term damage.
Use a level to check the angle, but remember that a tiny outward slope is often better than a perfectly flat fit. The goal is to help water naturally run off the sill.
Let Everything Cure
Once the sill is installed and sealed, leave it alone for the recommended curing time. Adhesive and caulk need time to harden fully. If you touch or stress the area too soon, the bond may weaken.
Follow the manufacturer’s instructions carefully. Different products cure at different speeds depending on temperature and humidity.
Be patient here. A strong cure helps the seal last much longer.
Finish the Surface if Needed
If your sill material needs paint, stain, or a protective topcoat, apply it after curing. This step is especially important for wood. It adds protection and improves appearance.
Make sure the finish is designed for outdoor use. Interior products may not hold up to rain and sunlight.
Step-by-Step Snapshot
- Measure and cut the sill.
- Dry-fit it in place.
- Attach it with adhesive or screws.
- Seal all edges with caulk.
- Confirm a slight outward slope.
- Let it cure fully.
- Finish the surface if needed.
Following these steps carefully will help you learn how to install an exterior window sill without unnecessary stress.
Common Mistakes to Avoid
Even simple projects can go wrong if you skip key steps. Avoiding these common mistakes will make installing an exterior window sill much smoother.
Skipping Preparation
Some people rush straight into installation without cleaning, measuring, or checking for damage. That is a big mistake. If the base is weak or dirty, the new sill will not hold up well.
Using the Wrong Material
Not every skill material works in every setting. A budget option may be fine for one home but poor for another. Always think about weather, moisture, and maintenance before choosing.
Forgetting the Slope
A flat sill can trap water. A correctly sloped sill helps protect the wall and frame. This small detail makes a huge difference over time.
Overusing Adhesive or Screws
More is not always better. Too much adhesive can squeeze out and look messy. Too many screws can damage the sill or weaken the material.
Ignoring Seams
If you leave small gaps unsealed, water can get in. Even tiny openings can turn into larger problems later. Always finish the job with proper caulking.
Maintenance Tips for Your New Exterior Window Sill
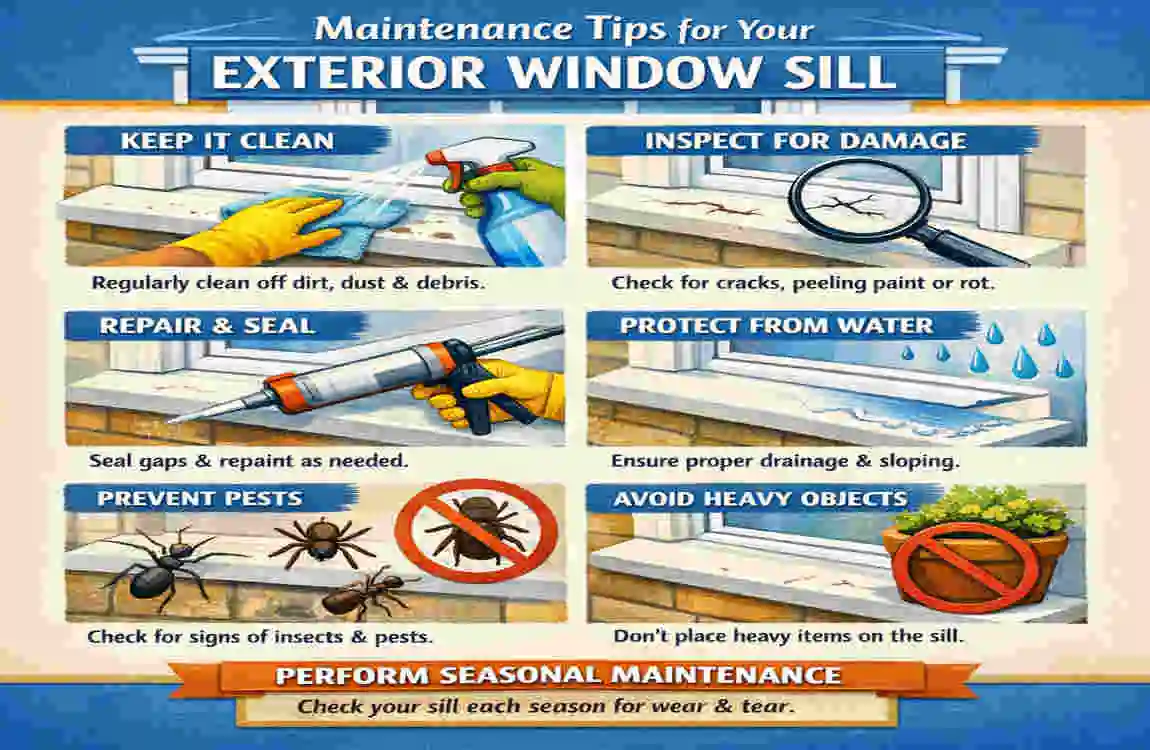
Proper maintenance ensures your effort in learning how to install an exterior window sill doesn’t go to waste. Once the sill is in place, a little care will keep it looking good and working well.
Clean It Regularly
Wipe away dirt, leaves, and debris from the sill area. This is especially important after storms or during seasons when pollen and dust build up.
A clean sill drains better and is easier to inspect.
Reseal When Needed
Caulk and sealants do not last forever. Over time, they can crack or shrink. Check the edges at least once a year and reseal if you notice gaps.
Watch for Early Warning Signs
Look for:
- Peeling paint
- Soft spots
- Cracks in the sealant
- Water stains below the window
- Loose edges
If you spot one of these signs early, you can usually fix it before it becomes a bigger repair.
Seasonal Care
In winter, ice and snow can put extra stress on the sill. In summer, heat and sunlight can dry sealant out more quickly. A quick seasonal check helps you stay ahead of problems.
If you live in a very wet area, inspect the sill more often. Moisture is the main enemy of a long-lasting window installation.
FAQ Section
How long does it take to install an exterior window sill?
Most basic installations can take a few hours. Still, the full time depends on the condition of the opening, the sill material, and how long the adhesive or caulk needs to cure. If you are replacing damaged wood, it may take longer.
Can I install an exterior window sill without professional help?
Yes, many homeowners can do it themselves with patience and the right tools. If the window area has major damage, structural issues, or heavy stone materials, professional help may be the safer choice.
What materials are best for exterior window sills?
The best material depends on your home and climate. Wood works well for classic styles, composite offers a strong balance of durability and maintenance, and aluminum or vinyl can be easier to care for. Stone is a strong option for long-term durability.
How do I know if I need to replace my window sill?
Replace it if you see rot, cracking, soft spots, water damage, or major wear that caulking can no longer fix. If the sill no longer slopes properly or continues to leak, replacement is usually the better option.
| Step | What to Do | Why It Matters | Helpful Tip |
|---|---|---|---|
| Measure the opening | Measure the window area carefully before cutting | Ensures a proper fit | Measure twice to avoid mistakes |
| Remove old sill | Take out the damaged sill and clean the surface | Gives you a clean base for installation | Remove dirt, old caulk, and loose material |
| Check for damage | Inspect the frame for rot, cracks, or weak spots | Prevents future problems | Repair damage before adding the new sill |
| Apply flashing tape | Place flashing tape around the opening | Helps block water from entering | Make sure the tape lays flat |
| Cut the sill | Cut the material to the correct size | Makes installation easier and neater | Use a straight edge for accurate cuts |
| Dry-fit the sill | Place it in position before attaching | Confirms proper alignment | Check the slope for water drainage |