It’s a Saturday morning. You walk into your kitchen with a steaming cup of coffee, enjoying the sunlight streaming through the window. Then, suddenly—snag. Your sock catches on a sharp, peeling edge of your vinyl flooring. You look down and notice not just that peeling corner, but a scratch near the fridge and a small tear where the dog loves to slide around.
It is a relatable scenario for almost every homeowner. We love vinyl flooring for a reason. It is affordable, incredibly durable, and looks fantastic in modern homes. But even the toughest floors take a beating. High traffic, humidity, sliding chairs, and enthusiastic pets can eventually leave their mark.
If you are staring at that damage and dreading the cost of hiring a contractor, I have some great news for you. You don’t need to rip up the whole floor, and you certainly don’t need to pay a professional hundreds of dollars to fix it.
Understanding Vinyl Flooring Damage
Before we jump into the glue and tools, it is helpful to understand exactly what you are working with. Not all vinyl is created equal, and knowing what type of flooring you have can change how you approach the repair.
Generally, you will find three main types of vinyl in homes today:
- Sheet Vinyl: This comes in large rolls and is often glued down completely or just at the perimeter. It is great for water resistance, but can be tricky to patch because you have to match the pattern perfectly.
- Vinyl Plank (LVP): These look like wood planks. They usually click together (floating floor) or are glued down. Individual planks are easier to replace, but scratches can appear in the wear layer.
- Vinyl Tile (LVT): Similar to planks but shaped like stone or ceramic tiles. These are often easier to repair because you can lift a single tile.
What Causes the Damage? You might be wondering, “Why is my floor falling apart?” It isn’t just you. Recent surveys suggest that nearly 70% of homes utilize some form of vinyl flooring, and they all face similar enemies.
Moisture is the biggest culprit, especially in bathrooms and kitchens. It seeps into seams, causing adhesive to fail and edges to curl. Heavy furniture dragged across the room without pads causes deep gouges. And, of course, age. Over time, the adhesive simply dries out and becomes brittle.
Should You DIY or Replace? This is the big question. When is a repair enough, and when should you throw in the towel?
- Repair it if: The damage is localized (a few scratches, one peeling corner, a small burn). If the rest of the floor is solid, a repair is the best option.
- Replace it if: the flooring is buckling across the entire room, mold is visible beneath it, or the pattern is worn off in high-traffic areas.
Safety First. Even though these are “light” repairs, safety matters, adhesives and solvents give off fumes. Always work with a window open for ventilation. Also, wear eye protection when cutting materials to avoid snapping blades or flying debris.
Preparation Steps Before Any Repair
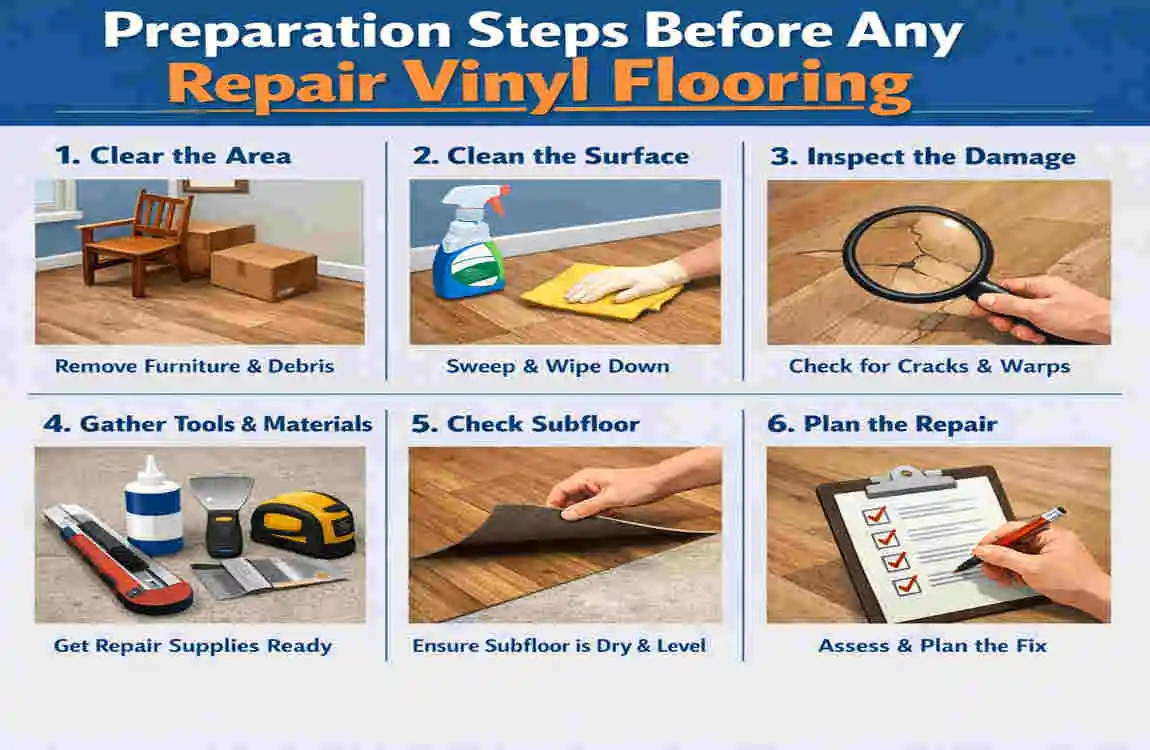
You wouldn’t paint a wall without dusting it first, right? The same logic applies here. The success of repairing vinyl flooring depends almost entirely on your prep work. If you skip this, your patch won’t stick, and your filler will flake off.
Step 1: Assess the Damage. Get down on the floor and really look at the issue. Take a photo if you need to match a color at the store. Measure the size of the tear or gouge. If you need a patch, knowing the exact dimensions helps you determine if you have enough scrap material left over from the original installation.
Clean the Area Thoroughly. Dirt and grease are the enemies of adhesive. Even if the floor looks clean, scrub it.
- Use a mild detergent and warm water to remove surface grime.
- If there is old wax or polish, use a wax stripper on the specific spot you are repairing.
- Crucial Step: Let it dry completely. I mean bone dry. If you trap moisture under a patch, you are inviting mold and future peeling.
Gather Your Supplies. You don’t need a professional workshop, but having these tools ready will save you a mid-project trip to the hardware store. You can get most of these for under $50 total.
- Utility Knife: With fresh, sharp blades.
- Vinyl Adhesive: Make sure it is compatible with your specific flooring type.
- Putty Knife: Plastic is better to avoid scratching.
- Hairdryer or Heat Gun: To make the vinyl pliable.
- Painter’s Tape: To protect the surrounding area.
- Rolling Pin or Seam Roller: To press the repair down flat.
Prepare the Workspace. Move any furniture out of the way. If you are working in a high-traffic area like a hallway, you might want to tape off the area so kids or pets don’t step on wet glue.
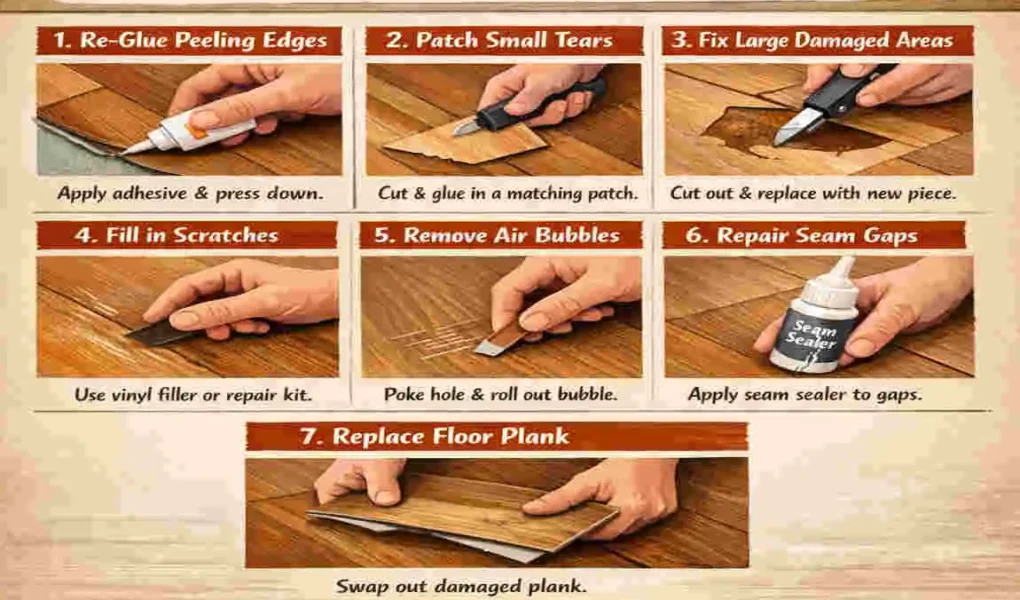
Repairing Peeling Edges
Peeling edges are perhaps the most annoying issue because they are a tripping hazard. This usually happens where two sheets meet or at the edge of a tile. The adhesive underneath has likely failed due to humidity or water from mopping.
Here is the good news: you can usually glue it right back down without adding new material.
Tools Needed:
- Vinyl flooring adhesive (or specialized vinyl glue)
- Putty knife
- Aluminum foil & an iron (or a heat gun)
- Heavy books or weights
Step-by-Step Instructions:
- Soften the Material: Vinyl becomes stiff as it ages. To manipulate it without cracking it, you need heat. Use a heat gun on a low setting or a hairdryer to warm up the peeling edge. It should become flexible.
- Clean Underneath: Gently lift the peeling flap. You will likely see dried, crusty old glue or dirt. Use your putty knife to gently scrape this debris away. Vacuum the crumbs out. If the subfloor is dirty, the new glue won’t bond.
- Apply the Adhesive: Squeeze a small amount of vinyl adhesive under the flap. You don’t want giant globs—just a thin, even layer. Use a toothpick or a small brush to spread it into the corners.
- Press and Wipe: Press the vinyl firmly back into place. Excess glue will likely squish out the sides. Immediately wipe this away with a damp cloth. Do not let it dry on the surface of your floor.
- Apply Heat and Pressure: This is a pro trick. Place a piece of aluminum foil over the repair and run a hot iron over it (carefully!) for a few seconds. This reactivates the glue and helps the vinyl relax.
- Weight It Down: Place a stack of heavy books or a heavy object over the repair. Leave it for at least 24 hours. This ensures the bond sets perfectly flat.
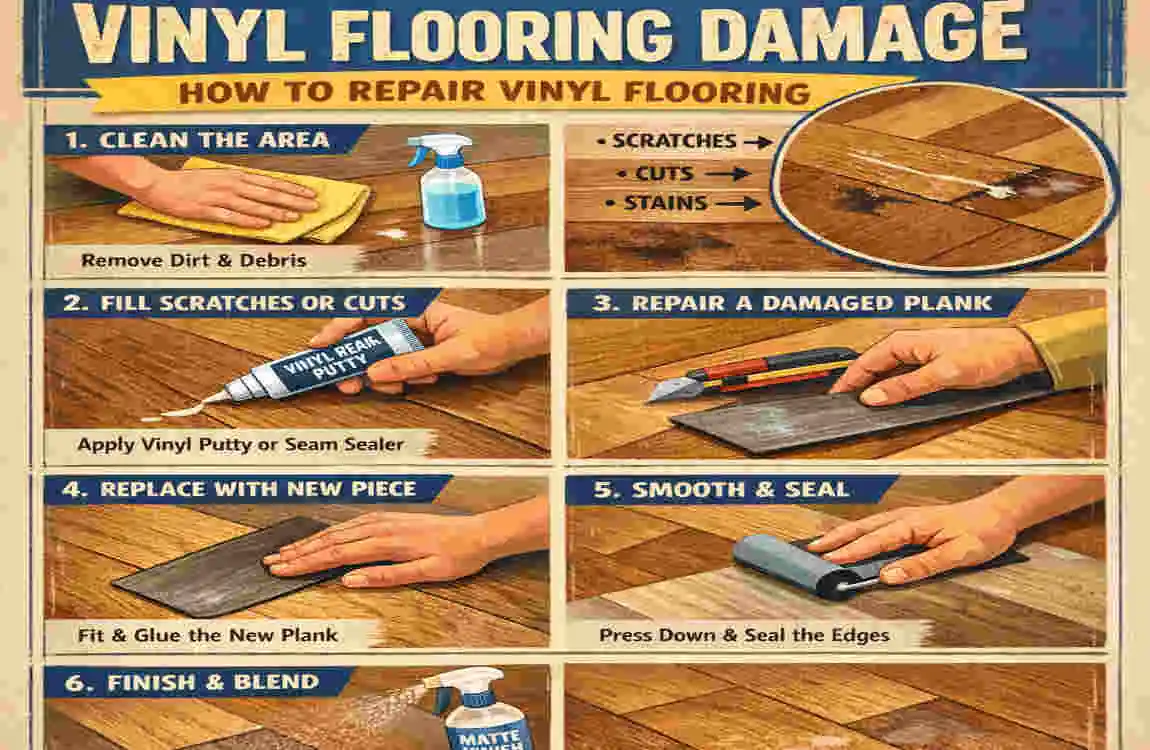
Patching Small Tears
Tears often happen when dragging appliances or dropping something sharp. A tear looks bad because it exposes the subfloor, which can absorb water. The best way to fix a significant tear is a “double-cut” patch method.
Tools Needed:
- A scrap piece of matching vinyl flooring
- Utility knife (razor sharp)
- Straight edge or metal ruler
- Vinyl adhesive
- Seam sealer (optional)
Step-by-Step Instructions:
- Find Your Match: You need a piece of vinyl that matches the pattern exactly. If you don’t have scraps left over from installation, you might be able to steal a piece from under the refrigerator or inside a closet.
- Align the Patch: Place the scrap piece of vinyl directly over the tear. Move it around until the pattern lines up perfectly with the floor below. Tape it down securely with painter’s tape so it doesn’t shift.
- The Double Cut: This is the most critical step. Take your utility knife and a straight edge. Cut through both the scrap piece and the damaged flooring underneath at the same time. You want to cut a square or rectangular shape around the tear.
- Why this works: By cutting both layers simultaneously, the new patch will be the same size and shape as the hole you are creating. It fits like a puzzle piece.
- Remove the Old Vinyl: Remove the scrap piece. Now, lift out the damaged square of flooring you just cut. You might need a putty knife to scrape it off the subfloor.
- Prep the Subfloor: Scrape away old adhesive, then vacuum the area.
- Glue the Patch: Apply adhesive to the subfloor. Place your new patch into the hole. It should fit seamlessly.
- Seal the Seams: If there are tiny gaps, use a clear liquid seam sealer to bond the patch edges to the existing floor.
- Roll It Out: Use a seam roller or a rolling pin to press the patch down firmly, ensuring it is level with the surrounding floor.
Troubleshooting: If the patch looks slightly higher than the floor, place a piece of wax paper over it and weigh it down overnight.
Filling Gouges and Deep Scratches
Sometimes you don’t have a tear, but a chunk of the vinyl is missing, or a heavy object has gouged a trench into the surface. Since you can’t just “glue it down,” you need to fill the void.
Difference Between Scratches and Gouges:
- Scratches are surface-level white marks.
- Gouges go deep, penetrating the color layer.
Tools Needed:
- Vinyl floor filler (paste) or acrylic caulk
- Colorant (to match the floor)
- Plastic putty knife
- Fine-grit sandpaper
- Clear floor finish/sealer
Step-by-Step Instructions:
- Clean the Gouge: Remove any loose debris or dirt from inside the gouge.
- Mix Your Filler: Most vinyl repair kits come with a base filler and several color pots. You will need to mix the colors to match your floor’s shade.
- Tip: Mix the color on a paper plate first and hold it next to the floor. The color often dries slightly darker, so aim for a perfect match or slightly lighter.
- Fill the Gap: Scoop a small amount of the mixture onto your putty knife. Press it into the gouge, overfilling it slightly (fillers shrink as they dry).
- Level It: Scrape the putty knife across the surface to level the filler with the floor. Wipe away excess from the surrounding area.
- Let It Dry: Follow the manufacturer’s instructions. This usually takes a few hours.
- Sand and Seal: Once dry, use very fine sandpaper to gently smooth the repair. Be careful not to sand the surrounding floor design. Finish by dabbing a little clear sealer or floor wax over the spot to restore the shine and protect the filler.
Smoothing Burns or Cigarette Marks
Accidents happen. Maybe a curling iron fell, or a cigarette dropped. Vinyl melts when exposed to high heat, leaving a charred or bubbled scar.
Quick Assessment: Is the burn just on the surface, or did it melt all the way through? If it is all the way through, use Fix 2 (Patching). If it is surface-level, follow these steps.
Tools Needed:
- Precision knife (X-Acto knife)
- Fine steel wool or sandpaper
- Vinyl seam sealer
- Nail polish remover (acetone) – use cautiously!
Step-by-Step Instructions:
- Scrape the Char: Use the tip of your precision knife to carefully scrape away the black, charred material. Do not dig too deep; just remove the burnt crust.
- Sand the Spot: Take a small piece of steel wool or fine sandpaper and gently buff the area. This helps smooth out the edges of the melted depression.
- Clean: Wipe the dust away with a damp cloth.
- Fill (If Necessary): If the burn left a divot, you can use the filler method from Fix 3 to level it out.
- Blend the Texture: If the burn was minor and you just sanded it, the spot might look dull. Apply a tiny drop of clear seam sealer or even clear nail polish (in a pinch) to fill the microscopic scratches and match the sheen of the rest of the floor.
Prevention: Always use heat-resistant mats under hot tools in the bathroom or kitchen to prevent this from happening again!
Fixing Loose or Buckled Seams
Sheet vinyl can sometimes buckle or bubble in the middle of a room, or the seams where two sheets meet can pop open. This usually happens due to temperature-induced expansion and contraction.
Tools Needed:
- Vinyl seam sealer kit (often comes with an applicator tip)
- Masking tape
- Rolling pin
Step-by-Step Instructions:
- Clean the Seam: If the seam has opened up, dirt has likely gotten in. Use a toothbrush and some soapy water to gently scrub the gap. Dry it thoroughly with a hairdryer.
- Tape It Off: Apply masking tape on both sides of the seam. This protects the good flooring from getting sealer on it.
- Apply Sealer: Insert the seam sealer nozzle into the gap. Draw a bead of sealer along the entire length of the loose seam.
- Note: If it is a “buckle” in the middle of the floor (no seam), you might need to make a small slit with a knife to release the air, then inject adhesive with a syringe.
- Press It Together: Remove the tape immediately. Press the seam edges together.
- Roll and Weight: Use your roller to flatten the seam. Place weights (books, bricks wrapped in a towel) along the seam and let it cure for at least 8 hours.
For Luxury Vinyl Plank (LVP): If a single plank is loose or buckling at the connection point, you can often use a rubber mallet to gently tap it back into the locking mechanism. If the lock is broken, you will need to glue the edge down using the steps above.
Buffing Out Light Scratches and Dull Spots
This is the easiest fix of all and deals with typical wear and tear. Over time, dragging chairs or walking with shoes can leave white, scuff-like scratches that dull the floor.
Tools Needed:
- Vinyl floor polish or restorer
- Microfiber mop or soft cloth
- Jojoba oil or WD-40 (for scuffs)
- Baking soda
Step-by-Step Instructions:
- The Tennis Ball Trick: For black scuff marks from shoes, take a clean tennis ball, cut an “X” in it, put it on the end of a broom handle, and rub the scuff. It acts like a giant eraser.
- Buffing Scratches: For light scratches, mix a paste of baking soda and water. Rub this gently into the scratch using a soft cloth. The mild abrasion buffs out the imperfection without damaging the pattern.
- Lubrication Hack: For minor white lines, apply a tiny amount of WD-40 or Jojoba oil on a cloth and rub it into the scratch. This darkens the scratch so it blends in with the floor. Wipe away all excess oil immediately to prevent the floor from becoming slippery.
- Overall Polish: If the whole room looks dull, clean the floor thoroughly and apply a specialized vinyl floor polish. This fills in micro-scratches and adds a protective layer, making the floor look brand new.
Sealing and Preventing Future Damage
Now that you have fixed the issues, let’s make sure you don’t have to do this again anytime soon. Sealing your vinyl flooring is a great way to extend its lifespan.
Tools Needed:
- High-quality vinyl floor sealer (check if your floor is “no-wax” or requires wax)
- Sponge mop
Step-by-Step Instructions:
- Deep Clean: You absolutely cannot seal a dirty floor. You will just seal the dirt in forever. Strip any old wax if necessary and scrub the floor well.
- Apply Sealer: Pour the sealer into a bucket. Dip your sponge mop in and wring it out so it is damp, not soaking.
- Spread evenly: Apply the sealer in thin, even coats. Avoid puddles. Work in sections, backing your way out of the room.
- Multiple Coats: Let the first coat dry (usually 30-60 minutes). Apply a second coat for better protection.
Maintenance Routine:
- Use felt pads on all furniture legs.
- Place doormats at entries to catch grit before it scratches the floor.
- Avoid rolling heavy appliances directly on the vinyl; use a sheet of plywood as a bridge.
Common Mistakes to Avoid
Even with the best intentions, DIY repairs can go wrong. Here are the most common pitfalls I see homeowners fall into when learning how to repair vinyl flooring:
- Using Too Much Glue: This is the mistake. Excess glue doesn’t make the bond stronger; it creates lumps and bubbles that look terrible and attract dirt.
- Skipping the Dry Time: I know you want to walk on your floor again, but if you remove the weights too early, the edges will curl up again. Patience is key.
- Wrong Adhesive: Do not use Super Glue or standard wood glue. They are brittle and will crack when the flexible vinyl floor moves. Always use an adhesive designed for vinyl.
- Not Cleaning the Subfloor: If you glue a patch down onto dust, you are essentially gluing it to the dust, not the floor. It will pop loose in a week.
Comparison: Repair Options at a Glance
Here is a quick reference table to help you decide which method fits your problem.
Damage Type, Difficulty Level, Time to Fix, Key Tool Needed
Peeling Edge Easy 30 Mins + Drying Vinyl Adhesive
Small Tear Moderate 1 Hour Utility Knife & Scrap Vinyl
Deep Gouge Easy 45 Mins Vinyl Filler Paste
Burn Mark Moderate 30 Mins Sandpaper / Knife
Buckled Seam Moderate 1 Hour + Drying Seam Sealer
Light Scratch Very Easy 10 Mins Baking Soda / Polish
FAQs
How long do vinyl flooring repairs last? If done correctly with the right adhesive and prep work, a repair can last 2 to 5 years or even match the remaining life of the floor.
Can I repair glue-down vinyl differently than I can repair click-lock vinyl? Yes. For click-lock (LVP) planks, it is often better to unclick the plank from the floor and replace the entire plank if the damage is severe. The methods in this guide (like patching) work best for glued-down sheet vinyl or glued planks.
How much does it cost to repair vs. hire a pro? Doing it yourself will cost between $20 and $50 for supplies. Hiring a professional flooring repairer usually requires a minimum trip charge, often starting at $150 to $300, even for a small repair.
Can I use a hair dryer to remove scratches from vinyl flooring? Not exactly. A hair dryer can help heat the vinyl to blend a repair or soften adhesive, but it won’t remove a scratch on its own. You need filler or polish for that.