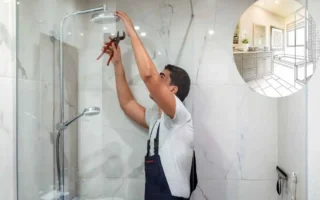
Are you staring at those dated, mustard-yellow bathroom tiles from the 1970s and feeling dread? You aren’t alone. Many of us want a fresh, modern bathroom, but the thought of a full-scale demolition is enough to make anyone want to close the door and forget about it. The dust, the noise, the skyrocketing labor costs, and the risk of hitting a hidden pipe are real concerns.
But what if I told you that you could achieve a high-end look without swinging a single sledgehammer? Learning how to cover bathroom wall tiles without removing them is the ultimate secret weapon for DIY enthusiasts and renters alike. It is a smart way to save money—often 70% to 80% compared to a complete renovation—and you can finish most of these projects over a single weekend.
Why Cover Bathroom Tiles Instead of Removing Them?

Before we dive into the “how,” let’s talk about the “why.” Traditional tile removal is an invasive process. It involves breaking ceramic, scraping away old mortar, and often replacing the drywall or backer board beneath it, which gets damaged during the process. This process can take weeks and leave your only bathroom out of commission.
When you choose to cover bathroom tiles without demolition, you are choosing efficiency. The cost is significantly lower—think $2 to $15 per square foot compared to the $20 to $50 you might spend on professional removal and replacement. Additionally, covering tiles provides an extra layer of protection for your walls, and it’sis a perfect solution for renters who aren’t allowed to make permanent changes.
However, it is essential to know when this is a good idea. If your tiles are falling off the wall or you have a significant mold problem behind them, you might need a deeper fix. But for dated styles, minor surface cracks, or just a desire for a new color, covering is the way to go.
Materials You’ll Need for Most Hacks
While each method has its own specific requirements, there are a few universal tools you should have on hand before you start your bathroom makeover.
Common Tool Kit:
- A high-quality degreaser or TSP (Trisodium Phosphate) for cleaning.
- Microfiber cloths and sponges.
- Measuring tape and a pencil.
- A utility knife or heavy-duty scissors.
- Level and straight edge.
- Silicone caulk and a caulking gun.
- Painter’s tape.
Estimated Budget Table:
Material Type, Estimated Cost (per sq ft), Difficulty Level, Best For
Peel-and-Stick Vinyl $2 – $5 Easy Renters & Beginners
Tile Paint/Epoxy $1 – $3 Moderate Custom Colors
Adhesive Panels $5 – $10 Moderate High-End Look
Waterproof Wallpaper $3 – $6 Easy/Moderate Patterns & Accents
Tile Decals $1 – $2 Very Easy Small Budgets
Shiplap Overlays $4 – $8 Advanced Farmhouse Style
Peel-and-Stick Vinyl Tile Overlays – The Easiest Fix
If you search for how to cover bathroom wall tiles without removing them, peel-and-stick vinyl is usually the first recommendation. Why? Because it is incredibly user-friendly. Modern vinyl overlays are a far cry from the cheap-looking stickers of the past. They now come with 3D textures, realistic grout lines, and waterproof finishes that can fool almost anyone.
Why Choose Peel-and-Stick?
These overlays are perfect for a quick transformation. They are moisture-resistant, which is vital in a bathroom setting, and they come in endless designs—from classic white subway tiles to intricate Moroccan patterns. If you are a renter, these are a godsend because most can be removed with a bit of heat from a hairdryer without damaging the original tile.
Step-by-Step Installation:
- Deep Clean: This is the most crucial step. Use a degreaser to remove all soap scum and oils. If the surface isn’t pristine, the adhesive won’t bond.
- Measure and plan: Start from the most visible corner. Measure your wall and plan where your cuts will fall so you don’t end up with a tiny sliver of tile at the edge.
- Peel and Align: Peel back a small portion of the backing. Align it with your level line and slowly press it onto the tile.
- Smooth it Out: Use a plastic smoothing tool or a soft cloth to push out any air bubbles.
- Seal the Edges: In a bathroom, moisture is your enemy. Apply a thin bead of clear silicone caulk along the edges where the vinyl meets the tub or vanity to prevent water from seeping behind the vinyl.
Paint Your Tiles for a Custom Color Pop
Can you really paint tile? Absolutely! Painting to cover bathroom wall tiles without removing them is one of the most transformative DIY projects you can undertake. It lets you completely change your room’s color palette for the price of a few cans of specialized paint.
Choosing the Right Paint
You can’t just use regular wall paint here. You need something that can handle humidity and constant cleaning. Epoxy-based paints are the gold standard for durability. They create a hard, glass-like finish that is scrubbable and water-resistant. If you are on a tighter budget, a high-quality acrylic tile paint can work, but it may require more frequent touch-ups.
How to Get a Professional Finish:
- Preparation is Key: Lightly sand the tiles with 200-grit sandpaper. You aren’t trying to remove the tile; you are just scuffing the glaze so the paint has something to “grab” onto.
- Prime: Use a high-adhesion primer designed explicitly for slick surfaces (like Rust-Oleum Tub & Tile).
- Apply the Paint: Use a high-density foam roller for a smooth finish. Apply 2-3 thin coats rather than a single thick coat to avoid drips.
- Let it Cure: This is where most people fail. You must let the paint cure for the full recommended time (usually 3-7 days) before using the shower. If you get it wet too early, the paint will peel.
Adhesive Wall Panels or Sheets
If you want a seamless, spa-like atmosphere, adhesive wall panels are your best bet. These are large sheets made of PVC, acrylic, or even thin stone veneers that you glue directly over your existing tiles. They are fantastic for quickly covering large areas and eliminating grout lines.
The Benefits of Panels
Panels offer a very high-end look. You can find options that mimic large slabs of marble, slate, or even concrete. Because there are fewer seams, there are fewer places for mold and mildew to grow, making your bathroom much easier to clean in the long run.
Installation Steps:
- Surface Prep: Just like the other methods, ensure the tiles are clean and dry.
- Dry Fit: Hold the panels up to the wall and trim them to fit around faucets and outlets using a jigsaw or a circular saw.
- Apply Adhesive: Use a heavy-duty construction adhesive (like Liquid Nails) in a “snake” pattern on the back of the panel.
- Press and Hold: Press the panel firmly against the tile. Use a J-roller to ensure total contact.
- Finish the Seams: Use matching trim pieces or silicone sealant at the corners and joints to ensure a 100% waterproof seal.
Wallpaper with Waterproof Liner
You might think wallpaper in a bathroom is a recipe for disaster, but modern technology has changed the game. Using wallpaper hacks to cover bathroom tiles without removing them is a trendy way to add bold patterns and textures that tiles can’t provide.
The Secret to Success
The trick is using marine-grade or vinyl wallpaper. These materials are designed to withstand moisture. For the best results on tile, use a “liner” first. A wallpaper liner is a thick, plain paper that covers the grout lines, providing a flat surface so the grout grid doesn’t show through your decorative wallpaper.
How to Apply:
- Prime the Tile: Use an oil-based primer to ensure the wallpaper paste sticks to the slick tile surface.
- Hang the Liner: Apply the liner horizontally to bridge the grout gaps.
- Hang the Wallpaper: Once the liner is dry, apply your waterproof wallpaper vertically.
- Seal the Deal: For extra protection, apply a thin coat of clear polycrylic over the wallpaper. This adds an invisible shield against steam and splashes.
Faux Tile Decals or Stickers
Are you working with a very tight budget? Or do you like your tiles, but they feel a bit boring? Tile decals are individual stickers designed to fit perfectly over a single tile. This is the ultimate “low effort, high reward” hack.
When to Use Decals
Decals are perfect for creating an “accent” look. You don’t have to cover every single tile. You can place them in a checkerboard pattern or create a “border” around the room. They are incredibly affordable—often around $1 per square foot—and take minutes to apply.
Shiplap or Wood Paneling Overlays
For those who love the rustic, farmhouse, or coastal look, shiplap is a fantastic way to hide ugly tiles. This method involves installing thin wood or MDF (Medium Density Fiberboard) planks directly over the tile.
Can Wood Survive a Bathroom?
Yes, but you have to be smart about it. You should use PVC shiplap or real wood that has been heavily treated and sealed. This method is best for the “dry” areas of the bathroom, such as the walls behind the vanity or toilet, rather than the shower stall itself.
How to install:
- Furring Strips: Since you can’t nail into tile easily, you can glue thin “furring strips” (thin pieces of wood) to the tile using construction adhesive.
- Attach the Planks: Nail or glue your shiplap planks to these strips.
- Caulk the Gaps: Fill any nail holes with wood filler and caulk the gaps between the planks and the ceiling/floor.
- Paint and Seal: Use a high-quality bathroom paint to finish the look and protect the wood from humidity.
Bathroom Tile Skins or Membranes
If you are looking for a professional-grade solution, especially for curved walls or shower interiors, tile skins or membranes are the way to go. These are fragile, flexible materials that are engineered to bond to existing surfaces.
Why Pro-Grade?
These membranes are often used in commercial settings because they are incredibly durable. They are thinner than traditional panels, which means they don’t “bulk out” your walls as much. This is important if you have tight clearances around your sink or toilet.
The Process:
- Adhesive Roll-on: You typically roll a specialized adhesive onto the existing tile.
- Apply Membrane: The flexible skin is rolled out over the adhesive.
- Smooth and Trim: Because it is flexible, you can easily wrap it around corners or into niches.
- Top Coat: Some systems require a clear top coat to finish the waterproofing process.
Common Challenges and How to Overcome Them

While learning how to cover bathroom wall tiles without removing them is easier than a full demo, it isn’t without its hurdles. Here are three common issues you might face and how to fix them:
- Uneven Surfaces: If your original tiles are crooked or have deep grout lines, your new covering might look “bumpy.”
- Solution: Use a self-leveling compound or a thick wallpaper liner to create a flat starting point.
- Persistent Moisture: If your bathroom has poor ventilation, any covering can eventually peel.
- Solution: Always use silicone sealant on every edge and corner. Also, consider upgrading your exhaust fan to keep the air dry.
- The “Renter’s Dilemma”: You want a change, but you need your security deposit back.
- Solution: Stick to peel-and-stick vinyl or decals. Avoid heavy-duty construction adhesives or paints that require sanding.
FAQ: Covering Bathroom Wall Tiles Without Removing Them
Q: Is it safe to cover tiles in the shower area?
A: Yes, but you must use specific materials. Epoxy paint, PVC panels, and certain high-end vinyl overlays are waterproof. Always seal the edges with 100% silicone caulk to prevent water from being trapped behind the new layer.
Q: How long do these covers usually last?
A: Depending on the method and the quality of installation, these hacks can last anywhere from 5 to 10 years. Paint and panels tend to last the longest, while decals may need to be replaced sooner in high-traffic areas.
Q: Can I cover floor tiles using these same methods?
A: You can use peel-and-stick floor vinyl or floor-specific epoxy paint. However, because floors take a lot of “foot traffic” abuse, you need to ensure the product is rated explicitly for floors. Wall decals will not hold up on a floor.
Q: Will covering tiles make my bathroom feel smaller?
A: Most of these materials (like paint, decals, and vinyl) are less than 1/8th of an inch thick so you won’t notice a difference. Even shiplap or panels only add about 1/4 to 1/2 inch, which is usually negligible even in small bathrooms.