Dreaming of a garden that looks neat, feels usable, and works better in everyday life? If your yard is uneven, muddy, or hard to manage, sleepers can help you shape it into a more level and practical space.
What Are Sleepers and Why Use Them?
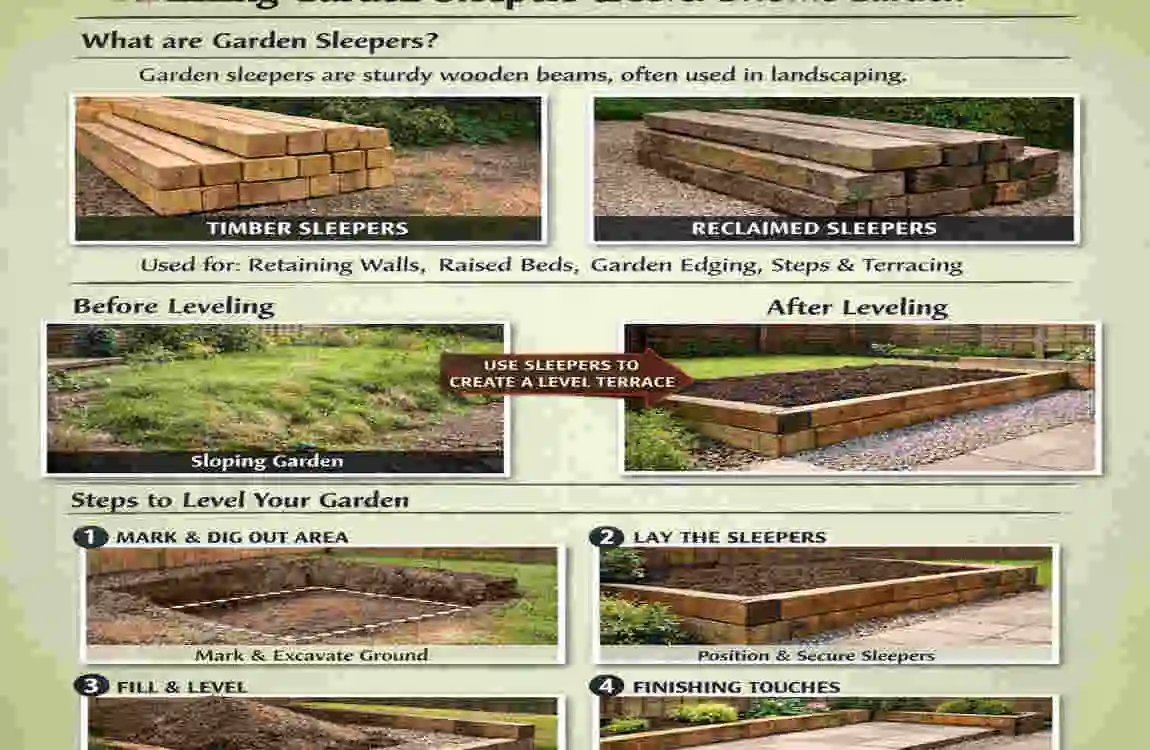
What are sleepers?
Sleepers are long, strong beams used in gardening and landscaping. They can be made from wood, concrete, or recycled materials. People often use them to build borders, raised beds, retaining edges, and level sections in a garden.
They are popular because they are sturdy, easy to work with, and can give a garden a natural, clean look.
Why sleepers are a smart choice
Sleepers are a great option for garden leveling because they bring together strength and style. They can hold soil in place, shape uneven ground, and create clear edges that make the garden look more organized.
Here are the main reasons people choose them:
- Durability: They can last for years when installed properly.
- Aesthetic appeal: They blend well with plants, grass, and stone.
- Ease of use: You can install them with basic tools and a clear plan.
When should you level your garden?
You may want to level your garden if you notice:
- Uneven ground that makes walking difficult
- Water pooling after rain
- Trouble laying turf or planting beds
- A slope that makes the garden hard to use
If any of these sound familiar, sleepers can be a practical fix.
Tools and Materials You Will Need
Essential tools
Before you begin, gather the tools you’ll need to measure, dig, level, and secure the sleepers.
ToolPurpose
Shovel Digging and moving soil
Spirit level : Checking that sleepers are level
Wheelbarrow carrying soil, gravel, or waste
Tape measure : Measuring the area accurately
Power drill , fixing sleepers together
Hammer is helpful for positioning and adjustments
Saw cutting sleepers to size if needed
Materials
You will also need a few basic materials to build a strong base and keep the sleepers in place:
- Sleepers: Wooden or concrete, depending on your design
- Gravel or hardcore: For a firm foundation
- Geotextile fabric: Optional, but useful for weed control
- Screws, spikes, or metal brackets: To secure the sleepers
Choosing good materials at the start makes the whole job easier and helps your garden stay stable longer.
How to Prepare Your Garden
Step 1: Assess the area
Start by looking closely at the space you want to level. Walk around it and notice where the ground rises and falls. Use a tape measure to clearly mark the area.
It helps to place string or markers to see the project’s shape before you begin digging.
Step 2: Clear the space
Remove anything that gets in the way. This may include:
- Plants
- Stones
- Old edging
- Debris
- Small structures or leftover materials
A clean area gives you a better base to work from and reduces mistakes later.
Step 3: plan the layout
Think about where the sleepers will go. Do you want one level area, a raised edge, or a stepped design? Sketch a simple plan on paper before you start.
This small step can save you time and help you avoid changing things halfway through the project.
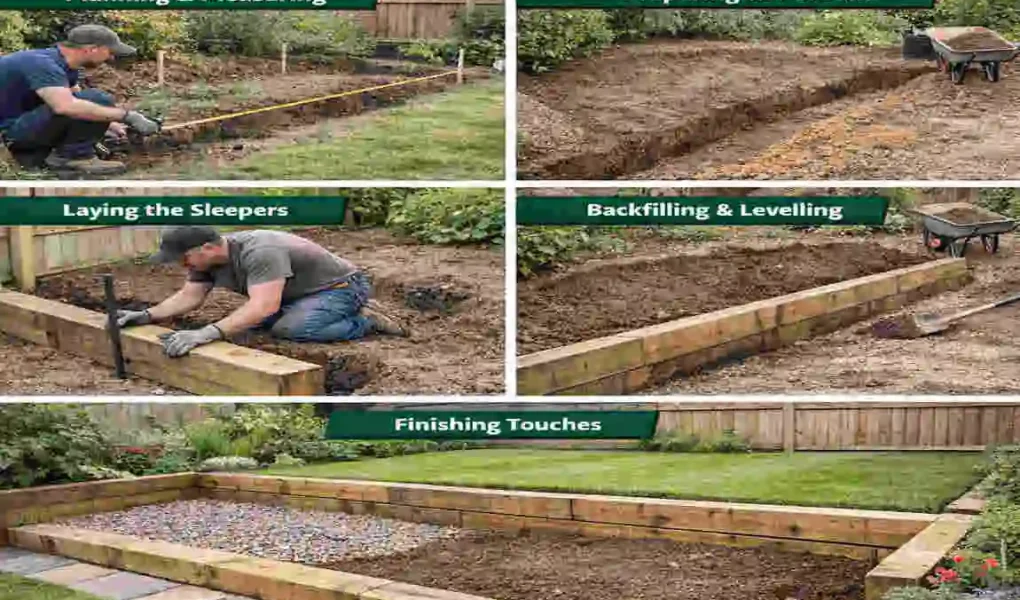
Step-by-Step Guide: How to Level a Home Garden with Sleepers
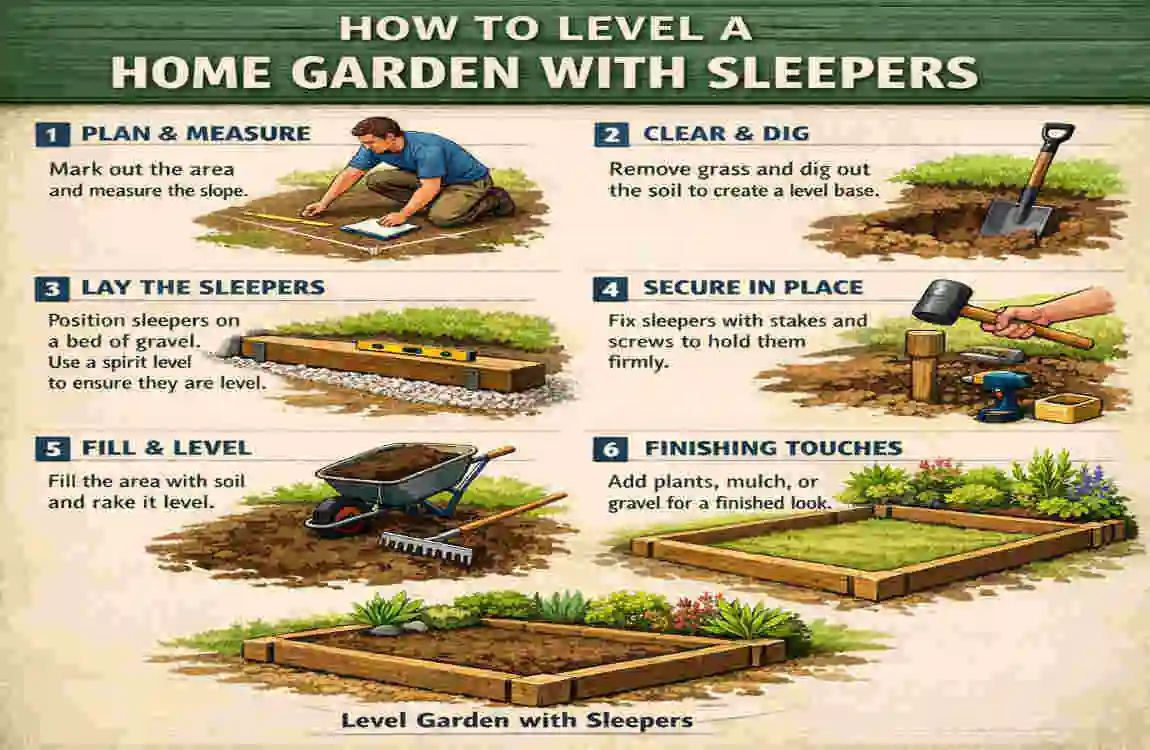
Step 1: Create a solid foundation
Dig a shallow trench where the sleepers will sit. The trench should be deep enough to hold the sleepers securely and help them stay in place.
After that, add a layer of gravel or hardcore. This gives the sleepers a firm, stable base and helps with drainage, too.
A solid foundation is one of the most important parts of the job. Without it, the sleepers may move over time.
Step 2: Position the sleepers
Place the sleepers into the trench and check their position carefully. Use the spirit level to make sure they are straight and even.
If you are building a raised section or a border, make sure each sleeper lines up with the next one. Take your time here, because accuracy at this stage makes the final result much better.
Step 3: Secure the sleepers
Once the sleepers are in place, secure them with screws, spikes, or metal brackets. This keeps them from shifting later.
If you are using wooden sleepers, make sure the fixings are strong enough for outdoor use. If you are using concrete sleepers, ensure your support system can handle the additional weight.
For long-term stability, make sure every sleeper is fixed tightly and checked more than once.
Step 4: Fill and compact the soil
Now add soil, compost, or another suitable filling material behind or around the sleepers. Spread it evenly so the surface rises to the level you want.
Then compact the soil by pressing it down firmly. This helps remove air pockets and creates a stronger, more even surface.
If the area will be used for planting, add compost to improve the soil quality.
Step 5: Add the finishing touches
This is the part where your garden starts to look finished. You can add:
- Turf
- Gravel
- Decorative stones
- Flower beds
- Potted plants
You can also stain or treat wooden sleepers if needed to help protect them from weather damage.
Common Mistakes to Avoid
Poor planning
Many problems begin with poor planning. If you do not measure the area properly, the sleepers may not fit well. Also, do not forget about drainage. Water needs a way to move away from the leveled area.
Using the wrong materials
Low-quality sleepers may rot, crack, or shift too soon. It is worth choosing materials that are strong and suitable for outdoor use.
Skipping the foundation
This is one of the biggest mistakes. If you place sleepers directly on soft ground, they may sink or move over time. A proper gravel base makes a huge difference.
Neglecting maintenance
Even a well-built sleeper project needs care. Check for signs of wear, movement, or rotting wood from time to time. A little maintenance now can prevent bigger problems later.
Benefits of a Leveled Home Garden with Sleepers
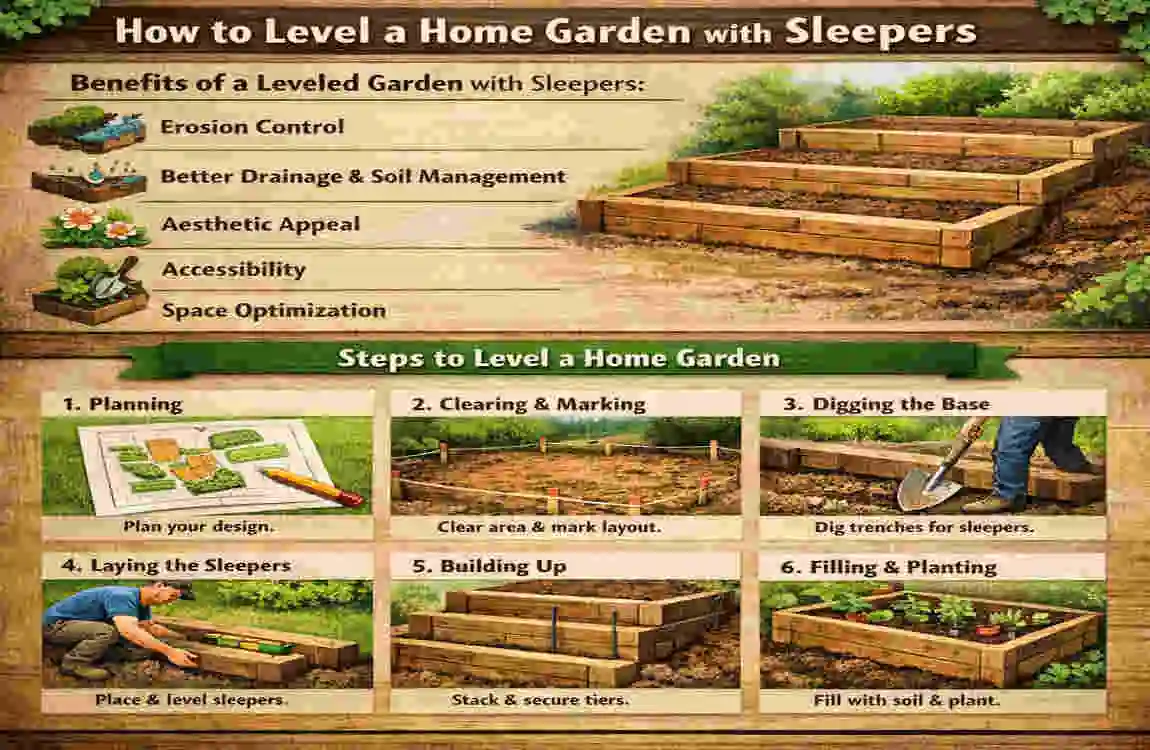
Improved appearance
A level garden looks tidy, balanced, and well cared for. Sleepers also add a natural design feature that can make the whole space feel more finished.
Better use of space
When the ground is level, the garden becomes easier to enjoy. You can walk safely, place furniture more easily, and create better planting areas.
Higher property value
A neat and usable garden can make your home more appealing. Buyers often notice outdoor spaces, and a well-kept garden can create a strong first impression.
Better drainage and eco-friendly use
A properly planned garden can manage water more effectively, helping reduce muddy patches and standing water. If you use recycled or sustainably sourced sleepers, you also make a greener choice.
FAQs About Leveling a Home Garden with Sleepers
How do I choose the right sleepers for my garden?
Choose sleepers based on your budget, style, and the level of strength you need. Wooden sleepers are common and natural-looking. Concrete sleepers are heavier and often more durable.
What is the best type of wood for sleepers?
Hardwoods and treated softwoods are both popular. Treated wood usually lasts longer outdoors because it resists moisture and decay better.
How long does it take to level a garden with sleepers?
It depends on the area’s size and the design’s complexity. A small project may take a weekend, while a larger one may take several days.
Can I install sleepers on a sloped garden?
Yes, you can. In fact, sleepers are often used to manage slopes. They can help create terraces or raised sections that make a sloped garden easier to use.
What maintenance do sleepers need over time?
Check them regularly for movement, damage, or signs of rot. Wooden sleepers may need treatment from time to time, while concrete sleepers usually need less care.
| Step | What to Do | Why It Matters | Main Tools/Materials |
|---|---|---|---|
| Assess the area | Measure the garden and mark high and low spots. | Helps you plan the level correctly. | Tape measure, string, stakes |
| Clear the space | Remove plants, stones, and debris. | Gives you a clean work area. | Shovel, wheelbarrow |
| Dig a trench | Make a shallow trench where the sleepers will sit. | Creates a stable base. | Shovel, spade |
| Add foundation | Put gravel or hardcore in the trench. | Prevents sinking and improves drainage. | Gravel, tamper |
| Place sleepers | Set the sleepers in position and check with a spirit level. | Keeps the garden level and even. | Sleepers, spirit level |
| Secure sleepers | Fix them with screws, spikes, or brackets. | Stops movement over time. | Drill, fixings |
| Fill and finish | Add soil, compact it, and finish with turf or plants. | Makes the garden usable and neat. | Soil, compost, turf |