It’s a Saturday evening, you have friends over for dinner, and the conversation is flowing just as smoothly as the red wine. Suddenly, a hand gestures a little too enthusiastically, and splash—a dark crimson puddle spreads across your beautiful, wood-look floor.
If you have luxury vinyl plank (LVP) flooring, your first reaction might be panic. But here is the good news: don’t panic. One of the reasons you likely chose this flooring is because of its incredible resilience and water resistance. However, just because it is tough doesn’t mean it is invincible.
Luxury vinyl flooring has skyrocketed in popularity, with market reports showing LVP sales up over 20% in 2025 alone. It gives you that high-end aesthetic of hardwood or stone without the high-maintenance headache or the steep price tag. But here is the catch—many homeowners treat it exactly like old-school linoleum or, worse, like ceramic tile. Treating it the wrong way can lead to dullness, scratches, and a voided warranty.
What Is Luxury Vinyl Flooring and Why Proper Cleaning Matters
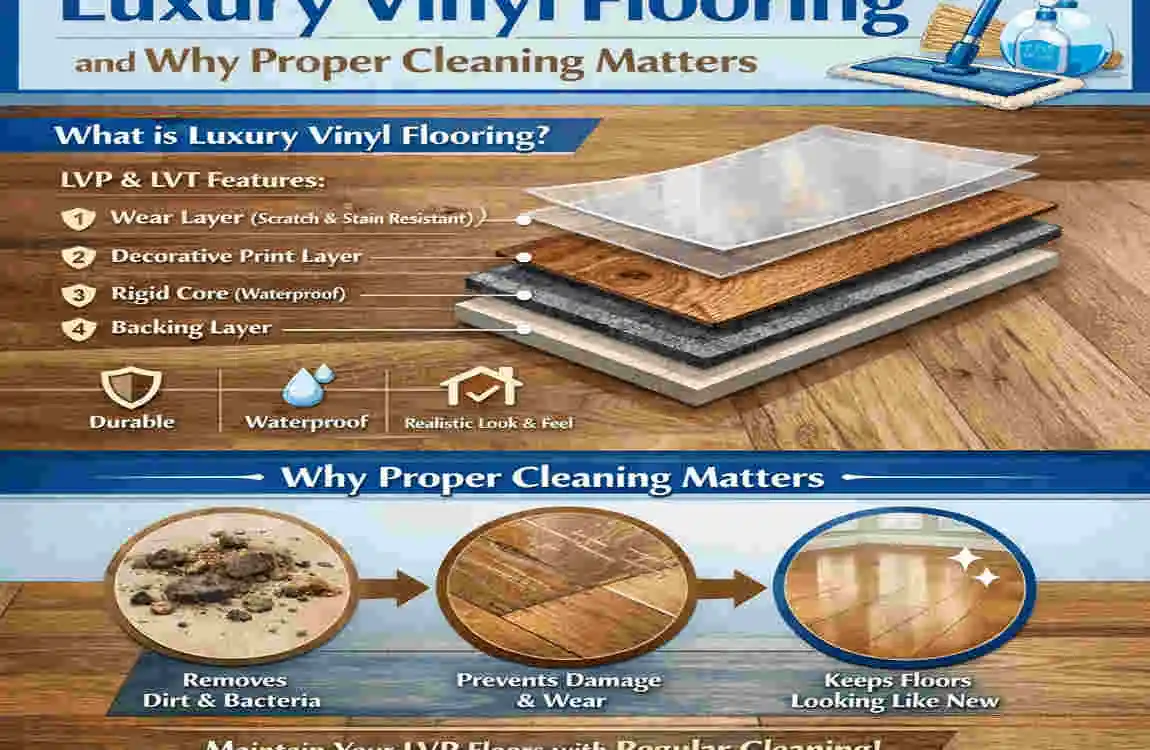
Before we start scrubbing, it is really important to understand what you are actually cleaning. Understanding luxury vinyl flooring before you clean is half the battle. Unlike the peel-and-stick vinyl of the 1980s, modern Luxury Vinyl Plank (LVP) or Luxury Vinyl Tile (LVT) is a sophisticated piece of engineering.
Think of your floor like a high-tech sandwich. It is generally made up of four distinct layers:
- The Backing Layer: This is the bottom of the plank that sits on your subfloor. It provides stability and sound insulation.
- The Core Layer: This is the rigid spine of the floor, often waterproof (like WPC or SPC cores), giving the plank its durability.
- The Print Film: This is the “pretty” part—a high-resolution photograph of wood, stone, or ceramic that gives the floor its realistic look.
- The Wear Layer: This is the clear, protective top coat. It is usually made of urethane and is designed to resist scratches and stains.
Why does this anatomy lesson matter?
When you are learning how to clean luxury vinyl flooring, your main goal is to protect that top wear layer. If you use harsh chemicals, abrasive scrubbers, or steam mops that are too hot, you can degrade this clear coat. Once the wear layer is gone, the print film is vulnerable. If that print film gets damaged, there is no sanding it down like real wood—you have to replace the plank.
Furthermore, improper cleaning can lead to “hazing.” This happens when residue from the wrong cleaner builds up on the surface, making your shiny floors look permanently dull and dirty, no matter how much you mop. By following the right steps, you protect the integrity of these layers, ensuring your floor remains waterproof, scratch-resistant, and vibrant.
Essential Tools and Supplies for Cleaning Luxury Vinyl Flooring
You wouldn’t try to paint a masterpiece with a toothbrush, and you shouldn’t try to clean your luxury floors with substandard tools. Having the right equipment makes the job faster, easier, and safer for your floors.
Here is a list of the tools you need to clean luxury vinyl flooring safely, along with why they are essential:
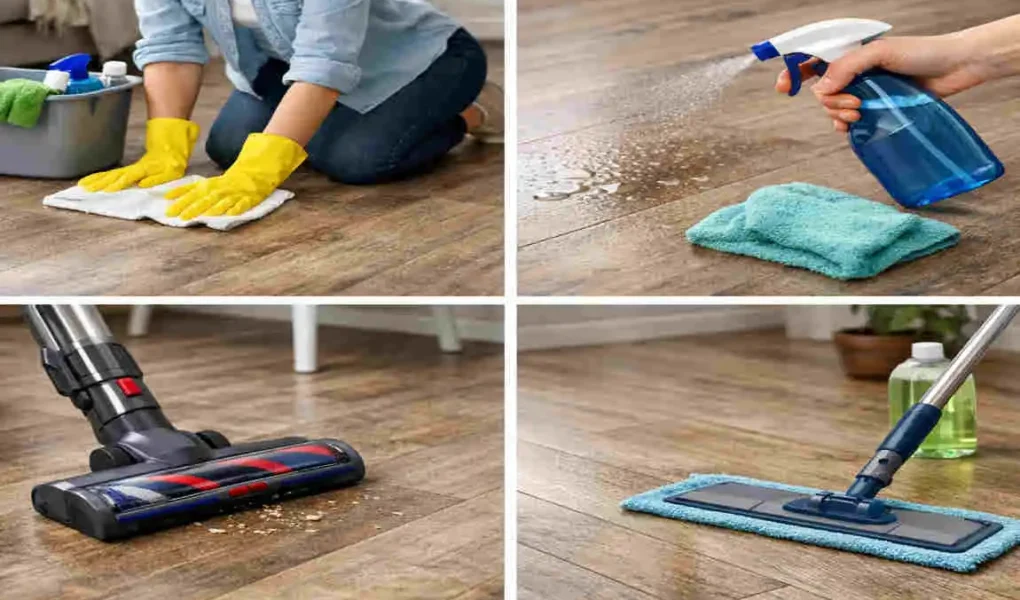
- Microfiber Mop and Cloths: This is non-negotiable. Old-school string mops hold too much water and push dirty water around. Microfiber uses static electricity to trap dust and dirt particles effectively without scratching the surface. Plus, they wring out almost dry, which is crucial for LVP.
- A High-Quality Vacuum: You need a vacuum that features a “hard floor” setting. Crucial: Make sure you can turn off the “beater bar” (the rotating bristle brush). That brush is great for digging into carpets, but it can micro-scratch your vinyl wear layer over time.
- Soft-Bristle Brush: Sometimes, dirt gets stuck in the textured grain of the vinyl. A soft nylon brush helps gently dislodge this grime without being abrasive.
- Two-Bucket System: If you are using a mop and bucket, use one bucket for your cleaning solution and a second bucket with plain water for rinsing your mop head. This ensures you aren’t mopping your floor with dirty water.
- pH-Neutral Cleaner: You want a cleaner specifically designed for vinyl or a pH-neutral option. Avoid anything with “polish” or “wax” in the title, and steer clear of ammonia or bleach.
- Spray Bottle: For spot cleaning or applying DIY solutions, a fine-mist spray bottle is your best friend. It controls the amount of moisture you put on the floor.
Pro Tip: If you are considering a steam mop, check your flooring manufacturer’s warranty first. Most manufacturers advise against them because the intense heat can force moisture between the seams and weaken the adhesive. If you must use one, ensure it has a variable heat setting and keep it on the lowest possible option.
Daily and Weekly Maintenance: Quick Wins to Keep LVP Spotless
The secret to a consistently clean home isn’t a massive deep clean once a month; it is small, consistent actions. By adopting a simple routine, you stop dirt from grinding into the finish. Here are easy ways to clean luxury vinyl flooring daily and weekly.
The Daily Routine: Dust Defense
The biggest enemy of luxury vinyl is dust and grit. Think of dirt particles like tiny shards of glass. When you walk on them, they dig into the wear layer.
- Sweep or Vacuum: Every day (or at least every other day), do a quick pass with a soft broom or your vacuum (remember: beater bar off). This removes the loose debris that causes scratches.
- Spot Clean Spills: Accidents happen. If you drop water, juice, or pet messes, wipe them up immediately. Even though LVP is water-resistant, acidic liquids (like wine or juice) can eventually stain if left to dry, and standing water can seep into the seams.
The Weekly Routine: The Refresh
Once a week, do a slightly more thorough clean to remove any buildup that the vacuum missed.
- Inspect the Floor: Look for scuff marks or dried spots.
- Damp Mop: Notice I said damp, not wet. Dip your microfiber pad into a pH-neutral cleaning solution (we will discuss recipes later), wring it out until it is barely moist, and run it over the floor.
- Check Furniture Pads: Take a quick look at the legs of your chairs and tables. Felt pads can wear down or fall off. Replacing a felt pad takes ten seconds; replacing a scratched plank takes hours.
Visualizing Success: Imagine lifting your area rug. If the floor underneath looks significantly brighter than the exposed floor, your daily maintenance might need a boost. The goal is for the high-traffic areas to look identical to the protected areas.
Step-by-Step Guide: How to Deep Clean Luxury Vinyl Flooring Like a Pro
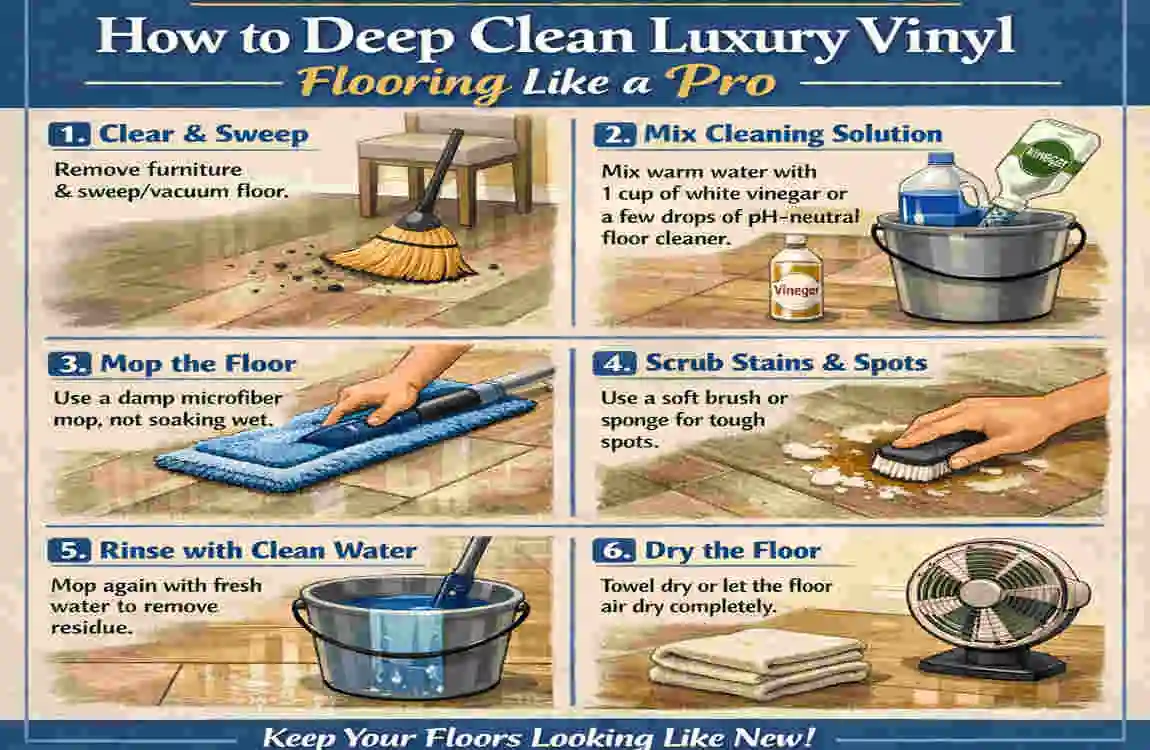
Okay, so you have kept up with the daily sweeping, but now it is time for the main event. Maybe you are spring cleaning, or maybe the floors look a little lackluster. It is time to learn how to clean luxury vinyl flooring deeply.
Follow this routine to get that showroom shine back without risking damage.
Preparing Your Space for LVP Cleaning
Don’t rush straight to the mop. Preparation is key.
Start by removing as much furniture as possible from the room. If you can’t move heavy items like sofas, move the lighter chairs and tables. You want a clear path. Next, protect your baseboards. If you are going to be mopping near the edges, give your baseboards a quick dust first so that you don’t drag dust from the wall onto your wet floor. Finally, do a “test spot” with your chosen cleaner in an inconspicuous corner (like a closet or under the fridge) to ensure it doesn’t leave a film or cause discoloration.
The Ultimate Deep Cleaning Routine
Here is the exact method professional cleaners use:
The “Detailed” Vacuum goes beyond the quick daily sweep. Use the wand attachment of your vacuum to get into the corners and along the baseboards. Dust bunnies love to hide here, and if you get them wet, they turn into sludge. Vacuum the main floor area thoroughly, going over high-traffic spots twice.
Mix Your Solution. You don’t need expensive chemicals. A fantastic DIY solution is Apple Cider Vinegar (ACV).
- Recipe: Mix 1 cup of Apple Cider Vinegar with 1 gallon of warm (not scalding) water. The acidity in the vinegar helps break down dirt and grime without leaving a soapy residue, and it disinfects naturally. If you prefer a store-bought cleaner, use a specialized LVP cleaner like Bona.
The “Figure 8” Mop Method: Dip your microfiber mop into the solution and wring it out thoroughly. The mop should be damp, not dripping. Start in the corner farthest from the exit. Move the mop in a “Figure 8” motion. This technique keeps the dirt on the leading edge of the mop, rather than spreading it back and forth. Rinse your mop head frequently in a separate bucket of clean water to avoid pushing dirt around.
The Rinse (If using soap) If you used dish soap or a commercial cleaner that isn’t “rinse-free,” you must do a rinse pass. Go over the floor again with a mop dampened only with plain water. This removes detergent residue that attracts more dirt later. If you used the vinegar mixture, a rinse is usually not necessary.
Buff It Dry. This is the step most people skip, but it is the secret to a streak-free shine. Take a clean, dry microfiber cloth or a dry mop pad and buff the floor. This removes any lingering moisture spots and polishes the wear layer.
Handling Stubborn Stains on Luxury Vinyl Floors
Sometimes, a mop isn’t enough. You might have tough stains like marker, grease, or scuffs. Here is a quick reference guide on how to tackle them without destroying your floor.
Stain Type Pro Secret Fix Time to Act
Grease / Oil: Make a paste of baking soda and water. Apply to the spot, let it sit for 5 minutes, then wipe clean. Less than 5 mins
Ink / Makeup / Marker: Apply a small amount of rubbing alcohol to a white cloth and gently dab the stain. Do not scrub hard. Immediate
Pet Urine clean up the liquid, then use an enzyme-based cleaner to break down odor-causing bacteria. Within the hour
Scuff Marks: Rub the scuff vigorously with a tennis ball or use a melamine sponge (Magic Eraser) very gently. When noticed
Nail Polish: Use an acetone-free nail polish remover. Test in a corner first! Immediate
Pro Secrets to Clean Luxury Vinyl Flooring Without Scratching
You now know the cleaning routine, but let’s take it a step further. How do you keep the floor looking like it was installed yesterday? Here are the insider tips to clean luxury vinyl flooring without scratching and maintain that factory finish.
The Tennis Ball Trick. This sounds strange, but it works like magic. If you have black scuff marks from shoes or furniture, take a clean tennis ball. Cut an “X” in the top and pop it on the end of a broom handle (or hold it). Rub the ball over the scuff mark. The texture of the tennis ball grips the rubber scuff and lifts it right off without using any abrasive chemicals.
The “Doormat Defense”: The best way to clean dirt is to keep it out of the house entirely. Place a high-quality doormat at every entrance to your home. Look for mats that are labeled “non-staining” (some rubber-backed mats can turn vinyl yellow due to a chemical reaction). A good mat catches 80% of the debris that would otherwise end up on your floor.
The Olive Oil Polish. Does your floor look clean but a little dry? You can make a natural polish.
- Mix: 1 cup of water, 1 cup of vinegar, and 1 tablespoon of olive oil. Spray this lightly and buff it into the floor. The vinegar cleans, and the tiny amount of oil adds a subtle sheen. Warning: Do not use too much oil, or the floor will become slippery.
Sunlight Management We love natural light, but UV rays are harsh. Over time, strong direct sunlight can fade the print film of your LVP. To prevent this, use sheer curtains or blinds during the brightest parts of the day.
Case Study: The High-Traffic Home. Consider a recent home makeover in a busy household in Lahore (or any bustling city!). The family had installed beautiful grey oak LVP. However, with three kids and the dusty environment, the floors looked perpetually matte and dusty. They switched from using a standard wet mop with detergent (which was leaving a sticky film that trapped the dust) to the dry vacuum + vinegar damp mop method. Within two weeks, the “haze” lifted, and the original satin sheen of the floor returned. The key wasn’t more cleaning; it was smarter cleaning.
Common Mistakes When Cleaning LVP Floors (And How to Avoid Them)
Even with the best intentions, you can accidentally damage your floors. Let’s look at the mistakes that ruin luxury vinyl flooring cleaning so you can avoid them.
Using Too Much Water I cannot stress this enough: LVP is water-resistant, not waterproof-submersible. If you flood the floor with water, liquid can seep through the tiny cracks and gaps between the planks. Once water gets under the floor, it can cause mold, mildew, and warping.
- The Fix: Always wring your mop out until it is just damp. The floor should air dry within 2-3 minutes of mopping.
Relying on “Mop and Shine” Products. Products that promise to clean and wax in one step are usually bad news for vinyl. They leave behind a layer of wax that builds up over time. Eventually, this wax turns yellow and starts to peel.
- The Fix: Stick to pH-neutral cleaners that leave zero residue. If you want shine, buff the clean floor with a dry cloth.
Using abrasive scrubbers, steel wool, and harsh scouring pads is banned from LVP care. They will instantly scratch the wear layer, leaving dull patches that attract dirt.
- The Fix: Stick to microfiber or soft nylon brushes. If a stain is stubborn, use patience and the right chemical solvent (like rubbing alcohol) rather than brute force.
Steam Mopping on High Heat: Steam mops force superheated steam into the pores and seams of the floor. This can cause the vinyl layers to delaminate (peel apart).
- The Fix: If you love steam, only use a mop specifically rated for vinyl, and never use the max setting.
Best Cleaners and Products for Luxury Vinyl Plank Floors in 2026
As we move through 2026, the market is shifting toward eco-friendly and residue-free cleaners. You don’t need a cabinet full of chemicals, just a few reliable products.
Here is a curated list of top-performing products for this year:
Product Name: Why It Works for LVP Estimated Price
Bona Hard-Surface Floor Cleaner: The gold standard. It is water-based, non-toxic, and dries fast with absolutely no streaks. $15 – $25
Rejuvenate All-In-One Floor Restorer. If your floors are older and look a bit dull, this fills in micro-scratches and adds a protective layer. $20 – $30
Better Life Naturally Dirt-Destroying Cleaner: A plant-based option that smells like peppermint and citrus. Safe for pets and kids. $12 – $18
Aunt Fannie’s Vinegar Wash : A concentrated vinegar solution that takes the guesswork out of DIY mixing. $10 – $15
FAQs: How to Clean Luxury Vinyl Flooring
You’ve got questions, we’ve got answers. Here are the most common things homeowners ask about LVP care.
How do I clean luxury vinyl flooring naturally? The best natural cleaner is a mixture of apple cider vinegar and warm water (1 cup vinegar to 1 gallon water). It cleans without harsh fumes and is safe for pets.
Can you use a Swiffer on LVP? Yes, you can! However, stick to the “Wet” pads that are pH balanced, or use the dry duster pads. Avoid the “WetJet” types if the solution they use is aggressive or leaves a sticky residue.
How often should I deep clean my floors? For most homes, a deep clean (mopping with solution) is needed once a week. If you live alone or have a “no shoes” policy, you might get away with every two weeks. High-traffic homes with pets might need a spot mop every few days.
Will vinegar damage my vinyl floors? Undiluted vinegar is too acidic, but when diluted with water, it is perfectly safe and effective. It helps cut through grease and neutralizes odors without harming the wear layer.