Have you ever walked into your bathroom, flipped the switch, and noticed that your exhaust fan sounds more like a jet engine than a quiet ventilator? Or perhaps you’ve looked up and realised that the once-bright light is now struggling to shine through a thick layer of grey fuzz. If this sounds familiar, you aren’t alone. Most of us ignore our bathroom fans until they start making scary noises or stop working altogether.
The truth is, learning how to clean the bathroom fan with the light unit is one of the most rewarding 30-minute DIY projects you can tackle. Not only does it make your bathroom look cleaner, but it also improves the air quality of your entire home. When a fan is clogged with dust, it can’t pull moisture out of the room. This leads to foggy mirrors, peeling wallpaper, and the dreaded growth of mould and mildew.
Why Clean Your Bathroom Fan Regularly

It is easy to forget about things that are literally “out of sight, out of mind,” but your bathroom fan is a workhorse that deserves some love. If you’ve been putting off this chore, understanding the health and performance benefits might give you the push you need.
Health Risks of a Dirty Fan
When your fan is caked in dust, it stops doing its primary job: removing moisture. Bathrooms are naturally damp, and without proper ventilation, that moisture stays trapped. This creates a perfect breeding ground for mould and allergens. If you or your family members have allergies or respiratory issues, a dirty fan could make things worse.
Poor ventilation means that every time you shower, you are potentially inviting spore growth into your drywall and grout. A clean fan ensures that damp air is sucked out quickly, keeping your lungs—and your walls—much healthier.
Performance and Efficiency Boosts
Did you know that a dirty fan can lose up to 50% of its efficiency? When dust builds up on the blades, it adds weight and creates friction. The motor has to work twice as hard to spin, which leads to that annoying, loud humming or rattling sound.
By cleaning the unit, you allow the motor to breathe. This results in quieter operation and a much longer lifespan for the appliance. Furthermore, a clean fan uses less electricity. When the motor doesn’t have to fight through layers of grime, it draws less power, which can actually save you a few dollars on your monthly energy bill.
How Often Should You Do It?
Most experts recommend a deep clean every 3 to 6 months. However, if you live in a particularly dusty area or have a large family that uses the shower frequently, you might want to do a quick wipe-down every month. Keeping a regular schedule prevents the dust from hardening into a “greasy” layer that is much harder to remove later.
Issue Before Cleaning After Cleaning
Airflow Weak, noisy, and inefficient Strong, quiet, and powerful
Light Quality Dim, yellowed, and dusty Bright, clear, and refreshing
Energy Use High (motor struggles) Up to 20% lower efficiency gain
Mould Risk High due to trapped humidity , Low due to fast moisture removal
Tools and Materials Needed
Before you climb up that ladder, you want to make sure you have everything you need right at your fingertips. There is nothing more frustrating than getting halfway through a job and realising you forgot a specific screwdriver.
To get your bathroom vent fan cleaning done right, gather these items:
- A sturdy step ladder: Safety first! Don’t try to balance on the edge of the bathtub.
- Screwdrivers: Usually a Phillips-head or a flathead, depending on your fan model.
- Vacuum cleaner: A vacuum with a brush attachment and a crevice tool is your best friend here.
- Microfiber cloths: These are great for trapping dust rather than just pushing it around.
- Mild dish soap: Avoid harsh chemicals that could damage the plastic or metal finish.
- An old toothbrush: This is the secret weapon for getting into those tiny nooks and crannies of the motor housing.
- Safety gear: Wear gloves and safety goggles. You’d be surprised how much dust falls directly into your eyes the moment you move the cover!
- Optional: A can of compressed air for those hard-to-reach spots inside the motor.
Most of these items are already sitting in your cleaning closet. If you had to buy them all new, you’d likely spend less than $20, making this one of the most budget-friendly home maintenance tasks you can perform.
Safety Precautions Before Starting
We cannot stress this enough: safety is the most important part of this process. You are dealing with a combination of electricity, height, and potentially moving parts.
Kill the Power
The very first thing you must do is turn off the power. Don’t just flip the wall switch to “off.” To be 100% safe, go to your circuit breaker panel and turn off the power to the bathroom. This ensures that even if someone accidentally flips the light switch while you’re working, you won’t get a dangerous electric shock. If you have a voltage tester, use it to double-check that no current is flowing to the unit.
Ladder Safety
Make sure your ladder is on a flat, dry surface. If your bathroom floor is tiled, it might be slippery, so ensure the ladder’s rubber feet make good contact. If possible, have a partner hold the ladder for you. Working above your head can make you feel a bit dizzy or off-balance, so having someone there to spot you is a great idea.
Handle Bulbs with Care
Since we are focusing on how to clean a bathroom fan with light combinations, you will be dealing with light bulbs. If the light was recently on, the bulb will be extremely hot. Give it at least 10 minutes to cool down before you try to unscrew it. Also, be gentle; old plastic clips on fan covers can become brittle over time and may snap if forced.
Step-by-Step Guide: How to Clean a Bathroom Fan with Light
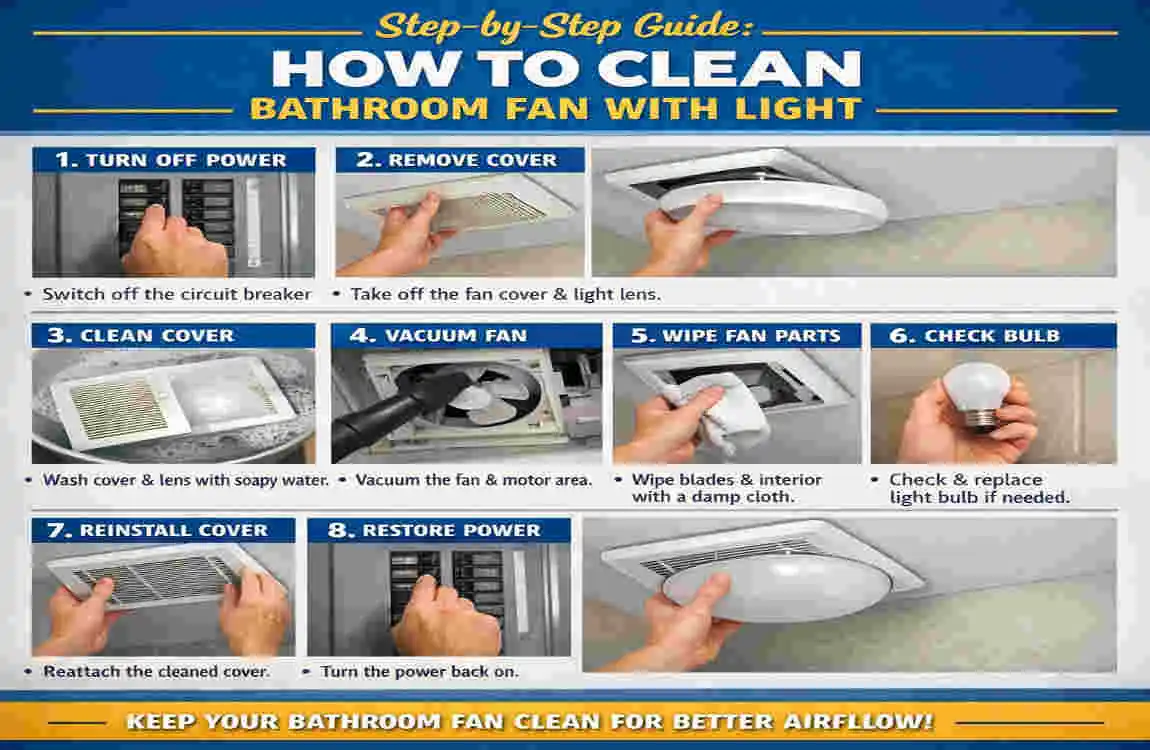
Now that we are prepared and safe, let’s dive into the actual cleaning process. Follow these steps closely to ensure a thorough refresh.
Power Down and Remove the Cover
Once the breaker is off, it’s time to remove the outer cover (often called the grille). Most modern bathroom fans don’t actually use screws to hold the cover in place. Instead, they use tension springs.
Gently pull the cover down about two inches from the ceiling. You will see two metal wires on opposite sides. Squeeze these wires together to release them from the slots in the fan housing. If your model has a light, there will be a wire connecting the light fixture to the motor housing. Carefully unplug this connector or unscrew the bulb if it’s blocking the clips.
Pro Tip: If the cover feels stuck, don’t yank it. Look closely to see if there is a hidden screw or if years of paint have “glued” the edges to the ceiling. Use a utility knife to gently score the paint line if needed.
Clean the Fan Cover and Light Lens
Take the cover over to the sink or a large bucket. If the cover is just plastic and doesn’t have integrated electronics, you can soak it in warm, soapy water. Use your microfiber cloth to wipe away the grime.
If your cover has a light lens (the clear or frosted plastic part), pay special attention to it. Dust often gets trapped inside the lens, which is why your light looks so dim. Use an old toothbrush to scrub the vents of the grille.
Wait! If your fan uses LED strips built into the cover, do not submerge it in water. Instead, use a damp cloth to wipe it down carefully. Make sure the cover is completely dry before you even think about putting it back up.
Dust Fan Blades and Motor Housing
While the cover is drying, head back up the ladder to tackle the “guts” of the fan. This is where the real magic happens. You will likely see a round fan (often called a squirrel cage) or a set of traditional blades.
Use your vacuum’s brush attachment to suck up as much loose dust as possible. Be gentle! You don’t want to bend the blades or knock the motor out of alignment. If there are clumps of dust stuck in the fins, use your old toothbrush or a pipe cleaner to dislodge them.
For the really deep-seated dust inside the motor itself, a quick blast of compressed air can work wonders. Just be prepared for a “dust shower”—this is why you’re wearing those safety goggles!
Wipe Housing and Reachable Vents
The “housing” is the metal box that sits inside your ceiling. Over time, dust can coat the interior walls of this box. Use a slightly damp microfiber cloth (not dripping wet) to wipe down the interior metal surfaces.
Check the area where the air gets pushed out into the duct. If you see big “dust bunnies” blocking the exit, pull them out. The clearer this path is, the quieter and more efficient your fan will be. Avoid touching any exposed wiring or the motor’s centre shaft with your wet cloth.
Reassemble and Test
Once everything is clean and—most importantly—completely dry, it’s time to put the puzzle back together.
- Plug the light back in: If you disconnected a wire for the light, snap it back into place.
- Attach the springs: Squeeze the metal tension wires and slide them back into their slots.
- Push the cover up: Slide the cover back until it sits flush against the ceiling.
- Restore power: Go back to your breaker box and flip the switch.
- The Test Run: Turn on the fan and the light.
You should immediately notice a difference. The light should be crisp and bright, and the fan should have a smooth, consistent whir rather than a clunky rattle.
StepEstimated TimeKey Maintenance Tip
Remove Cover 3-5 Minutes . Be gentle with the tension springs.
Wash Cover 10 Minutes . Ensure it is 100% dry before re-installing.
Vacuum Blades 10 Minutes . Use a brush attachment to avoid damage.
Wipe Housing 5 Minutes . Use a damp (not wet) cloth on metal parts.
Reassemble 5 Minutes . Check that the cover is flush with the ceiling.
Common Mistakes to Avoid
Even though this is a simple project, there are a few “rookie mistakes” that can turn a quick refresh into a headache.
- Cleaning while the power is on: This is the biggest mistake. Even if the switch is off, there’s always a small risk. Always use the breaker.
- Using too much water: You are working with an electrical appliance. Never spray water directly into the fan housing. A damp cloth is all you need for the internal parts.
- Forcing the cover: If the cover doesn’t want to come off, there is a reason. Check for hidden screws or paint buildup. Forcing it will likely crack the plastic, and finding replacement covers for old fans can be a nightmare.
- Ignoring the motor: Many people just wash the cover and call it a day. But the dust on the motor is what causes the noise and the fire hazard. Don’t skip Step 3!
- Forgetting to dry: Putting a wet cover back on can cause a short circuit or encourage new mould to grow right away.
Maintenance Tips for Longevity
Now that your fan is sparkling clean, how do you keep it that way? A little preventive maintenance goes a long way toward extending the life of your bathroom exhaust fan.
The Monthly Wipe: Once a month, take your vacuum or a duster and quickly run it over the outside of the fan cover. This prevents the “fuzz” from building up and getting sucked into the motor.
Dryer Sheet Hack: Some homeowners swear by wiping the fan blades with a dryer sheet after cleaning. The anti-static properties of the dryer sheet can help repel dust, keeping the blades cleaner for an extended period.
Upgrade Your Bulbs: While you have the cover off, consider upgrading to an LED bulb if your fan allows it. LEDs stay much cooler than old incandescent bulbs. Heat attracts dust and can make the fan’s plastic components brittle over time. Plus, you won’t have to change the bulb again for years!
Check the Flapper: If you feel a cold draft coming from your fan in the winter, the “backdraft flapper” might be stuck open with dust. Cleaning the unit often fixes this, ensuring your home stays energy-efficient.
When to Call a Professional
While most people can handle cleaning a bathroom fan with light units on their own, there are times when you should put down the screwdriver and call in a pro.
If you turn on your fan and smell something burning, turn it off immediately at the breaker and do not use it again. This usually means the motor is failing or there is a wiring issue. Similarly, if the fan makes a loud grinding or screeching noise even after cleaning, the bearings in the motor are likely shot.
In these cases, a professional electrician or handyman can replace the motor or the entire unit. A new fan usually costs between $50 and $150, and professional installation might add another $100. Compared to the risk of an electrical fire, it is a minimal price to pay.