When you want to know everything about framing how to build a tiny house, you are essentially learning how to build the skeleton of your future home. If the skeleton is strong, the whole house is strong. Mastering this foundational step ensures your tiny house maintains its structural integrity during raging storms and on bumpy highways. It also ensures you stay compliant with RVIA (Recreational Vehicle Industry Association) guidelines if you plan to certify your mobile home.
Planning your tiny house layout and structural frame requires deep focus and precision. Just as a professional creator meticulously structures a project for flow and user experience, you must organize your building plans to ensure a seamless construction journey. Your blueprint must be clear, consistent, and high-quality so the final result actually feels like a human-centered home .
Tools and Materials: Gearing Up for Success
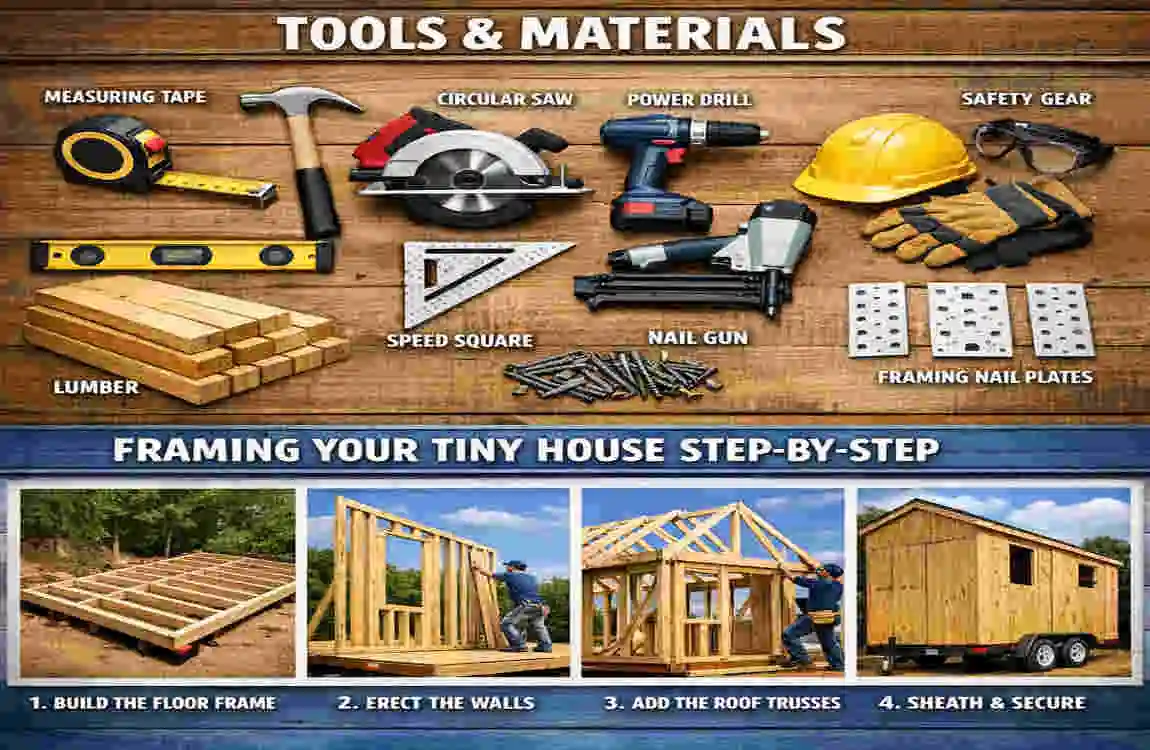
Before you make a single sawdust pile, gather your tools and materials. Having the right gear on hand will save you endless frustration and trips to the hardware store.
When you are figuring out framing how to build a tiny house, your toolkit is your best friend. Keep things simple, but do not skimp on quality. You want to make sure your building process flows as smoothly as a well-written, conversational guide .
Here are the absolute essentials you will need to get the job done right:
- Circular Saw: This is your magic wand. A good circular saw will cut through lumber quickly and cleanly.
- Framing Square: This heavy-duty metal “L” shape ensures your corners are perfectly at 90-degree right angles.
- Nail Gun & Ring Shank Nails: Do not hand-hammer a whole house! A pneumatic nail gun will save your arms. Make sure to use ring shank nails. These nails have small ridges that grip the wood like fishhooks, preventing your house from rattling apart while bouncing down the highway.
- Heavy-Duty Level: Because nobody wants to live in a crooked house.
- Tape Measure: Get a durable 25-foot tape measure. You will use this every 5 minutes.
- Lumber (2x4s and 2x6s): This is the meat of your frame. We will discuss the differences shortly.
- Plywood or OSB Sheathing: This serves as the “skin” of your house, holding the skeleton in place.
Traditional vs. Advanced Framing
You have two main choices when ordering your wood: traditional framing or advanced framing.
Traditional framing places the vertical wooden studs exactly 16 inches apart (known as “16-inches on-center”). This is incredibly strong but uses a lot of wood.
Advanced framing uses 24-inch on-center spacing for studs. This technique uses slightly thicker wood but spaces it further apart. It makes your house significantly lighter for towing, leaves more room inside the walls for thick insulation, and saves you money.
Your Estimated Budget Breakdown
How much will the raw skeleton of your tiny home cost? Here is a quick breakdown to help you plan your finances.
Item Quantity Cost Estimate
2×4 Lumber 100 pcs $800
Plywood/OSB 20 sheets $600
Nails/Screws/Hardware 10 lbs $150
Total – $1,550
Do Not Forget Safety Gear
Construction is deeply rewarding, but it can be dangerous if you are careless. You must prioritize safety.
Always wear heavy-duty work gloves to prevent painful splinters. Keep a pair of safety goggles on to protect your eyes from flying woodchips. Finally, when it is time to build your roof, invest in a proper safety harness. A fall from 13 feet can end your tiny house journey real quick!
Planning Your Tiny House Frame
You cannot build a sturdy house by just winging it. You need a solid plan. Think of your blueprint as your treasure map; it tells you exactly where to go and what to do next.
First, you must review your blueprints and ensure they meet road legality requirements. If you are building a tiny house on a trailer, you are legally bound by highway transportation limits.
Your house cannot be wider than 8.5 feet. Why? Because highway lanes are only so wide, and anything larger requires a special “oversized load” permit every time you move it.
Furthermore, your house cannot be taller than 13.5 feet from the ground to the peak of the roof. If you build it any taller, you risk smashing your beautiful new roof into a low highway overpass bridge.
Mapping the Floor Plan Layout
Before cutting wood, map out your floor plan. Use chalk or tape to mark your layout on your trailer deck or subfloor.
Mark exactly where your front door will be. Mark the locations of your windows. Outline where the bathroom walls will go. Standing in the physical space and seeing these markings will help you spot design flaws before they become permanent.
Software Tools for Perfect Planning
You do not need to be an architect to design a tiny house frame today.
There are amazing software tools available to help you visualize your project. Programs like SketchUp allow you to build your tiny house frame in a 3D digital world first. You can rotate the model, look inside the walls, and see exactly how the wood fits together.
If designing from scratch sounds terrifying, do not worry. You can find highly detailed, free tiny house plans online that include cut lists and step-by-step diagrams.
Pro Tip: The 3-4-5 Rule
When you are framing your layout, how do you know if a corner is perfectly square? You use the magical 3-4-5 rule.
Start at the corner. Measure exactly 3 feet down one wall and make a mark. Measure exactly 4 feet down the connecting wall and make a mark. Now, measure the diagonal distance between those two marks. If it is exactly 5 feet, your corner is perfectly square! If not, you need to adjust your framing.
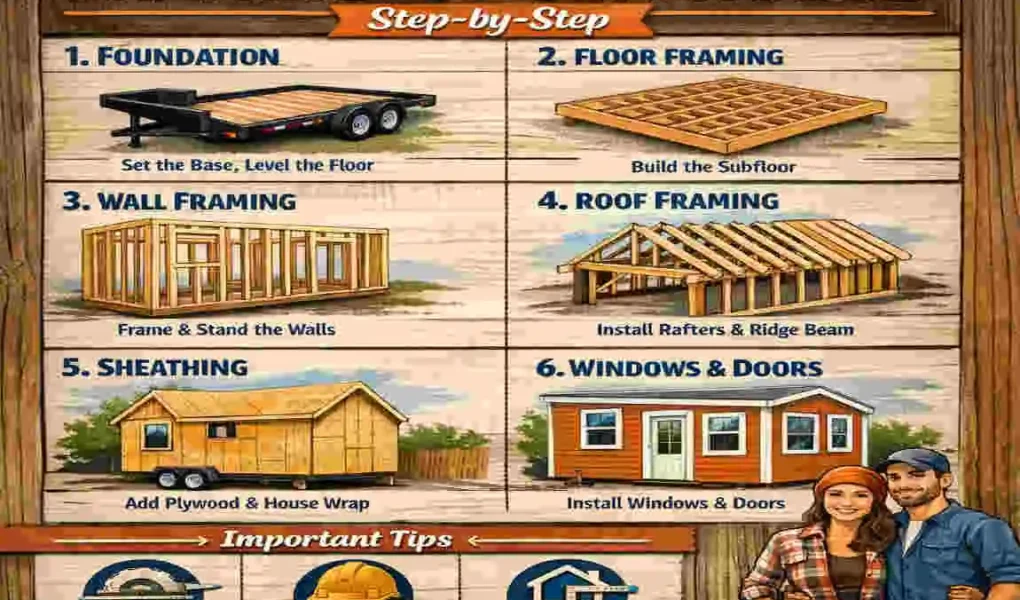
Floor Framing Basics
Now it is time to start building. Everything rests on your floor frame, so it needs to be rock solid.
If you are building on a trailer, securing the trailer frame is your absolute priority. Your trailer is your foundation.
You will be installing rim joists (the outer border of your floor frame) and floor joists (the internal beams that support the floor you walk on). These should be spaced 16 inches on-center for maximum floor rigidity.
Bolt Down the Perimeter
Start by placing pressure-treated 2×6 lumber around the perimeter of your metal trailer frame. Pressure-treated wood is treated with special chemicals that resist water rot and insect damage.
You must physically bolt these wooden beams to the steel trailer. You will drill holes through the wood and the metal flange of the trailer, then secure them with heavy-duty carriage bolts.
Add Blocking for Stability
Once your long floor joists are installed, they can sometimes warp or twist over time. To prevent this, you will install “blocking.”
Blocking involves cutting small, precise chunks of wood and wedging them horizontally between your long floor joists. This creates a solid grid pattern. It prevents joists from twisting and gives your floor a firm, squeak-free feel when you walk across it.
Wall Framing Step-by-Step
This is the most exciting part of framing a tiny house. This is when your flat trailer finally starts looking like a real, three-dimensional home.
The most important rule for wall framing is this: Build your wall sections flat on the ground.
Do not try to build a wall standing up. Gravity will fight you the entire time. By building the wall flat on your subfloor, you can easily measure, cut, and nail everything together safely.
Mark Your Plates
Every wall has a top horizontal board (the top plate) and a bottom horizontal board (the bottom plate). The vertical boards that make up the wall are called studs.
Lay your top and bottom plates side by side on the ground. Take your tape measure and mark where every single stud will go. Depending on your chosen method, you will place a mark every 16 or 24 inches on-center.
Assemble the Walls
Once your plates are marked, slide your vertical studs into position.
Now, grab your nail gun or your drill. If you are using screws, we highly recommend 3-inch star-drive screws. Unlike traditional Phillips-head screws, star-drive screws rarely strip out when you apply heavy pressure. They pull the wood together tightly and securely.
Next, you have to frame the windows’ headers. A header is a thick, strong beam (usually two 2x6s nailed together) that sits horizontally above a window opening. It carries the heavy weight of the roof so that the window glass does not get crushed.
Beneath the window, you will install cripple studs. These are simply short, stubby studs that support the window sill.
Raise, Plumb, and Brace
Once the wall is fully assembled on the floor, it is time for the heavy lifting. Grab a friend (or three) and carefully tilt the heavy wall upward until it stands vertically.
Immediately use a heavy-duty level to make sure the wall is “plumb” (perfectly straight up and down). If it leans even slightly, your house will be crooked.
Once it is perfectly plumb, nail temporary diagonal wooden braces to it so the wind does not blow it over while you build the remaining walls. Finally, stagger your top plates. This means adding a second top plate that overlaps the corners, securely locking the adjacent walls together.
Corner Framing: The Three-Stud Method
When two walls meet at a corner, you need to create a strong connection that also allows for insulation.
Using the “three-stud method” (often called a California corner) forms a sturdy, U-shaped pocket in the corner. This brilliant little trick leaves a hollow space where you can later pack thick fiberglass or spray foam insulation, preventing winter cold drafts.
Common Mistakes to Avoid
A frequent mistake beginners make is using uneven or bowed studs. Before you nail a stud into place, pick it up and look down its edge like you are aiming a rifle. If it curves wildly like a banana, throw it in the scrap pile!
Always use consistent, straight lumber for your walls. A crooked stud will result in a wavy wall that looks terrible and makes installing cabinets a nightmare.
Window and Door Openings
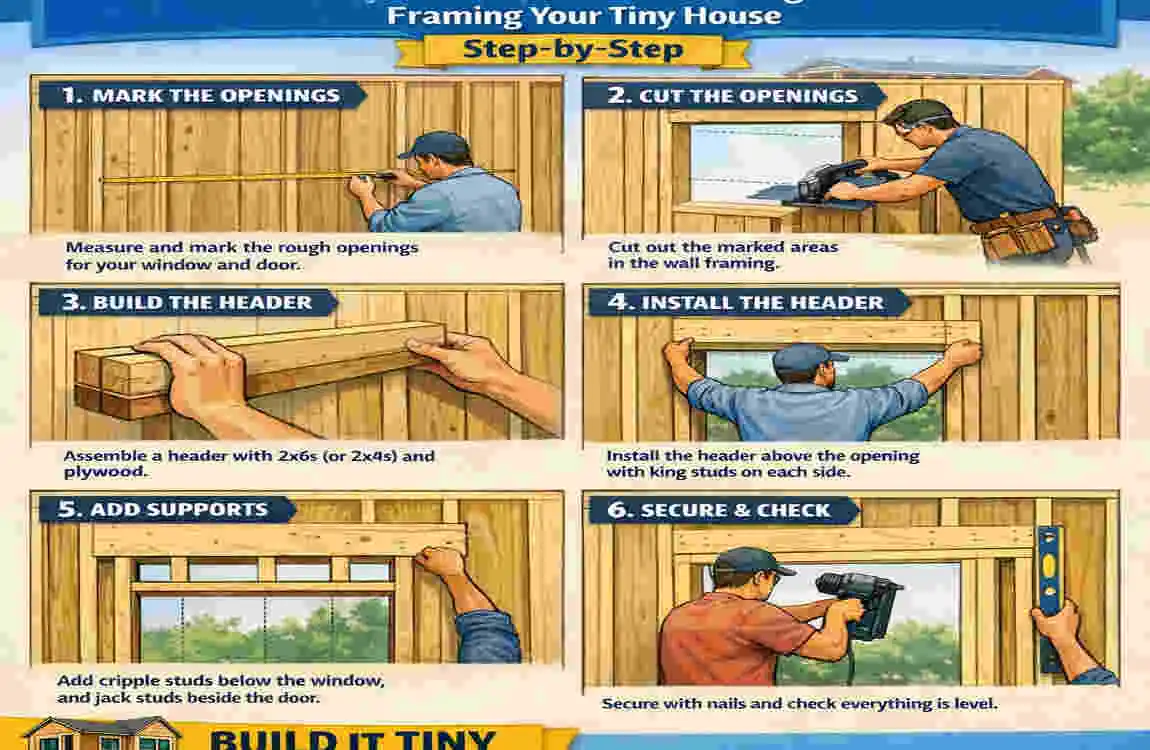
Framing the holes where your doors and windows will go is a delicate art. You have to leave exactly enough room.
When you look at your blueprint, you will see the dimensions for your windows. However, you cannot frame the opening to those exact measurements. You must create a rough opening.
A rough opening should be exactly 1 inch wider and 1/2 inch taller than the actual window or door you are installing.
Why? Because houses are never mathematically perfect. By leaving a little extra wiggle room, you can place the window inside the hole, use small wooden wedges (called shims) to get it perfectly level, and then screw it securely into place.
King Studs and Jack Studs
When framing around your rough openings, you will use two specific types of studs.
First is the King Stud. This is a standard, full-length stud that runs completely from the bottom plate to the top plate right beside the window.
Second is the Jack Stud (sometimes called a trimmer stud). This stud is shorter. It sits flush against the King Stud, but it stops just below the heavy window header to physically hold it up.
Pre-hung vs. Site-built Doors
Should you build your own custom door or buy a pre-hung door?
For your very first tiny house, strongly consider buying a pre-hung door. A pre-hung door comes pre-attached to its own wooden frame, with perfectly aligned hinges. All you have to do is slide the entire unit into your rough opening, level it, and nail it in. It will save you countless hours of frustrating hinge-alignment!
Roof Framing Techniques
Building the roof is where framing a tiny house gets truly exciting. This gives your structure its final shape.
Because of the 13.5-foot height restriction on the highway, you have to choose your roof shape carefully. The two most popular styles are the Gable roof and the Shed roof.
A Gable roof is your classic, symmetrical triangle shape. A Shed roof is a flat, single-sloped roof that starts high on one side and angles down to the other.
Building the Bones of the Roof
If you are stick-framing your roof, you will be using long boards called rafters (usually 2×6 lumber).
To make the rafters sit flat and securely on top of your walls, you have to cut a small, triangular notch into the bottom of the rafter. In the carpentry world, this is called a birdsmouth cut.
At the very peak of the roof, your rafters will attach to a long, central beam called a ridge board. This acts as the spine of your house.
To stop the heavy roof from slowly flattening out and pushing your exterior walls outward, you must install collar ties. These are horizontal beams that connect the opposing rafters, forming a rigid, unmoving triangle.
Loft Framing
One of the best features of a tiny home is the sleeping loft! It utilizes the empty, high-ceiling space for a cozy bedroom.
Because you will be sleeping, moving, and storing items up there, your loft floor needs to be incredibly strong. You should use double joists for the sleeping platform frame. This ensures the floor will not bounce or sag under human weight.
Advanced: Truss Kits
If cutting precise roof angles sounds too intimidating, you can use an advanced shortcut: Truss Kits.
Trusses are pre-engineered, factory-built roof frames. They arrive at your build site already perfectly cut and assembled. You simply lift them, space them out, and nail them down. It greatly accelerates your building speed.
Here is a quick comparison table to help you decide on your roof style:
Roof Type Pros Cons
Gable Offers classic looks and more central loft headroom Much heavier; complex angle cuts
Shed Extremely simple to build; much cheaper Less overall loft space on the low side
Sheathing and Bracing
Once the wooden skeleton is complete, it is time to give your tiny house its skin. This process is known as sheathing.
Sheathing involves installing large 4×8-foot sheets of plywood or OSB (Oriented Strand Board) directly to the exterior of your wall studs and roof rafters.
You might think the sheathing is just there to block the wind, but it serves a massive structural purpose. Sheathing provides shear strength.
Without sheathing, a strong gust of wind or a sudden braking maneuver on the highway could cause your vertical wall studs to fold over like a deck of cards. Applying the plywood, especially diagonally, locks all the studs into a rigid, unmoving panel.
The Nailing Pattern
Do not just shoot nails randomly into the plywood. Follow the golden rule of sheathing: Nail every 6 inches along the edges of the plywood panel, and every 12 inches in the field (the middle section of the panel).
When sheathing your roof, always use tiny metal brackets called H-clips. You place these clips between the edges of the plywood sheets. They leave a tiny, microscopic gap between the wood panels, allowing the wood to naturally expand and contract in the hot summer sun without buckling.
Advanced Framing Tips
Once you understand the basics of framing for a tiny house, you might want to try some advanced value-engineering techniques.
As mentioned earlier, framing your walls 24 inches on-center instead of 16 inches is a brilliant move for tiny homes. Combine this with using single headers over smaller windows and insulated corners.
By utilizing these advanced framing techniques, you can easily save up to 15% on your total lumber order. More importantly, it removes hundreds of pounds of unnecessary weight from your trailer. If you plan to travel constantly, reducing your towing weight is critical for gas mileage and vehicle safety.
The Steel Framing Alternative
Want to go ultra-modern? Consider swapping traditional wood for cold-formed steel framing.
Steel framing is up to 60% lighter than wood. It never rots, it never warps in the rain, and termites cannot eat it. The catch? It is significantly pricier than wood, and it requires specialized screws and tools to assemble. However, for a premium, lightweight build, it is an incredible alternative.
Common Mistakes and Fixes
Every builder makes mistakes. Do not panic when things go slightly wrong. The key to being a great builder is knowing how to fix the errors.
- Avoid Twisted Studs: Always look down the length of your wood before cutting it. Pre-cut accurately, then toss the twisted boards aside for scrap blocking later.
- Avoid Poor Squaring: Always use your tape measure diagonally across your floor frame to check for squareness before locking it down.
- The Fix – Sistering: What happens if you accidentally cut a notch too deep into a floor joist, weakening it? You use a technique called “sistering.” Simply take a scrap piece of sturdy lumber, place it right alongside the weak joist, and bolt them tightly together. The “sister” board instantly restores the original beam’s strength.
Cost Breakdown and Timeline
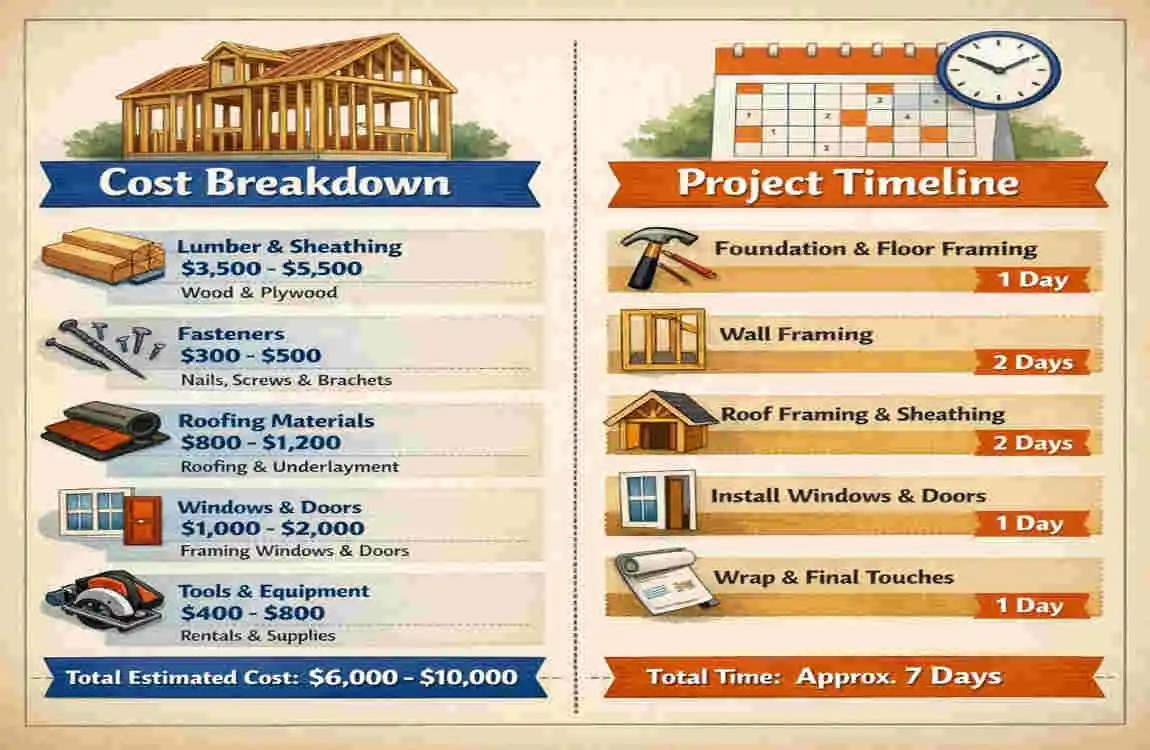
How long will the framing phase take, and how much will it truly cost?
If you are a solo builder working on weekends, expect the framing phase to take roughly 1 to 2 weeks of solid, focused labor.
Financially, the total framing package—including the floor, walls, roof, sheathing, and hardware—typically ranges from $3,000 to $5,000.
If you carefully plan your material use and minimize scrap, you can keep the budget closer to the lower end of that spectrum.
FAQs About Tiny House Framing
You likely have a few lingering questions. Let us address the most common inquiries we hear from enthusiastic beginner builders.
How much does it cost to frame a tiny house? Just the raw materials for the framing skeleton typically cost between $1,500 and $3,000, depending on lumber prices in your area and the size of your trailer. When you add the heavy sheathing, the price scales up slightly.
Should I use 2×4 or 2×6 lumber for my exterior walls? This is a massive debate in the tiny house community! Standard 2x4s are cheaper, lighter, and give you slightly more interior living space. However, using thicker 2x6s creates a deeper wall cavity. This allows you to install much thicker insulation, keeping your home incredibly warm in freezing winter climates. Choose based on where you plan to park the house.
Should I build on a trailer or a foundation? Build on a trailer if mobility, freedom, and avoiding strict municipal zoning laws are your priorities. Build on a concrete foundation if you own your land permanently and want a larger, wider footprint than a trailer allows.
Are building permits needed? If you are building on a foundation, absolutely yes. If you are building on a trailer, you bypass many traditional housing permits. However, you should strictly follow local RV codes and aim for RVIA certification to ensure you can legally park and insure your mobile dwelling.