Are you wondering how to install a felt roof on your house without spending a fortune on professional help? You’re not alone! Many homeowners look for affordable ways to protect their roofs, especially on flat or low-pitched roofs where traditional shingles don’t work well. Felt roofing offers an excellent solution — it’s waterproof, durable, and easier to install than you might think.
What Is Felt Roofing and Why Choose It for Your Home?

Before grabbing your tools, it’s important to understand what felt roofing is and why it might be the perfect choice for your house.
Types of Felt Roofing Materials
Felt roofing comes in several varieties, each with its own strengths:
- Torch-on Felt (SBS Modified Bitumen):
- This type needs to be heated with a propane torch to melt the underside and stick to the roof. It forms a tough, waterproof layer. Pros include excellent adhesion and durability, but it requires careful handling of fire, so safety is crucial. It’s a favorite for DIYers who want a professional-quality finish.
- Self-Adhesive Felt:
- This is the easiest to apply, especially for beginners. The underside has a sticky layer covered by a peel-off sheet. You press it onto the roof, making installation faster and safer (no torch needed). It’s perfect for smaller projects, such as sheds or garages.
- Mineral-Surfaced Cap Sheets:
- These are felt sheets coated with mineral granules on top for UV protection and durability. Usually used as the final layer, they help extend the roof’s life.
Felt Roof Types Comparison Table
TypeInstallation MethodProsConsBest For
Torch-on (SBS) Heated with propane torch Strong adhesion, durable Requires fire safety Larger roofs, DIY pros.
Self-Adhesive Peel and stick Easy, safe, quick Less durable than torch Small roofs, beginners
Mineral-Surfaced: Laid over base layers, UV-resistant, long-lasting, and more expensive. Final protective layer.
Benefits of DIY Felt Roof Installation
Why choose to install a felt roof DIY instead of hiring a pro?
- Cost Savings: Professionals can charge $3,000 or more for a typical project, while doing it yourself can cost between $500 and $2,000, depending on size and materials.
- Durability: Felt roofing resists water, UV rays, and can handle temperature swings well. You’ll have a reliable waterproof barrier.
- Easy Repairs: If a section of the roof gets damaged, you can fix it yourself without calling a roofer.
- Perfect for Small Structures: Ideal for flat or low-slope roofs on sheds, garages, or home extensions.
In short, learning how to install felt roof DIY saves money and gives you control over your home’s protection.
When to Use Felt Roofing
You should consider felt roofing if:
- Your roof is flat or has a low pitch (less than 10°) — traditional shingles won’t shed water well here.
- You notice leaks, cracks, or wear on your existing roof surface.
- You want a cost-effective, reliable waterproof layer for new builds or replacements.
Tools and Materials Needed to install Felt Roof
Getting started means gathering the right tools and materials. Having everything ready not only makes the job smoother but also safer.
Essential Tools List
Here’s what you’ll need to install a felt roof:
- Roofing torch or propane burner (for torch-on felt roofing)
- Utility knife with sharp blades to cut felt sheets
- Roofing roller to press felt firmly onto the surface
- Roof brackets and ladders for safe access and movement
- Safety gear: Gloves, goggles, a respirator mask, and a harness if working on steep roofs
- Measuring tape and chalk line for accuracy
Materials Checklist
You’ll also need these materials, measured per 100 square feet of roof:
MaterialQuantityCost Estimate
Base sheet felt 100 sq ft $50 – $100
Cap sheet (top layer) 100 sq ft $75 – $150
Bitumen primer or adhesive 1 gallon $30
Galvanized roofing nails 1 lb (approx.) $5 – $10
Where to Buy and Cost Breakdown
Most materials can be found at home improvement stores like Home Depot or specialized roofing suppliers. For torch-on felt, specialty shops may offer better, higher-quality products.
Safety Precautions Before You Start Felt Roof Installation
Safety is a top priority when working on roofs, especially when using heat.
Personal Protective Equipment PPE
Before you climb up, gear up with:
- Gloves: Protect your hands from hot materials and sharp tools.
- Goggles: Shield your eyes from debris, dust, and flame sparks.
- Respirator mask: Useful when applying adhesives or primer with strong fumes.
- Harness and safety ropes: Prevent falls, especially on steeper roofs.
- Long sleeves and pants: Reduce skin exposure.
Weather and Roof Prep Safety
Choose a dry day with temperatures between 50°F and 80°F. Avoid windy or rainy days as they make handling felt and flame dangerous.
Before installing:
- Inspect the roof for weak spots or rotten wood that could collapse.
- Check for asbestos in older roofs—if found, hire professionals.
Legal and Insurance Tips
- Verify local building codes to ensure felt roofing is permitted and meets the required standards.
- Check your homeowner’s insurance for coverage during DIY projects.
- Safety first in your ” How to install Felt Roof guide means avoiding costly accidents and legal troubles.
Preparing Your Roof Surface for Felt Installation
Preparation is crucial for a smooth, lasting felt roof.
Step-by-Step Roof Inspection
- Clear debris: Remove leaves, old roofing, dirt, and nails.
- Repair substrate: Replace any damaged plywood or OSB boards to get a clean, solid base.
- Measure: Calculate your roof’s square footage with the formula:
- [ \text{Area} = \text{Length} \times \text{Width} ]
Having an accurate measurement helps order the right amount of materials.
Priming the Surface
Apply a bitumen primer to the clean roof surface to improve the felt’s adhesion. Use a brush or roller evenly, and let it dry completely — usually about 1-2 hours, depending on the temperature.
Step-by-Step Guide: How to install a Felt Roof DIY
This is the heart of your project. Follow these detailed steps carefully.
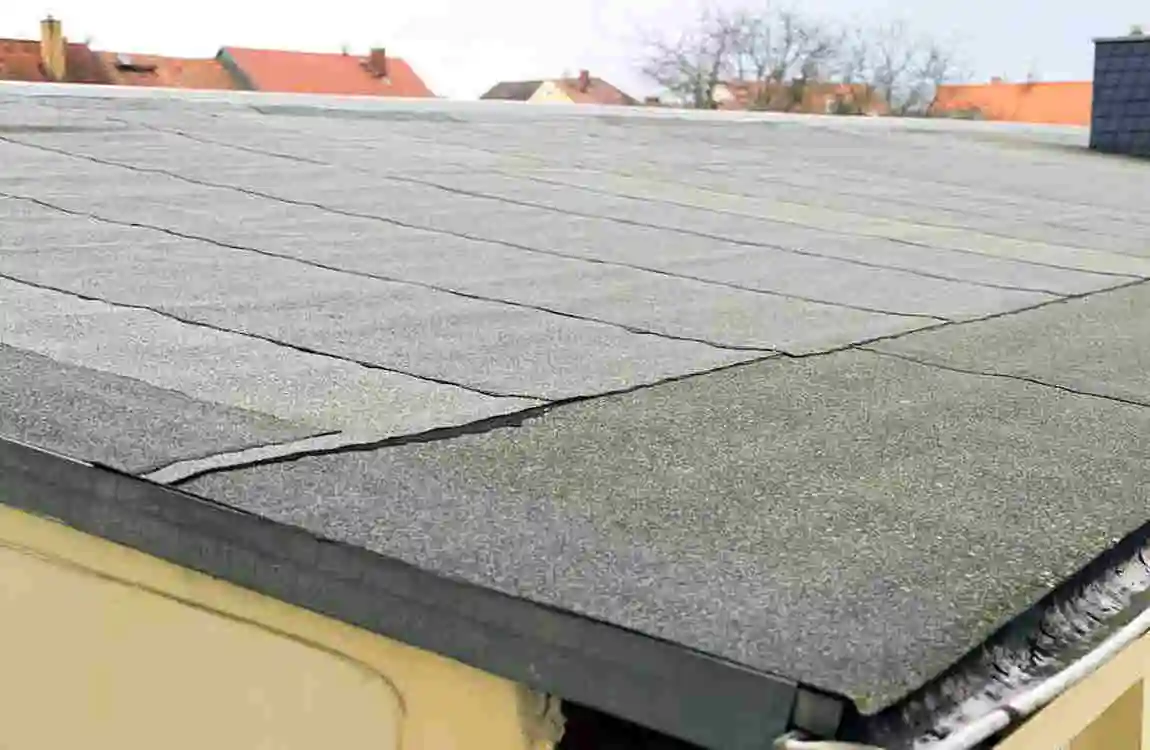
Laying the Base Sheet
- Start at the eaves (lowest edge of the roof).
- Unroll a 3-4 ft section and align it straight.
- For torch-on felt, heat the underside until it melts slightly, then press it onto the primed surface using a roller.
- Overlap each new sheet by 3-4 inches to create a waterproof seal.
Installing Underlayment Layers
For durability, apply multiple plies:
- The base sheet provides the first waterproof layer.
- Additional underlayment sheets add strength and protection against leaks.
Make sure each ply overlaps properly and is securely adhered.
Applying the Cap Sheet
This is the topmost layer:
- Use the torch-on technique to melt and bond the cap sheet firmly.
- Pay special attention to edges, valleys, and ridges — seal these well to prevent water penetration.
Flashing and Detailing
- Install flashing around chimneys, vents, and skylights to divert water.
- Use galvanized nails and sealant to secure and waterproof these tricky areas.
Featured Snippet: Full 10-Step Felt Roof Installation Process
- Inspect and prepare the roof surface
- Apply primer and let it dry
- Lay the first base sheet starting at the eaves
- Torch or adhere the base sheet securely
- Overlap sheets by 3-4 inches
- Add second and third underlayment sheets
- Apply the cap sheet with the torch-on method
- Seal edges and overlaps carefully
- Install flashing around roof penetrations
- Perform final inspection and touch-ups
Common Mistakes to Avoid When Installing Felt Roof
Even with a guide, beginners can trip up. Here are the top pitfalls to watch out for:
- Poor overlaps: Skimping on overlap width leads to leaks. Always overlap at least 3-4 inches.
- Ignoring temperature: Applying felt when too cold or wet causes bubbling and poor adhesion.
- Skipping primer: Without primer, the felt won’t stick well and can peel off prematurely.
- Inadequate flashing: Leaving gaps around chimneys or vents invites water damage.
- Rushing: Taking your time ensures proper bonding and a long-lasting roof.
Troubleshooting Tips
ProblemCauseFix
Bubbles in felt: moisture trapped or cold application. Pierce the bubble, reapply heat, and press down.
Felt peeling, no primer, or poor adhesion. Clean the area, re-prime, and reapply the felt
Leaks at seams , Insufficient overlap, Add extra sealing strips or patch
Finishing Touches and Roof Maintenance After Installation
A great roof requires care to stay great.
Post-Install Checks
- Walk carefully to test adhesion and stability.
- Apply extra sealant to any visible gaps or nail heads.
Long-Term Maintenance Schedule
TaskFrequency
Inspect seams Annually
Clean debris twice a year
Check flashing Annually
Expected Lifespan and When to Re-Roof
With good care, felt roofs last 10-15 years. If you notice cracks, widespread bubbling, or persistent leaks, it’s time to think about replacement.
FAQs: How to install Felt Roof
- How long does installation take?
- Usually 1-3 days for a 500 sq ft roof, depending on experience.
- Can beginners install felt roofing?
- Yes! Self-adhesive felt is easiest for beginners; torch-on requires some practice.
- Torch-on vs. self-adhesive — which is better?
- Torch-on lasts longer and adheres better, but requires fire safety precautions. Self-adhesive is quick and safe.
- Cost per square meter?
- Around $10-$30, depending on materials and region.