Do you find yourself frustrated with manual windows that stick, jam, or require unnecessary effort to operate? You’re not alone! Many homeowners in humid climates or areas prone to extreme weather, like Lahore, have faced similar issues. Upgrading to an electric window system is a practical and stylish solution.
Why install an Electric Window at Home?
Here are some compelling reasons to consider this upgrade:
- Improved convenience: Electric windows eliminate the hassle of manual operation.
- Enhanced energy efficiency: Proper installation can prevent drafts and reduce heating or cooling costs.
- Boost in property value: A home equipped with modern features, such as electric windows, is more appealing to buyers.
- Cost savings: Doing it yourself could save you between PKR 20,000 and 50,000 compared to hiring professionals.
This guide will break down how to install a home electric window safely and efficiently in 10 steps. Even if you’re a beginner, by the end of this article, you’ll feel confident tackling this project. Ready to get started? Let’s dive in!
Tools and Materials Needed

Before you start, gather the necessary tools and materials to ensure a smooth installation. Here’s a handy table to help you organise everything:
Category Items: Why Needed
Tools: drill, level, wire strippers, screwdriver set, caulk gun. For precise fitting and safe wiring
Materials: Electric window kit (motor, regulator), wiring harness, shims, silicone caulk, 12V transformer. Core components for the electric operation
Safety Gear: Gloves, goggles, and a voltage tester. To prevent injuries and electrical mishaps
Preparation Steps
Proper preparation is key to a successful installation. Follow these steps before diving into the actual work:
Inspect the Window Opening
Measure the width, height, and depth of the window opening. Ensure the new electric window unit will fit snugly without requiring excessive adjustments.
Prioritize Safety
Turn off the power at the circuit breaker. If you’re working on a battery-powered setup, disconnect the battery to avoid electrical shocks.
Remove the Old Window
Carefully pry off the window stops and remove the sash. Use a vacuum to remove any debris or dust from the frame. A clean surface makes for a smoother installation.
Now that you’re prepared, let’s move on to the step-by-step guide to install an electric window at home.
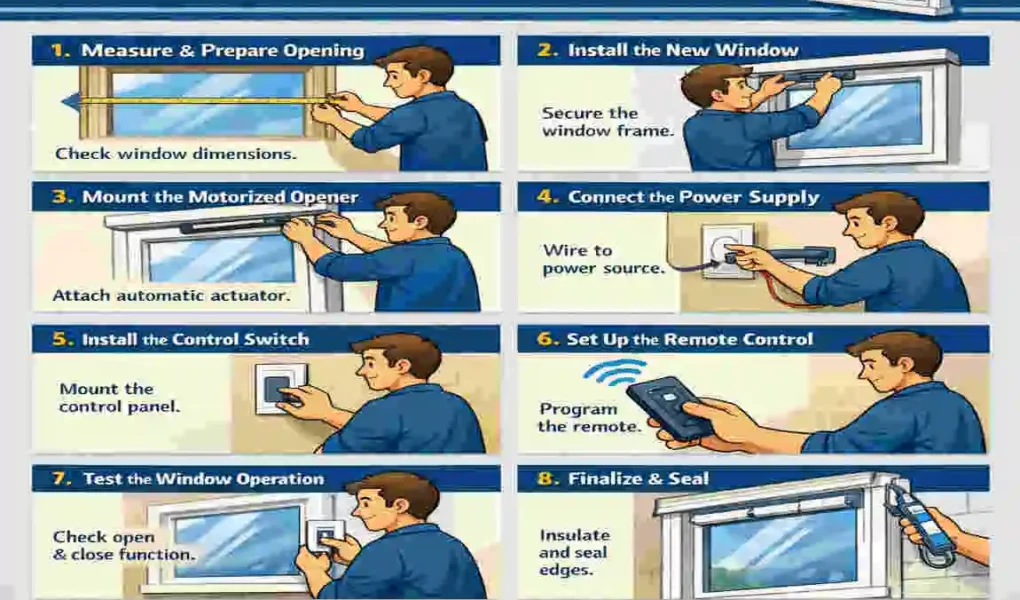
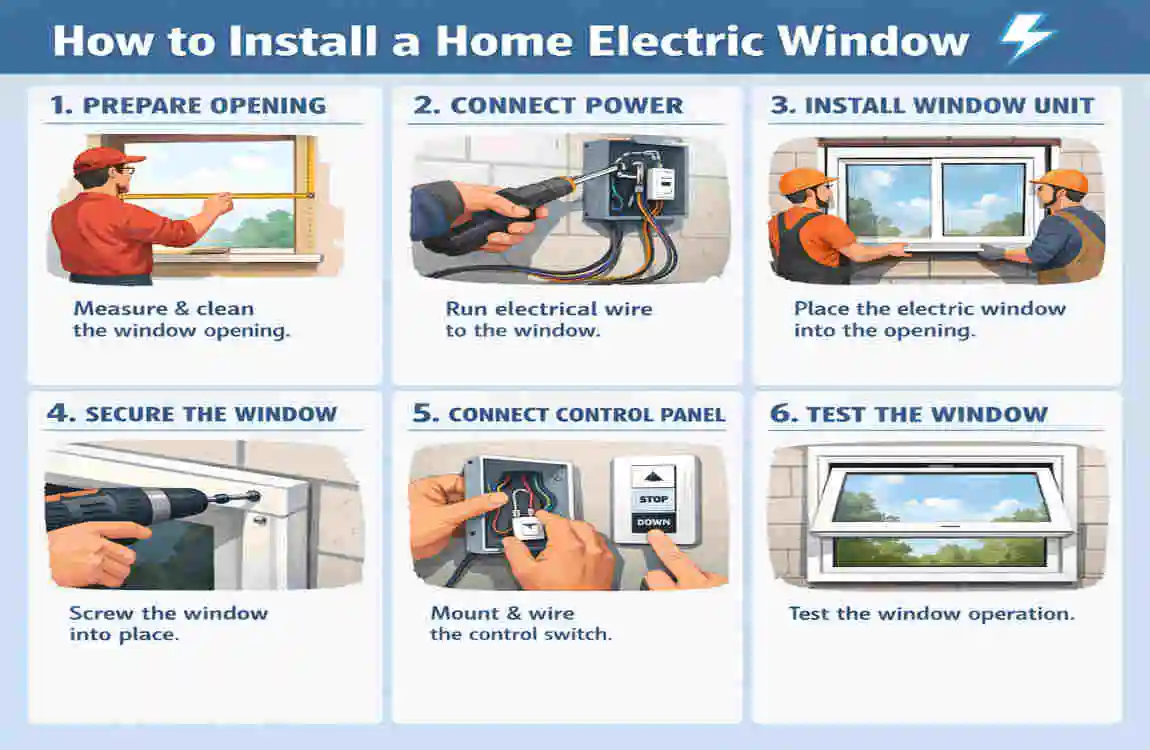
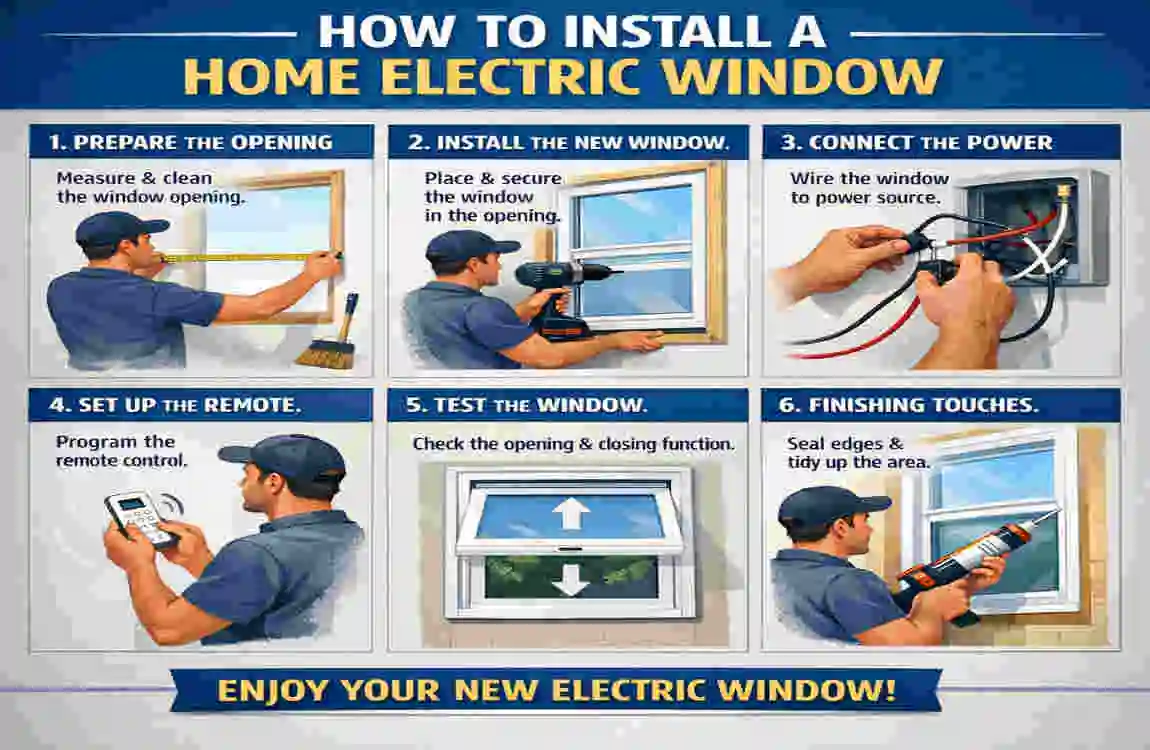
Step-by-Step Installation Guide
Test-Fit the New Window
Before securing anything, dry-fit the electric window unit into the frame. Use shims to ensure the window is level and plumb. This step helps you identify any adjustments needed before permanent installation.
install the Window Regulator and Motor
The regulator and motor are the heart of your electric window system. Follow these steps:
- Mount the regulator to the frame brackets.
- Secure the motor using screws or rivets.
- Ensure all components are aligned properly for smooth movement.
Route the Wiring Harness
Electric windows require precise wiring to function correctly:
- Run the wires from the motor through the window frame to the power source.
- Use clips to secure the wiring and prevent pinching.
- Match colour-coded wires according to the manufacturer’s instructions.
Secure the Window in the Opening
Apply a bead of silicone caulk around the frame. Tilt the window into place, starting from the top. Use shims along the bottom and sides to keep the window square.
Level and Plumb Check
Using a level, ensure that all sides of the window are perfectly straight. Adjust the shims as needed. This step is critical to ensuring the window operates smoothly.
Connect Electrical Components
Wire the system to a 12V transformer or your home’s electrical switch. Test the voltage using a voltage tester to ensure everything is functioning properly. Adhering to local electrical codes is essential.
Install Control Switches
Mount the control switches in an accessible location on the window frame or nearby wall. Connect the switches to the wiring harness.
Insulate and Seal
Fill any gaps around the window with foam insulation. Apply silicone caulk along the exterior edges to weatherproof the installation and prevent drafts.
Trim and Finish
Cut off any excess shims and install trim moulding around the window for a polished look.
Test and Troubleshoot
Turn the power back on and test the window by cycling it up and down 10 times. If you notice any issues, such as uneven movement or unresponsiveness, check the wiring, fuses, or alignment.
Common Mistakes to Avoid
Even with the best intentions, mistakes can happen. Here are some common errors and how to avoid them:
- Skipping level checks: This can cause the window to bind or operate unevenly.
- Improper wiring: Always use a voltage tester to verify connections.
- Over-tightening screws: This can warp the window frame and affect functionality.
Cost Breakdown and Savings
Here’s a simple cost comparison to show how much you can save by opting for a DIY approach:
Item DIY Cost (PKR)Professional Cost (PKR)
Electric Window Kit 15,000 Included in package
Labor 0 25,000
Tools 2,000 (one-time) N/A
Total 17,000 60,000+
When to Call a Professional
While this guide makes DIY installation manageable, there are situations where professional help might be necessary:
- Complex wiring setups that require advanced electrical knowledge.
- Installing windows in rental properties that require modification approval.
FAQs
How long does it take to install an electric window?
On average, the process takes 4-6 hours, depending on your experience level.
Is this a beginner-friendly project?
Yes! With the right tools and instructions, even DIY beginners can handle it.
What should I do if the electric motor fails?
Check the warranty on your electric window kit or consult the manufacturer for replacement parts.
| Step | Action | Key Tips |
|---|---|---|
| Prepare | Measure opening, turn off power, remove old window | Use level; wear safety gear . |
| Test-Fit | Dry-fit electric unit with regulator/motor | Shim for plumb; avoid forcing . |
| Mount Components | Install regulator, motor, route wiring harness | Secure with screws; match wire colors . |
| Secure Window | Tilt in, shim, caulk frame | Check square on all sides . |
| Wire & Test | Connect to 12V transformer/switches | Test voltage; cycle 10x for issues . |
| Finish | Insulate gaps, add trim, full test | Seal for weatherproofing . |