Have you ever stepped out of a relaxing, steamy shower, looked up, and found yourself wondering: why is paint peeling in bathroom ceiling corners? If you are nodding your head right now, you are definitely not alone. It is a highly relatable scenario for homeowners everywhere. You try to create a spa-like sanctuary in your home, but instead, you are greeted by unsightly flakes of paint slowly raining down onto your clean floors.
It is an incredibly frustrating experience. Those little cracks and curling edges might seem like a minor cosmetic annoyance at first. However, peeling paint often points to hidden risks that you cannot afford to ignore, like deep-seated mold, stubborn mildew, or even structural decay. When your ceiling starts shedding its skin, your house is trying to tell you that something is out of balance.
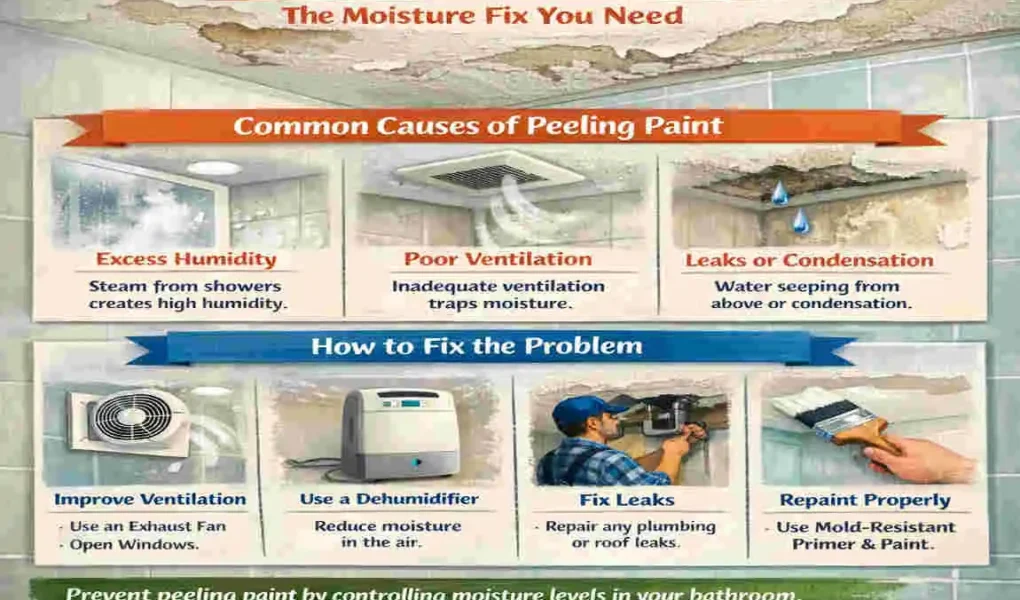
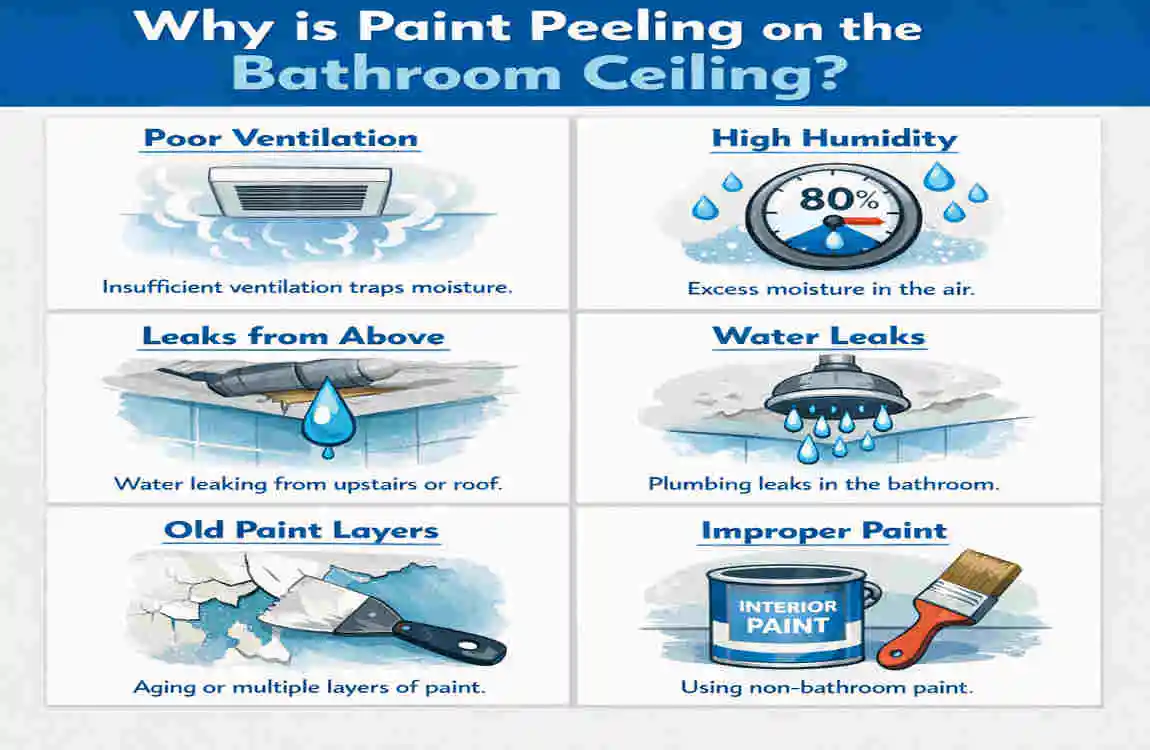
The core culprit behind this messy problem is almost always moisture buildup. Bathrooms are naturally wet, humid environments. Every time you turn on the hot water, you release a cloud of warm steam. Without a proper escape route, that steam goes straight up, attacking your ceiling paint day after day.
Common Causes of Bathroom Ceiling Paint Peeling
To permanently fix peeling paint on your bathroom ceiling, we first need to understand the root of the problem. If you slap a new coat of paint over the flaking areas without fixing the underlying issue, you will be repeating the exact same chore in a few months. Here are the four main reasons your ceiling paint is losing its grip.
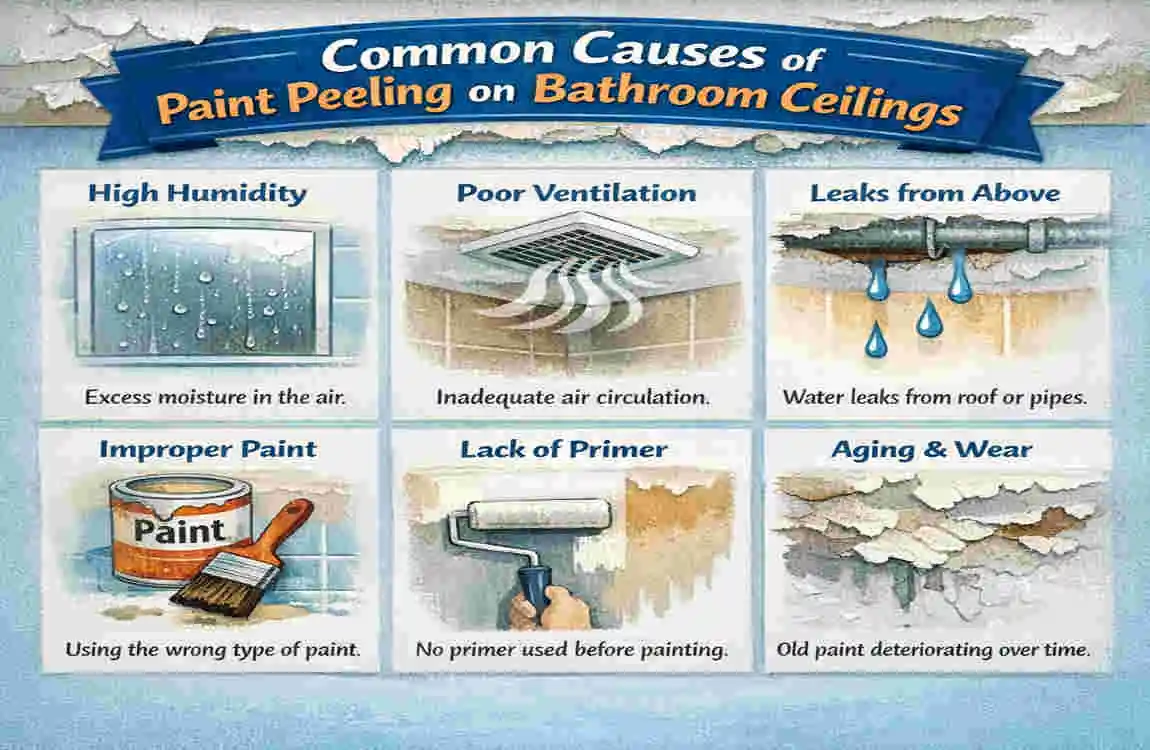
High Humidity and Steam Buildup
Bathrooms are indoor rain-rooms. Every time you take a hot shower or soak in the tub, the room fills up with thick steam. Because hot air is lighter than cold air, all that steam immediately rises to the highest point in the room—your ceiling.
When this warm, moist air touches the cooler surface of your ceiling drywall, a physical reaction occurs. The steam instantly turns back into liquid water. This process is known as condensation. Over time, these tiny water droplets saturate the ceiling material.
As the ceiling gets wet and then dries out throughout the day, the materials expand and contract. This constant swelling and shrinking severely weakens the paint’s adhesion. Eventually, the paint gives up, softening and separating from the drywall beneath it. This is why you will often notice the worst peeling directly above your showerhead or bathtub.
Poor Ventilation Issues
Even with high humidity, your ceiling would survive if the moisture had a quick way to escape. This brings us to the second major cause: poor ventilation.
Faulty exhaust fans, clogged vents, or completely absent ventilation systems let moisture linger in the air for far too long. If your bathroom stays foggy for twenty minutes after you turn off the shower, your ventilation is failing you. This lingering dampness pushes the paint to its absolute limit, causing it to bubble, crack, and peel.
There is a massive difference between ventless bathrooms and vented bathrooms. In a ventless space, the moisture is trapped in a sealed box, slowly eating away at your walls and ceiling. In a properly vented bathroom, a high-quality fan pulls the heavy, wet air outside your home, keeping the indoor climate dry and protecting your delicate paint job.
Wrong Paint Choices
Not all paints are created equal, and using the wrong formula is a guaranteed recipe for disaster in a wet environment. Standard interior paints, especially those with a “flat” or “matte” finish, are highly porous. This means they act just like a sponge, eagerly absorbing any moisture they come into contact with.
Many homeowners make the mistake of using the same standard flat paint on their bathroom ceiling that they used in their living room. In a bathroom, you need a protective shield, not a sponge. Furthermore, mixing different chemical bases can cause instant peeling. For instance, applying a modern water-based latex paint directly over an older, shiny oil-based paint without proper preparation will cause the new layer to peel off in large strips almost immediately.
Surface Prep Failures
Sometimes, the peeling has nothing to do with steam or paint quality. Instead, it comes down to how the ceiling was treated before the paint brush ever touched it. Surface preparation failures are incredibly common in fast, DIY paint jobs.
If a ceiling is unprimed, dirty, or covered in a thin layer of soap scum and dust, the new paint will never form a strong bond. It is like trying to put a sticker on a dusty window; it just will not stick. When you paint over a poorly prepped surface, you trap invisible pockets of air, dirt, or moisture beneath the fresh layers. As soon as the room gets humid, those trapped pockets expand, causing the new paint to lift and flake away.
Cause Impact on Paint Prevention Tip
Humidity Softens and lifts layers over time Run your exhaust fan for 20 mins post-shower
Poor Ventilation Builds heavy condensation that ruins adhesion install a powerful 80+ CFM bathroom fan
Wrong Paint Absorbs water like a sponge Use a bathroom-specific acrylic semi-gloss
Bad Prep Creates weak bonding and trapped air Prime heavily with a reliable moisture blocker
Signs and Inspection: Catching the Damage Early
The best time to fix a moisture problem is before half your ceiling ends up on the floor. Spotting the early warning signs of moisture damage can save you time, money, and a massive headache.
Start by looking closely at the areas directly above your shower and your bathroom mirrors. Do you see any bubbling, tiny hairline cracking, or faint yellow stains? These are the first cries for help from your ceiling. A bubble means water has already broken the bond between the paint and the drywall. A yellow stain is a classic indicator that water has pooled behind the paint.
To catch hidden peels that are hard to see under normal lighting, try the flashlight trick. Turn off your main bathroom lights and hold a bright flashlight flat against the ceiling, shining the beam horizontally across the surface. This harsh angle will cast long shadows on any raised bumps, blisters, or curling edges, revealing damage that is completely invisible in everyday light.
During your inspection, it is crucial to differentiate between cosmetic damage and deep structural damage. Press gently on the peeling area with your fingers. Does the ceiling feel firm and solid? If so, you are likely just dealing with cosmetic paint failure. However, if the ceiling feels soft, squishy, or crumbles easily under light pressure, you are dealing with drywall rot. This means water is likely leaking from a plumbing pipe or a damaged roof above, rather than just steam from below. If you discover soft drywall, you will need to replace the damaged panels before thinking about paint.
Step-by-Step Fix Guide for Peeling Paint
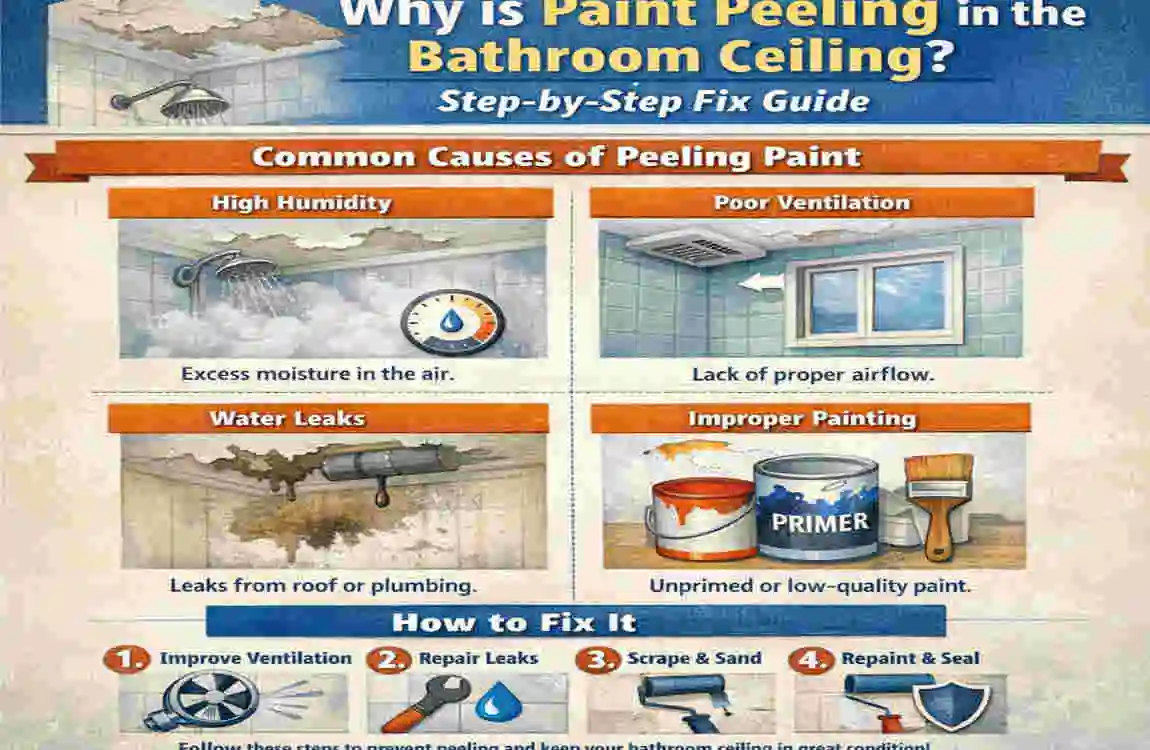
Ready to roll up your sleeves? Repairing a flaking bathroom ceiling might seem intimidating, but it is highly manageable if you break it down into simple, understandable segments. Here is your fail-proof guide to fixing the problem for good.
Prep the Area
Preparation is the secret to a flawless, long-lasting finish. Start by prioritizing your safety: turn off the power to your bathroom light fixtures at the circuit breaker and lay down thick drop cloths to catch the falling debris. Put on safety goggles and a dust mask.
Take a sturdy putty knife and begin to scrape away all the loose, flaking paint gently. Do not aggressively dig into the drywall; remove anything that is no longer firmly attached. Once the loose flakes are gone, use a 150-grit sandpaper to smooth out the transition lines between the bare ceiling and the remaining healthy paint. The goal is to create a perfectly flat, dull surface that new paint can easily grip onto.
Address the Moisture Source
Before you open a single can of paint, you must fix the root cause. If you skip this step, your beautiful new paint job will peel again in a matter of months.
Upgrade your bathroom exhaust fan if it is old, noisy, or ineffective. Look for a model that moves at least 80 Cubic Feet per Minute (CFM) to clear the air properly. If you cannot install a new fan right away, bring a portable dehumidifier into the bathroom to actively pull moisture out of the air. Finally, check your windows and ceiling fixtures, sealing any drafty gaps with high-quality, mold-resistant silicone caulk to prevent damp air from getting trapped in the walls.
Repair and Prime
With the area prepped and the moisture controlled, it is time to make the surface flawless. If your scraping left any small dents, divots, or holes, fill them in with a lightweight spackling compound or ceiling patch. Let it dry completely, and then give it a final, gentle sanding.
Next comes the most critical layer: the primer. Do not skip this! You need a heavy-duty, moisture-blocking primer to seal the surface and provide an anchor for your topcoat. Products like an oil-based primer or a specialized shellac-based primer (like Zinsser BIN) are incredibly effective. They lock out water and ensure that your new paint bonds permanently to the ceiling. Apply one solid, even coat and let it dry according to the manufacturer’s instructions.
Repaint Properly
Finally, it is time to bring the color back. For bathroom ceilings, you must choose a paint designed to fight moisture. Opt for a high-quality, mildew-resistant bathroom paint in a semi-gloss or satin finish. The slight gloss in these finishes creates a hard, slippery shell that allows condensation to bead up and roll off, rather than soaking into the drywall.
Apply the paint in two thin, even coats rather than one thick, messy layer. Thick coats take forever to dry and are prone to bubbling. Use a high-quality roller and cut in the edges with an angled brush. Most importantly, let the first coat dry for a full 24 hours before applying the second coat. This extended drying time allows the paint to cure properly, creating an impenetrable barrier against future steam.
Pro Tips Table
Need a quick reference guide before you head to the hardware store? Here is a breakdown of what you need for this project.
Step Tools Needed Time Estimate
Scrape/Sand Putty knife scraper, 150-grit sandpaper, safety glasses 30 mins of active labor
Prime Moisture-blocking primer (oil or shellac-based), brush 15 mins to apply, 1 hour dry time
Paint Mildew-resistant semi-gloss paint, roller, tray 2 coats, requiring 2 days for full curing
Prevention Strategies: Keeping Your Ceiling Flawless
You have put in the hard work to fix your bathroom ceiling paint peeling issue. Now, let’s make sure it never happens again. Prevention is entirely about controlling daily moisture habits.
First, rethink your ventilation habits. The golden rule is to use your exhaust fan during every single shower, and let it run for at least 20 to 30 minutes after you turn off the water. If you are prone to forgetting, install a smart humidity-sensing vent switch or a simple countdown timer. These devices automatically run the fan until the room is perfectly dry, taking the guesswork out of the equation.
For a long-term defense, adopt a few simple daily habits. Whenever possible, open a bathroom window during your shower to give the steam an immediate escape route. Leave your bathroom door slightly cracked when the room is not in use to encourage continuous airflow.
Lastly, commit to annual visual inspections. Check your ceiling once a year for the earliest signs of wear and tear. If you want total peace of mind, reach out to a professional to schedule a comprehensive moisture audit. We can pinpoint hidden dampness in your home before it destroys your hard work!
Related Issues You Should Not Ignore
When you are dealing with a moisture problem on your ceiling, it is rarely an isolated event. Heavy dampness has a habit of spreading. If your paint is peeling, you may also be facing related issues like rapid mold growth in your grout lines or along the baseboards.
Pay close attention to any strange, dark ceiling stains. While peeling is often caused by steam from below, a distinct brown water ring usually means you have a plumbing leak or a roof leak coming from above. Furthermore, if condensation is heavy enough to ruin your ceiling, it is heavy enough to run down the walls and pool on the ground, potentially leading to unseen floor leaks that rot your subfloor.
Protecting your entire bathroom requires a holistic approach. Be sure to check out our other detailed guides on complete “bathroom waterproofing” to safeguard your entire space from top to bottom.
Frequently Asked Questions (FAQs)
Why is paint peeling in the bathroom ceiling only, but nowhere else in the house? It all comes down to high steam concentration. Your bathroom handles more sudden temperature changes and water vapor than any other room in your home. Because hot steam rises rapidly, the ceiling absorbs the brunt of this daily moisture attack, making it the first place to show signs of damage.
How much does it cost to fix a peeling bathroom ceiling? If you tackle this as a DIY project, you can expect to spend between $200 and $800. This budget covers basic tools, a high-quality primer, Premium mold-resistant paint, and potentially upgrading a standard exhaust fan. If you need to hire professionals to replace water-logged drywall, costs will increase.
What is the absolute best paint to use on a bathroom ceiling? You should always choose a high-quality acrylic paint with built-in mildewcides. Aim for a satin or semi-gloss finish. Avoid flat or matte paints at all costs, as their porous nature will trap moisture and restart the peeling cycle.