Did you know that burglaries via sliding windows account for nearly 25% of home break-ins? That is a startling statistic, isn’t it? If you have sliding windows or patio doors, you might feel vulnerable right now, and honestly, you have every right to be. But here is the good news: you don’t have to be a statistic. You can take control of your home security this weekend.
If you are wondering how to install sliding window locks in your home, you have landed on the right page. Many homeowners assume that securing these entry points requires expensive professional installation or high-tech gadgetry. The reality is much simpler. With a quick trip to the hardware store and about 30 minutes per window, you can turn a potential weak point into a fortress.
Why Sliding Window Locks Are a Must for Home security

You might be looking at your sliding windows and thinking, “But they already have locks on them!” It is a common misconception. Most standard sliding windows come equipped with simple latches, not true locks. These latches are designed to keep the window closed against the wind, not to withstand the force of a determined intruder.
Let’s dive into why upgrading is non-negotiable for peace of mind.
Common Risks Without Proper Locks
The sliding window mechanism is its biggest vulnerability. Because they sit on a track, they don’t seal as tightly as casement windows.
- Easy to Jimmy Open: A burglar with a simple screwdriver or crowbar can often pop the factory latch in seconds. The metal is usually thin, and the “catch” is shallow.
- Track Jumping: This is the scary part. Without a secondary lock, many sliding windows can be lifted out of their tracks from the outside. If a thief lifts the window panel, the latch disengages completely, allowing them to slide the window open without breaking a single pane of glass.
- The Statistics: According to various crime data reports, first-floor windows are the second-most-common entry point for burglars, right after the front door.
Key Benefits of Upgrading
When you learn how to install sliding window locks in your home, you are doing more than just stopping thieves.
- Enhanced Strength: Aftermarket locks—whether they are pin locks, bars, or keyed options—physically block the track or pin the two sashes together. This makes physically forcing the window open impossible without shattering the glass (which creates noise that thieves hate).
- Childproofing: This is huge for parents. Sliding windows are dangerously easy for toddlers to open. Installing a secondary lock high up on the frame prevents little ones from opening the window and risking a fall.
- Cost Savings: A professional locksmith might charge you hundreds of dollars to secure your home. Doing this yourself? You are looking at $10 to $50 per lock. That is a massive saving.
- Weather Sealing: Tighter locks often mean a tighter seal against the weather, keeping your cool air in and the dust out.
Types of Sliding Window Locks: Choose the Best for Your Home
Before you buy, you need to know what fits. Not all locks work on all windows. Are your frames vinyl, aluminum, or wood? Do you want a lock you can see (visual deterrent) or one that is hidden?
Here is a breakdown to help you decide.
Type Description Price Range Best For Security Level
Pin Locks A large pin inserts through the frame to hold sashes together. $5 – $15 Vinyl & Wood Windows Medium
Bar/Stop Locks An extendable rod that blocks the track path. $10 – $30 Patio Sliders & Large Windows High
Keyed Locks A cylinder lock that bolts the window to the track/frame. $15 – $40 High-traffic areas & Ground floors Very High
Foot Locks Mounted at the base; operated by foot or hand. $20 – $50 Heavy Sliding Doors High
How to Pick Based on Window Material
- Vinyl Windows: Be careful with drilling. Vinyl is hollow inside. You don’t want to overtighten screws and crack the frame. Pin locks are fantastic here because the pin goes through the sash frame and into the inner frame, creating a solid bond.
- Aluminum Windows: These are tough but can be slippery for clamp-on locks. Drill-mounted keyed locks or track-blockers work best here.
- Wood Windows: You have the most flexibility here. Almost any lock type works, but make sure you pre-drill holes so the wood doesn’t split.
Top Recommended Styles
If you are shopping online or at a local store, look for Prime-Line or Defender security products. For a quick fix without tools, simple thumbscrew track locks are great, but for permanent security, stick to the Pin Lock or Keyed Sash Lock.
Tools and Materials You’ll Need for Installation

The beauty of this project is that you probably already have 90% of the tools in your junk drawer. You don’t need a contractor’s van full of equipment. If you are in an area like Lahore or any major city, a quick trip to a local hardware store will get you sorted for under $50 total.
Here is your checklist. Gather these before you start so you aren’t running around looking for a screwdriver halfway through.
Essential Tools
- Power Drill: This is the most important tool. Make sure it is charged.
- Drill Bit Set: You will need specific sizes for pilot holes (usually 1/8 inch or 3/32 inch).
- Screwdrivers: A Phillips head is standard, but check your lock kit.
- Measuring Tape: Guessing leads to holes in the wrong places.
- Pencil or Marker: A sharp pencil works on wood; a fine-tip marker is better for vinyl or aluminum.
- Centre Punch (Optional): Helps prevent your drill bit from slipping on aluminium frames.
- Safety Gear: Goggles are a must—metal or vinyl shavings can easily fly into your eyes.
Materials Per Window
- The Lock Kit: Ensure it comes with the mounting screws.
- Lubricant: Silicone spray for the tracks (might as well clean them while you are there!).
- Optional: If you are renting, look for adhesive locks or track clamps that require no drilling.
Pro Tip: If you are shopping locally, hardware stores often sell these locks in “contractor packs” or bulk bundles. If you are doing the whole house, buying in bulk can save you a significant amount of money compared to buying individual blister packs.
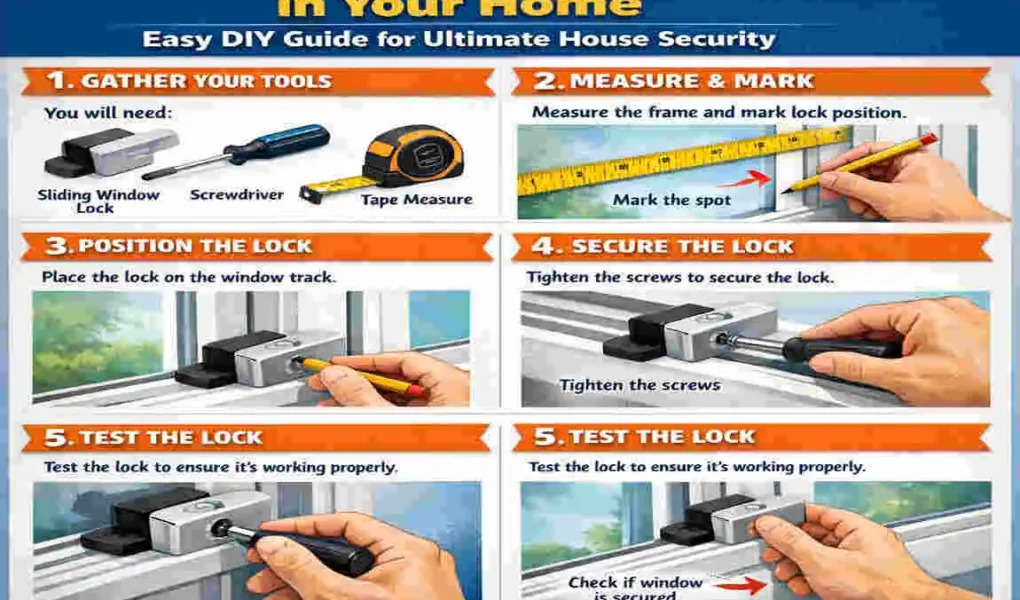
Step-by-Step Guide: How to install Sliding Window Locks in Your Home
Alright, this is the main event. We are going to break this down into bite-sized chunks so you can follow along easily. We will focus on the most common and effective DIY lock: the Pin Lock (also known as a plunger lock) and the Charley Bar.
Preparation: Measure and plan
Before you pick up that drill, stop and look at your window.
- Clean the Track: Vacuum out the dead bugs, dust, and old grease. A clean track ensures the window sits perfectly square, which is vital for the lock to line up.
- Inspect for Damage: If your window frame is already cracked or the glass is loose, fix that first. Installing a lock on a broken frame is like putting a bandage on a broken leg.
- Determine Position: Decide where you want the lock.
- Ventilation Mode: Some people install two locks—one to keep the window fully closed and another to allow it to open 3-4 inches for airflow while still locked.
Step 1: install Pin Locks for Quick security
Pin locks are popular because they prevent the window from sliding and from being lifted out of the track.
- 1. Mark Your Spot: Close the window tightly. locate the spot where the inner window sash (the part that moves) overlaps with the outer frame. You want to drill through the moving sash and into the stationary frame. Mark this spot with your pencil about halfway up the window for easy reach.
- 2. Drill the Pilot Hole: Warning: This is the tricky part. You must not hit the glass! Look at the edge of your window frame; the glass usually sits about 1/2 inch deep inside the frame. Drill your hole near the edge of the frame, away from the glass. Drill through the first sash, then change bits if necessary to drill the receiving hole in the second sash.
- 3. Insert the Pin: Place the metal housing of the pin lock over the hole you just drilled on the inner sash. Screw it into place using the provided screws.
- 4. Test the Slide: Insert the locking pin. Try to slide the window. It shouldn’t move. Try to jiggle it. It should feel solid.
Add Bar Locks for Maximum Strength
If drilling into the frame makes you nervous, or if you want a visual deterrent that thieves can see from the street, use a Bar Lock (Charley Bar).
- 1. Position the Bar: These usually mount on the side of the window frame, halfway up. When the window is closed, the bar folds down horizontally to wedge between the back of the moving sash and the window jamb.
- 2. Mark the Bracket Holes: Hold the bar in place (you might need a helper here). Mark the screw holes for the mounting bracket on the window jamb.
- 3. Secure the Brackets: Drill small pilot holes and screw the bracket in.
- 4. Adjust the Length: Most bars are telescopic. Lower the bar and adjust the length so it fits snugly against the window sash. It should be tight enough that the window has zero wiggle room, but not so tight that you have to force it down.
Secure with Keyed or Foot Locks
For sliding patio doors or large ground-floor windows, a foot lock or keyed cylinder lock is best.
- 1. Align at the Track: These locks usually sit on the bottom track. Close the window/door. Place the lock on the track so the bolt can slide into a hole you will drill in the frame or the opposing sash.
- 2. Pre-Drill Carefully: Mark the hole for the bolt bolt. Drill into the bottom rail of the moving sash (for foot bolts) or the track itself.
- 3. Mount the Housing: Screw the lock body into the track or floor.
- 4. Test Operation: Push the bolt in (or step on it for foot locks). Ensure it engages smoothly. Crucial: Keep the key nearby but out of reach of the window (don’t leave it in the lock!).
Final Checks and Testing
You are almost done! But before you pack up your tools, we need to stress-test your work.
- The Force Test: Lock the window. Try to open it with a reasonable amount of force (don’t break it, but give it a firm tug). It should not budge.
- The Lift Test: Try lifting the sliding panel. The new lock should catch it and prevent it from popping out of the track.
- Weatherproofing: If you drilled holes that go to the exterior (which you shouldn’t have, but accidents happen), seal them with a dab of silicone caulk to prevent water leaks.
Troubleshooting Common Issues
Issue Likely Cause Quick Fix
Loose Fit Pilot hole was too big. Use a larger screw or add a wood matchstick/filler to the hole.
Drill Bit Slip : Surface is too slick (Aluminium). Use a center punch or a piece of masking tape over the spot to catch the bit.
Window Won’t Slide Screw head is sticking out. Ensure you used “countersunk” screws that sit flush with the surface.
Maintenance Tips and Common Mistakes to Avoid
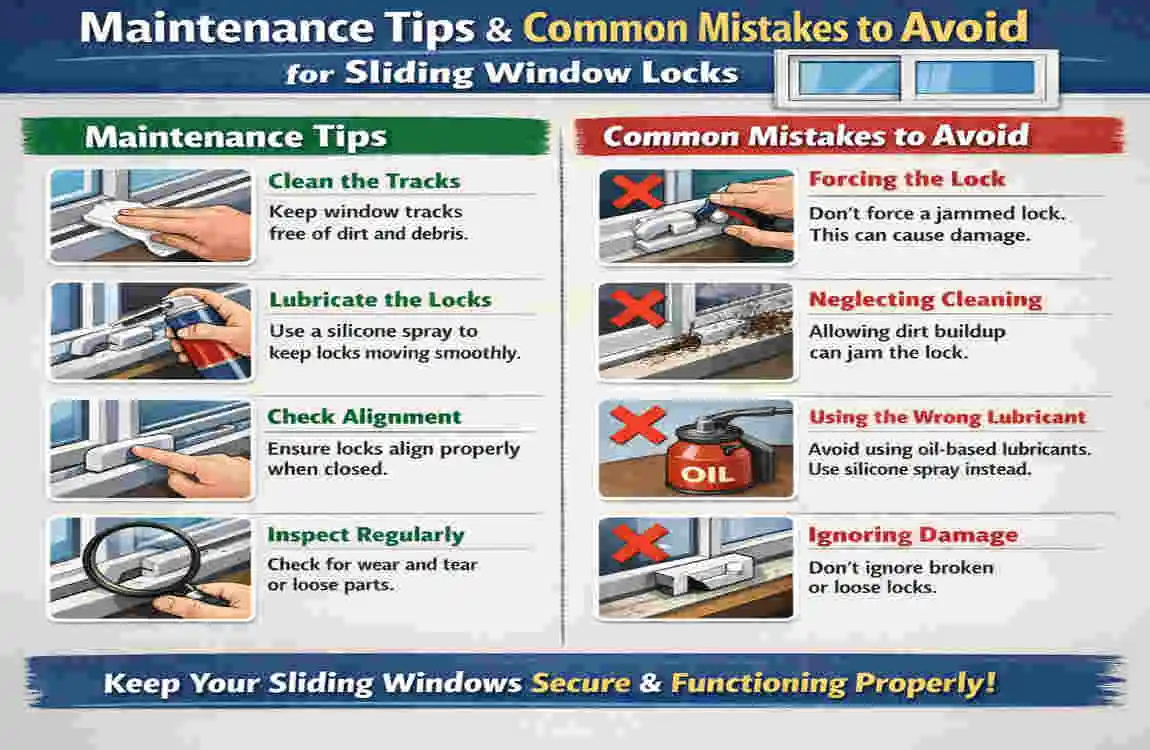
Congratulations! You have successfully installed your locks. To keep them working for years, you need a tiny bit of maintenance.
Routine Care
- Lubricate: Once a year, spray a little dry silicone lubricant into the keyhole or the sliding mechanism of the lock. Do not use grease or oil, as these attract dust and grit which will eventually jam the lock.
- Check Tightness: With the constant banging of closing windows, screws can loosen over time. Give them a quick check with a screwdriver every six months.
Mistakes to Avoid
- The “Eyeball” Method: Never drill without measuring. If your hole is even 2mm off, the pin won’t slide in, and you will be left with an ugly hole in your window frame.
- Ignoring the Glass Depth: This is the biggest disaster. Drilling into the glass instantly will shatter theantly. Always visualize where the glass sits inside the frame before you pull the trigger on the drill.
- Losing the Keys: If you install keyed locks, put the spare keys in a labelled box immediately. Trying to open a locked window during an emergency without a key is dangerous.
Boosting Overall Home security Beyond Window Locks
Learning how to install sliding window locks in your home is a massive step forward, but think of it as one layer of an onion. For ultimate security, you want multiple layers.
Consider pairing your new physical locks with electronic deterrence.
- Window Sensors: These are cheap peel-and-stick magnets. If the window opens while the alarm is set, a siren goes off.
- Motion Sensor Lights: install these outside your sliding windows. Burglars hate the spotlight.
- Glass Break Sensors: Since locks don’t stop someone from smashing the glass, a glass break sensor adds that final layer of protection.
FAQ Section
How long does it take to install sliding window locks in your home? It takes about 15 to 30 minutes per window. The first one might take a little longer as you get used to the tools, but once you get the hang of it, you will fly through the rest.
Are sliding window locks DIY-friendly for beginners? Absolutely. If you can hold a drill and read a tape measure, you can do this. Pin locks and bar locks are specifically designed for homeowner installation.
What if my windows have tempered glass? You need to be extra careful. Tempered glass cannot be cut or drilled—it will explode. However, you are drilling into the frame, not the glass. If you are nervous, use clamp-on track locks or adhesive locks that require zero drilling.
Can I install locks on old aluminum windows? Yes, in fact, older aluminum windows need them the most as their latches are often worn out. Clamp-on locks are usually the easiest solution for vintage aluminum frames.
Do these locks work for renters? If you are renting, you might not be allowed to drill holes. Look for removable track locks or sliding window bars. They provide excellent security but can be removed without leaving a mark when you move out.