You walk into your living room, the morning sun is streaming in, and your eyes go straight to that one specific spot. Maybe it’s a deep gouge from when you moved the sofa, a dark water stain from a forgotten plant pot, or a warped plank from a spill that happened months ago. A single damaged plank can ruin the entire vibe of a room. It sticks out like a sore thumb, nagging you every time you walk by.
For many homeowners, the immediate reaction is panic. You might have to refinish the entire floor or, worse, hire a professional contractor who will charge you thousands of dollars. But here is the good news: learning how to replace damaged hardwood flooring is an empowering project that is completely within your reach. You don’t need to be a master carpenter to achieve professional-looking results.
By taking the DIY route, you can restore your floor’s beauty and achieve seamless results while saving 50% to 70% compared to hiring a pro. While a professional might charge upwards of $3,000 for a small repair job due to minimum labor fees, you can often tackle the project for $500 to $1,000, depending on the materials you already own.
Why Replace Damaged Hardwood Flooring Yourself?

Before we dive into the “how,” let’s talk about the “why.” Hardwood floors are durable, but they aren’t invincible. Life happens. The most common types of damage we see include warping (cupping due to moisture), deep gouges (from heavy furniture or dropped objects), pet scratches, and water stains that turn the wood black.
When you notice this damage, calling a professional seems like the easy button, but it comes at a premium. Contractors have overhead costs, travel time, and minimum labor charges. If you only need to replace three or four planks, a contractor still has to charge you for a full day’s worth of logistics.
Here is a breakdown of why doing it yourself is a smart financial move:
Pro vs. DIY Comparison
Aspect Professional DIY
Cost $5 – $15 per sq. ft. (plus minimums) $2 – $5 per sq. ft. (materials only)
Time 3 – 7 days (scheduling delays) 1 – 2 days (on your schedule)
Control Limited (you get what you get) Full customization & attention to detail
Skills Needed : None , Basic tools / Handyman level
The savings are undeniable. Most of your expense in a DIY project goes strictly toward material costs, which generally range from $100 to $500, depending on the wood species. You eliminate the hefty labor fees.
However, there is a caveat. You should know when not to DIY. If you suspect the damage is structural—meaning the subfloor is rotting away—or if the damage covers more than 30% of the room, it might be time to call in the pros. But for those isolated, annoying, damaged boards? You have got this.
Assessing Damage: Is Replacement Needed?
Before you run to the hardware store, you need to play detective. Not every scratch requires a full plank replacement. Sometimes, sanding and refinishing will do the trick. Correctly assessing the situation is the first step in learning how to replace damaged hardwood flooring.
Step-by-Step Inspection
- Visual Check: Look closely at the board. Is the damage just on the surface (the finish), or does it penetrate deep into the wood fiber? If it’s just surface scratches, a touch-up kit might suffice. If the wood is black or cracked, it must be replaced.
- The Tap Test: Take a coin or a screwdriver handle and gently tap the damaged boards. Then, tap a healthy part of the floor. Do the damaged boards sound hollow? A hollow sound often indicates that the adhesive has failed or the subfloor beneath has issues.
- Moisture Check: This is crucial. If the damage was caused by water, you must ensure the area is dry before repairing it. Replacing a plank over damp subflooring will lead to mold and more warping.
Types Fixable via DIY
You can easily handle single or multiple plank replacements where the damage is localized. For example, if you have a patch of 5-10 boards near a sliding door that are sun-bleached or water-damaged, that is a perfect DIY candidate. However, if you notice the floor heaving in waves across the entire room, you likely have a widespread humidity issue that requires professional remediation.
Tools for Assessment
You don’t need much to assess the damage, but a few tools help:
- Flashlight: To check for the depth of scratches.
- Pry Bar: Used toUsed to test whetherwhether a board is loose gently.
- Moisture Meter: This is a pro tool you can buy for about $20-$40. It tells you the wood’s water content. If the reading is high, you must dry the area out with fans and dehumidifiers before you even think about installing new wood.
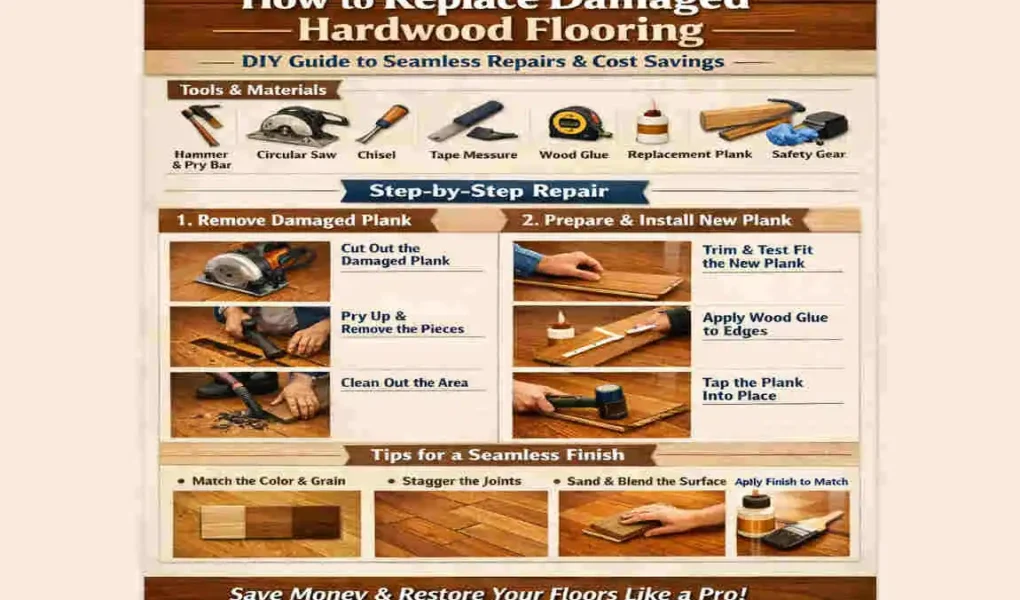
Tools and Materials You’ll Need for DIY Hardwood Replacement
You cannot do a good job with bad tools. The secret to a seamless repair lies in having the right equipment on hand before you start prying up boards. This ensures you aren’t running back and forth to the store in the middle of the project.
Essential Tools List
- Circular Saw: Use this to cut through the center of the damaged boards.
- Oscillating Multi-Tool: This is a lifesaver for making precise cuts near the edges of the board without damaging the surrounding floor.
- Pry Bar & Chisel: For leveraging the old wood out.
- Hammer & Nail Set: Essential for securing the new boards.
- Rubber Mallet: To tap boards into place without denting them.
- Safety Gear: Never skip this. You need heavy-duty gloves (splinters are real), safety goggles, knee pads, and a dust mask or respirator.
Materials Checklist
- Matching Hardwood Planks: This is the most critical part. You need to match the species (Oak, Maple, Cherry) and the width exactly. Always buy 10% extra to account for cutting mistakes.
- Wood Adhesive: A high-quality flooring glue.
- Finishing Supplies: If you are using unfinished wood, you will need stain and polyurethane.
- Wood Filler: To fill in nail holes.
Cost Estimator Table (For a ~10 sq ft repair)
Item Estimated Cost Where to Buy
Hardwood Planks $100 – $400 Home Depot / Lowe’s / Lumber Liquidators
Tools (if buying) $50 – $150 Amazon / Local Hardware Store
Finish / Supplies $50 Local Hardware Store
TOTAL $200 – $600
Sourcing Tip: The hardest part of this project is often matching the grain and color. If you have leftover planks from the original installation stored in your attic, you have hit the jackpot. If not, try to find a local salvage yard. They often have older wood that matches the “aged” look of your current floor better than brand-new wood from a big-box store.
Step-by-Step Guide: How to Replace Damaged Hardwood Flooring
Now, we get to the core of the project. We are going to break this down into four distinct phases. Take your time with each phase. Rushing is the enemy of quality here.
Preparation (The Key to Success)
Before you pick up a saw, you must prepare the room and the wood.
First, clear the room. You need space to move around. If you are only replacing a small area, you can move the furniture to the other side of the room, but give yourself plenty of working space.
Second, protect your surroundings. Replacing flooring creates a lot of dust. Hang plastic sheets over doorways and cover your furniture. This simple step saves you hours of cleaning later.
Third, and most importantly, acclimate your new planks. This is where many people fail. You cannot bring wood from a cold store and install it immediately. Bring the new wood into the room where it will be installed and let it sit for 48 to 72 hours. This allows the wood to expand or contract to match the humidity of your home. If you skip this, your new boards might shrink (leaving gaps) or expand (buckling) after installation.
Finally, use blue painter’s tape to mark the boards you intend to remove. This prevents you from accidentally cutting into a perfectly good plank.
Removing Damaged Planks
This part requires a steady hand. The goal is to get the bad wood out without touching the good wood next to it.
- Score the Edges: Use a sharp utility knife to score the finish along the seams of the damaged board. This cuts the varnish layer so that when you pull the board up, it doesn’t peel the finish off the neighbor board.
- The Center Cut: Set your circular saw depth to the exact thickness of your flooring (usually 3/4 inch). You do not want to cut into the subfloor. Make two parallel cuts down the center of the board, about an inch apart. Stop the saw a few inches before you hit the end of the board to avoid cutting the adjacent planks.
- The Cross Cut: Use your oscillating multi-tool or a sharp chisel to connect the cuts at the ends. Ideally, you want to cut a rectangle out of the center of the board.
- Remove the Center: Pry out the center strip you just cut. This relieves the pressure on the board.
- Remove the Sides: Now that the middle is gone, you can gently pry the remaining edges of the board inward. Be very careful with the tongue-and-groove side. You want to gently wiggle the tongue out of the groove on the adjacent board.
- Clean the Subfloor: Once the wood is gone, vacuum the subfloor. Remove any old staples, nails, or glue ridges. If the subfloor is uneven, sand it down. If you found moisture earlier, ensure this area is now bone dry.
Pro Tip: If you are removing multiple boards, stagger your removal. Don’t just rip them all out at once; take them out row by row to keep track of the pattern.
Installing New Hardwood Floor Planks
Now for the rewarding part: putting the floor back together.
- Dry Fit: Place your new board into the gap to see if it fits. It will likely be tight. You should sand the edges lightly.
- Prepare the Board: Because you can’t angle the board to lock the tongue-and-groove (since the surrounding floor is already down), you have to modify the new board. On the groove side of the new plank, use your table saw or chisel to shave off the bottom lip of the groove. This turns the board into a “drop-in” plank.
- Apply Adhesive: Apply a high-quality wood flooring adhesive to the subfloor. Do not use too much, or it will squeeze up through the cracks.
- Install: Insert the tongue side of the new board into the groove of the existing floor. Then, drop the modified groove side down flat.
- Secure: Use a rubber mallet and a tapping block to tap the board tightly against its neighbors.
- Fastening: Depending on your subfloor, you can face-nail the board with finish nails. Drill tiny pilot holes first to prevent splitting. Drive the nails in, then use a nail set to sink the heads below the surface of the wood. If you are using a floating floor, you will rely mostly on glue at the seams.
Image Series Idea: Imagine a series of photos here showing the “Bottom Lip Removal” technique—it is the secret sauce of repair work.
Finishing and Blending Repairs
If you used pre-finished wood that matches perfectly, you are done! But most of the time, you are using unfinished wood, or the color is slightly off.
- Fill the Holes: Use a wood filler that matches your species to fill the nail holes and any small gaps. Let it dry completely.
- Sand: Hand-sand the new boards. Start with 80-grit sandpaper if the boards are uneven, then move to 120-grit, and finish with 220-grit for a glass-smooth finish. Crucial: Sand slightly over the edges onto the old floor to help blend the new and old sections.
- Stain: This is the artist’s moment. Apply your stain. Always test the stain on a scrap piece of wood first. Apply it with a rag, let it sit for a minute, and wipe it off.
- Seal: Once the stain is dry (usually 24 hours), apply your polyurethane finish. You will likely need 2 to 3 coats. Lightly sand with very fine sandpaper between coats for the best adhesion.
- Feathering: To avoid a “patch” look, feather the new finish out onto the surrounding boards. This helps the repair disappear into the rest of the floor.
Cure Time: Keep pets and feet off this area for at least 24 to 72 hours. The finish might feel dry to the touch sooner, but it needs time to harden.
Cost-Saving Tips for Hardwood Flooring Replacement
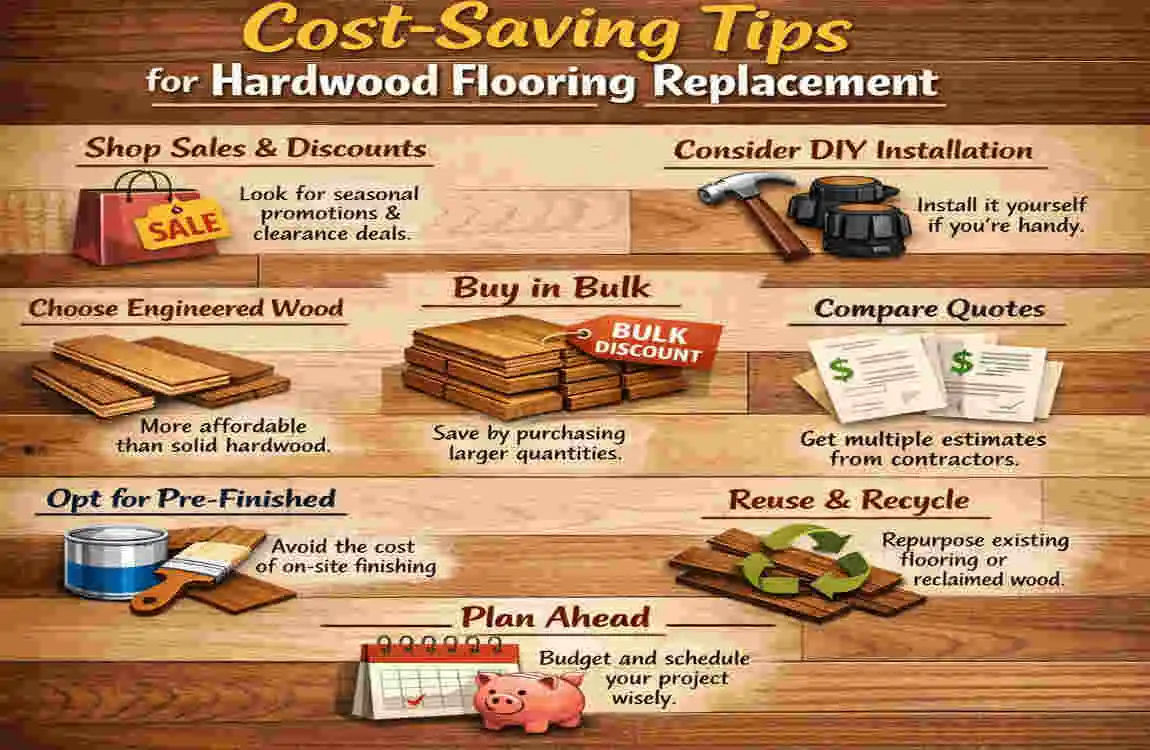
We know that budget is a big factor in deciding to DIY. Here are some savvy ways to keep your costs even lower.
- Hunt for Remnants: You usually don’t need a full box of wood. Check Facebook Marketplace, Craigslist, or eBay for people selling leftover boxes from their own renovations. You can often pick up a small bundle of high-quality oak or maple for pennies on the dollar.
- Tool Rental: If you don’t own a circular saw or an oscillating tool, don’t feel like you have to buy them. Big box hardware stores offer tool rentals for around $20-$40 per day. This is much cheaper than buying a $150 saw that you might only use once.
- Upcycle Adjacent Boards: If you are repairing a high-visibility area (like the center of the living room), consider stealing a board from a hidden area, like a closet or under the refrigerator. Put the new (possibly slightly mismatched) wood in the hidden spot and put the original, perfectly matched wood in the living room.
- Tax Deductions: While general repairs aren’t usually tax-deductible, if you are a landlord or work from a home office, keep your receipts. This maintenance might be a write-off.
By being smart with materials, you could bring a project that would cost $1,500 with a pro down to under $200.
Common Mistakes to Avoid When Replacing Hardwood Flooring
Even with a guide, things can go wrong. Here are the most common stumbling blocks we see DIYers hit, and how to avoid them.
- Rushing Acclimation: We mentioned this before, but it bears repeating. If you install wood the same day you buy it, it will warp. Patience is your best tool.
- Poor Color Matching: Don’t trust the color on the stain can. Wood varies. The age of your floor varies. Always test your stain on a scrap piece and let it dry. Old floors have ambered over time due to UV light; new floors have not. You should mix stains to get the right hue.
- Over-Sanding: When blending the repair, be careful not to sand the surrounding “old” floor too aggressively. You can sand right through the finish and the stain, leaving a bright spot that looks worse than the original damage.
- Skipping Safety: Sawdust from finished floors contains chemicals and varnish particles. Breathing this in is bad for your lungs. Wear your mask and keep the room ventilated.
Maintenance After DIY Repairs
Congratulations! You have successfully learned how to replace damaged hardwood flooring. Now, let’s make sure you never have to do it again.
Daily Care: Keep the floor clean. Dirt acts like sandpaper. Sweep or vacuum regularly. Avoid using wet mops; water is the enemy of wood. Use a damp microfiber cloth instead.
Long-Term Protection: Put felt pads under every piece of furniture. This prevents the gouges that lead to these repairs in the first place. If you have pets, keep their nails trimmed.
Climate Control: Wood reacts to humidity. Try to keep your home’s humidity levels between 40% and 60%. In the winter, use a humidifier; in the summer, use your A/C or a dehumidifier. This stability prevents the boards from expanding and contracting violently, which causes cracks and buckling.
FAQs: How to Replace Damaged Hardwood Flooring
Q: Can I replace just one hardwood plank? A: Absolutely. Replacing a single plank is a very common repair. As long as you can match the wood species and size, the process is straightforward.
Q: How much does it cost to replace damaged hardwood flooring? A: If you do it yourself, expect to spend between $2 and $5 per square foot for materials. Professional repairs will cost significantly more due to labor minimums.
Q: What is the difference between replacing solid wood and engineered wood? A: Solid wood is nailed or glued to a subfloor. Engineered wood is often “floating” (clicked together). Replacing a floating plank often requires unclicking the floor from the wall, then reinstalling it back to the damaged spot, which can be more labor-intensive than cutting out a single solid board.
Q: Are there tools for renters or methods that don’t require drilling? A: If you are renting, you should generally contact your landlord before doing structural repairs. However, for minor scratches, wax sticks and wood markers are great non-invasive tools to hide damage without replacing boards.