Is there anything more frustrating than watching your favorite houseplant slowly turn into a “leggy” mess? You know the look: long, bare stems with just a few sad leaves at the very end, stretching desperately toward the window. Or you may have a plant that has outgrown its space, taking over your living room like a green monster. If you are struggling with these issues or spotting yellowing leaves that ruin the vibe of your indoor jungle, you are not alone.
Learning how to cut house plants is the secret weapon that separates a novice plant owner from a true green thumb. It might feel scary at first—taking a pair of sharp scissors to something you’ve nurtured feels counterintuitive. What if you kill it? What if it never grows back? Put those fears aside. Pruning is actually one of the kindest things you can do for your greenery. It encourages fresh growth, keeps pests at bay, and helps you sculpt a fuller, healthier plant.
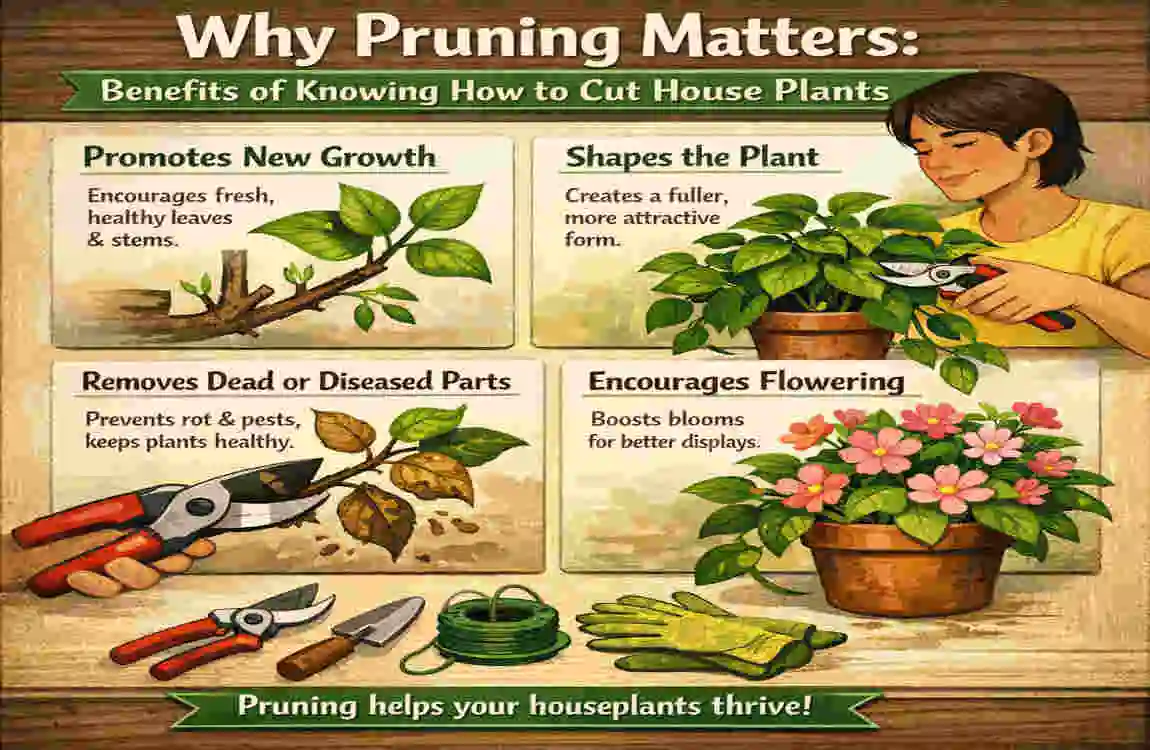
Why Pruning Matters: Benefits of Knowing How to Cut House Plants
You might be thinking, “In nature, nobody runs around with scissors trimming the rainforest.” That is true! However, in nature, plants have wind, animals, and weather events to break off dead limbs and manage growth naturally. Inside your luxury home, you are the force of nature. Understanding how to cut house plants isn’t just about aesthetics; it is about biology.
The Health Boost
Think of pruning like exfoliating your skin. When a plant has dead, yellowing, or diseased leaves, it is still wasting energy trying to keep those parts alive. By snipping them off, you redirect the plant’s limited energy resources toward new, healthy growth. Furthermore, thinning out dense foliage improves airflow between the leaves. In humid environments—like a non-air-conditioned room during a monsoon summer—stagnant air is a breeding ground for fungal infections and pests. A good trim keeps the air moving and the plant breathing.
Shape and Size Control
The most common reason people reach for the shears is to fix “legginess.” This happens when a plant isn’t getting enough light; it stretches its stems thin and long to reach the sun, leaving large gaps between leaves. By cutting back these long stems, you force the plant to grow more compactly.
The Science of “Bushier” Growth
Here is a quick science lesson. Plants have a hormone called auxin that is concentrated in the main tip of the stem (the apical bud). This hormone screams, “Grow up! Grow tall!” It actually suppresses the growth of side shoots. When you cut off that top tip, you remove the auxin source. Suddenly, the dormant buds further down the stem wake up and say, “It’s our time to shine!” This results in lateral growth, making your plant bushier and fuller rather than just tall and skinny.
Propagation Perks
This is the best part. When you learn how to cut house plants correctly, the pieces you cut off don’t have to go in the bin. Most clippings can be rooted in water or soil to create brand-new baby plants. It is the most cost-effective way to expand your collection or make gifts for friends.
Essential Tools for Cutting House Plants Like a Pro
You wouldn’t try to cut a steak with a spoon, and you shouldn’t try to prune a woody plant with dull craft scissors. Having the right gear makes the job cleaner, faster, and much healthier for the plant. A jagged cut from a dull tool crushes the stem tissue, inviting disease. A clean slice heals quickly.
Here is your toolkit for success:
Must-Have Equipment
- Bypass Pruners: These are the gold standard. Unlike “anvil” pruners that crush the stem against a flat surface, bypass pruners work like scissors with two curved blades sliding past each other. They are perfect for thicker, woody stems, such as a Rubber Plant or a mature Monstera.
- Sharp Scissors or Snips: For delicate, soft-stemmed plants like Pothos or Spider Plants, or for removing thin, dead leaves, a dedicated pair of sharp gardening scissors is ideal. They offer precision in tight spaces.
- Rubbing Alcohol (Isopropyl): This is non-negotiable. You must sterilize your blades before you start and between plants. This prevents you from accidentally spreading a bacterial infection or spider mites from one plant to another.
- Gardening Gloves: Some plants, like the Ficus family or Euphorbia, bleed a milky sap that can irritate the skin. Protect your hands!
Budget vs. Upgrade
You don’t need to spend a fortune, but investing in quality pays off. Here is a breakdown of what to look for, priced in Pakistani Rupees (PKR) for context, though these tools are available globally.
Tools Comparison Table
ToolBest Used ForPrice Range (PKR)Top Pick Features
Bypass Pruners Thick stems, woody branches, tough stalks 1,500 – 4,000 Look for carbon steel blades and ergonomic grips (e.g., Felco style).
Precision Snips Herbs, soft vines, deadheading flowers 500 – 1,500 Spring-loaded handles reduce hand fatigue.
Alcohol Spray Sanitizing tools effectively 300. Any generic 70% Isopropyl alcohol works.
Rooting Hormone Speeding up propagation 800 – 2,000. Powder or gel form helps cuttings root faster.
Step-by-Step Guide: How to Cut House Plants
Now that you are equipped, let’s get into the actual process. While every plant is slightly different, the core principles of how to cut house plants remain the same. Follow these steps to ensure a safe and effective trim.
Assess Your Plant
Take a step back. Look at the plant from all angles. Identify the problem areas.
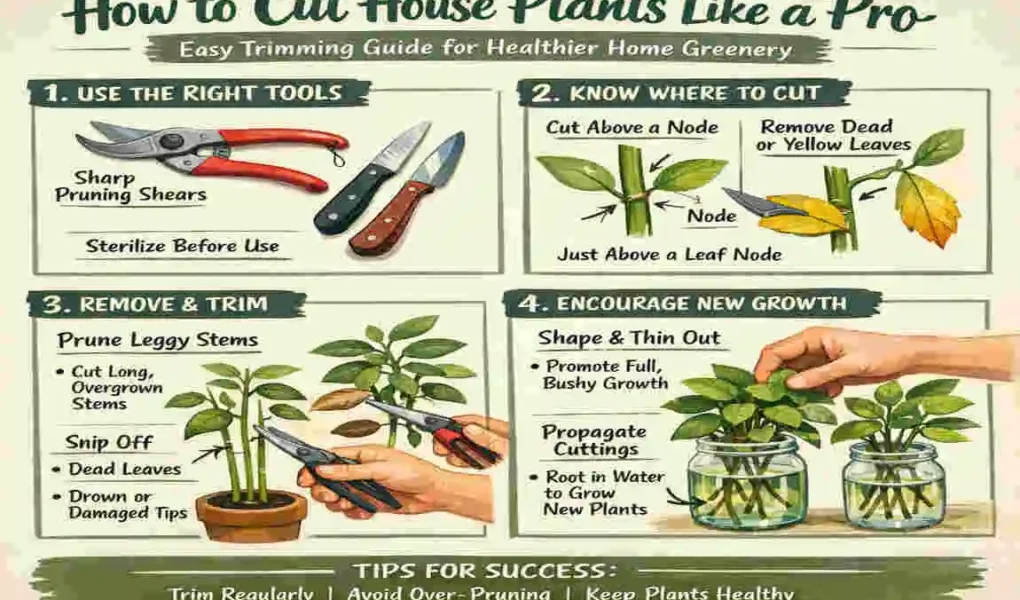
- Are there yellow or brown leaves?
- Is one side growing much faster than the other?
- Are there “leggy” stems with wide gaps between leaves?
- The Rule of Thirds: Never remove more than 1/3 of the plant’s foliage at one time. Plants need leaves to photosynthesize and make food. Taking too much can send them into shock.
Prep Your Workspace
Clear a table or a spot on the floor. Ideally, do this in a well-lit area so you can see exactly where you are cutting. Have your trash bin or compost bucket ready for the debris, and place your propagation station (jars of water) nearby if you plan to save the cuttings. Wipe down your blades with your rubbing alcohol.
Identify the “Node”
This is the most critical concept in pruning. A node is the point on the stem where leaves, aerial roots, or branches grow. It usually looks like a small bump, a line, or a slightly thicker part of the stem.
- To Encourage Growth: You want to cut just above a node. This tells the plant to activate that node and push out new growth from that point.
- To Remove Dead Weight: If you are removing a dead leaf or a whole branch, cut it back to the main stem or soil line, being careful not to damage the main trunk.
Make the Cut
Hold the stem steady with one hand and your tool in the other.
- The Angle: Make your cut at a 45-degree angle. This isn’t just for style. A slanted cut prevents water from pooling in the open wound (which can cause rot) and increases the surface area for healing.
- The Motion: Commit to the cut. Don’t hesitate or stare at the stem. One quick, clean snip is best.
Aftercare
Once you have finished trimming, give the plant a little love. Water it lightly if the soil is dry. Avoid placing it in harsh, direct sunlight immediately, as it might be a little sensitive. Wait at least two to three weeks before fertilizing, as you want the plant to recover from the “surgery” before you force it to eat a heavy meal.
Step 6: Timing Matters
The best time to perform a heavy prune is during the active growing season, which is typically spring and early summer. This is when the plant naturally pushes out energy and heals the fastest. Avoid heavy chopping in winter when the plant is dormant, as it won’t be able to regrow the lost leaves quickly.
How to Cut House Plants by Type: Plant-Specific Tips
A cactus is not a fern, and a fern is not a fiddle leaf fig. While the steps above are general, here is how to tailor your approach to specific plant families.
Vining Plants Pothos, Philodendron, Ivy
These are the most forgiving plants to practice on. They grow fast and love a haircut.
- The Goal: To make them fuller on top rather than long and stringy.
- Technique: Lift the long vines. Find a spot where the leaves are starting to look sparse. Locate a node—Snip just above it.
- Frequency: You can trim these every 6 to 8 weeks during the growing season. The more you trim the tips, the more the base will branch out.
Foliage Giants Monstera, Fiddle Leaf Fig, Rubber Plant
These plants can be intimidating because the leaves are so big.
- The Goal: Controlling height and removing damage.
- Technique: If your Rubber Plant is hitting the ceiling, you can “top” it. Cut the main trunk at the desired height, just above a leaf node. It feels scary, but it will force the plant to branch out laterally, creating a tree-like canopy.
- Warning: These plants often drip sap. Keep a cloth handy to wipe the “wound,” so it doesn’t drip on your floor.
Succulents and Cacti
These require a different approach because they hold so much water.
- The Goal: Fixing stretched (etiolated) growth or propagation.
- Technique: If a succulent has stretched tall, you can “behead” it. Cut the top rosette off with a sharp knife. Leave the bottom stem in the pot; it will grow new babies.
- Callousing: Unlike other plants, do not put succulent cuttings in water immediately. Let the cut end dry out and “callus” over for 1-2 days before planting to prevent rot.
Flowering Plants Peace Lily, Anthurium
- The Goal: Encouraging more flowers.
- Technique: This is called deadheading. Once a flower has turned brown and died, follow its stem all the way down to the base of the plant. Snip it off as close to the soil as possible. This stops the plant from wasting energy on seeds and encourages it to bloom again.
Plant Pruning Reference Table
Plant Type, Best Season, Where to Cut, and Propagation Potential
Monstera Spring Below the aerial root/node High (Water prop)
Snake Plant Spring/Summer Cut leaf at the base Moderate (Leaf cuttings)
ZZ Plant Rarely needed Remove yellow stalks at base Low (Slow stem prop)
Pothos Any time Just above any leaf node Very High (Water prop)
Ficus/Tree Early Spring Top of main trunk Moderate (Woody stem)
Propagation Magic: Turn Cuttings into New Plants
You have done the hard work of learning how to cut house plants, and now you have a pile of stems on the table. Don’t throw them away! This is free greenery.
The Water Method
This is the easiest and most satisfying method.
- Take your cutting. Ensure it has at least one or two nodes (the bumps).
- Remove the lower leaves so they don’t sit in water (which can cause rot).
- Plop the stem into a jar of clean water. Ensure the node is submerged.
- Place it in bright, indirect light.
- Change the water once a week. In a few weeks, you will see white roots shooting out!
The Soil Method
Some people prefer going straight to dirt.
- Dip the cut end of your stem into rooting hormone powder. This isn’t required, but it speeds things up.
- Poke a hole in moist potting soil with a pencil.
- Insert the cutting and pat the soil down around it.
- Keep the soil consistently moist (but not soggy) for the first month.
Success Rates
Not every cutting will survive, and that is okay! Soft-stemmed plants like Philodendrons have about an 80-90% success rate. Woody plants take longer and can be finicky. Patience is key.
Common Mistakes When Learning How to Cut House Plants
Even pros make mistakes. Here are the pitfalls to avoid so you don’t accidentally hurt your green friends.
The “Hack Job” This happens when you use dull scissors. Instead of slicing the stem, you crush it. This crushed tissue dies, becoming a gateway for bacteria. Solution: Sharpen your tools or buy new ones.
Over-Pruning. It is easy to get carried away. You start snipping, and suddenly the plant is bald. Remember, the plant needs leaves to make food. Solution: Stick to the 1/3 rule. If you need to cut more, wait a month for the plant to recover, then cut again.
Wrong Timing Pruning in the dead of winter (unless it’s just removing dead leaves) is risky. The plant is dormant, and healing takes much longer, leaving it vulnerable. Solution: Wait for the warmth of spring.
Leaving “Stubs” When you cut a branch halfway between nodes, you leave a “stub.” This piece of stem has no growth point, so it will just rot and look ugly. Solution: Always cut right above the node or back to the main trunk.
Aftercare & Troubleshooting for Pruned Plants
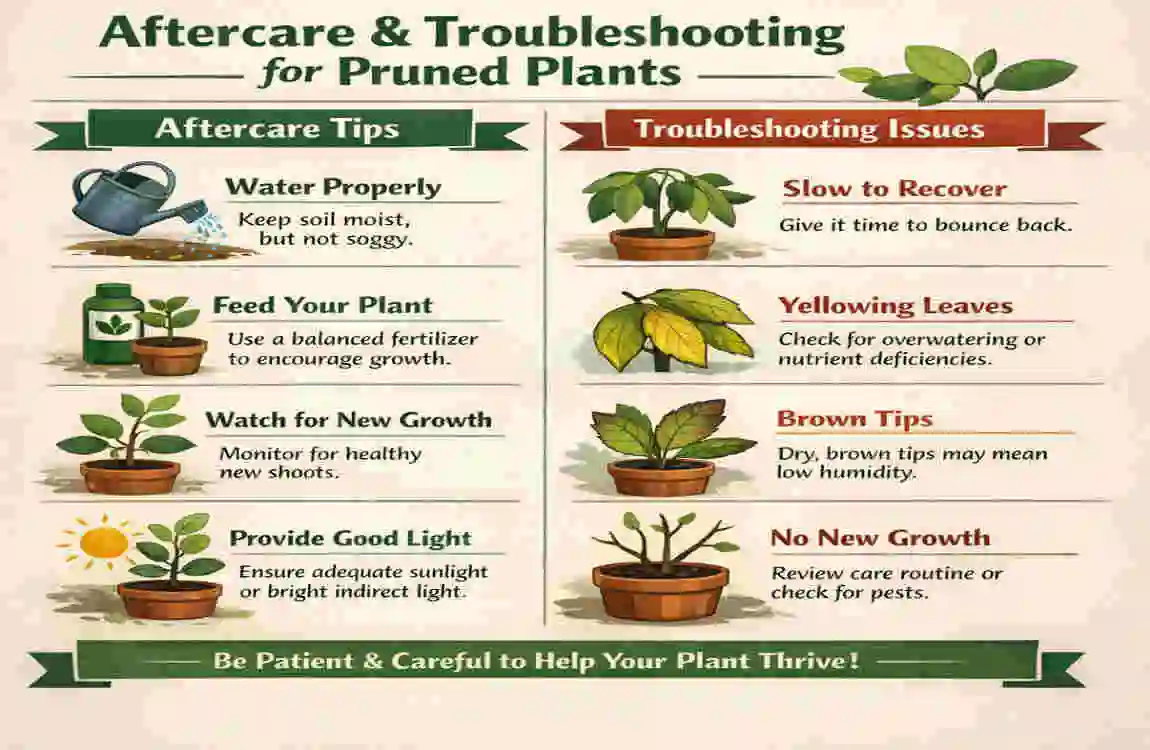
You have made the cut. Now what? Your plant is in recovery mode.
- Lighting: Ensure the plant gets its preferred light. Pruning stimulates growth, but light powers it. If you prune a plant and leave it in the dark, the new growth will be weak and stringy—exactly what you were trying to fix!
- Watering: Be mindful. If you removed a lot of leaves, the plant‘s water requirement might drop slightly because there is less surface area for transpiration. Check the soil with your finger before watering automatically.
- Pest Watch: Fresh sap smells delicious to bugs. Keep an eye out for aphids or mealybugs near the fresh cuts. If you see them, wipe them off immediately with a neem oil solution. This is especially important in humid climates like Lahore or coastal cities, where pests thrive in the moisture.
FAQs
How to cut house plants without killing them? The key is to never remove more than one-third of the foliage at a time. Always use sharp, sterilized tools to make clean cuts, and cut just above a “node” (the bump where leaves grow) to encourage new stems to form.
What tools do I need to cut house plants? For most indoor plants, a pair of sharp bypass pruners or gardening scissors is sufficient. You also need rubbing alcohol to sterilize the blades to prevent the spread of disease.
What is the best time to prune indoor plants? The best time is during the active growing season, which is typically spring and summer. Avoid heavy pruning in winter, when plants are dormant, as they heal more slowly.
Can I cut the brown tips off plant leaves? Yes! You can trim brown leaf tips to improve the plant’s appearance. Use sharp scissors and follow the leaf’s natural shape. However, this is usually a sign of low humidity or watering issues, so check your care routine too.
Does pruning make house plants grow faster? Yes, in a way. Pruning the tips of stems removes the hormone that suppresses side growth. This encourages the plant to invest energy in lateral branches, making it grow bushier and fuller.