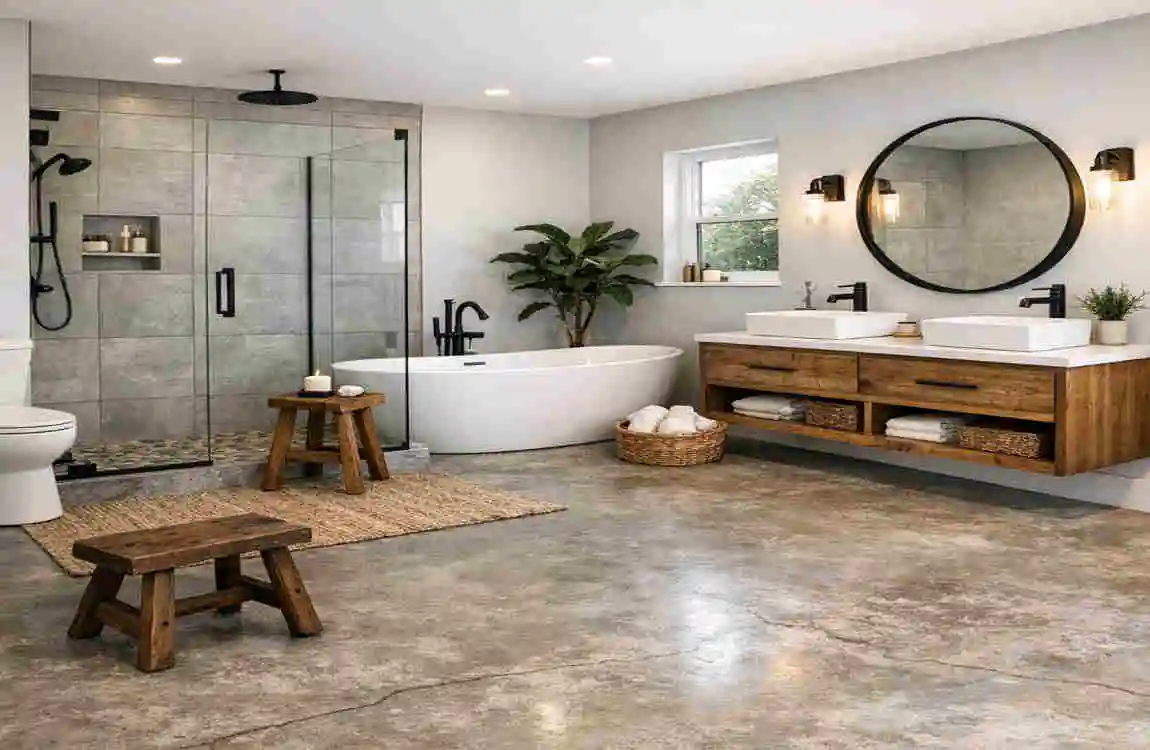
Imagine this: You have a perfect spot in your home for a new bathroom. It could be in the basement, a converted garage, or a new extension. You’re excited to start, but then you look down and see it—a solid, thick, unforgiving concrete slab.
For many homeowners, the idea of building a bathroom on a concrete slab feels like a mission impossible. You might think, “How do I get the pipes under there?” or “Is it going to cost a fortune to break through that rock?”
Why Build a Bathroom on a Concrete Slab
Before we pick up a sledgehammer, let’s talk about why you’re making a great choice. Many modern homes, especially in urban areas like Lahore, are built on slab foundations. It isn’t just about what was already there; there are genuine perks to this style of construction.
Cost-Effectiveness and Savings
Believe it or not, a bathroom addition on a concrete slab can actually save you money in the long run. When you build on a slab, you don’t have to worry about joists rotting, floorboards creaking, or the expensive excavation required for a deep crawl space. Generally, slab foundations can cut your initial material costs by about 15% to 25% compared to framed floors. You are essentially using the earth as your support system, which is as cheap as it gets!
Durability and Moisture Resistance
If you live in a climate with high humidity or heavy monsoon seasons, concrete is your best friend. Unlike wood, concrete doesn’t rot when it gets damp. In a bathroom—where water is everywhere—having a solid stone base means you have a natural defense against mold and structural decay. It’s a “set it and forget it” foundation that can last a century.
Space Efficiency
When you build on a slab, you aren’t elevating the house. This is perfect for homes where ceiling height is a concern. You get to keep every inch of vertical space because your floor starts right at the ground level. For many slab homes in Pakistan, this is the only way to add a powder room or a guest bath without altering the entire house’s profile.
Tools and Materials Needed
You wouldn’t go into battle without armor, and you shouldn’t start a concrete slab bathroom renovation without the right gear. Working with concrete requires some heavy-duty equipment that you might not have in your standard toolbox.
To make things easy, I’ve broken down exactly what you’ll need into a handy table.
CategoryEssential ItemsPurpose
Heavy Tools: Angle grinder, electric jackhammer, wet saw. Cutting through the concrete and breaking it up for pipe trenches.
Precision Tools: Laser level, tape measure, chalk line. Ensuring your drains have the right “slope” so water actually moves.
Plumbing Supplies: PVC drain pipes (3″ and 2″), PVC primer/glue, P-traps. The “veins” of your bathroom that carry waste away.
Construction Materials: Pressure-treated 2x4s, FRP panels, cement backer board. Building the walls and preparing for tile.
Waterproofing: Liquid membrane (like RedGard), silicone caulk, keeping water inside the shower and off your slab.
Safety Gear: N95 Respirator, heavy-duty gloves, safety goggles. Protecting you from concrete dust and flying stone chips.
Preparation and Planning Phase
Success in any renovation is 90% planning and 10% perspiration. If you start cutting into your floor without a plan, you might hit a main water line or find out your toilet doesn’t fit the space.
Assess Your Concrete Slab
First, we need to know what we are working with. Walk around the area where the bathroom will go. Are there major cracks? If you see a crack wider than a coin, investigate whether the slab is shifting.
You should also check the load-bearing capacity. Most residential slabs are designed to hold at least 100 pounds per square foot, which is plenty for a bathroom, but if you’re planning a giant cast-iron soaking tub, you might want to double-check. A simple “dye test” (pouring water with food coloring) can help you see if existing cracks are leaking moisture from the ground up.
Design and Layout
Now, grab your graph paper or a digital design app. You need to sketch out exactly where the toilet, sink, and shower will go.
Why is this critical? Because on a concrete slab, your plumbing is “set in stone”—literally. Once you pour the concrete back over the pipes, moving a toilet two inches to the left becomes a nightmare.
- The Golden Rule of Drainage: Your pipes must slope downward. In Pakistan, the standard is usually 1/4 inch per foot of horizontal pipe. If it’s too flat, things get clogged. If it’s too steep, the water runs faster than the waste, which can also cause clogs.
- Space Requirements: For a comfortable powder room, aim for at least 8 feet by 10 feet. If you’re tight on space, you can go smaller, but check your local building codes first.
Obtain Permits and Hire Pros
I know, nobody likes paperwork. However, if you live in a city like Lahore, getting MCD (Municipal Corporation) approvals is vital. If you ever try to sell your home and the bathroom isn’t on the deed or doesn’t meet code, it can ruin the sale.
Even if you are a DIY master, I highly recommend hiring a professional plumber for the “rough-in” phase. They know how to vent the pipes so your bathroom doesn’t smell like a sewer. It’s worth the investment for peace of mind.
Step-by-Step Construction Guide
This is the core of our journey. We are going to take it step by step, from a solid floor to a finished bathroom. Grab your safety gear; it’s about to get dusty!
Mark and Cut Slab Openings
Start by using your chalk line and a laser level to mark the precise locations for your pipes’ trenches. You aren’t just cutting a hole for the toilet; you are cutting a path from the bathroom to the house’s main sewer line.
Use a wet saw with a diamond blade to cut the edges of the trench. The water keeps the dust down (trust me, concrete dust gets everywhere). Once the edges are cut, use your rented electric jackhammer to break up the center.
Important: Dig out the dirt under the concrete to a depth of about 8 to 12 inches. This gives you room to lay your pipes and add a gravel bed for support.
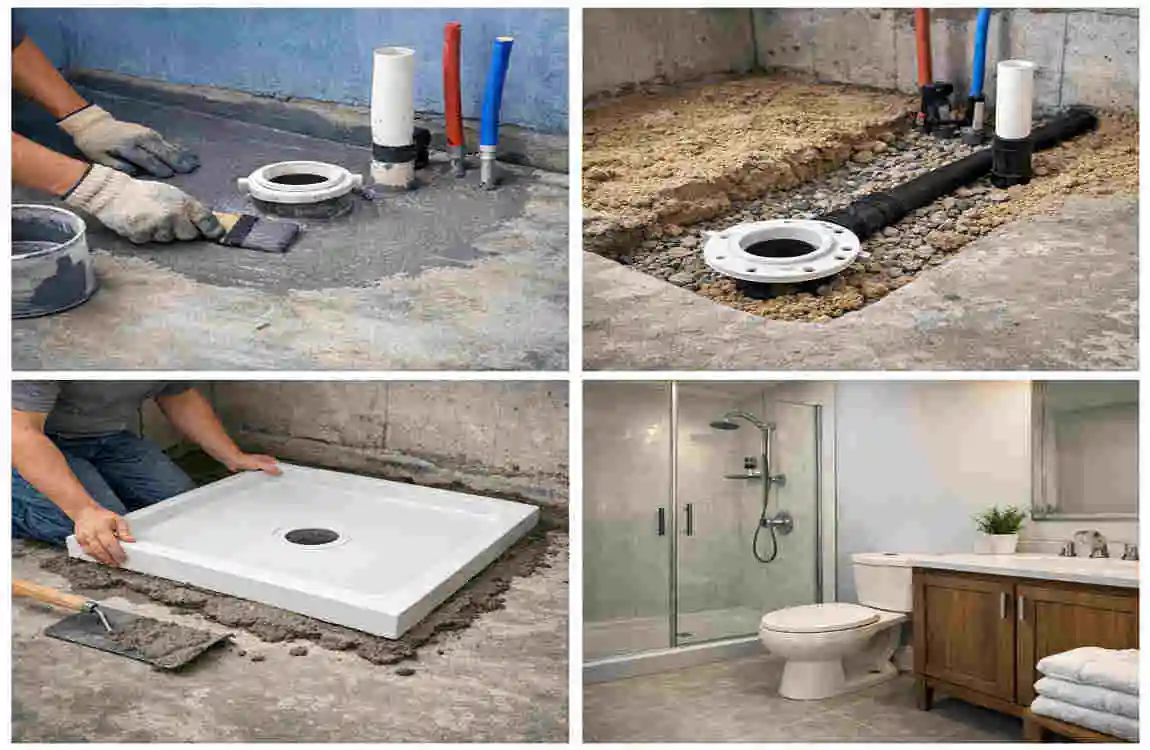
install Plumbing Rough-In
Now we lay the “bones” of the bathroom. You’ll be using PVC pipes.
- The Toilet: Needs a 3-inch or 4-inch pipe.
- The Sink and Shower: Usually, 2-inch pipes are fine.
When you connect the pipes, use plenty of PVC primer and glue. You do not want a leak under a concrete slab! Once the pipes are in place, you must pressure test them. Plug the ends and fill the system with water or air (usually 50 PSI for 15 minutes) to ensure there are no drips.
Wait! Before you backfill the trench, take photos of the pipes with a measuring tape next to each. If you ever have a problem 10 years from now, you’ll know exactly where the pipes are located under the floor.
Frame Walls and install Vapor Barrier
Once the plumbing is inspected and the concrete is patched back up (use a high-strength concrete mix), it’s time to build the walls.
On a slab, you cannot use regular wood for the “bottom plate” (the piece of wood that touches the floor). You must use pressure-treated lumber. Concrete naturally holds moisture, and regular wood will rot within a few years if it’s sitting directly on the slab.
After the studs are up, install a vapor barrier. This is usually a thick plastic sheet or a specialized membrane, such as Kerdi. This prevents moisture from the ground from seeping into your wall insulation, which can cause mold.
Electrical and Ventilation Setup
Bathrooms are wet places, so electrical safety is paramount. You must use GFCI (Ground Fault Circuit Interrupter) outlets. These are the ones with the “Reset” button that pop up if they detect water, preventing electrocution.
Don’t forget the exhaust fan. Since you are on a slab, you might not have a crawl space to vent through, so you’ll likely need to vent through the wall or up through the roof. Aim for a fan with at least 50 CFM (Cubic Feet per Minute) to keep the steam out.
Flooring and Shower Pan
This is where the bathroom starts to look like a bathroom. You have two main choices for the shower:
- A Pre-fab Pan: Easy to install, sits right on the slab.
- A Custom Tiled Floor: Requires you to create a “sloped bed” of mortar so the water flows to the drain.
For the rest of the floor, use a self-leveling compound. Concrete slabs are rarely perfectly flat. This liquid “magic” pours out and settles into a perfectly level surface, making your tile job much easier.
Step 6: Fixtures, Walls, and Finishing
Hang your cement backer board on the walls (it’s better than drywall for wet areas). Then, start tiling!
- The Vanity: Bolt it to the wall studs for stability.
- The Toilet: Set it on a wax ring over the pipe you installed in Step 2.
- The Grout: Use a high-quality, mold-resistant grout.
Once everything is dry, apply a bead of 100% silicone caulk around the base of the toilet, the sink, and the shower corners. This is your last line of defense against leaks.
Common Mistakes to Avoid
Even pros make mistakes. Here are the “big ones” that can turn your dream bathroom into a nightmare.
- Skipping the Waterproofing: Many people think, “It’s just concrete, it’s fine.” Wrong. Concrete is porous. If you don’t use a liquid membrane like RedGard before tiling, water will eventually soak through and cause the tile to pop off.
- Improper Pipe Slope: I mentioned this before, but it’s the #1 cause of failure. If your drain doesn’t have a 1/4-inch-per-foot drop, you will be calling a plumber every month to snake it.
- Ignoring the “P-Trap”: Every drain needs a P-trap (that U-shaped pipe). It holds a little water, which acts as a seal, preventing stinky sewer gases from entering your home.
- Cheap Ventilation: If your bathroom smells like a locker room and the mirrors are always foggy, your fan isn’t strong enough. Don’t skimp here!
MistakeConsequencePrevention
No Vapor Barrier, Mold and rot in walls. Use 6-mil poly or membrane
Wrong Wood on Floor: Structural rot. Use Pressure-Treated lumber
Poor Sealing, Water damage to the slab. Use 100% Silicone caulk.
Cost Breakdown and Timeline
If you are building in a market like Lahore, Pakistan, prices can vary based on the quality of tiles and fixtures you choose. Here is a realistic estimate for a standard 10×10 ft bathroom.
ItemEstimated Cost (PKR)Timeline
Materials (Pipes, Wood, Cement, Tile) 300,000 – 450,000 1 Week (Shopping/Delivery)
Labor (Plumbing, Masonry, Electric) 350,000 – 500,000 3-4 Weeks
Fixtures (Toilet, Sink, Shower Head) 100,000 – 200,000 N/A
Permits & Misc 50,000 1-2 Weeks
TOTAL ~800,000 – 1,200,000 Approx. 5-7 Weeks
How to save money? You can save about 30% on the total cost by doing the demolition (jackhammering) and painting yourself. Leave the plumbing and electrical to the experts!
Maintenance Tips for Longevity
Congratulations! You’ve built it. Now, how do you keep it looking new?
- Grout Cleaning: Once a month, use a mild cleaner on your grout. If it starts to crack, patch it immediately to keep water from getting under the tiles.
- Check the Seal: Once a year, look at the caulk around your tub and toilet. If it’s peeling, scrape it off and put down a fresh bead. It takes 10 minutes and saves thousands in water damage.
- Water Softeners: If you live in an area with “hard water” (high mineral content), consider a whole-house filter. This prevents white crusty buildup on your beautiful new faucets.
- Inspect the Drain: Every few months, pour a gallon of boiling water down the drains to help clear out any soap scum or hair buildup before it becomes a clog.