Metal roofing has become one of the most trusted roofing choices for homes, barns, workshops, commercial buildings, and agricultural structures. It is easy to see why. A well-installed metal roof can last 50 years or more, withstand harsh weather, reflect heat, and reduce long-term maintenance costs. Many modern metal roofing systems can withstand winds up to 140 mph, making them a solid choice in storm-prone areas.
That is why learning how to attach metal roofing panels properly matters so much. The attachment process affects everything from leak protection to wind resistance to the overall look of the finished roof. A roof can have premium panels and still fail early if the screws are installed incorrectly, the overlaps are too short, or the flashing is omitted.
Tools and Materials You Will Need
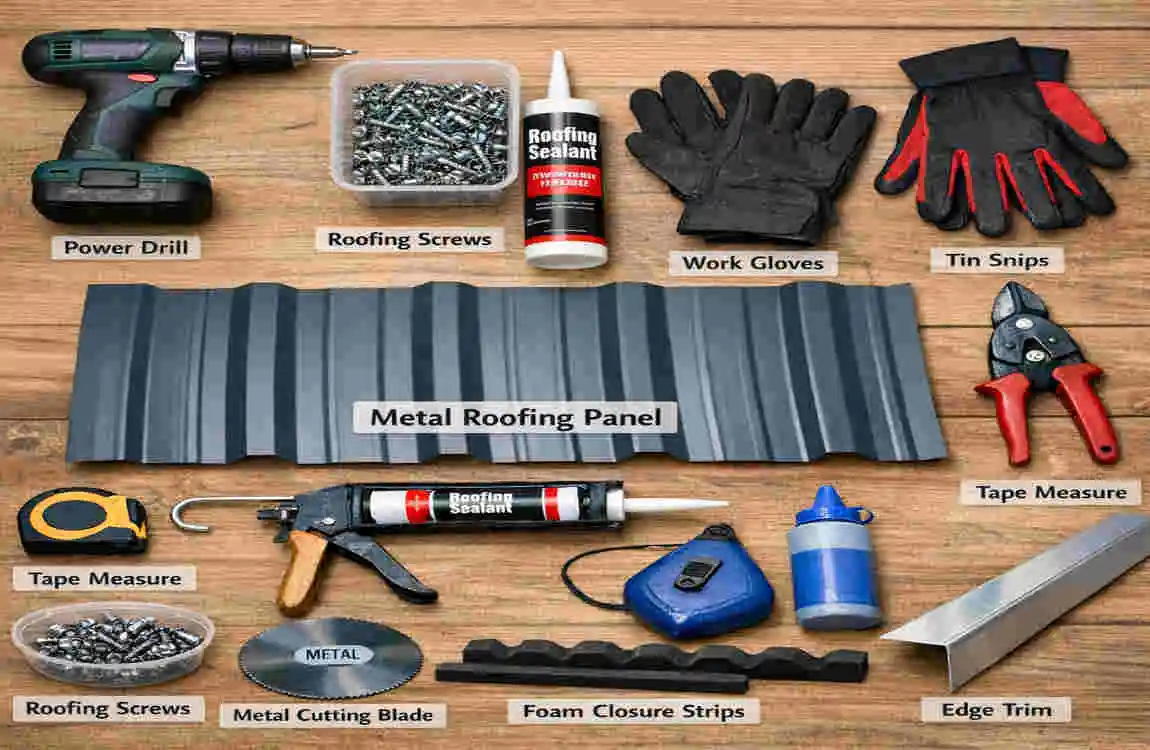
Before you start attaching panels, gather everything in one place. This saves time, reduces mistakes, and keeps the job site safer. Good preparation also helps you move through the installation without stopping every few minutes to look for missing items.
Fasteners
The most important hardware for this job is the metal roofing screw. In most cases, you will want #10 or #12 screws with neoprene washers. These washers compress around the screw head, helping create a watertight seal. Most installers use screws that are 1.5 to 2 inches long, but the correct length depends on your panel profile and roof deck thickness.
Avoid nails for most modern metal roofing systems. Screws hold better, resist pull-out, and create a more secure attachment in high winds.
Cutting Tools
You may need to trim panels at the eaves, ridge, valleys, rakes, or around vents and chimneys. Common cutting tools include:
- Tin snips for small cuts and detail work
- Nibblers for clean, controlled cuts with less heat
- Circular saws with metal-cutting blades for long, straight cuts
Each tool has its place. Tin snips are great for accuracy, while saws save time on large jobs.
Safety Gear
Never treat roof safety as optional. Metal panels can be slippery, sharp, and dangerous on steep slopes. At minimum, use:
- Safety harness
- Gloves
- Non-slip boots
- Eye protection
- Ear protection
Other Essentials
You will also need a few support tools to keep the installation clean and accurate:
- Chalk line
- Butyl tape or sealant
- Synthetic underlayment
- Drill or screw gun
- Ladder
- Measuring tape
High-quality materials matter. Cheap fasteners and low-grade sealants can lead to early leaks, rust, and callbacks.
Fastener Comparison Table
Fastener Type Best For Spacing
Exposed Screw Corrugated panels 12–24 inches along ribs
Hidden Clip Standing seam panels Every 12 inches at overlaps
Wood grip Screw Installing over shingles or wood decking 18–24 inches in the field
If you want a roof that stays tight and dry for decades, start with dependable materials. It makes every later step easier.
Preparation Steps Before Installation
A good metal roof starts with a solid base. If the roof deck is weak, uneven, or poorly protected, the panels will not perform the way they should. Preparation may not be the most exciting part of the project, but it is one of the most important.
Inspect the Roof Deck
Start by checking the decking carefully. Look for:
- Rot
- Soft spots
- Loose sheathing
- Water damage
- Sagging areas
Walk the roof with care and pay attention to any places that feel weak underfoot. Replace damaged wood before you install anything. Metal panels should sit over a stable, secure surface. If the deck moves, flexes, or dips too much, the roof may develop visible waves, poor screw holding strength, or future leaks.
Remove Old Roofing if Needed
Some metal roofs can go over existing shingles, but that does not always mean it is the best choice. If the old roofing is damaged, uneven, or already holding moisture, remove it. Starting fresh makes it easier to inspect the deck and build a clean roofing system from the bottom up.
If you install over shingles, make sure local codes allow it and that the structure can handle the added weight. In many cases, installers use furring strips or battens to create a flat surface and ventilation space.
Install Underlayment
Once the deck is ready, add a high-quality synthetic underlayment. This layer acts as a backup barrier against water. Even though metal roofs shed water well, underlayment adds valuable protection against wind-driven rain, condensation, and minor installation errors.
In roof valleys and other vulnerable areas, use ice-and-water shield or another self-sealing membrane. Valleys take on more water flow than most roof sections, so they need extra protection.
Add Drip Edge
Next, install the drip edge along the eaves and rakes. This metal flashing helps direct water away from the roof deck and into the gutters. It also gives the roof edge a cleaner finish and supports the first panel line.
Drip edge placement matters. If it is crooked or loose, the first row of panels may also end up misaligned. Take a little extra time here, and you will make the entire panel layout easier.
Snap Chalk Lines
Before you attach any metal roofing panels, mark your layout. Use a chalk line to snap straight reference lines from the eave to the ridge. This helps you keep every panel square and evenly spaced.
Even a small alignment error on the first panel can turn into a major problem by the time you reach the far side of the roof. Straight lines help you avoid drifting, uneven overhangs, and awkward cuts at the end of the run.
Safety Comes First
Roof preparation also includes planning for safe access. If the roof is steep, use roof jacks, scaffolding, or proper fall protection systems. Never rush setup. A safe job site helps you work more accurately and with more confidence.
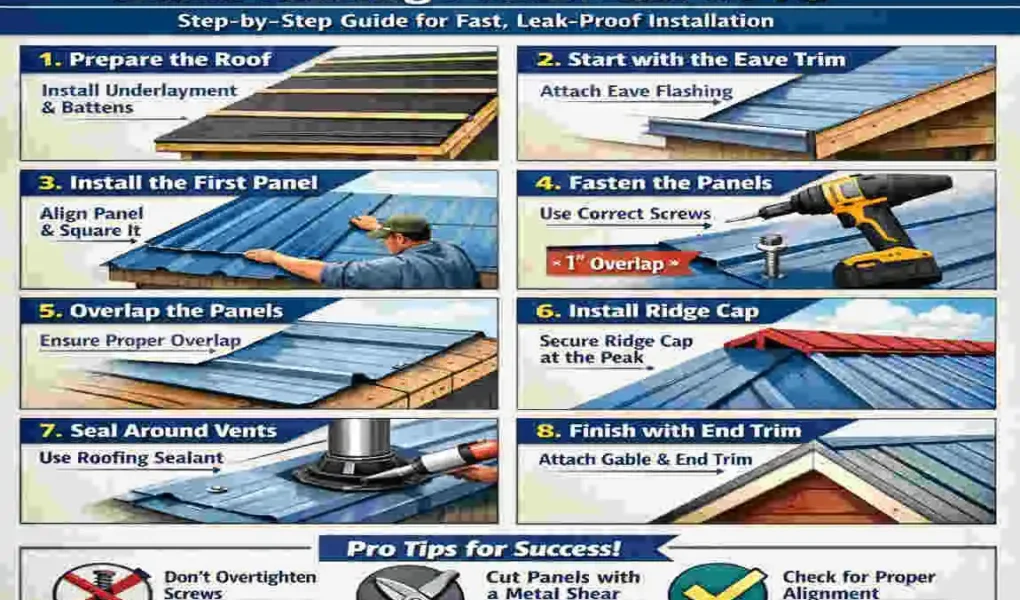
Step-by-Step Installation Guide
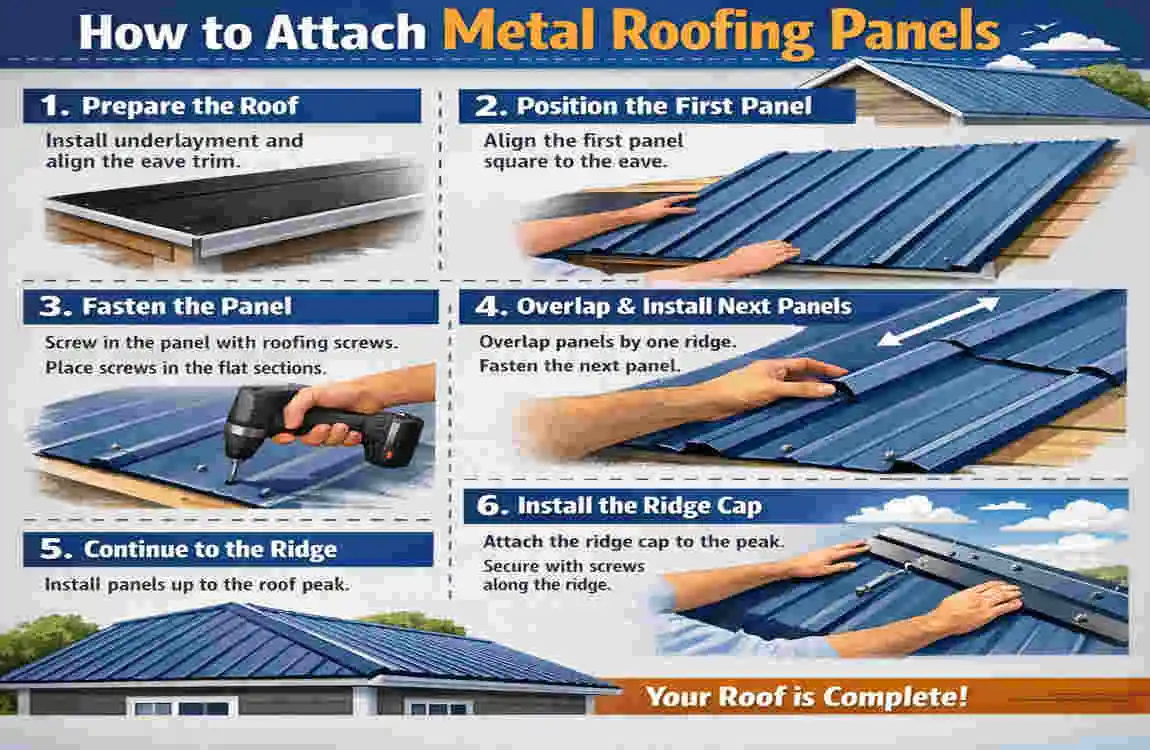
This is the core of the job. If you want to understand how to attach metal roofing panels correctly, this is where the process comes together. Each step builds on the one before it, so do not skip ahead too quickly.
Measure and Cut Panels
Accurate measurement makes installation smoother from the start. Measure from the eave to the ridge and confirm each roof plane separately. Do not assume both sides of the roof are the same. Older buildings, additions, and barns often have small differences that can throw off panel lengths.
In most cases, order panels that are 2 to 3 inches longer than the measured roof run. This gives you enough material for a proper overhang at the eave. You can trim if needed, but it is much harder to fix a panel that is too short.
When cutting, use the right tool for the job. Tin snips work well for smaller cuts and trimming corners. A nibbler creates clean cuts with less edge distortion. A metal-cutting saw blade can help with long, straight cuts, especially on larger panels.
Always wear gloves when handling cut metal. The edges can be sharp, and small burrs can cause serious cuts.
Another detail many people forget is thermal expansion. Metal expands and contracts with changes in temperature. Leave about a 1/8-inch gap at the ends when required by the manufacturer, especially in systems designed to allow movement. This helps prevent buckling, oil canning, or stress around fasteners.
Measure twice. Cut once. Then carefully stack the prepared panels on padded supports so they do not scratch during installation.
Install the First Panel
The first panel sets the tone for the entire roof. If it goes crooked, every panel after it will fight you. That is why this step deserves patience.
Start at the eave corner recommended by the panel manufacturer. For many exposed-fastener systems, installers begin at the lower edge and work across the roof. Align the panel with the drip edge and leave a 1 to 2 inch overhang at the eave, depending on your gutter setup and panel type.
Check the panel for squareness before fastening. Use your chalk line and confirm that the panel runs straight from eave to ridge. It should sit cleanly without twisting or leaning.
Some installers like to pre-drill holes, especially when working on detailed layouts or thicker panels. If you pre-drill, drill only in the recommended fastening zones. On many systems, that means drilling in the flat areas or the rib crowns, depending on the panel design. Always follow the panel manufacturer’s pattern. Incorrect screw placement can lead to leaks.
Begin fastening from the top down in a consistent pattern. A common method is:
- Set the top of the panel in place
- Confirm alignment
- Add the first few screws to hold it
- Continue fastening evenly as you move downward
At the eave, many installers use one screw per rib, then continue upward with screws spaced about every 12 inches along the fastening line or according to panel requirements.
Do not over-tighten. The neoprene washer should compress enough to seal, but it should not bulge outward or split. If you drive the screw too hard, you can deform the panel and weaken the waterproof seal.
Overlap and Attach Subsequent Panels
Once the first panel is in place, the rest of the roof follows a repeating pattern. Still, this is where many leaks begin. The overlap must be correct, the panels must nest tightly, and the fastening must stay consistent.
Most metal roofing systems require a side overlap and, in some cases, an end overlap, depending on panel length and roof layout. A common overlap range is 6 to 12 inches, but the exact amount depends on the profile, roof slope, and manufacturer’s instructions.
Before placing the next panel, apply sealant tape or butyl tape where needed. On some panels, this goes along the rib or overlap seam to create a watertight connection. This small step makes a big difference on low-slope roofs and in areas with wind-driven rain.
Set the next panel into place and make sure it nests tightly against the previous one. You should not see a visible gap if the profile is engaging correctly. Press the seam together as needed before fastening.
When you fasten metal roof panels, keep your screw lines straight. This improves appearance and helps evenly distribute holding power across the roof. In the field of the panel, spacing is typically around 24 inches. However, exact spacing varies by profile and local wind requirements.
The washer on each screw should sit flat and tight. If the screw goes in at an angle, back it out and redo it. Crooked screws can cause uneven pressure around the washer and create entry points for water.
Here is a quick look at common overlap issues:
Common Mistake Fix
Insufficient overlap. Add 2 inches extra and reseal the seam
Over-tightening screws. Use controlled torque; slight dimples are acceptable
Skipped sealant at seam. Apply butyl tape before refastening
Panels are not fully nested. Re-seat the panel before adding more screws
As you work across the roof, keep checking your alignment. Use a tape measure to confirm that the panel run remains even at the top and bottom. If you drift out of line, fix it early. A small shift on panel three becomes a big problem on panel ten.
Take your time with this phase. The panels may seem repetitive, but precision here is what creates a clean-looking, leak-proof roofing system that lasts.
Handle Valleys, Peaks, and Penetrations
Straight panel runs are only part of the job. Roofs become more complex where planes meet or objects pass through the roof. Valleys, ridges, vents, chimneys, skylights, and plumbing stacks all need careful detailing.
In a valley, water concentrates and moves quickly. This area must stay open enough to drain and sealed well enough to prevent backup. Cut valley panels carefully, often in an L-shape or angled pattern, so they fit the valley flashing without blocking water flow. Do not crowd the center of the valley.
Install the proper valley metal first, then lay the panel edges over it, following the required spacing. Use closure strips or sealant where needed, but do not trap water.
At the ridge, install closure strips that match the panel profile. These fillers help block wind-driven rain, insects, and debris while still supporting ventilation when the system is designed for airflow. After the closures are in place, install the ridge cap and fasten it with screws about every 12 inches or as recommended.
For pipe boots and vent penetrations, use flashing boots designed for metal roofing. Slide the boot over the pipe, shape the base to match the panel ribs, and seal it with approved sealant before fastening. This is one of the most common leak points on any roof, so do not rush it.
Chimneys and skylights need proper metal flashing, often including step flashing and counterflashing. If you are unsure how to flash a complex penetration, bringing in a professional is often the smart choice.
These transitions are where craftsmanship really shows. A roof is only as strong as its weakest detail.
Trim and Finish Edges
After the field panels are installed, you still need to finish the perimeter and exposed ends. Trims are not just decorative. They close gaps, direct water, improve wind resistance, and make the roof look complete.
Start with the gable or rake trim. This trim covers the outer panel edges at the sloped sides of the roof. It protects the roof from wind uplift and provides a sharp, finished edge. Install it straight and fasten it securely, following the panel profile.
Next, install any needed fascia closures or edge closures. These pieces help block openings where rain, pests, or debris could enter. On some systems, foam closure strips match the panel shape and seal the gaps between trim and panel ribs.
Check all seams where trim pieces meet. Apply caulk or sealant where recommended, especially at corners, laps, and transitions. Use sealant carefully. Too little may leave gaps, but too much can look messy and trap dirt. Clean application matters.
Once the trims are on, inspect the fasteners again. Look for:
- Loose screws
- Crooked screws
- Missing washers
- Over-driven fasteners
- Uneven trim lines
Walk the roof carefully if conditions allow and if your safety setup is secure. You are not walking to test the roof. You are checking for movement, loose edges, and places where a panel may not have seated correctly.
A strong finish does more than improve appearance. It protects the roof system at the exact spots where wind and water often attack first.
Final Inspection and Cleanup
The last step is often overlooked, but it should never be skipped. A final inspection helps catch small issues before they become expensive problems.
Start by checking the roof’s overall alignment. Stand back and look at the panel lines. Are they straight? Are the overhangs consistent? Does the ridge cap run evenly across the top? Visual checks help spot issues that are easy to miss up close.
Then inspect every section for fastener tightness. The screws should be snug, straight, and evenly spaced. Replace any damaged or stripped screws right away. If a washer looks pinched, cracked, or off-center, fix it before the roof goes into service.
Look closely at all cut edges and scratches. If the finish has been damaged, use manufacturer-approved touch-up paint to protect the exposed metal. This helps reduce the chance of premature rust.
Another important cleanup task is removing metal shavings and cut debris from the roof. Tiny metal filings can rust quickly and stain the panel finish. Use a soft brush or blower to clear them away. Do not leave scraps in valleys or gutters.
Dispose of old roofing materials, packaging, and offcuts responsibly. A clean site is safer and leaves a better impression if this is a customer project.
Finally, keep your records. Save panel information, color details, fastener type, and warranty paperwork. If repairs or additions are needed later, these details will help you match the existing roof and protect your warranty.
A final inspection is not just the end of the job. It is the step that confirms the roof is ready to perform.
Common Mistakes to Avoid
Even experienced installers can make small errors that later lead to leaks, rust, or panel movement. If you want better results, watch for these common problems.
- Drilling in the wrong place
- On many systems, placing screws in the wrong zone can cause leaks. Always follow the panel profile requirements. If the manufacturer says to fasten on the rib crown, stay there. If the panel is designed for fastening in the flats, do not improvise.
- Ignoring expansion gaps
- Metal moves as temperatures change. If you attach panels too tightly without allowing for movement, they can buckle, shift, or stress the fasteners.
- Using poor overlaps
- Weak side laps and end laps are a major source of water intrusion. Add sealant where needed, and ensure the overlap length matches the roof design.
- Choosing the wrong screw length
- A screw that is too short may not grip well. A screw that is too long can over-penetrate the decking or create an awkward fastening. Match the screw to the panel and substrate.
- Over-tightening screws
- This is one of the most common mistakes in metal roofing installation. When the washer crushes too much, it can fail early. Tight is good. Crushed is not.
- Skipping underlayment details
- A metal roof still needs backup moisture protection. Valleys, eaves, and penetrations especially need proper underlayment and flashing support.
- Starting with a crooked first panel
- Every panel after that will follow the same error. Always double-check the first panel before moving on.
A helpful pro tip is to think about wind uplift before you finish. After installation, inspect edges, overlaps, and trim, assuming strong winds will try to lift them. If anything seems loose now, fix it now.
Avoiding these mistakes will save time, reduce callbacks, and help your roof stay dry for years.
FAQs
How far apart should screws be when attaching metal roofing panels?
In many exposed fastener systems, screws are spaced about 12 to 24 inches apart along the ribs or fastening lines. The exact spacing depends on the panel profile, roof slope, and local wind codes.
Can I install metal roofing panels over asphalt shingles?
Yes, in some cases you can. Many installers use furring strips or battens over shingles to create a flatter surface and allow airflow. Always check local code requirements and make sure the roof structure can support the system.
What is the fastest way to install metal roof panels?
The fastest method is usually working with a team of two, pre-cutting panels ahead of time, staging materials carefully, and keeping screw patterns consistent. Speed is helpful, but accuracy matters more than rushing.
How do I prevent leaks around vents and pipes?
Use properly sized pipe boots, shape them to the panel profile, seal them correctly, and fasten them securely. Most leaks happen at penetrations, not in the middle of the panel field.