Have you ever looked at a finished room and thought, “How did they make this feel so right?” The answer is rarely luck. In most cases, it is the result of a clear, organized interior design process that moves step by step from ideas to execution.
If you are asking, what are the 7 stages of interior design? You are already thinking like a smart homeowner, business owner, or project manager. Understanding these stages helps you avoid rushed decisions, wasted money, and design choices that look good on paper but fail in real life.
Interior design is not just about choosing paint colors, sofas, or lighting. It is about creating a space that works for your daily life, supports your goals, and feels comfortable every single day. Whether you are designing a family home, a rental property, an office, or a retail space, the process matters just as much as the final look.
The 7 stages of the interior design process give structure to a project. They help the designer and client stay on the same page, protect the budget, and keep the work moving in the right direction. When these stages are followed carefully, the project becomes smoother, faster, and far less stressful.
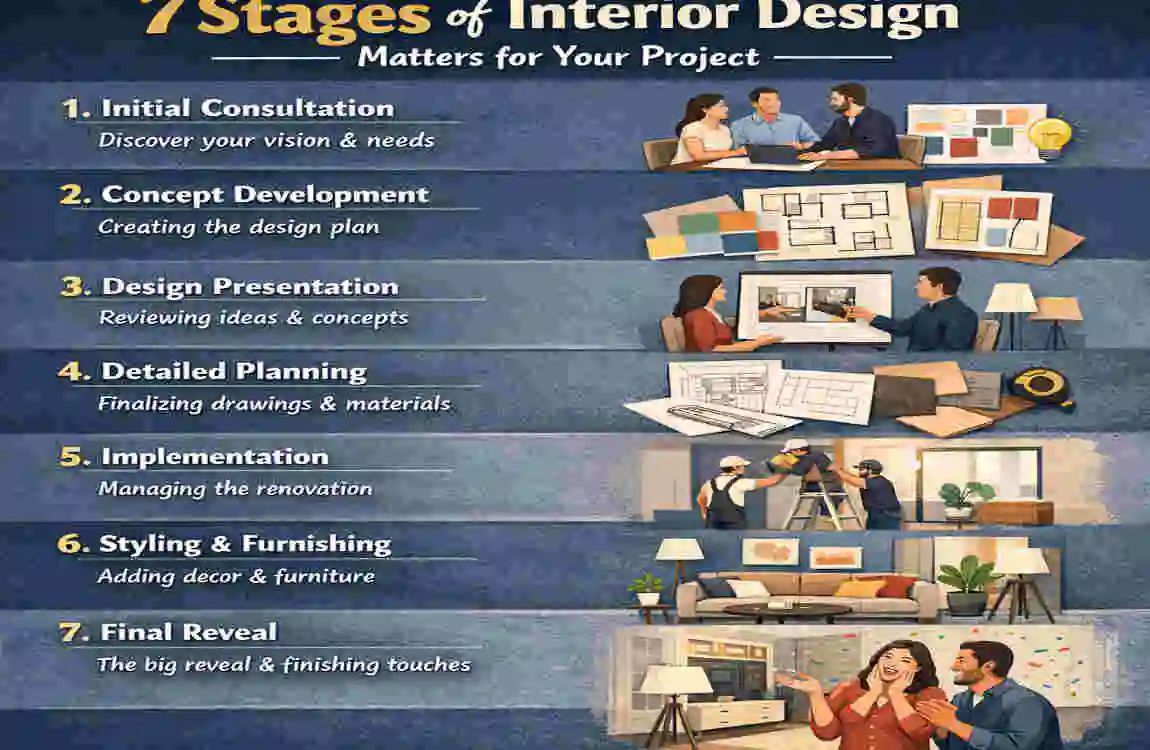
Why Understanding the 7 Stages of Interior Design Matters for Your Project
A lot of people jump straight to the fun part of interior design. They want to choose a color scheme, browse furniture, and imagine the finished room. That excitement is natural, but it can also create problems when the project starts without a clear process.
The truth is simple: good design needs good planning. When you understand the stages, you can make better decisions, ask better questions, and avoid common mistakes before they become expensive.
One of the biggest reasons projects go wrong is that people assume design is only about appearance. In reality, the interior design process includes function, layout, material selection, technical details, ordering, delivery, supervision, and final handover. Each stage supports the next one.
If you skip the early stages, you may end up with a beautiful space that doesn’t work in real life. For example, a living room may look stylish but feel cramped. A kitchen may look modern, but offer poor workflow. A bedroom may be elegant but lack enough storage. These are not small issues. They affect how you live your day-to-day life.
Understanding the professional interior design stages also helps with budgeting. When you know what comes next, you can plan your money more wisely. You are less likely to overspend on one item and then struggle to complete the rest of the project.
This matters for more than just homeowners. Real estate investors need spaces that attract buyers or tenants. Commercial spaces need practical layouts, brand consistency, and comfort for staff or customers. Families need designs that fit their lifestyle, culture, and long-term needs.
In places and other growing cities, design projects often involve tight budgets, compact spaces, and strong cultural preferences. That makes the process even more important. A well-planned interior can support family life, improve business image, and increase property value.
Many design professionals, including industry groups such as ASID, emphasize the value of a structured process because it improves communication and reduces project risk. That is really the heart of it. When everyone understands the stages, everyone works better together.
Here is a simple way to think about it:
What you gain when you follow the stages
- Better control over time and budget
- Less stress during the project
- Fewer design mistakes
- A space that fits your real needs
- Clear communication between the client and the designer
So, if you have ever wondered why some spaces feel polished and complete while others feel unfinished or awkward, the answer often lies in the process. The following stages explain that process clearly.
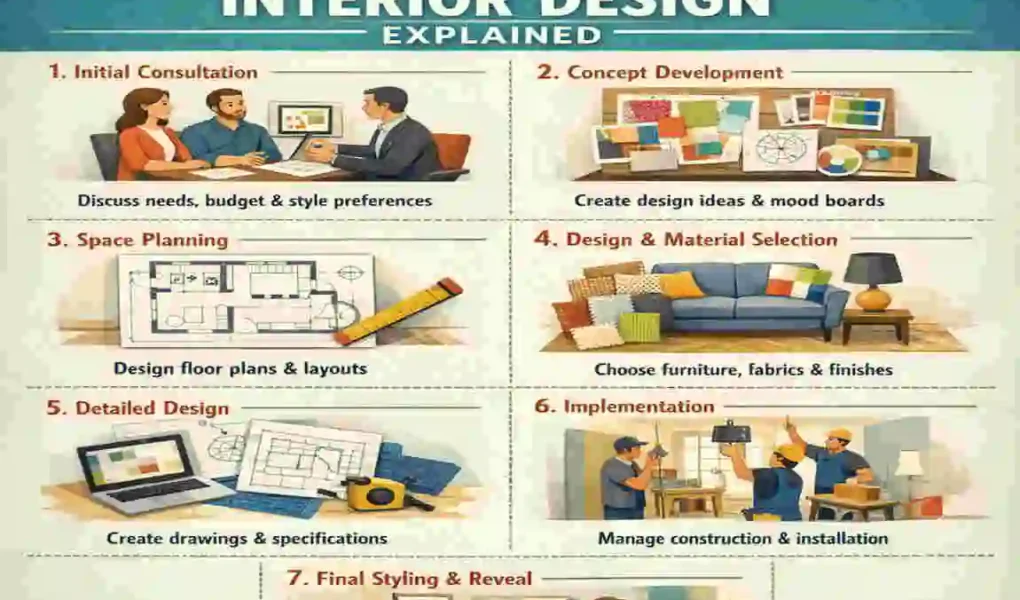
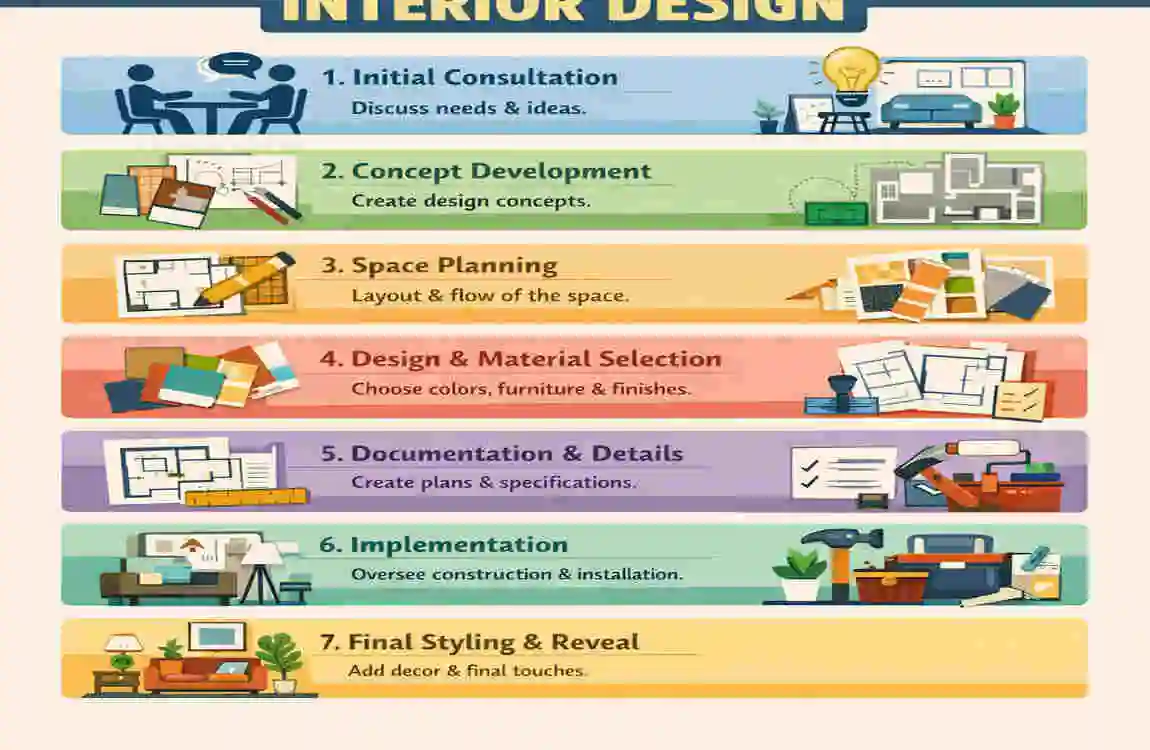
The first stage of interior design is where the project truly begins. This is the point at which the designer learns about the client, the space, and the project’s goals.
At this stage, the focus is not on picking furniture or choosing wall colors. Instead, the goal is to understand the people who will use the space. A good designer wants to know how you live, what you like, what you dislike, and what problems you want solved.
What happens in this stage?
The designer usually starts with a conversation, questionnaire, or meeting. This can happen in person or online. The main purpose is to collect important information such as:
- Your style preferences
- Your budget range
- The function of the space
- Your timeline
- Existing items you want to keep
- Any special needs or restrictions
A site visit is often part of this stage, too. The designer looks at the room, checks measurements, observes natural light, and notes structural details that may affect the design.
This is also where honest budget talk should take place. A realistic budget helps the designer make smart recommendations. It is much better to discuss financial limits early than to redesign everything later because the project has become too expensive.
Key deliverables in Stage 1
By the end of this stage, the client usually receives:
- A project brief
- Initial notes about goals and style
- A summary of the scope
- Early ideas or direction
- Sometimes, a rough mood sketch or reference board
Why this stage matters
This stage sets the tone for the whole project. If the brief is vague, the rest of the process becomes harder. If the brief is clear, the designer can build a stronger concept and avoid unnecessary revisions.
For example, a family home in Punjab may need a design that balances beauty with practical family use. The client may want a formal guest space, but the home also needs durable seating, easy-to-clean surfaces, and storage for daily life. Those details are easier to handle when they are discussed early.
Visual idea: A consultation checklist infographic showing goals, budget, style, function, and timeline.
Stage 2: Programming and Space Planning
Once the designer understands the client’s needs, the next step is programming and space planning. This is one of the most important stages in an interior design project because it determines how the space will actually work.
A beautiful room with a poor layout can feel frustrating every day. Good space planning prevents that. It helps the designer arrange furniture, walkways, storage, and activity zones in a way that feels natural and practical.
Defining functional requirements
This part begins with a function. The designer asks a few simple but powerful questions:
- Who will use this space?
- What activities will happen here?
- How many people will be here at once?
- What items need storage?
- Where should movement be easy or restricted?
A living room, for example, may need conversation seating, a TV area, a prayer corner, or space for children to play. A home office may need a desk, filing storage, good lighting, and enough privacy for calls. A kitchen may need smooth movement between cooking, washing, and storage areas.
Why zoning matters
Zoning means dividing a space into clear use areas. This is especially useful in smaller homes and apartments. For example, one room may need to work as both a family lounge and a study area. In that case, zoning helps the designer make the room feel organized instead of crowded.
In a small apartment, space planning may be the difference between a cramped room and a flexible, comfortable home. The designer may use multifunctional furniture, wall storage, and thoughtful layout choices to support both remote work and family life.
Tools and techniques
Designers often use sketches, scaled drawings, and digital tools such as floor plan software to test different layouts. This stage may include:
- Measuring the room carefully
- Planning furniture sizes
- Checking circulation paths
- Reviewing window and door placement
- Testing different layout options
The purpose is not to guess. It is to plan with intention.
Visual idea: A before-and-after floor plan diagram showing better traffic flow and furniture placement.
Stage 3: Concept Development and Mood Boards
After the layout is planned, the designer begins to shape the visual direction. This is the concept development stage, where the project starts to feel real.
At this point, the designer takes all the information from the brief and space plan and turns it into a style concept. This concept explains the overall look and mood of the space.
Brainstorming the design direction
The designer explores ideas such as:
- Modern, classic, minimalist, or traditional style
- Color palette
- Texture choices
- Finish options
- Decorative themes
- Cultural influences
A project might combine clean modern lines with traditional details. Another project might lean toward a calm, neutral look for a family home or a bold, elegant style for a commercial office.
This is where mood boards in the 7 stages of interior design become very useful. A mood board is a visual collection of colors, materials, furniture references, and inspiration images. It helps the client understand the direction before making any major purchase.
Why mood boards matter
Mood boards make abstract ideas easier to understand. A client may say they want a “warm and elegant” room, but those words can mean many different things. A mood board helps turn those words into visual choices.
It also helps prevent confusion. If the client likes soft beige tones and natural wood, but the designer is thinking about black metal and sharp contrast, the mismatch can be corrected early.
Client feedback and revisions
This stage is not one-way. Good designers share their ideas, listen to feedback, and refine the concept based on the client’s response. The goal is not to force one idea. The goal is to align the design with the client’s vision and practical needs.
For example, a villa concept may start with an eclectic style that mixes old and new influences. The client may then prefer a more refined version with less visual clutter and more emphasis on comfort. Those revisions are part of the process, not a problem.
Visual idea: A sample mood board gallery showing fabrics, colors, finishes, and inspiration images.
Design Development and Detailed Planning
Once the concept is approved, the project moves into design development. This is where the idea becomes detailed, measurable, and ready for technical work.
This is often the stage where clients begin to see the full shape of the project. The design is no longer just a feeling or a mood. It becomes a carefully built plan.
Refining the concept
At this stage, the designer develops the chosen direction more deeply. This can include:
- Scaled drawings
- 3D views or renderings
- Furniture selection
- Lighting ideas
- Material samples
- Finish choices
- Built-in storage details
This is where decisions become more specific. Instead of saying “warm flooring,” the team may choose a particular wood tone or tile finish. Instead of “good lighting,” they may choose ambient, task, and accent lighting in specific areas.
Technical coordination
Design is not just visual. It also has to work technically. That means the designer must consider:
- Electrical points
- Switch placement
- Lighting fixtures
- Air conditioning needs
- Ceiling features
- Wall treatments
- Joinery and built-ins
When these things are planned properly, the result looks smoother and feels more functional. When they are ignored, the final space may look incomplete or become expensive to fix later.
Budget refinement
This stage also helps sharpen the budget. Early guesses are replaced with more accurate cost estimates. This is useful because the project scope is now clearer. The designer knows what materials are needed, how much work is involved, and where spending needs to be controlled.
A well-managed design development stage prevents surprises. It helps the client understand where the money is going and where choices can be adjusted if needed.
For example, a designer working on a home interior may create a more elegant feature wall and then balance the cost by choosing simpler materials for other areas. That is the value of design development: smart trade-offs without losing quality.
Visual idea: A 3D rendering progression that shows the concept moving from sketch to polished room view.
Documentation and Technical Drawings
The next stage is one of the most practical parts of the entire process: documentation and technical drawings. This is the backbone of execution.
Many people do not think of this stage when they imagine interior design, but it is essential. It is what turns creative ideas into instructions that contractors, carpenters, electricians, and vendors can follow.
What gets documented?
This stage may include:
- Floor plans
- Ceiling plans
- Electrical layouts
- Lighting plans
- Elevations
- Joinery drawings
- Furniture schedules
- Material schedules
- Finish specifications
These documents show exactly what should be built, installed, or ordered. They reduce confusion and help everyone work from the same plan.
Why technical drawings matter
Without proper documentation, a project can easily go off track. The contractor may guess dimensions. The carpenter may make the wrong cabinet size. The electrician may place points in the wrong locations. Even small errors can create delays and add costs.
Technical drawings help prevent those issues. They make the project more professional and more precise.
This stage is also important for compliance. Depending on the project and location, designs may need to follow local building requirements or safety standards. In a Punjab-based project, for example, the team may need to consider local rules, site conditions, and practical construction limits. Good documentation makes this easier to handle.
The role of clarity
The best technical drawings are easy to read and complete enough to guide the team. They should answer questions before they are asked. That level of clarity saves time during construction and reduces back-and-forth communication.
This stage may not feel as exciting as mood boards or furniture shopping, but it is one of the strongest signs of a well-run project. A beautiful design cannot be built properly without it.
Visual idea: A sample blueprint excerpt with labels for lighting, cabinets, and furniture placement.
Procurement and Vendor Coordination
After the design documents are ready, the project moves into procurement and vendor coordination. This is the stage where the approved design begins to turn into real materials, products, and services.
In simple terms, procurement means buying or arranging everything needed for the project. That may include furniture, lighting, fabrics, tiles, fittings, and custom-made pieces.
Sourcing the right materials
The designer or project team may request quotes from multiple vendors. They compare prices, quality, lead times, and reliability before making decisions.
This stage often includes a choice between:
- Custom-made items
- Ready-made items
- Imported products
- Local alternatives
Each choice has pros and cons. Custom pieces may fit better and match the design more closely, but they can take longer to produce. Ready-made items may arrive faster, but they may not match the space as perfectly.
Why coordination matters
Good procurement is not just about buying things. It is about timing, tracking, communication, and quality control. A single late delivery can delay an entire project. A wrong finish can affect the design. A weak vendor can create frustration for everyone involved.
That is why vendor coordination matters so much. The design team must make sure the right items arrive at the right time and in the right condition.
Example of practical sourcing
Imagine a commercial space that wants sustainable fabrics, durable seating, and a polished look. The design team may look for local vendors who can supply quality materials within the project timeline. They may compare samples, negotiate costs, and confirm delivery schedules before placing final orders.
This stage is where careful organization pays off. A project with strong procurement planning is much less likely to face last-minute chaos.
Visual idea: A vendor checklist table showing item, supplier, lead time, and status.
Implementation, Supervision, and Project Closeout
The final stage of the 7 stages of interior design is where everything comes together. This is the implementation phase, followed by supervision and closeout.
At this point, all the planning, drawings, and orders are turned into a real finished space. It is exciting, but it also requires close attention. Even the best design can fall short if execution is not properly managed.
On-site supervision
During implementation, the designer or project manager often visits the site to check progress. They review workmanship, confirm that materials are installed correctly, and ensure the design matches the approved plan.
This is important because construction and installation rarely go perfectly without guidance. A cabinet may need adjustment. A light fixture may need repositioning. A finish may look different in real life than it did on a sample board. Supervision helps solve these issues quickly.
Punch list and final walkthrough
Near the end of the project, the team creates a punch list. This is a simple list of items that still need attention. It may include paint touch-ups, alignment fixes, missing hardware, or minor repairs.
Then comes the final walkthrough with the client. This is the moment to review the space carefully and confirm that everything has been completed to the expected standard.
Project closeout
Closeout is more than a handover. It includes:
- Final review of work
- Handover of documents or care instructions
- Basic maintenance guidance
- Client feedback
- Final approvals
This is also the stage at which the client learns to maintain the space. That might include cleaning advice for certain materials, care for upholstery, or simple tips for preserving finishes.
A strong closeout creates a better long-term relationship between the client and the design team. It shows professionalism and care.
Visual idea: A simple project timeline or Gantt chart showing design, ordering, installation, and handover.
Common Challenges in the 7 Stages of Interior Design and How to Overcome Them
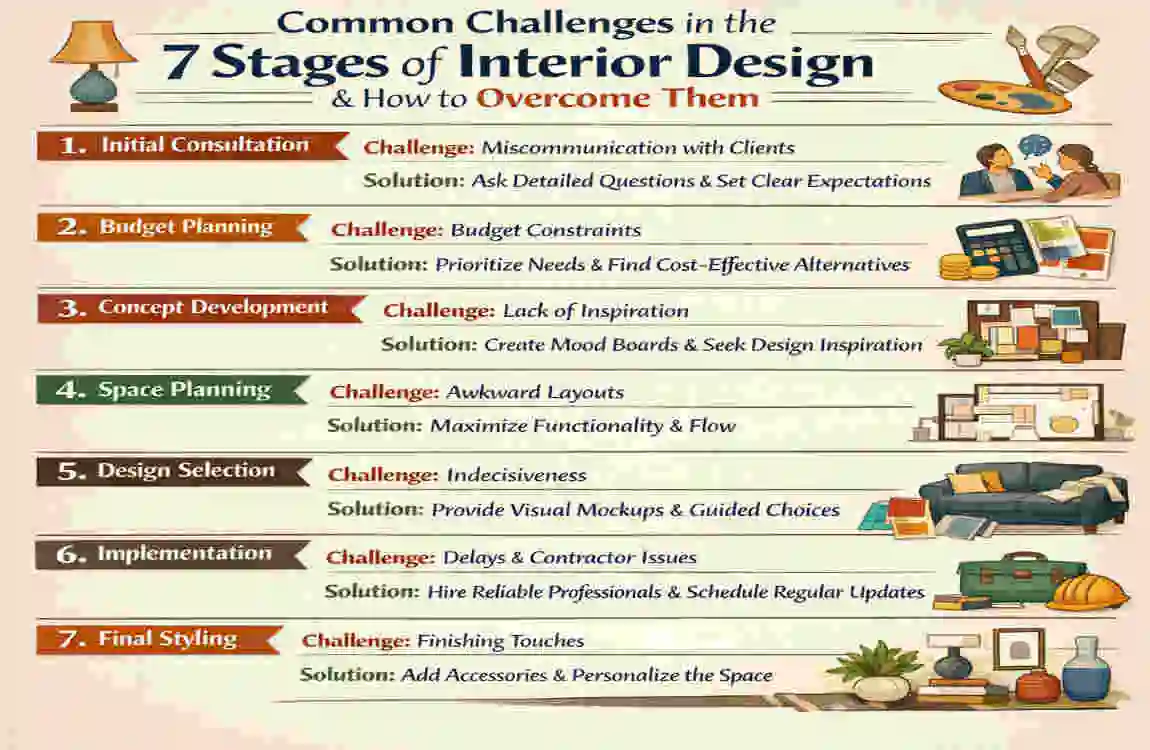
Even with a clear process, interior design projects can still run into problems. The good news is that most issues can be managed if you spot them early.
Some of the most common challenges include budget creep, delayed deliveries, unclear expectations, and scope changes. These problems are normal in many projects, but they become much easier to handle when the process is organized.
The key is to keep communication open. The client should know what is happening, what it costs, and what the next step will be. The design team should document decisions, confirm approvals, and check progress regularly.
Common challenges and smart solutions
ChallengeSolutionPrevention Tip
Budget overruns, review costs at every stage, and set a realistic budget from the start.
Delays in delivery, Track vendor timelines closely, Order long-lead items early.
Design changes mid-project. Use a clear approval process. Finalize the concept before procurement.
Poor space use. Recheck the layout before execution. Invest time in space planning.
Material mismatch: Review samples in real conditions. Test colors and textures before buying.
Miscommunication: Keep written records of decisions. Hold regular update meetings.
A simple way to stay in control
If you want a smoother project, remember these three habits:
- Confirm decisions in writing
- Review the plan before buying anything
- Stay involved at key stages
These habits may sound simple, but they protect your project from many common problems. They also reduce stress for everyone involved.
FAQs: What Are the 7 Stages of Interior Design?
How long do the 7 stages of interior design take?
The timeline depends on the project’s size, level of detail, and availability of materials. A small room may take a few weeks, while a full home or commercial project can take several months.
Can I skip any of the stages?
You should avoid skipping stages whenever possible. Each stage supports the next one. If you skip planning or documentation, you often create bigger problems later.
What is the most important stage?
All seven matter, but many professionals consider space planning, design development, and documentation especially important because they affect function, cost, and execution.
Do I need a designer for a small project?
Not always, but a designer can still help even with a smaller space. Sometimes a short consultation can save you from expensive layout or material mistakes.
What is the difference between design development and documentation?
Design development focuses on refining the look, materials, and technical direction. Documentation turns those decisions into drawings and schedules that the team can build from.
How can I make sure my project stays on budget?
Start with a realistic budget, approve decisions carefully, and avoid making changes after procurement begins. Regular check-ins also help you stay on track.
Is interior design only for luxury homes?
No. Interior design helps in homes, offices, shops, apartments, and many other spaces. It is about function and comfort as much as it is about style.