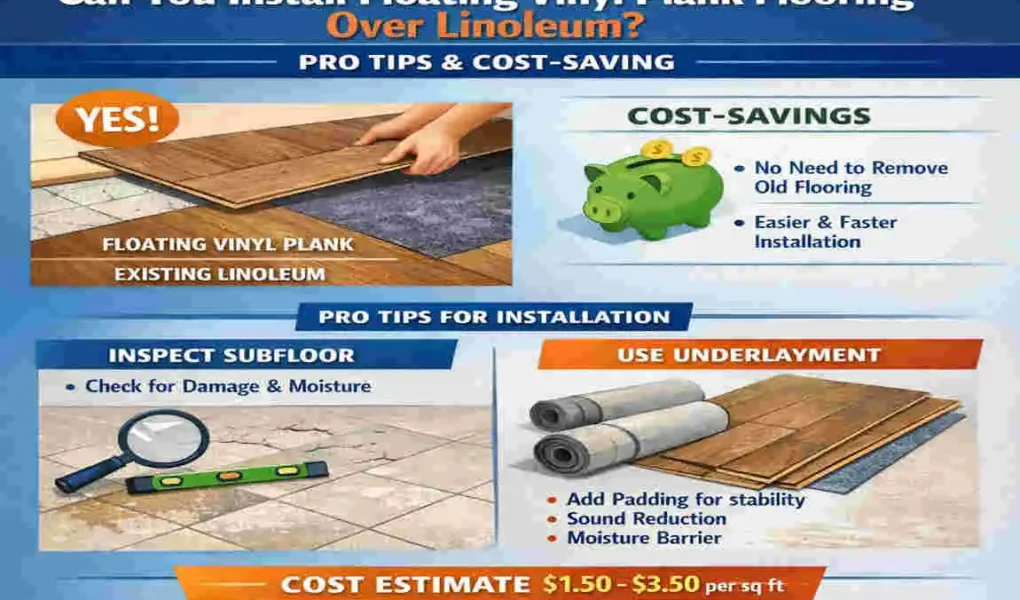
If you have old linoleum on your floor right now, you may be staring at it and wondering if you really need to tear it all out before putting down something better. That is a common question, and the good news is that full removal is not always necessary.
In many homes, floating vinyl plank flooring over linoleum works very well. The key is not just the flooring itself. The real key is the condition of the existing linoleum. If it is flat, firmly attached, clean, and free from major damage, then it can often serve as a solid base for your new floor.
That is why so many people ask, can you install floating vinyl plank flooring over linoleum without hiring a full demo crew. In many situations, the answer is yes. And if you handle the prep work correctly, it can become a smart DIY flooring project that gives your room a fresh new look without a complete floor tear-out.
Why Homeowners Choose Floating Vinyl Plank Over Linoleum

Before you start cutting planks and moving furniture, it helps to understand why this flooring method is so popular.
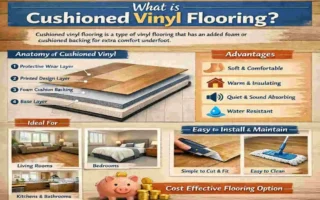
What Floating Vinyl Plank Flooring Actually Means
A floating floor does not need to be glued or nailed to the surface below. Instead, the planks connect using a click-lock system. Once joined together, they “float” over the existing floor.
That is what makes this option especially attractive when you already have linoleum in place.
Instead of scraping up old material, patching the subfloor, and dealing with a dusty mess, you can often lay the new planks right over the old surface. This makes the project faster and much more manageable for the average homeowner.
Why It Works Well Over Linoleum
Linoleum and similar sheet flooring often create a smooth, continuous surface. If the floor is still in good shape, that smoothness can support a floating luxury vinyl plank floor.
Here is why many people like this route:
- Less demolition
- Lower labor costs
- Faster installation
- Less mess in the home
- A more beginner-friendly DIY project
That combination makes vinyl plank over linoleum a practical option for kitchens, hallways, laundry rooms, and even some living spaces.
Comparing Your Main Options
Here is a simple look at how installing over linoleum compares to other flooring methods:
Aspect Over Linoleum Full Removal Glue-Down Vinyl
Average Cost per Sq. Ft. $3–$5 $8–$12 $5–$8
Time Required 1–2 days 3–5 days 2 days
Mess Level Low High Medium
DIY Difficulty Beginner-Friendly More Advanced Intermediate
Need for Adhesive No No Yes
As you can see, floating LVP on linoleum usually wins when you want a balance of cost, speed, and simplicity.
A Big Bonus: Avoiding Unnecessary Tear-Out
Older flooring removal can come with surprises. Sometimes people discover damaged subfloors, multiple layers of flooring, or unknown materials beneath the linoleum. In older homes, there may also be concerns about hazardous materials in flooring or adhesives.
That does not mean you should never remove old floors. If the linoleum is still sound, installing over it can help you avoid a lot of avoidable trouble.
When Can You Install Floating Vinyl Plank Flooring Over Linoleum?
This is the most important part of the whole project.
The answer to can you install floating vinyl plank flooring over linoleum depends less on the new floor and more on the old one.
The Linoleum Must Be Flat and Stable
Your old floor should be:
- Firmly attached
- Flat across the room
- Free of large dips or raised areas
- Without major tears, bubbles, or curling edges
Floating vinyl plank flooring needs a stable base. If the floor underneath moves, sinks, lifts, or has soft spots, the planks above it can separate, flex, or wear down too early.
Even though vinyl plank is forgiving, it is not magic. It will not hide major floor problems.
The Surface Must Be Clean and Free of Wax
Many older linoleum floors have years of polish, wax, grime, or cleaning residue. That can create issues, especially if the floor is slick, sticky, or uneven in spots.
You want a surface that is clean, dry, and solid.
If the linoleum has a heavy wax build-up, you may need to strip or scrub it thoroughly before installation. The new floor is floating, but the surface below still matters. Any hidden grime or residue can affect how smoothly the planks lie.
Cushioned Flooring Can Be a Problem
This is a big one.
If the old linoleum or sheet vinyl has a soft, cushioned backing, it may not be a good candidate for floating LVP. Soft flooring underneath can cause movement, joint stress, and premature failure in the click-lock system.
You want a firm base, not a spongy one.
Watch Out for Moisture Issues
Moisture is one of the biggest reasons floors fail.
If your linoleum sits over concrete and moisture is rising through it, you need to address that first. Floating floors do not fix moisture problems. They only cover them.
If the room is prone to dampness, you may need a moisture barrier or extra prep before you install anything.
Quick Green Light vs. Red Light Guide
Here is a simple way to judge whether your old floor is a good candidate.
Green LightRed Light
Flat, smooth linoleum Peeling or loose edges
Fully bonded to floor Bubbles or soft spots
Clean, dry surface Heavy wax build-up
No major tears Deep gouges or missing sections
Firm underfoot Cushioned or spongy flooring
Modern, known material Very old flooring with uncertain composition
What About Very Old Linoleum?
If your home is older and the flooring dates back several decades, do not assume it is safe to disturb. Some older flooring materials or adhesives may contain hazardous substances.
If you suspect the flooring is very old, especially pre-1980s material, it is wise to have it professionally checked before sanding, scraping, or tearing into it.
That is not meant to scare you. It is just the smart move.
The Simple Rule to Remember
If the linoleum is:
flat + secure + clean + dry + firm,
then installing floating vinyl plank flooring over it is often a very workable option.
If it is damaged, soft, wet, or coming loose, you should stop and fix those problems first.
Prep Work: What to Do Before You Install
Even the best flooring will underperform if the prep work is sloppy.
If you want the answer to the question, “Can you install floating vinyl plank flooring over linoleum to work out in real life?” the prep stage matters just as much as the install itself.
Clean the Floor Thoroughly
Start with a deep clean.
Sweep everything first. Then vacuum dust, crumbs, and debris from corners and edges. After that, wash the floor with a cleaner that removes grease and residue.
Kitchen floors especially need careful cleaning. Cooking oils, food spills, and cleaner build-up can leave a film you may not even notice.
Let the floor dry completely before moving on.
Inspect Every Part of the Room
Now walk slowly through the room and look closely.
Check for:
- Loose corners
- Curling edges
- Cracks
- Soft areas
- Raised seams
- Bubbles
- Dips in the floor
Use a long straightedge or level to check flatness. Minor imperfections can usually be managed. Bigger high or low spots need correction.
Repair Minor Problem Areas
A few small flaws do not always mean the whole floor must come out.
You may be able to:
- Reattach loose edges
- Cut out badly damaged small areas
- Fill low spots with floor patch
- Smooth minor seams
- Sand or grind small high spots if safe and appropriate
The goal is simple: create a surface that feels even and solid.
Check the Manufacturer Instructions
Not all vinyl plank products are the same. Some brands allow installation over existing resilient flooring. Others have stricter rules.
Before you begin, read the flooring instructions carefully. That step can protect your warranty and help you avoid mistakes.
Acclimate the Vinyl Planks
This step is often rushed, but it matters.
Bring the flooring into the room and let it sit for 48 to 72 hours, or for whatever time the manufacturer recommends. Keep the room at normal indoor temperature and humidity.
This helps the planks adjust to the space before installation.
If you skip acclimation, you increase the chance of movement after the floor is installed.
Decide Whether You Need Underlayment
Some floating vinyl plank floors come with attached underlayment. Some do not.
If the floor already has built-in padding, adding more underneath can sometimes cause too much softness. If it does not, you may want a thin underlayment for sound control or moisture protection, depending on the room and subfloor below.
Again, the manufacturer instructions should guide this decision.
Tools You Will Likely Need
Here is a practical list for a typical DIY install:
- Tape measure
- Pencil
- Utility knife
- Straight edge
- Spacers
- Rubber mallet
- Tapping block
- Pull bar
- Level or straightedge
- Jigsaw or saw for tricky cuts
- Floor patch or leveling compound if needed
- Vacuum and cleaning supplies
You do not need a huge workshop to do this project. In most cases, the tool list is manageable and affordable.
Remove Trim if Possible
For a cleaner finish, remove baseboards or quarter-round trim before installation. This gives you room to leave the proper expansion gap while keeping the final result neat.
If you leave trim in place, you may need to add new shoe molding later.
Prep Is Where Good Floors Begin
People often focus on the visible part of the project. Still, the truth is simple: most flooring problems start below the surface.
So if you are serious about installing floating vinyl plank flooring over linoleum, slow down here. Good prep is what turns a budget-friendly flooring update into a floor that actually lasts.
Step-by-Step Guide to Installing Floating Vinyl Plank Flooring Over Linoleum
Now let’s get into the actual install.
If your old floor is ready, this part becomes much easier than many people expect.
Plan the Layout
Before you click a single plank into place, decide how the floor will run.
Most people install planks parallel to the longest wall or in the direction that makes the room feel longer. In many homes, it also looks best when the planks run with the main sightline as you enter the room.
Dry-lay a few rows first. This helps you avoid ending with a tiny sliver of flooring on the last row.
Also plan your seam staggering. A good rule is to stagger end joints by at least 12 inches, though many manufacturers prefer a greater spacing.
Leave an Expansion Gap
Floating floors need room to expand and contract.
Place spacers around the perimeter of the room to maintain the correct gap, usually about 1/4 inch. However, you should confirm your product requirements.
Do not skip this. If the planks are installed too tightly against walls or cabinets, the floor may buckle later.
Start with the First Row
Begin along your chosen starting wall.
Usually, you place the first row with the groove facing the wall and the tongue facing out. Check your product instructions, since some systems vary slightly.
Cut the first plank if needed so the row starts cleanly and stays straight.
This first row matters a lot. If it is crooked, the rest of the room will follow that mistake.
Take your time here.
Click the Planks Together
Most floating vinyl plank floors use an angle-and-lock system.
You insert the tongue into the groove at an angle, then lower it down until it locks into place. You may need a tapping block and rubber mallet to snug things together, but use controlled force. Do not hammer directly on the plank edge.
As you continue, check the joints often. They should sit tight, not gapped or lifted.
Cut the End Pieces
At the end of each row, measure carefully and cut the final plank to fit, keeping your expansion gap.
For many vinyl planks, a utility knife works for straight cuts. Score the plank firmly and snap it. For harder rigid-core products or more complex cuts, a saw may be easier.
Save usable offcuts. They can start the next row and reduce waste.
Stagger the Seams
Start the next row with a shorter or longer plank so the end seams do not line up with those of the previous row.
This matters for both looks and strength.
A natural stagger creates a more realistic wood-floor appearance and helps distribute stress across the floor system.
Avoid repeating the same pattern too obviously. You want the layout to look balanced, not robotic.
Work Around Obstacles
Door frames, toilets, pipes, vanities, and floor vents all require extra care.
Measure twice before cutting.
For pipes, mark the center point and use a hole saw or jigsaw to cut a clean opening. For door jambs, you may get a cleaner look by undercutting the trim so the plank slides underneath.
If you are installing in a bathroom, some people choose to remove the toilet for a cleaner finished result. That is often the best-looking option, though it adds another task.
Install the Final Row
The last row is often the trickiest because it usually needs to be ripped lengthwise.
Measure the width carefully at several points, because walls are not always straight. Cut the planks to fit while preserving the expansion gap.
Use a pull bar if there is not enough room to angle the last row normally.
This tool makes a big difference in tight spaces and helps lock the final pieces without damaging them.
Remove Spacers and Finish the Edges
Once all planks are in place, remove the spacers.
Then reinstall the baseboards or add quarter-round or shoe molding to cover the expansion gap. Nail trim to the wall, not to the floor, because the floor still needs freedom to move.
Install transitions at doorways or where the vinyl plank meets another flooring type.
Inspect the Whole Floor
Walk the room and look for:
- Gaps between planks
- Raised corners
- Soft spots
- Uneven seams
- Areas where the floor binds against the wall
Fix small issues right away. It is much easier to correct them now than after furniture goes back in.
A Simple Tip That Saves Headaches
Can you install floating vinyl plank flooring over linoleum as a DIY project? The answer is yes in many cases, but only if you stay patient.
Do not rush the first row.
Do not skip the expansion gap.
Do not force damaged planks to fit.
A steady, careful pace almost always leads to a better finished floor.
Pro Tips for a Better-Looking, Longer-Lasting Floor
A basic installation can work. But a careful installation looks better and holds up longer.
Make Sure the First Row Is Perfect
The first row sets the path for everything else.
If the row drifts, the problem grows with each new plank. Check alignment often and do not assume the wall is perfectly straight.
Keep the Room Conditions Stable
Vinyl plank flooring performs best when installed in a normal indoor environment.
Try to work in a space with steady temperature and moderate humidity. Extreme conditions can make installation harder and may affect how the planks settle.
Mix Planks from Different Boxes
If your flooring has natural grain variation, open several boxes and mix planks as you go.
This helps the floor look more natural and avoids clusters of similar color or pattern in one area.
Undercut Door Jambs for a Cleaner Finish
Instead of cutting flooring around every door trim edge, undercutting the jamb often gives a cleaner, more professional result.
The plank slides underneath, and the cut edge disappears.
Use the Right Tools for Tight Areas
A pull bar, tapping block, and spacers may seem like small accessories, but they make the job cleaner and easier.
Trying to install a click-lock floor without them often leads to chipped edges or loose joints.
Protect the Floor During the Project
Do not drag tools, furniture, or appliances across the new floor while you work.
Even durable vinyl plank can be damaged by heavy or sharp objects.
Do Not Trap the Floor
Heavy cabinets, islands, or fixed structures should be handled in accordance with the flooring manufacturer’s instructions. Some floating floors should not be trapped under fixed weight in certain ways.
That is one reason planning matters.
Watch the Transitions Between Rooms
Large areas and connected rooms may require transitions or movement breaks depending on the product.
If you are doing a whole floor install across multiple rooms, check the maximum run length allowed.
Stay Realistic About Floor Quality
Even though DIY flooring over old linoleum can be a great choice, the finished result still depends on the condition of the floor below.
If the base floor has major flaws, the new floor will often reveal them over time.
Buy Extra Material
It is smart to buy about 5% to 10% extra flooring, depending on the room’s shape, to avoid cutting waste.
That extra material helps with mistakes, odd cuts, and future repairs.
Cost Breakdown: How Much Can You Save?
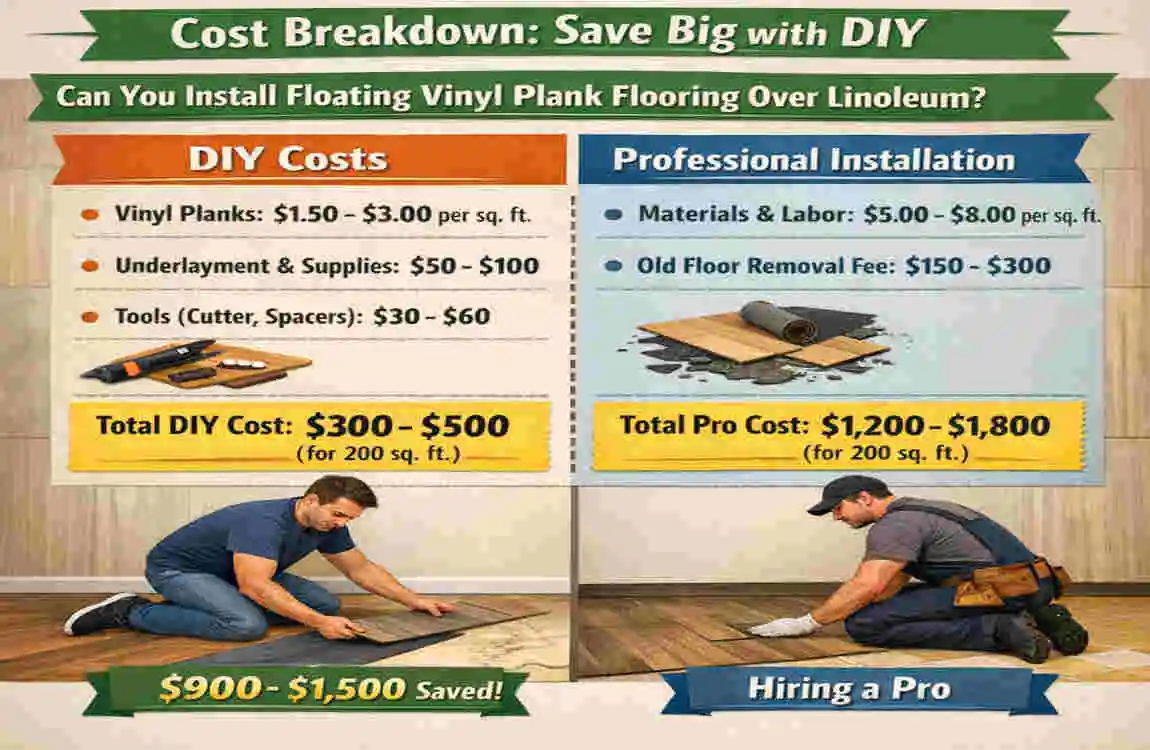
One of the biggest reasons people ask, “Can you install floating vinyl plank flooring over linoleum?” is simple: they want to save money.
And in many cases, they can.
Why Installing Over Linoleum Costs Less
The largest savings usually come from avoiding demolition.
When you remove old flooring, you may pay for:
- Labor
- Disposal fees
- Surface repair
- Additional prep materials
- More project time
By installing floating LVP over a suitable existing floor, you skip many of those extra expenses.
DIY vs. Professional Cost Comparison
Here is a realistic side-by-side estimate:
Item DIY Cost per Sq. Ft. Pro Cost per Sq. Ft. Estimated Savings
Vinyl Plank Flooring $2–$4 $2–$4 —
Underlayment / Supplies $0.50–$1 Usually included $1–$2
Prep Work $0.25–$1 $1–$3 $1–$2
Demolition $0 $2–$4 $2–$4
Installation Labor $0 $2–$5 $2–$5
Total for 500 Sq. Ft. $1,500–$2,500 $3,500–$6,000 $2,000+
These numbers vary by area, product quality, and room condition, but the general pattern holds.
What Affects the Final Price?
Your total project cost will depend on several things:
Flooring Quality
Basic LVP costs less, but thicker rigid-core planks often perform better over existing floors. If your old linoleum has minor imperfections, a stronger plank may be worth the extra cost.
Room Shape
Simple square rooms are cheaper and easier to build. Small bathrooms, awkward corners, closets, and lots of doorways increase cutting time and waste.
Tool Needs
If you already own basic tools, your cost stays lower. If you need to buy everything from scratch, your first project costs more, though you will still own the tools afterward.
Trim and Transitions
People often forget to budget for finishing pieces. Baseboards, thresholds, reducers, and quarter-round can add a noticeable amount.
Is DIY Always the Cheapest Choice?
Usually, yes. But not always.
If the floor needs major leveling, moisture correction, or repair work, a professional may still be the smarter choice. A bad install can end up costing more than hiring help from the start.
Still, if your room is straightforward and the old linoleum is in good shape, installing vinyl plank over linoleum can be one of the most cost-effective home improvement projects you can do.
Common Problems and How to Fix Them
Even a well-planned floor can run into trouble. The good news is that many problems have simple causes.
Buckling or Lifting
If the floor rises or pushes upward, the most common reason is not enough expansion space.
Check the room edges. The floor may be trapped under trim, cabinets, or tight wall contact.
Fix: Relieve the pressure by creating proper expansion gaps and making sure trim is not pinning the floor down.
Gaps Between Planks
This usually happens when joints were not fully locked during installation or when dirt got into the seam.
Fix: Re-seat the plank if possible. In some cases, you may need to lift a section and reconnect it properly.
Soft or Hollow Feeling
If the floor feels uneven when you walk on it, the old linoleum or subfloor may have dips or damage underneath.
Fix: Depending on severity, you may need to pull up the affected area and level the floor below.
Noisy Movement
Clicking or shifting sounds can happen if the floor was installed over debris, on an uneven surface, or without proper support.
Fix: Inspect for low spots, surface dirt, or weak locking joints.
Moisture-Related Trouble
If moisture comes up from below, you may notice movement, odor, or long-term damage.
Fix: Identify the moisture source first. A moisture barrier or more serious subfloor correction may be necessary.
How Long Will the Floor Last?
When installed correctly over a suitable linoleum base, floating vinyl plank flooring can last 15 to 25 years or more, depending on wear, product quality, and maintenance.
That is why proper prep is worth the effort. A few extra hours at the beginning can add years to the floor’s life.
How to Maintain Your New Floor
Once your floor is in, the hard part is over. Now you need to protect your investment.
Daily and Weekly Care
For regular maintenance:
- Sweep or dust mop often
- Vacuum with a hard-floor setting if needed
- Damp mop with a vinyl-safe cleaner
- Wipe spills quickly
Simple habits make a big difference.
Avoid Too Much Water
Even though vinyl plank handles moisture better than many flooring types, you still do not want standing water sitting on it.
Use a damp mop, not a soaking wet one.
Skip Harsh Cleaning Methods
Avoid:
- Steam cleaners
- Abrasive scrub pads
- Harsh chemicals
- Oil soaps
- Wax products
These can damage the wear layer or leave residue behind.
Protect High-Traffic Areas
Use mats at entry doors and felt pads under furniture legs. If you move heavy furniture, lift it rather than drag it.
These small steps help prevent scratches and dents.
Keep the Floor Looking Good for Years
Good maintenance is not complicated. The biggest idea is this: clean gently and consistently.
That is the easiest way to keep your floating vinyl plank floor looking sharp long after the installation is finished.
Alternatives If Installing Over Linoleum Is Not a Good Idea
Sometimes the answer to the question “can you install floating vinyl plank flooring over linoleum?” is no.
That does not mean your project is dead. It means you may need a different path.
When Another Option Makes More Sense
If your old floor is peeling, soft, heavily damaged, or moisture-prone, installing over it is risky.
In that case, consider one of these options.
Remove the Linoleum First
This is the best choice when you want the cleanest possible start or when the old floor has significant issues.
It costs more and takes longer, but it can solve hidden problems before they get worse.
Peel-and-Stick Vinyl Tiles
These are often used for low-cost updates, but they require a very smooth, stable surface.
They are not as durable as quality floating LVP, but they can work in some spaces.
Glue-Down Vinyl
Glue-down flooring can be a good product, but it usually demands a more perfectly prepared floor. It is less forgiving than floating click-lock flooring.
Other Flooring Materials
If your goal is something completely different, consider tile or another hard-surface floor. Still, those options usually involve more prep and a higher budget.
Quick Comparison of Alternatives
OptionCan Go Over Linoleum?CostDurability
Floating LVP Often yes Low to Medium High
Glue-Down Vinyl Sometimes, less ideal Medium Medium
Peel-and-Stick Tile Sometimes Low Low to Medium
Hardwood Usually no High High
Full Removal + New Floor Yes, after demo High High
If your existing floor is in poor shape, full removal may still be the smartest long-term move. But if the surface is sound, floating LVP on linoleum remains one of the easiest and most budget-friendly updates you can make.
FAQs About Installing Floating Vinyl Plank Flooring Over Linoleum
Can you install floating vinyl plank flooring over linoleum?
Yes, in many cases you can. The old linoleum needs to be flat, secure, clean, dry, and in overall good condition. If it is peeling, cushioned, damaged, or uneven, you should fix those issues first or remove the old floor.
Do I need underlayment over linoleum?
It depends on the vinyl plank product. Some planks come with attached underlayment, and adding more can actually cause problems. Others may allow or recommend a thin underlayment for sound or moisture control. Always check the manufacturer instructions before adding anything.
How long does floating vinyl plank flooring last over linoleum?
A good-quality installation can last 15 to 25 years or longer. Longevity depends on the quality of the planks, the condition of the old floor underneath, and how well you maintain the new floor.
Is this a good DIY project for beginners?
Yes, it often is. That is one of the biggest benefits. Floating click-lock flooring is more beginner-friendly than many other flooring types. Still, you need patience, careful measuring, and proper floor prep.
What tools do I need?
Most DIY installs need:
- Tape measure
- Utility knife
- Spacers
- Tapping block
- Pull bar
- Rubber mallet
- Straight edge
- Saw or jigsaw for specialty cuts
You can often gather the basics without spending a fortune.
Can I install vinyl plank over old kitchen linoleum?
Yes, kitchens are one of the most common places for this type of project. Just make sure the old floor is firm, clean, and free of moisture or heavy wear.
What if the linoleum has a few minor flaws?
Small issues may be repairable. You can often patch low spots, reattach loose sections, or smooth minor irregularities. But if the flaws are widespread, the safer move may be to remove them.